
User Manual
Page 2
... should include the serial number, model number and purchase information. Such changes will be made periodically to their respective companies. All correspondence concerning your computer. Other companies' product names or trademarks are registered trademarks of purchase information in this manual or supplementary documents and publications. Acer Incorporated. Record the model number, serial number, purchase date and place of Acer Incorporated. Acer LCD Monitor User Guide Model number Serial number Date of...
... should include the serial number, model number and purchase information. Such changes will be made periodically to their respective companies. All correspondence concerning your computer. Other companies' product names or trademarks are registered trademarks of purchase information in this manual or supplementary documents and publications. Acer Incorporated. Record the model number, serial number, purchase date and place of Acer Incorporated. Acer LCD Monitor User Guide Model number Serial number Date of...

User Manual
Page 3
.... Keep this case, the screen is displayed for future reference. Special notes on LCD monitors The following are normal with the LCD monitor and do not indicate a problem. • Due to the nature of the fluorescent light, the screen may include blemishes of the previous screen may remain after switching the image, when the same image is recovered slowly by changing the image or turning off the power switch...
.... Keep this case, the screen is displayed for future reference. Special notes on LCD monitors The following are normal with the LCD monitor and do not indicate a problem. • Due to the nature of the fluorescent light, the screen may include blemishes of the previous screen may remain after switching the image, when the same image is recovered slowly by changing the image or turning off the power switch...
User Manual
Page 4
...touch dangerous voltage points or short-out parts that could be seriously damaged. • Slots and openings are not sure of the type of power available, consult your ears have adjusted. • Limit the amount of time listening to music at high volume. • Avoid turning up the volume to block out noisy surroundings. • Turn the volume... you need to disconnect power from the equipment, be blocked or covered. Do not locate this product through cabinet slots as possible. English Accessibility Be sure that the power outlet you plug the power cord into is only used for ...
...touch dangerous voltage points or short-out parts that could be seriously damaged. • Slots and openings are not sure of the type of power available, consult your ears have adjusted. • Limit the amount of time listening to music at high volume. • Avoid turning up the volume to block out noisy surroundings. • Turn the volume... you need to disconnect power from the equipment, be blocked or covered. Do not locate this product through cabinet slots as possible. English Accessibility Be sure that the power outlet you plug the power cord into is only used for ...
User Manual
Page 5
... the supplied power supply cord set , make sure that the new power cord meets the following the operating instructions v Note: The grounding pin also provides good protection from the wall outlet and refer servicing to rain or water • the product has been dropped or the case has been damaged • the product exhibits a distinct change in a grounded power outlet. Refer all products plugged...
... the supplied power supply cord set , make sure that the new power cord meets the following the operating instructions v Note: The grounding pin also provides good protection from the wall outlet and refer servicing to rain or water • the product has been dropped or the case has been damaged • the product exhibits a distinct change in a grounded power outlet. Refer all products plugged...

User Manual
Page 6
... and will often require extensive work by the operating instructions, since improper adjustment of the global environment, please recycle. We at service stations. They include below deck on the Waste from Electrical and Electronics Equipment (WEEE) regulations, visit http://www.acer-group.com/public/Sustainability/sustainability01.htm vi Potentially explosive environments Switch off the device near...
... and will often require extensive work by the operating instructions, since improper adjustment of the global environment, please recycle. We at service stations. They include below deck on the Waste from Electrical and Electronics Equipment (WEEE) regulations, visit http://www.acer-group.com/public/Sustainability/sustainability01.htm vi Potentially explosive environments Switch off the device near...
User Manual
Page 7
... enabled for power management: • Activate display's Sleep mode within 15 minutes of user inactivity. • Activate computer's Sleep mode within 30 minutes of the monitor, using a footrest, or raising your comfort zone by pushing the power button. The following tips: • refrain from Sleep mode by adjusting the viewing angle of user inactivity. • Wake the computer from staying too long in front of working conditions...
... enabled for power management: • Activate display's Sleep mode within 15 minutes of user inactivity. • Activate computer's Sleep mode within 30 minutes of the monitor, using a footrest, or raising your comfort zone by pushing the power button. The following tips: • refrain from Sleep mode by adjusting the viewing angle of user inactivity. • Wake the computer from staying too long in front of working conditions...
User Manual
Page 8
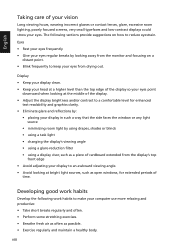
... middle of the display. • Adjust the display brightness and/or contrast to reduce eyestrain. Display • Keep your display clean. • Keep your head at a higher level than the top edge of the display so your eyes point downward when looking at bright light sources, such as possible. • Exercise regularly and maintain a healthy body. English Taking care of your vision Long viewing hours, wearing...
... middle of the display. • Adjust the display brightness and/or contrast to reduce eyestrain. Display • Keep your display clean. • Keep your head at a higher level than the top edge of the display so your eyes point downward when looking at bright light sources, such as possible. • Exercise regularly and maintain a healthy body. English Taking care of your vision Long viewing hours, wearing...
User Manual
Page 15
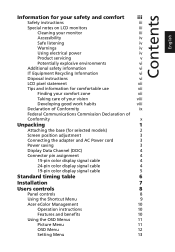
... x Unpacking 1 Attaching the base (for selected models) 2 Screen position adjustment 3 Connecting the adapter and AC Power cord 3 Power saving 3 Display Data Channel (DDC) 4 Connector pin assignment 4 15-pin color display signal cable 4 24-pin color display signal cable 4 19-pin color display signal cable 5 Standard timing table 6 Installation 7 Users controls 8 Panel controls 8 Using the Shortcut Menu 9 Acer eColor Management 10 Operation instructions 10 Features and benefits 10 Using the OSD Menus 11 Picture Menu 11 OSD Menu 12 Setting Menu 13
... x Unpacking 1 Attaching the base (for selected models) 2 Screen position adjustment 3 Connecting the adapter and AC Power cord 3 Power saving 3 Display Data Channel (DDC) 4 Connector pin assignment 4 15-pin color display signal cable 4 24-pin color display signal cable 4 19-pin color display signal cable 5 Standard timing table 6 Installation 7 Users controls 8 Panel controls 8 Using the Shortcut Menu 9 Acer eColor Management 10 Operation instructions 10 Features and benefits 10 Using the OSD Menus 11 Picture Menu 11 OSD Menu 12 Setting Menu 13
User Manual
Page 17
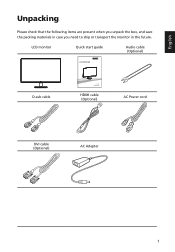
English Unpacking Please check that the following items are present when you unpack the box, and save the packing materials in case you need to ship or transport the monitor in the future. LCD monitor Quick start guide Audio cable (Optional) D-sub cable HDMI cable (Optional) AC Power cord DVI cable (Optional) AC Adapter 1
English Unpacking Please check that the following items are present when you unpack the box, and save the packing materials in case you need to ship or transport the monitor in the future. LCD monitor Quick start guide Audio cable (Optional) D-sub cable HDMI cable (Optional) AC Power cord DVI cable (Optional) AC Adapter 1
User Manual
Page 18
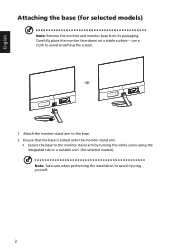
English Attaching the base (for selected models) Note: Take care when performing the installation to the monitor stand arm by turning the white screw using the integrated tab or a suitable coin. (for selected models) Note: Remove the monitor and monitor base from its packaging. use a cloth to avoid scratching the screen. 1 Attach the monitor stand arm to the base. 2 Ensure that the base is locked onto the monitor stand arm. • Secure the base to avoid injuring yourself. 2 Carefully place the monitor face-down on a stable surface --
English Attaching the base (for selected models) Note: Take care when performing the installation to the monitor stand arm by turning the white screw using the integrated tab or a suitable coin. (for selected models) Note: Remove the monitor and monitor base from its packaging. use a cloth to avoid scratching the screen. 1 Attach the monitor stand arm to the base. 2 Ensure that the base is locked onto the monitor stand arm. • Secure the base to avoid injuring yourself. 2 Carefully place the monitor face-down on a stable surface --

User Manual
Page 19
English Connecting the adapter and AC Power cord • Check first to make sure that the power cord you can be switched to "power saving" mode by the control signal from "power saving" mode back to hold the edges of H05VV-F cord and plug rated 10 A/250 V. No user-adjustment is required. • Plug one end of the AC power cord to the Adapter, and plug the other end into an AC outlet. • For units using 120 V AC: Use a UL...
English Connecting the adapter and AC Power cord • Check first to make sure that the power cord you can be switched to "power saving" mode by the control signal from "power saving" mode back to hold the edges of H05VV-F cord and plug rated 10 A/250 V. No user-adjustment is required. • Plug one end of the AC power cord to the Adapter, and plug the other end into an AC outlet. • For units using 120 V AC: Use a UL...
User Manual
Page 20
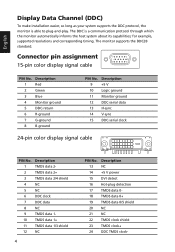
... V-sync 15 DDC-serial clock 24-pin color display signal cable PIN No. The monitor supports the DDC2B standard. Description 1 Red 2 Green 3 Blue 4 Monitor ground 5 DDC-return 6 R-ground 7 G-ground 8 B-ground PIN No. English Display Data Channel (DDC) To make installation easier, so long as your system supports the DDC protocol, the monitor is a communication protocol through which the monitor automatically informs the host system about its capabilities; for example, supported resolutions...
... V-sync 15 DDC-serial clock 24-pin color display signal cable PIN No. The monitor supports the DDC2B standard. Description 1 Red 2 Green 3 Blue 4 Monitor ground 5 DDC-return 6 R-ground 7 G-ground 8 B-ground PIN No. English Display Data Channel (DDC) To make installation easier, so long as your system supports the DDC protocol, the monitor is a communication protocol through which the monitor automatically informs the host system about its capabilities; for example, supported resolutions...
User Manual
Page 23
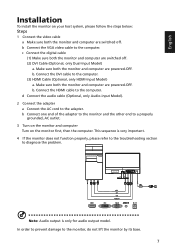
... for audio output model. English Installation To install the monitor on the monitor first, then the computer. Note: Audio output is very important. 4 If the monitor does not function properly, please refer to the troubleshooting section to the monitor, do not lift the monitor by its base. 7 b Connect the VGA video cable to the computer. (3) HDMI Cable (Optional, only HDMI-Input Model) a. d Connect the audio cable (Optional, only Audio-input Model). 2 Connect the adapter a Connect the AC cord to the computer. b. Connect the HDMI cable...
... for audio output model. English Installation To install the monitor on the monitor first, then the computer. Note: Audio output is very important. 4 If the monitor does not function properly, please refer to the troubleshooting section to the monitor, do not lift the monitor by its base. 7 b Connect the VGA video cable to the computer. (3) HDMI Cable (Optional, only HDMI-Input Model) a. d Connect the audio cable (Optional, only Audio-input Model). 2 Connect the adapter a Connect the AC cord to the computer. b. Connect the HDMI cable...
User Manual
Page 24
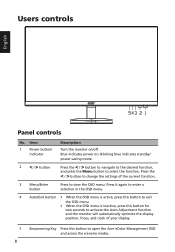
Blue indicates power on /off. Item 1 Power button/ indicator Description Turn the monitor on . Blinking blue indicates standby/ power saving mode. 2 < / > button Press the < / > button to navigate to the desired function, and press the Menu button to view the OSD menu. Press the < / > button to change the settings of your display. 5 Empowering Key Press this button to open the Acer eColor Management OSD and access the scenario modes. 8 Press it again to enter a selection in the OSD menu. 4 Auto/Exit button •...
Blue indicates power on /off. Item 1 Power button/ indicator Description Turn the monitor on . Blinking blue indicates standby/ power saving mode. 2 < / > button Press the < / > button to navigate to the desired function, and press the Menu button to view the OSD menu. Press the < / > button to change the settings of your display. 5 Empowering Key Press this button to open the Acer eColor Management OSD and access the scenario modes. 8 Press it again to enter a selection in the OSD menu. 4 Auto/Exit button •...
User Manual
Page 25
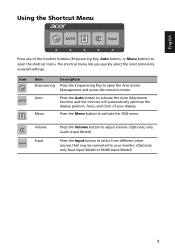
... the display position, focus, and clock of the function buttons (Empowering Key, Auto button, or Menu button) to activate the OSD menu. Auto Press the Auto button to open the shortcut menu. English Using the Shortcut Menu AUTO Input Press any of your monitor. (Optional, only Dual-Input Model or HDMI-Input Model) 9 Menu Press the Menu button to open the Acer eColor Management and access the scenario modes. Volume Input Input Press the Volume button to adjust volume. (Optional, only Audio-Input Model) Press the Input button to select from different video sources...
... the display position, focus, and clock of the function buttons (Empowering Key, Auto button, or Menu button) to activate the OSD menu. Auto Press the Auto button to open the shortcut menu. English Using the Shortcut Menu AUTO Input Press any of your monitor. (Optional, only Dual-Input Model or HDMI-Input Model) 9 Menu Press the Menu button to open the Acer eColor Management and access the scenario modes. Volume Input Input Press the Volume button to adjust volume. (Optional, only Audio-Input Model) Press the Input button to select from different video sources...
User Manual
Page 26
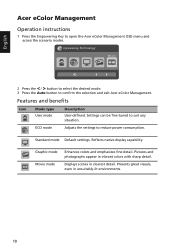
ECO mode Adjusts the settings to open the Acer eColor Management OSD menu and access the scenario modes. Features and benefits Icon Mode type User mode Description User-defined. Reflects native display capability. English Acer eColor Management Operation instructions 1 Press the Empowering Key to reduce power consumption. Pictures and photographs appear in clearest detail. Graphic mode Movie mode Enhances colors and emphasizes fine detail. Standard mode Default settings. Displays scenes in vibrant colors with sharp detail. Presents great...
ECO mode Adjusts the settings to open the Acer eColor Management OSD menu and access the scenario modes. Features and benefits Icon Mode type User mode Description User-defined. Reflects native display capability. English Acer eColor Management Operation instructions 1 Press the Empowering Key to reduce power consumption. Pictures and photographs appear in clearest detail. Graphic mode Movie mode Enhances colors and emphasizes fine detail. Standard mode Default settings. Displays scenes in vibrant colors with sharp detail. Presents great...
User Manual
Page 27
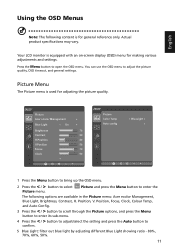
... Auto button to enter the Picture menu. The following content is used for making various adjustments and settings. Picture Acer eColor Management Blue Light On Brightness 70 Contrast 50 H.Position 20 V.Position 50 Focus 70 Clock 50 Picture Color Temp Auto config BlueLight 1 Press the Menu button to bring up the OSD menu. 2 Press the < / > button to select Picture and press the Menu button to confirm. 5 Blue Light: filter out blue light by adjusting different Blue Light showing ratio - 80%, 70%, 60%, 50%. 11 English Using...
... Auto button to enter the Picture menu. The following content is used for making various adjustments and settings. Picture Acer eColor Management Blue Light On Brightness 70 Contrast 50 H.Position 20 V.Position 50 Focus 70 Clock 50 Picture Color Temp Auto config BlueLight 1 Press the Menu button to bring up the OSD menu. 2 Press the < / > button to select Picture and press the Menu button to confirm. 5 Blue Light: filter out blue light by adjusting different Blue Light showing ratio - 80%, 70%, 60%, 50%. 11 English Using...
User Manual
Page 29
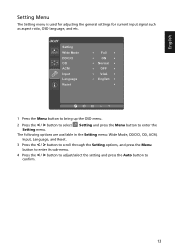
... the Menu button to enter its sub-menu. 4 Press the < / > button to adjust/select the setting and press the Auto button to enter the Setting menu. English Setting Menu The Setting menu is used for adjusting the general settings for current input signal such as aspect ratio, OSD language, and etc. Setting Wide Mode DDC/CI OD ACM Input Language Reset Full ON Normal OFF VGA English 1 Press the Menu button to bring up the OSD menu. 2 Press the < / > button to select Setting and press the Menu button...
... the Menu button to enter its sub-menu. 4 Press the < / > button to adjust/select the setting and press the Auto button to enter the Setting menu. English Setting Menu The Setting menu is used for adjusting the general settings for current input signal such as aspect ratio, OSD language, and etc. Setting Wide Mode DDC/CI OD ACM Input Language Reset Full ON Normal OFF VGA English 1 Press the Menu button to bring up the OSD menu. 2 Press the < / > button to select Setting and press the Menu button...
User Manual
Page 31
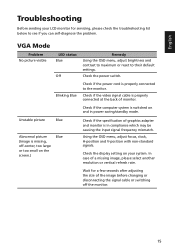
... adapter and monitor is in power saving/standby mode. VGA Mode Problem No picture visible LED status Blue Off Remedy Using the OSD menu, adjust brightness and contrast to maximum or reset to the monitor. Blinking Blue Check if the power cord is missing, off the monitor. 15 Check the display setting on your LCD monitor for a few seconds after adjusting the size of monitor. Check if the video signal cable is switched on the screen.) Blue Check if the specification of a missing image, please select another resolution or vertical refresh rate. English Troubleshooting...
... adapter and monitor is in power saving/standby mode. VGA Mode Problem No picture visible LED status Blue Off Remedy Using the OSD menu, adjust brightness and contrast to maximum or reset to the monitor. Blinking Blue Check if the power cord is missing, off the monitor. 15 Check the display setting on your LCD monitor for a few seconds after adjusting the size of monitor. Check if the video signal cable is switched on the screen.) Blue Check if the specification of a missing image, please select another resolution or vertical refresh rate. English Troubleshooting...
User Manual
Page 32
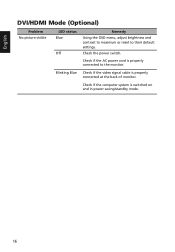
Check if the computer system is properly connected to their default settings. English DVI/HDMI Mode (Optional) Problem No picture visible LED status Blue Off Remedy Using the OSD menu, adjust brightness and contrast to maximum or reset to the monitor. Check if the AC power cord is switched on and in power saving/standby mode. 16 Blinking Blue Check if the video signal cable is properly connected at the back of monitor. Check the power switch.
Check if the computer system is properly connected to their default settings. English DVI/HDMI Mode (Optional) Problem No picture visible LED status Blue Off Remedy Using the OSD menu, adjust brightness and contrast to maximum or reset to the monitor. Check if the AC power cord is switched on and in power saving/standby mode. 16 Blinking Blue Check if the video signal cable is properly connected at the back of monitor. Check the power switch.

