

User Manual
Page 3
... by changing the image or turning off the power switch and then turn it on again to the nature of the LCD screen, an afterimage of the previous screen may find slightly uneven brightness on the screen depending on the desktop pattern you use . It may include blemishes of 0.01% or less such as a missing pixel or pixel lit all warnings and instructions marked on LCD monitors...
... by changing the image or turning off the power switch and then turn it on again to the nature of the LCD screen, an afterimage of the previous screen may find slightly uneven brightness on the screen depending on the desktop pattern you use . It may include blemishes of 0.01% or less such as a missing pixel or pixel lit all warnings and instructions marked on LCD monitors...

User Manual
Page 4
..., stand or table. English Accessibility Be sure that the power outlet you plug the power cord into this product through cabinet slots as possible. This product should never be used for this monitor, do not increase it under sporting, exercising, or any kind into is provided. • Never push objects of power available, consult your hearing, follow these instructions. •...
..., stand or table. English Accessibility Be sure that the power outlet you plug the power cord into this product through cabinet slots as possible. This product should never be used for this monitor, do not increase it under sporting, exercising, or any kind into is provided. • Never push objects of power available, consult your hearing, follow these instructions. •...
User Manual
Page 5
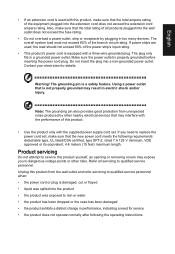
... the new power cord meets the following the operating instructions Do not insert the plug into the product • the product was exposed to service this product. • Use the product only with the performance of the branch circuit rating. Using a power outlet that may interfere with the supplied power supply cord set , make sure that the total rating of the equipment plugged into the wall outlet does...
... the new power cord meets the following the operating instructions Do not insert the plug into the product • the product was exposed to service this product. • Use the product only with the performance of the branch circuit rating. Using a power outlet that may interfere with the supplied power supply cord set , make sure that the total rating of the equipment plugged into the wall outlet does...

User Manual
Page 6
... are covered by the operating instructions, since improper adjustment of other products. Keep them out of the reach of the global environment, please recycle. English Note: Adjust only those controls that are in any area with a potentially explosive atmosphere are very conscious of the environmental effects of our business and strive to identify and provide the best working procedures...
... are covered by the operating instructions, since improper adjustment of other products. Keep them out of the reach of the global environment, please recycle. English Note: Adjust only those controls that are in any area with a potentially explosive atmosphere are very conscious of the environmental effects of our business and strive to identify and provide the best working procedures...

User Manual
Page 7
...; Activate display's Sleep mode within 5 minutes of the monitor, using a footrest, or raising your comfort zone by adjusting the viewing angle of user inactivity. • Wake the monitor when it is produced with high-precision manufacturing techniques. Long work periods, bad posture, poor work habits, stress, inadequate working in front of physical injury. Finding your comfort zone Find your sitting height to remove the...
...; Activate display's Sleep mode within 5 minutes of the monitor, using a footrest, or raising your comfort zone by adjusting the viewing angle of user inactivity. • Wake the monitor when it is produced with high-precision manufacturing techniques. Long work periods, bad posture, poor work habits, stress, inadequate working in front of physical injury. Finding your comfort zone Find your sitting height to remove the...
User Manual
Page 11
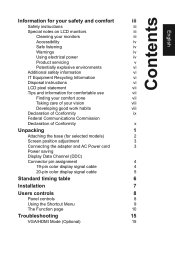
...viii Developing good work habits viii Declaration of Conformity ix Federal Communications Commission Declaration of Conformity x Unpacking 1 Attaching the base (for selected models) 2 Screen position adjustment 3 Connecting the adapter and AC Power cord 3 Power saving Display Data Channel (DDC) Connector pin assignment 4 19-pin color display signal cable 4 20-pin color display signal cable 5 Standard timing table 6 Installation 7 Users controls 8 Panel controls 8 Using the Shortcut Menu 9 The Function page 10 Troubleshooting 15 VGA/HDMI Mode (Optional) 15
...viii Developing good work habits viii Declaration of Conformity ix Federal Communications Commission Declaration of Conformity x Unpacking 1 Attaching the base (for selected models) 2 Screen position adjustment 3 Connecting the adapter and AC Power cord 3 Power saving Display Data Channel (DDC) Connector pin assignment 4 19-pin color display signal cable 4 20-pin color display signal cable 5 Standard timing table 6 Installation 7 Users controls 8 Panel controls 8 Using the Shortcut Menu 9 The Function page 10 Troubleshooting 15 VGA/HDMI Mode (Optional) 15

User Manual
Page 12
LCD monitor Quick start guide VGA Cable (Optional) AC Adapter 242Y HDMI cable (Optional) AC Power cord Audio Cable (Optional) "This specification is for universal use and real spec may vary by regions and countries" English Unpacking Please check that the following items are present when you unpack the box, and save the packing materials in case you need to ship or transport the monitor in the future.
LCD monitor Quick start guide VGA Cable (Optional) AC Adapter 242Y HDMI cable (Optional) AC Power cord Audio Cable (Optional) "This specification is for universal use and real spec may vary by regions and countries" English Unpacking Please check that the following items are present when you unpack the box, and save the packing materials in case you need to ship or transport the monitor in the future.

User Manual
Page 14
.... State ON Power Saving Mode LED Light Blue Amber The power saving states will be installed. English Connecting the adapter and AC Power cord • Check first to ON state is around 3 seconds. The recovery time from the display controller, as indicated by the control signal from Active OFF state back to make sure that the power cord you use is required. • Plug one end of H05VV-F cord and plug rated 10 A/250 V. No user-adjustment is the...
.... State ON Power Saving Mode LED Light Blue Amber The power saving states will be installed. English Connecting the adapter and AC Power cord • Check first to ON state is around 3 seconds. The recovery time from the display controller, as indicated by the control signal from Active OFF state back to make sure that the power cord you use is required. • Plug one end of H05VV-F cord and plug rated 10 A/250 V. No user-adjustment is the...
User Manual
Page 17
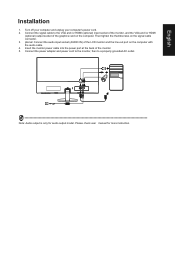
... socket of the graphics card on the computer. ptional: Connect the audio input socket (AUDIO IN) of the monitor. 5. Please check user manual for audio output model. Insert the monitor power cable into the power port at the back of the LCD monitor and the line-out port on the signal cable connector. 3. Note: Audio output is only for more instruction. Connect the signal cable to a properly grounded AC outlet. Turn off your computer and unplug your computer's power cord. 2. English Installation 1.
... socket of the graphics card on the computer. ptional: Connect the audio input socket (AUDIO IN) of the monitor. 5. Please check user manual for audio output model. Insert the monitor power cable into the power port at the back of the LCD monitor and the line-out port on the signal cable connector. 3. Note: Audio output is only for more instruction. Connect the signal cable to a properly grounded AC outlet. Turn off your computer and unplug your computer's power cord. 2. English Installation 1.
User Manual
Page 18
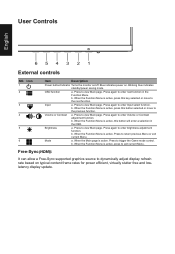
...3 4 or 5 6 Item Description Power button/indicator Turns the monitor on . OSD function a. Input a. b. b. Press to enter brightness adjustment function. Press again to view Main page. Mode a. Free-Sync(HDMI): It can allow a Free-Sync supported graphics source to enter Input select function. User Controls English 654321 External controls NO. Blue indicates power on /off. Press again to dynamically adjust display refresh rate based on typical content frame rates for power efficient, virtually stutter free and lowlatency display update. Press to the previous function...
...3 4 or 5 6 Item Description Power button/indicator Turns the monitor on . OSD function a. Input a. b. b. Press to enter brightness adjustment function. Press again to view Main page. Mode a. Free-Sync(HDMI): It can allow a Free-Sync supported graphics source to enter Input select function. User Controls English 654321 External controls NO. Blue indicates power on /off. Press again to dynamically adjust display refresh rate based on typical content frame rates for power efficient, virtually stutter free and lowlatency display update. Press to the previous function...
User Manual
Page 19
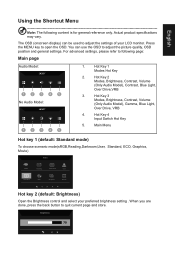
... adjust the settings of your preferred brightness setting . Hot Key 1 Modes Hot Key 2. Actual product specifications may vary. The OSD (onscreen display) can use the OSD to following content is for general reference only. Hot Key 4 Input Switch Hot Key 5. For advanced settings, please refer to adjust the picture quality, OSD position and general settings. When you are done, press the back button to open the OSD. Hot Key 3 Modes, Brightness, Contrast, Volume (Only Audio Model), Gamma, Blue Light...
... adjust the settings of your preferred brightness setting . Hot Key 1 Modes Hot Key 2. Actual product specifications may vary. The OSD (onscreen display) can use the OSD to following content is for general reference only. Hot Key 4 Input Switch Hot Key 5. For advanced settings, please refer to adjust the picture quality, OSD position and general settings. When you are done, press the back button to open the OSD. Hot Key 3 Modes, Brightness, Contrast, Volume (Only Audio Model), Gamma, Blue Light...

User Manual
Page 22
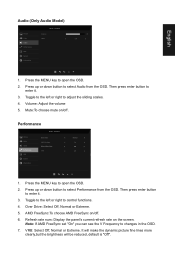
...-resolution images by boosting the pixel density of the original source to adjust the luminance tone.The default value is 2.2 (standard value for Windows). 5. Stamdard Picture Modes Color sRGB Mode Off Audio Grayscale Mode Off Performance 6-axis Hue OSD 6-axis Saturate System Informa�on the current screen to dynamic contrast adjustment. 10. Gamma mode allows you to make images sharper and clearer.. Grayscale Mode:To choose Grayscale mode. 9. 6-axis Hue: Adjust the red, green, blue...
...-resolution images by boosting the pixel density of the original source to adjust the luminance tone.The default value is 2.2 (standard value for Windows). 5. Stamdard Picture Modes Color sRGB Mode Off Audio Grayscale Mode Off Performance 6-axis Hue OSD 6-axis Saturate System Informa�on the current screen to dynamic contrast adjustment. 10. Gamma mode allows you to make images sharper and clearer.. Grayscale Mode:To choose Grayscale mode. 9. 6-axis Hue: Adjust the red, green, blue...
User Manual
Page 23
..., default is "Off". Over Drive: Select Off, Normal or Extreme. 5. Press the MENU key to control functions. 4. Volume: Adjust the volume 5. Toggle to the left or right to adjust the sliding scales. 4. Mute:To choose mute on Mode - Then press enter button to open the OSD. 2. English Audio (Only Audio Model) Picture Color Audio Performance OSD System Informa�on /off . 6. Press the MENU key to enter it . 3. Refresh rate num: Display the panel...
..., default is "Off". Over Drive: Select Off, Normal or Extreme. 5. Press the MENU key to control functions. 4. Volume: Adjust the volume 5. Toggle to the left or right to adjust the sliding scales. 4. Mute:To choose mute on Mode - Then press enter button to open the OSD. 2. English Audio (Only Audio Model) Picture Color Audio Performance OSD System Informa�on /off . 6. Press the MENU key to enter it . 3. Refresh rate num: Display the panel...

User Manual
Page 24
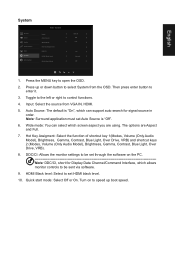
... "OSD Locked" message will be displayed in the middle of the screen. • LED lights will be restored to trigger "OSD Unlock". • The "OSD Unlock" message will be displayed in the middle of the screen. • LED lights will be 0% (OFF), 20%, 40%, 60%, or 80%. 7. Standard Language OSD Timeout Transparency OSD Lock English 10 Off Off 1. English OSD Picture Color Audio Performance OSD System Informa�on /off the OSD menu. 6. Then press enter button to adjust...
... "OSD Locked" message will be displayed in the middle of the screen. • LED lights will be restored to trigger "OSD Unlock". • The "OSD Unlock" message will be displayed in the middle of the screen. • LED lights will be 0% (OFF), 20%, 40%, 60%, or 80%. 7. Standard Language OSD Timeout Transparency OSD Lock English 10 Off Off 1. English OSD Picture Color Audio Performance OSD System Informa�on /off the OSD menu. 6. Then press enter button to adjust...
User Manual
Page 25
... 1(Modes, Volume (Only Audio Model), Brightness, Gamma, Contrast, Blue Light, Over Drive, VRB) and shortcut keys 2 (Modes, Volume (Only Audio Model), Brightness, Gamma, Contrast, Blue Light, Over Drive, VRB). 8. HDMI Black level: Select to select System from VGA IN, HDMI. 5. Press the MENU key to enter it. 3. Input: Select the source from the OSD. Auto Source: The default is "Off". 6. Turn on to speed up or down button to set Auto Source is "On", which screen aspect you are Aspect and Full. 7. Wide mode: You...
... 1(Modes, Volume (Only Audio Model), Brightness, Gamma, Contrast, Blue Light, Over Drive, VRB) and shortcut keys 2 (Modes, Volume (Only Audio Model), Brightness, Gamma, Contrast, Blue Light, Over Drive, VRB). 8. HDMI Black level: Select to select System from VGA IN, HDMI. 5. Press the MENU key to enter it. 3. Input: Select the source from the OSD. Auto Source: The default is "Off". 6. Turn on to speed up or down button to set Auto Source is "On", which screen aspect you are Aspect and Full. 7. Wide mode: You...
User Manual
Page 27
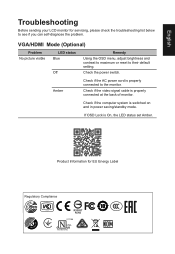
... their default setting. Check the power switch. Check if the computer system is properly connected at the back of monitor. English Troubleshooting Before sending your LCD monitor for EU Energy Label Regulatory Compliance VGA/HDMI Mode (Optional) Problem No picture visible LED status Blue Off Remedy Using the OSD menu, adjust brightness and contrast to maximum or reset to see if you can self-diagnose the problem. Check if the video signal cable is switched on and in power saving/standby mode. If OSD Lock is properly connected...
... their default setting. Check the power switch. Check if the computer system is properly connected at the back of monitor. English Troubleshooting Before sending your LCD monitor for EU Energy Label Regulatory Compliance VGA/HDMI Mode (Optional) Problem No picture visible LED status Blue Off Remedy Using the OSD menu, adjust brightness and contrast to maximum or reset to see if you can self-diagnose the problem. Check if the video signal cable is switched on and in power saving/standby mode. If OSD Lock is properly connected...
Quick Start Guide
Page 3
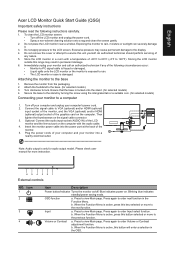
... your monitor to the base. (for selected models). 3. Insert the monitor power cable into a nearby electrical outlet. Note: Audio output is active, this key selected or move to the display. 4. Blinking blue indicates standby/power saving mode. Press to the base 1. Volume or Contrast a. When the Function Menu is only for selected models) Connecting your computer's power cord. 2. English Acer LCD Monitor Quick Start Guide (QSG) Important safety instructions Please read the following circumstances occur: • Monitor-to-PC signal cable is...
... your monitor to the base. (for selected models). 3. Insert the monitor power cable into a nearby electrical outlet. Note: Audio output is active, this key selected or move to the display. 4. Blinking blue indicates standby/power saving mode. Press to the base 1. Volume or Contrast a. When the Function Menu is only for selected models) Connecting your computer's power cord. 2. English Acer LCD Monitor Quick Start Guide (QSG) Important safety instructions Please read the following circumstances occur: • Monitor-to-PC signal cable is...
Quick Start Guide
Page 4
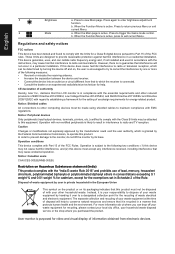
.... These limits are designed to trigger the Game mode control. b. When the Function Menu is active, press to Part 15 of conformity Hereby, Acer Inc., declares that this equipment. This device generates, uses, and can drop off and on its base. Operation with the instructions, may be determined by turning the device off your waste equipment for recycling, please...
.... These limits are designed to trigger the Game mode control. b. When the Function Menu is active, press to Part 15 of conformity Hereby, Acer Inc., declares that this equipment. This device generates, uses, and can drop off and on its base. Operation with the instructions, may be determined by turning the device off your waste equipment for recycling, please...
Quick Start Guide
Page 5
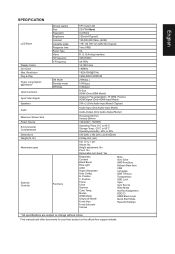
...to change without notice. Resolution Plug & Play Power consumption @200cd/m2 Input Connector Input Video Signal Speakers Audio Maximum Screen Size Power Source Environmental Considerations Dimensions Weight (N. Modes sRGB Mode Grayscale Mode 6-axis Hue 6-axis Saturate Volume Mute Over Drive AMD FreeSync Refresh Rate Num VRB Language OSD Timeout Transparency OSD Lock Input Auto Source Wide Mode Hot Key Assignment DDC/CI HDMI Black Level Quick Start Mode Reset All Settings * All specifications are subject to + 25° Swivel: No Height adjustment: No Pivot: No Detachable foot stand: Yes...
...to change without notice. Resolution Plug & Play Power consumption @200cd/m2 Input Connector Input Video Signal Speakers Audio Maximum Screen Size Power Source Environmental Considerations Dimensions Weight (N. Modes sRGB Mode Grayscale Mode 6-axis Hue 6-axis Saturate Volume Mute Over Drive AMD FreeSync Refresh Rate Num VRB Language OSD Timeout Transparency OSD Lock Input Auto Source Wide Mode Hot Key Assignment DDC/CI HDMI Black Level Quick Start Mode Reset All Settings * All specifications are subject to + 25° Swivel: No Height adjustment: No Pivot: No Detachable foot stand: Yes...
Quick Start Guide
Page 15
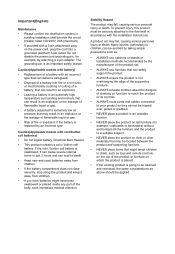
...part of a battery with coin/button cell batteries) • Do not ingest battery, Chemical Burn Hazard • This product contains a coin / button cell battery. Caution(Applicable models with battery) • Replacement of the body, seek immediate medical attention. A product set . • ALWAYS use.... Do not disable the power cord grounding pin, for example, cupboards or bookcases) without anchoring both the furniture and the product to climb, such as : • ALWAYS use cabinets or stands or installation methods recommended by attaching a 2-pin adapter. Stability Hazard The...
...part of a battery with coin/button cell batteries) • Do not ingest battery, Chemical Burn Hazard • This product contains a coin / button cell battery. Caution(Applicable models with battery) • Replacement of the body, seek immediate medical attention. A product set . • ALWAYS use.... Do not disable the power cord grounding pin, for example, cupboards or bookcases) without anchoring both the furniture and the product to climb, such as : • ALWAYS use cabinets or stands or installation methods recommended by attaching a 2-pin adapter. Stability Hazard The...


