

Acer Power SP Service Guide
Page 40
... Spread Spectrum Description Options If the CPU Ratio is set to Manual, end users can introduce a temporary boost in this menu. Enabled Disabled When the motherboard's clock generator pulses, the extreme values (spikes) of the pulses are the default and suggested settings. The spread Spectrum function reduces the EMI generated by...
... Spread Spectrum Description Options If the CPU Ratio is set to Manual, end users can introduce a temporary boost in this menu. Enabled Disabled When the motherboard's clock generator pulses, the extreme values (spikes) of the pulses are the default and suggested settings. The spread Spectrum function reduces the EMI generated by...

Power Sp User Guide
Page 15
... socket, you restart the system, BIOS (Basic Input/Output System) will automatically detect the amount of the 184-pin DDR sockets locate on the motherboard. 2. Gently pull the DDR out from its protective bag. 4. Take the new PCI card from the socket. Installing PCI cards Install PCI card...undesired card. 3.4. Remark: The DDR DIMM sockets are slotted to back panel and remove the bracket. 3. Find an empty PCI slot on the motherboard. Install DDR DIMM 1. To reconfigure your computer with the socket. 2. This can be done by adding the additional 128MB, 256MB, 512MB or 1GB...
... socket, you restart the system, BIOS (Basic Input/Output System) will automatically detect the amount of the 184-pin DDR sockets locate on the motherboard. 2. Gently pull the DDR out from its protective bag. 4. Take the new PCI card from the socket. Installing PCI cards Install PCI card...undesired card. 3.4. Remark: The DDR DIMM sockets are slotted to back panel and remove the bracket. 3. Find an empty PCI slot on the motherboard. Install DDR DIMM 1. To reconfigure your computer with the socket. 2. This can be done by adding the additional 128MB, 256MB, 512MB or 1GB...
Power Sp User Guide
Page 16
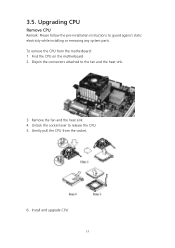
Upgrading CPU Remove CPU Remark: Please follow the pre-installation instructions to the fan and the heat sink. 3. Find the CPU on the motherboard 2. Remove the fan and the heat sink. 4. 3.5. Disjoin the connectors attached to guard against static electricity while installing or removing any system parts. Install and upgrade CPU 15 Gently pull the CPU from the motherboard: 1. Unlock the socket lever to release the CPU. 5. To remove the CPU from the socket. 6.
Upgrading CPU Remove CPU Remark: Please follow the pre-installation instructions to the fan and the heat sink. 3. Find the CPU on the motherboard 2. Remove the fan and the heat sink. 4. 3.5. Disjoin the connectors attached to guard against static electricity while installing or removing any system parts. Install and upgrade CPU 15 Gently pull the CPU from the motherboard: 1. Unlock the socket lever to release the CPU. 5. To remove the CPU from the socket. 6.

