User Manual
Page 2
... unit should include the serial number, model number and purchase information. Acer LCD Monitor User's Guide Model number Serial number Date of purchase Place of Acer Incorporated. Other companies' product names or trademarks are used herein for a particular purpose. Acer LCD Monitor User's Guide Original Issue: 05/2019 Changes may be reproduced, stored.... This company makes no representations or warranties, either expressed or implied, with respect to the contents hereof and specifically disclaims the implied warranties of such revisions or changes. No part of this publication...
... unit should include the serial number, model number and purchase information. Acer LCD Monitor User's Guide Model number Serial number Date of purchase Place of Acer Incorporated. Other companies' product names or trademarks are used herein for a particular purpose. Acer LCD Monitor User's Guide Original Issue: 05/2019 Changes may be reproduced, stored.... This company makes no representations or warranties, either expressed or implied, with respect to the contents hereof and specifically disclaims the implied warranties of such revisions or changes. No part of this publication...
User Manual
Page 3
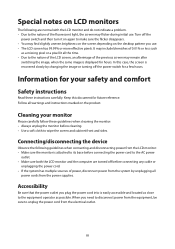
... its base before connecting the power cord to the AC power outlet. • Make sure both the LCD monitor and the computer are normal with the LCD monitor and do not indicate a problem. • Due to the nature of the fluorescent light, the screen may flicker during initial use . • The LCD screen has 99.99% or more effective pixels. iii Connecting/disconnecting the device Observe the following are turned...
... its base before connecting the power cord to the AC power outlet. • Make sure both the LCD monitor and the computer are normal with the LCD monitor and do not indicate a problem. • Due to the nature of the fluorescent light, the screen may flicker during initial use . • The LCD screen has 99.99% or more effective pixels. iii Connecting/disconnecting the device Observe the following are turned...
User Manual
Page 4
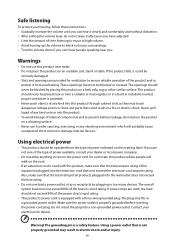
... the power cord plug. The openings should not exceed 80% of power indicated on the cord. • If an extension cord is used with a three-wire grounded plug. Using electrical power • This product should never be blocked or covered. If you . Contact your dealer or local power company. • Do not allow anything to rest on an unstable cart, stand or table. Using a power outlet...
... the power cord plug. The openings should not exceed 80% of power indicated on the cord. • If an extension cord is used with a three-wire grounded plug. Using electrical power • This product should never be blocked or covered. If you . Contact your dealer or local power company. • Do not allow anything to rest on an unstable cart, stand or table. Using a power outlet...
User Manual
Page 5
... all servicing to qualified service personnel. Refer all signs and instructions. Product servicing Do not attempt to service this product. • Use the product only with the supplied power supply cord set , make sure ...rated 7 A 125 V minimum, VDE approved or its enhancements may contain small parts. Switch off your device in any area with a potentially explosive atmosphere are in bodily injury or even death. Note: The grounding pin also provides good protection from the wall outlet and refer servicing to qualified service personnel when: • the power cord or plug...
... all servicing to qualified service personnel. Refer all signs and instructions. Product servicing Do not attempt to service this product. • Use the product only with the supplied power supply cord set , make sure ...rated 7 A 125 V minimum, VDE approved or its enhancements may contain small parts. Switch off your device in any area with a potentially explosive atmosphere are in bodily injury or even death. Note: The grounding pin also provides good protection from the wall outlet and refer servicing to qualified service personnel when: • the power cord or plug...
User Manual
Page 6
.... This has no effect on the Waste from Sleep mode by pushing the power button. Disposal instructions Do not throw this website: http://www.acergroup.com/public/Sustainability/ Visit www.acer-group.com for power management: • Activate display's Sleep mode within 15 minutes of user inactivity. • Activate computer's Sleep mode within 30 minutes of user inactivity. • Wake the computer from Electrical...
.... This has no effect on the Waste from Sleep mode by pushing the power button. Disposal instructions Do not throw this website: http://www.acergroup.com/public/Sustainability/ Visit www.acer-group.com for power management: • Activate display's Sleep mode within 15 minutes of user inactivity. • Activate computer's Sleep mode within 30 minutes of user inactivity. • Wake the computer from Electrical...

User Manual
Page 7
... and inform your eyes from staying too long in front of the monitor, using a task light • changing the display's viewing angle vii Users are also at the middle of your vision Long viewing hours, wearing incorrect glasses or contact lenses, glare, excessive room lighting, poorly focused screens, very small typefaces and low-contrast displays could stress your sitting height to reduce eyestrain.
... and inform your eyes from staying too long in front of the monitor, using a task light • changing the display's viewing angle vii Users are also at the middle of your vision Long viewing hours, wearing incorrect glasses or contact lenses, glare, excessive room lighting, poorly focused screens, very small typefaces and low-contrast displays could stress your sitting height to reduce eyestrain.

User Manual
Page 8
Developing good work habits Develop the following work habits to make your display to an awkward viewing angle. • Avoid looking at bright light sources, such as possible. • Exercise regularly and maintain a healthy body. • In order to prevent damage to the monitor, do not lift the monitor by its base. • using a glare-reduction filter • using a display visor, such as a piece of...
Developing good work habits Develop the following work habits to make your display to an awkward viewing angle. • Avoid looking at bright light sources, such as possible. • Exercise regularly and maintain a healthy body. • In order to prevent damage to the monitor, do not lift the monitor by its base. • using a glare-reduction filter • using a display visor, such as a piece of...
User Manual
Page 9
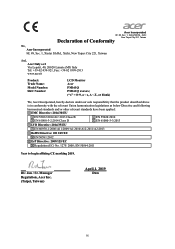
... s.r.l Via Lepetit, 40, 20020 Lainate (MI) Italy Tel: +39-02-939-921 ,Fax: +39-02 9399-2913 www.acer.it Product: Trade Name: Model Number: SKU Number: LCD Monitor Acer PM161Q PM161Q xxxxxx; ("x" = 0~9, a ~ z, A ~ Z, or blank) We, Acer Incorporated, hereby declare under our sole responsibility that the product described above is in conformity with the relevant Union harmonization legislations as below...
... s.r.l Via Lepetit, 40, 20020 Lainate (MI) Italy Tel: +39-02-939-921 ,Fax: +39-02 9399-2913 www.acer.it Product: Trade Name: Model Number: SKU Number: LCD Monitor Acer PM161Q PM161Q xxxxxx; ("x" = 0~9, a ~ z, A ~ Z, or blank) We, Acer Incorporated, hereby declare under our sole responsibility that the product described above is in conformity with the relevant Union harmonization legislations as below...
User Manual
Page 10
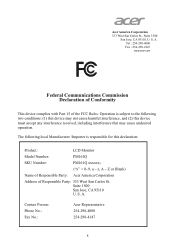
... Conformity This device complies with Part 15 of Responsible Party: 333 West San Carlos St. S. The following local Manufacturer /Importer is subject to the following two conditions: (1) this device may not cause harmful interference, and (2) this declaration: Product: LCD Monitor Model Number: PM161Q SKU Number: PM161Q xxxxxx; ("x" = 0~9, a ~ z, A ~ Z or Blank) Name of Responsible Party: Acer America Corporation Address of the...
... Conformity This device complies with Part 15 of Responsible Party: 333 West San Carlos St. S. The following local Manufacturer /Importer is subject to the following two conditions: (1) this device may not cause harmful interference, and (2) this declaration: Product: LCD Monitor Model Number: PM161Q SKU Number: PM161Q xxxxxx; ("x" = 0~9, a ~ z, A ~ Z or Blank) Name of Responsible Party: Acer America Corporation Address of the...
User Manual
Page 11
...Disposal instructions vi LCD pixel statement vi Tips and information for comfortable use vii CE Declaration of Conformity ix Federal Communications Commission Declaration of Conformity x Unpacking 1 Attaching the monitor to the base 2 Power saving 3 Display Data Channel (DDC) 3 Connector pin assignment 4 Standard timing table 5 Installation 6 User controls 7 Adjusting the OSD settings 8 Adjusting the picture quality 8 Adjusting the Color setting 9 Adjusting the Language setting 9 Product the OSD setting 10 Product the Setup Menu setting 10 Troubleshooting...
...Disposal instructions vi LCD pixel statement vi Tips and information for comfortable use vii CE Declaration of Conformity ix Federal Communications Commission Declaration of Conformity x Unpacking 1 Attaching the monitor to the base 2 Power saving 3 Display Data Channel (DDC) 3 Connector pin assignment 4 Standard timing table 5 Installation 6 User controls 7 Adjusting the OSD settings 8 Adjusting the picture quality 8 Adjusting the Color setting 9 Adjusting the Language setting 9 Product the OSD setting 10 Product the Setup Menu setting 10 Troubleshooting...
User Manual
Page 12
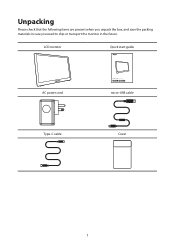
Unpacking Please check that the following items are present when you unpack the box, and save the packing materials in case you need to ship or transport the monitor in the future. LCD monitor Quick start guide AC power cord LCD monitor PM1 Series-PM161Q USER GUIDE micro-USB cable Type-C cable Cover 1
Unpacking Please check that the following items are present when you unpack the box, and save the packing materials in case you need to ship or transport the monitor in the future. LCD monitor Quick start guide AC power cord LCD monitor PM1 Series-PM161Q USER GUIDE micro-USB cable Type-C cable Cover 1

User Manual
Page 13
Open or close the rear bracket. Attaching the monitor to the base 1. The viewing angle of the monitor can be adjusted using the stand. (As shown below) 2 Remove the monitor bracket and base from the packaging and place it on a stable and level workspace. 2.
Open or close the rear bracket. Attaching the monitor to the base 1. The viewing angle of the monitor can be adjusted using the stand. (As shown below) 2 Remove the monitor bracket and base from the packaging and place it on a stable and level workspace. 2.
User Manual
Page 14
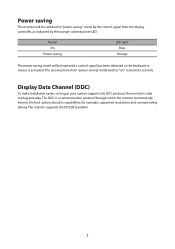
... (DDC) To make installation easier, so long as indicated by the control signal from "power saving" mode back to "power saving" mode by the orange-colored power LED. for example, supported resolutions and corresponding timing. The recovery time from the display controller, as your system supports the DDC protocol, the monitor is able to plug-and-play. The monitor supports the DDC2B standard. 3 Model On Power saving LED light Blue Orange The power saving mode will be kept until a control signal has been...
... (DDC) To make installation easier, so long as indicated by the control signal from "power saving" mode back to "power saving" mode by the orange-colored power LED. for example, supported resolutions and corresponding timing. The recovery time from the display controller, as your system supports the DDC protocol, the monitor is able to plug-and-play. The monitor supports the DDC2B standard. 3 Model On Power saving LED light Blue Orange The power saving mode will be kept until a control signal has been...
User Manual
Page 16
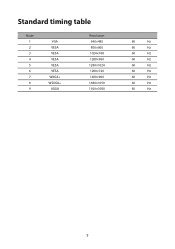
Standard timing table Mode 1 2 3 4 5 6 7 8 9 VGA VESA VESA VESA VESA VESA WXGA+ WSXGA+ UXGA Resolution 640×480 800×600 1024×768 1280×960 1280×1024 1280×720 1400×900 1680×1050 1920×1080 60 Hz 60 Hz 60 Hz 60 Hz 60 Hz 60 Hz 60 Hz 60 Hz 60 Hz 5
Standard timing table Mode 1 2 3 4 5 6 7 8 9 VGA VESA VESA VESA VESA VESA WXGA+ WSXGA+ UXGA Resolution 640×480 800×600 1024×768 1280×960 1280×1024 1280×720 1400×900 1680×1050 1920×1080 60 Hz 60 Hz 60 Hz 60 Hz 60 Hz 60 Hz 60 Hz 60 Hz 60 Hz 5
User Manual
Page 17
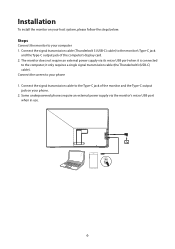
... connected to your computer 1. Connect the screen to the computer; Installation To install the monitor on your phone. 2. Connect the signal transmission cable to your phone 1. The monitor does not require an external power supply via the monitor's micro USB port when in use. 6 Some underpowered phones require an external power supply via its micro USB port when it only requires a single signal transmission cable (the Thunderbolt3 (USB-C) cable). Connect the signal transmission cable (Thunderbolt 3 (USB-C) cable) to the monitor...
... connected to your computer 1. Connect the screen to the computer; Installation To install the monitor on your phone. 2. Connect the signal transmission cable to your phone 1. The monitor does not require an external power supply via the monitor's micro USB port when in use. 6 Some underpowered phones require an external power supply via its micro USB port when it only requires a single signal transmission cable (the Thunderbolt3 (USB-C) cable). Connect the signal transmission cable (Thunderbolt 3 (USB-C) cable) to the monitor...
User Manual
Page 18
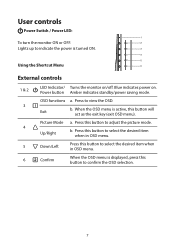
... when in OSD menu. 6 Confirm When the OSD menu is turned ON. 3 4 5 Using the Shortcut Menu 6 External controls 1 & 2 LED Indicator/ Turns the monitor on . Picture Mode a. Power button Amber indicates standby/power saving mode. Press this button will act as the exit key (exit OSD menu). User controls Power Switch / Power LED: 1 To turn the monitor ON or OFF. 2 Lights up to indicate the power is displayed, press this button to confirm the OSD selection. 7 OSD functions a. When the OSD menu is active, this button to view the OSD. 3 Exit...
... when in OSD menu. 6 Confirm When the OSD menu is turned ON. 3 4 5 Using the Shortcut Menu 6 External controls 1 & 2 LED Indicator/ Turns the monitor on . Picture Mode a. Power button Amber indicates standby/power saving mode. Press this button will act as the exit key (exit OSD menu). User controls Power Switch / Power LED: 1 To turn the monitor ON or OFF. 2 Lights up to indicate the power is displayed, press this button to confirm the OSD selection. 7 OSD functions a. When the OSD menu is active, this button to view the OSD. 3 Exit...

User Manual
Page 19
... wish to open the OSD. Sharpness: Adjust the contrast from 0 to 100 Note: Change Image's sharpness/Smooth effect. 0 is most sharpness. Contrast: Adjust the contrast from 0 to 100 Note: Sets the degree of your select. 4. Press the key to adjust. 3. Press the key to adjust the sliding scales. 5. Use the / keys to bring up the OSD. 2. Adjusting the OSD settings Note: The following page: Adjusting the picture quality Picture Color Language OSD Settings Setup Menu Brightness Contrast Sharpness...
... wish to open the OSD. Sharpness: Adjust the contrast from 0 to 100 Note: Change Image's sharpness/Smooth effect. 0 is most sharpness. Contrast: Adjust the contrast from 0 to 100 Note: Sets the degree of your select. 4. Press the key to adjust. 3. Press the key to adjust the sliding scales. 5. Use the / keys to bring up the OSD. 2. Adjusting the OSD settings Note: The following page: Adjusting the picture quality Picture Color Language OSD Settings Setup Menu Brightness Contrast Sharpness...
User Manual
Page 20
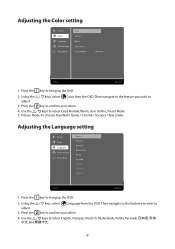
...; and 9 Adjusting the Language setting Picture Color Language OSD Settings Setup Menu English Français Deutsch Nederlands Polski 1:Exit Select:2 1. Using the / keys, select Color from the OSD. Press the key to adjust. 3. Then navigate to the feature you wish to confirm your select. 4. Picture Mode: To choose Standard / Game / Cinema / Scenery / Text mode. Press the key to bring up the OSD. 2. Adjusting the Color setting Picture Color Language OSD Settings Setup Menu Cool Normal Warm User Define Picture Mode Standard...
...; and 9 Adjusting the Language setting Picture Color Language OSD Settings Setup Menu English Français Deutsch Nederlands Polski 1:Exit Select:2 1. Using the / keys, select Color from the OSD. Press the key to adjust. 3. Then navigate to the feature you wish to confirm your select. 4. Picture Mode: To choose Standard / Game / Cinema / Scenery / Text mode. Press the key to bring up the OSD. 2. Adjusting the Color setting Picture Color Language OSD Settings Setup Menu Cool Normal Warm User Define Picture Mode Standard...
User Manual
Page 21
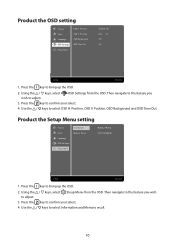
.... 4. Product the Setup Menu setting Picture Color Language OSD Settings Setup Menu Information Memory Recall MODEL PM161Q 1920x1080@60Hz 1:Exit Select:2 1. Press the key to select OSD H. Position, OSD Background and OSD Time Out. Using the / keys, select Steup Menu from the OSD. Then navigate to confirm your select. 4. Press the key to the feature you wish to bring up the OSD. 2. Use the / keys to adjust. Product the OSD setting Picture Color Language OSD Settings Setup Menu OSD H. Position OSD V. Using the / keys, select...
.... 4. Product the Setup Menu setting Picture Color Language OSD Settings Setup Menu Information Memory Recall MODEL PM161Q 1920x1080@60Hz 1:Exit Select:2 1. Press the key to select OSD H. Position, OSD Background and OSD Time Out. Using the / keys, select Steup Menu from the OSD. Then navigate to confirm your select. 4. Press the key to the feature you wish to bring up the OSD. 2. Use the / keys to adjust. Product the OSD setting Picture Color Language OSD Settings Setup Menu OSD H. Position OSD V. Using the / keys, select...
User Manual
Page 22
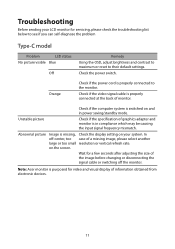
... resolution or vertical refresh rate. Check if the video signal cable is in power saving/standby mode. Unstable picture Check if the specification of graphics adapter and monitor is properly connected at the back of monitor. In off the monitor. Orange Check if the power cord is purposed for servicing, please check the troubleshooting list below to see if you can self-diagnose the problem Type-C model Problem LED status No picture visible Blue Off Remedy Using the OSD, adjust brightness and contrast to maximum or reset...
... resolution or vertical refresh rate. Check if the video signal cable is in power saving/standby mode. Unstable picture Check if the specification of graphics adapter and monitor is properly connected at the back of monitor. In off the monitor. Orange Check if the power cord is purposed for servicing, please check the troubleshooting list below to see if you can self-diagnose the problem Type-C model Problem LED status No picture visible Blue Off Remedy Using the OSD, adjust brightness and contrast to maximum or reset...


