

User Manual
Page 3
... unit from the system by placing the product on the product. When you plug the power cord into is provided. • Never push objects of power, disconnect power from the projector. • If the system has multiple sources of any kind onto or into this product... it from the electrical outlet. The openings should never be sure to the AC power outlet. • Unplug the power cord before connecting the power cord to unplug the power cord from overheating. Follow all power cords from the wall outlet before cleaning Unplug this document for ventilation to protect it could...
... unit from the system by placing the product on the product. When you plug the power cord into is provided. • Never push objects of power, disconnect power from the projector. • If the system has multiple sources of any kind onto or into this product... it from the electrical outlet. The openings should never be sure to the AC power outlet. • Unplug the power cord before connecting the power cord to unplug the power cord from overheating. Follow all power cords from the wall outlet before cleaning Unplug this document for ventilation to protect it could...

User Manual
Page 4
... components and to prevent battery leakage, do not place the product on the power cord. The plug only fits in too many devices. Using electrical power • This product should not exceed 80% of the power strip's input rating. • This product's AC adapter is not properly ...product, make sure that the total ampere rating of the branch circuit rating. If you are used with the supplied power supply cord set , make sure that the new power cord meets the following requirements: detachable type, UL listed/CSA certified, VDE approved or its equivalent, 4.6 meters (15 feet...
... components and to prevent battery leakage, do not place the product on the power cord. The plug only fits in too many devices. Using electrical power • This product should not exceed 80% of the power strip's input rating. • This product's AC adapter is not properly ...product, make sure that the total ampere rating of the branch circuit rating. If you are used with the supplied power supply cord set , make sure that the new power cord meets the following requirements: detachable type, UL listed/CSA certified, VDE approved or its equivalent, 4.6 meters (15 feet...
User Manual
Page 5
... projector. The bright may hurt your projector. At least 50cm clearance from the wall outlet and refer servicing to qualified service personnel when: • the power cord or plug is damaged, cut or frayed • liquid was spilled into the projector's lens when the lamp is on the projector first and then...
... projector. The bright may hurt your projector. At least 50cm clearance from the wall outlet and refer servicing to qualified service personnel when: • the power cord or plug is damaged, cut or frayed • liquid was spilled into the projector's lens when the lamp is on the projector first and then...
User Manual
Page 12
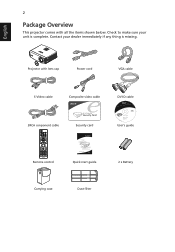
Check to make sure your dealer immediately if any thing is complete. Contact your unit is missing. English 2 Package Overview This projector comes with lens cap Power cord VGA cable S-Video cable Composite video cable DVI-D cable 3RCA conponent cable Security card Acer Projector Remote control Quick Start Guide Quick start guide User's guide 2 x Battery Carrying case Dust filter SOURCE MENU TEMP RESYNC LAMP ZOOM Projector with all the items shown below.
Check to make sure your dealer immediately if any thing is complete. Contact your unit is missing. English 2 Package Overview This projector comes with lens cap Power cord VGA cable S-Video cable Composite video cable DVI-D cable 3RCA conponent cable Security card Acer Projector Remote control Quick Start Guide Quick start guide User's guide 2 x Battery Carrying case Dust filter SOURCE MENU TEMP RESYNC LAMP ZOOM Projector with all the items shown below.
User Manual
Page 18
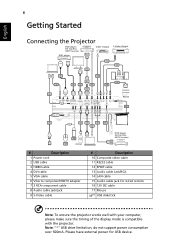
Please have external power for wired remote 16 12V DC cable 17 Mouse 18(*) USB disk/stick Note: To ensure the projector works...11 RS232 RS232 USB 16 D-Sub B RG 1 14 5 7 15 USB 8 D-Sub 18 17 Intrnet DVD player, Set-top Box, HDTV receiver R B G # Description 1 Power cord 2 USB cable 3 HDMI cable 4 DVI cable 5 VGA cable 6 VGA to component/HDTV adapter 7 3 RCA component cable 8 Audio cable jack/jack 9 S-Video cable # Description 10...Jack/RCA 14 LAN cable 15 Audio cable jack for USB device. Note: "*" USB drive limitation, do not support power consumption over 500mA.
Please have external power for wired remote 16 12V DC cable 17 Mouse 18(*) USB disk/stick Note: To ensure the projector works...11 RS232 RS232 USB 16 D-Sub B RG 1 14 5 7 15 USB 8 D-Sub 18 17 Intrnet DVD player, Set-top Box, HDTV receiver R B G # Description 1 Power cord 2 USB cable 3 HDMI cable 4 DVI cable 5 VGA cable 6 VGA to component/HDTV adapter 7 3 RCA component cable 8 Audio cable jack/jack 9 S-Video cable # Description 10...Jack/RCA 14 LAN cable 15 Audio cable jack for USB device. Note: "*" USB drive limitation, do not support power consumption over 500mA.
User Manual
Page 19
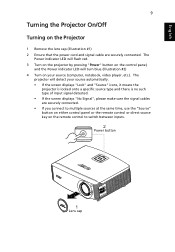
... are securely connected. • If you connect to switch between inputs. 2 Power button SOURCE 1 Lens cap MENU TEMP RESYNC LAMP ZOOM The Power indicator LED will flash red. 3 Turn on the projector by pressing "Power" button on the control panel, and the Power indicator LED will detect your source (computer, notebook, video player ,etc... "Source" button on either control panel or the remote control or direct source key on the Projector 1 Remove the lens cap.(Illustration #1) 2 Ensure that the power cord and signal cable are securely connected.
... are securely connected. • If you connect to switch between inputs. 2 Power button SOURCE 1 Lens cap MENU TEMP RESYNC LAMP ZOOM The Power indicator LED will flash red. 3 Turn on the projector by pressing "Power" button on the control panel, and the Power indicator LED will detect your source (computer, notebook, video player ,etc... "Source" button on either control panel or the remote control or direct source key on the Projector 1 Remove the lens cap.(Illustration #1) 2 Ensure that the power cord and signal cable are securely connected.

User Manual
Page 20
...(s) will continue to operate for about 2 minutes to ensure that the system cools properly. 3 As long as the power cord remains plugged in, you can press the power button to turn solid red to indicate standby mode. 5 It is now safe to complete the shutdown process." Contact ...2minute shutdown process. 4 Once the system has finished cooling, the LED power indicator will blink. This message appears: "Please press the power button again to unplug the power cord. Lamp will automatically turn the projector off, press the power button. English 10 Turning the projector off 1 To turn off soon...
...(s) will continue to operate for about 2 minutes to ensure that the system cools properly. 3 As long as the power cord remains plugged in, you can press the power button to turn solid red to indicate standby mode. 5 It is now safe to complete the shutdown process." Contact ...2minute shutdown process. 4 Once the system has finished cooling, the LED power indicator will blink. This message appears: "Please press the power button again to unplug the power cord. Lamp will automatically turn the projector off, press the power button. English 10 Turning the projector off 1 To turn off soon...
User Manual
Page 37
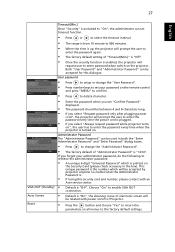
...will prompt the user to enter the password every time the power cord is plugged. • If you select "Request password only after plugging power cord", the projector will be accepted for this security card and number, please contact with power on/off of Projector. • Press the button and ... User password • Press to setup or change the "Administrator Password". • The factory default of electronic screen will be related with an Acer service center. • Default is "Off". If you forgot your password on ", the user has to change the "User Password". •...
...will prompt the user to enter the password every time the power cord is plugged. • If you select "Request password only after plugging power cord", the projector will be accepted for this security card and number, please contact with power on/off of Projector. • Press the button and ... User password • Press to setup or change the "Administrator Password". • The factory default of electronic screen will be related with an Acer service center. • Default is "Off". If you forgot your password on ", the user has to change the "User Password". •...
User Manual
Page 42
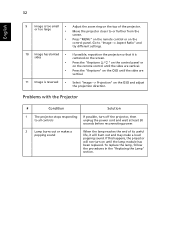
... on the OSD and adjust the projection direction. or too large • Move the projector closer to all controls unplug the power cord and wait at least 30 seconds before reconnecting power. 2 Lamp burns out or makes a popping sound When the lamp reaches the end of the projector. Go to "Image --> Aspect Ratio...
... on the OSD and adjust the projection direction. or too large • Move the projector closer to all controls unplug the power cord and wait at least 30 seconds before reconnecting power. 2 Lamp burns out or makes a popping sound When the lamp reaches the end of the projector. Go to "Image --> Aspect Ratio...

User Manual
Page 44
Error (fan lock failure) -- V -- Error (lamp breakdown) Error (color Wheel fail) V Quick flashing Temp LED Red -- --- -- -- V -- V -- completed) Error (thermal failure) -- V Quick flashing --- Power LED Red Blue V -- --- Quick flashing V V Quick flashing -- -- -- V state) Turning off (cooling -- 34 English LED & Alarm Definition Listing LED Messages Message Standby (power cord plugged in) Power button ON Lamp retry Lamp LED Red -- --- Turning off (cooling --
Error (fan lock failure) -- V -- Error (lamp breakdown) Error (color Wheel fail) V Quick flashing Temp LED Red -- --- -- -- V -- V -- completed) Error (thermal failure) -- V Quick flashing --- Power LED Red Blue V -- --- Quick flashing V V Quick flashing -- -- -- V state) Turning off (cooling -- 34 English LED & Alarm Definition Listing LED Messages Message Standby (power cord plugged in) Power button ON Lamp retry Lamp LED Red -- --- Turning off (cooling --

User Manual
Page 45
... and replacing the dust filters Cleaning the dust filters Clean the dust filters after every 1000 hours of use a small vacuum cleaner designed for the Power LED to stop flashing then unplug the power cord. 2 Allow the projector at least 30 mins to obtain a new filter.
... and replacing the dust filters Cleaning the dust filters Clean the dust filters after every 1000 hours of use a small vacuum cleaner designed for the Power LED to stop flashing then unplug the power cord. 2 Allow the projector at least 30 mins to obtain a new filter.

User Manual
Page 46
... 5 Open the cover. (Illustration #2) 6 Remove the two screws that secure the lamp module.(Illustration #3) 7 Pull out the lamp module by pressing the power button. 2 Allow the projector at least 30 mins to remove the screw(s) from the cover, and then pull out the lamp. You will detect the... projector will be shown a warning message "Lamp is approaching the end of its useful life in full power operation. Replacement Suggested!" Make sure the projector has been cooling down . 3 Disconnect the power cord. 4 Find the "OPEN" button on side of personal injury, do not drop the lamp module or...
... 5 Open the cover. (Illustration #2) 6 Remove the two screws that secure the lamp module.(Illustration #3) 7 Pull out the lamp module by pressing the power button. 2 Allow the projector at least 30 mins to remove the screw(s) from the cover, and then pull out the lamp. You will detect the... projector will be shown a warning message "Lamp is approaching the end of its useful life in full power operation. Replacement Suggested!" Make sure the projector has been cooling down . 3 Disconnect the power cord. 4 Find the "OPEN" button on side of personal injury, do not drop the lamp module or...

User Manual
Page 51
41 English I/O connectors Standard package contents • Power socket x1 • VGA input x2 • Composite input x1 • S-Video x1 • VGA output x1 • HDMI x2 • DVI-D x1: with HDCP ... x1 • 3 RCA Component video x1 • 3.5 mm jack input x1: for wired IR remote control • RJ45 x1 • DC Jack x1 • AC power cord x1 • VGA cable x1 • DVI-D cable x1 • S-Video cable x1 • Composite video cable x1 • Component cable (3 RCA) x1 • Remote...
41 English I/O connectors Standard package contents • Power socket x1 • VGA input x2 • Composite input x1 • S-Video x1 • VGA output x1 • HDMI x2 • DVI-D x1: with HDCP ... x1 • 3 RCA Component video x1 • 3.5 mm jack input x1: for wired IR remote control • RJ45 x1 • DC Jack x1 • AC power cord x1 • VGA cable x1 • DVI-D cable x1 • S-Video cable x1 • Composite video cable x1 • Component cable (3 RCA) x1 • Remote...


