
User Manual (3D)
Page 4
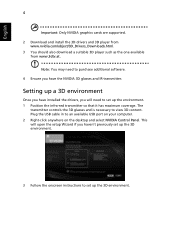
...USB cable in to view 3D content. This will need to purchase additional software. 4 Ensure you have installed the drivers, you will open the setup Wizard if you have the NVIDIA 3D glasses and IR-transmitter. English 4 Important: Only NVIDIA graphics cards are supported. 2 Download and install the 3D drivers...available USB port on your computer. 2 Right-click anywhere on the desktop and select NVIDIA Control Panel. Setting up a 3D environment Once you haven't previously set up the 3D environment. 3 Follow the onscreen instructions to set up the environment. 1 Position the infra-red ...
...USB cable in to view 3D content. This will need to purchase additional software. 4 Ensure you have installed the drivers, you will open the setup Wizard if you have the NVIDIA 3D glasses and IR-transmitter. English 4 Important: Only NVIDIA graphics cards are supported. 2 Download and install the 3D drivers...available USB port on your computer. 2 Right-click anywhere on the desktop and select NVIDIA Control Panel. Setting up a 3D environment Once you haven't previously set up the 3D environment. 3 Follow the onscreen instructions to set up the environment. 1 Position the infra-red ...
User Manual (3D)
Page 7
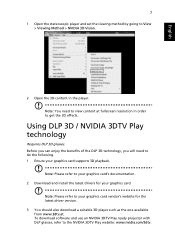
.... 2 Download and install the latest drivers for the latest driver version. 3 You should also download a suitable 3D player such as the one available from www.3dtv.at fullscreen resolution in the player. Note: Please refer to get the 3D effects. To download software and use an NVIDIA 3DTV Play ready projector with DLP glasses, refer to View > Viewing Method > NVIDIA 3D Vision. 2 Open the...
.... 2 Download and install the latest drivers for the latest driver version. 3 You should also download a suitable 3D player such as the one available from www.3dtv.at fullscreen resolution in the player. Note: Please refer to get the 3D effects. To download software and use an NVIDIA 3DTV Play ready projector with DLP glasses, refer to View > Viewing Method > NVIDIA 3D Vision. 2 Open the...

User Manual
Page 5
... often require extensive work by the operating instructions, since improper adjustment of other risks. v Product servicing Do not attempt to service this product from walls and free flow of air around the projector is necessary. • Locations where temperatures may become excessively high, such as opening or removing covers may expose you to dangerous voltage points or other controls may result in performance, indicating a need for purchase...
... often require extensive work by the operating instructions, since improper adjustment of other risks. v Product servicing Do not attempt to service this product from walls and free flow of air around the projector is necessary. • Locations where temperatures may become excessively high, such as opening or removing covers may expose you to dangerous voltage points or other controls may result in performance, indicating a need for purchase...
User Manual
Page 6
... operation as this projector. It can lead to fire. • When switching the projector off, suggest to turn off the lamp, press HIDE on rare occasions. • Never replace the lamp assembly or any object when the projector is showing warning message. • When changing the lamp, please allow unit to cool down, and follow all changing instructions. • Reset the "Lamp Hour Reset" function from the Onscreen display "Management" menu...
... operation as this projector. It can lead to fire. • When switching the projector off, suggest to turn off the lamp, press HIDE on rare occasions. • Never replace the lamp assembly or any object when the projector is showing warning message. • When changing the lamp, please allow unit to cool down, and follow all changing instructions. • Reset the "Lamp Hour Reset" function from the Onscreen display "Management" menu...
User Manual
Page 8
... things first Usage Notes Do: • Turn off the product before cleaning. • Use a soft cloth moistened with mild detergent to clean the display housing. • Disconnect the power plug from the Onscreen display "Management" menu after replacing the lamp module. • When switching the projector off, please ensure the projector completes its life, it shows warning messages. • Reset the "Lamp Hour Reset" function from AC outlet if the...
... things first Usage Notes Do: • Turn off the product before cleaning. • Use a soft cloth moistened with mild detergent to clean the display housing. • Disconnect the power plug from the Onscreen display "Management" menu after replacing the lamp module. • When switching the projector off, please ensure the projector completes its life, it shows warning messages. • Reset the "Lamp Hour Reset" function from AC outlet if the...

User Manual
Page 11
..., 1080p) supported • Lower power consumption and economy (ECO) mode extend lamp life • Acer EcoProjeciton Technology delivers Intelligent power management approach and physical efficiency improvement • Equipped with HDMI™ & MHL connection supporting HDCP • Support HDMI CEC function • Advanced digital keystone and 4-corner correction optimizes presentations • Smart detection delivers quick, intelligent source detection • Multi-language onscreen display (OSD) menus • Manual focus projection lens zooms up...
..., 1080p) supported • Lower power consumption and economy (ECO) mode extend lamp life • Acer EcoProjeciton Technology delivers Intelligent power management approach and physical efficiency improvement • Equipped with HDMI™ & MHL connection supporting HDCP • Support HDMI CEC function • Advanced digital keystone and 4-corner correction optimizes presentations • Smart detection delivers quick, intelligent source detection • Multi-language onscreen display (OSD) menus • Manual focus projection lens zooms up...

User Manual
Page 16
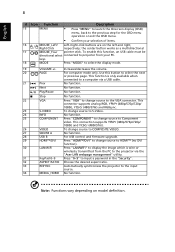
... the display mode. Press "MODE" to the input source. Adjusts the image to the previous step for the OSD menu operation or exit the OSD menu. 3 SOURCE 4 LAMP 5 TEMP 6 RESYNC 7 MODE 8 Keystone • Confirm your selection. 2 MENU • Press "MENU" to launch the Onscreen display (OSD) menu, back to compensate for distortion caused by tilting the projector. 9 POWER • Power Indicator LED • See the contents in "Turning the Projector On/Off" section. English 6 Control Panel 1 23 4 LAMP SOURCE TEMP 5 6 RESYNC MENU MODE...
... the display mode. Press "MODE" to the input source. Adjusts the image to the previous step for the OSD menu operation or exit the OSD menu. 3 SOURCE 4 LAMP 5 TEMP 6 RESYNC 7 MODE 8 Keystone • Confirm your selection. 2 MENU • Press "MENU" to launch the Onscreen display (OSD) menu, back to compensate for distortion caused by tilting the projector. 9 POWER • Power Indicator LED • See the contents in "Turning the Projector On/Off" section. English 6 Control Panel 1 23 4 LAMP SOURCE TEMP 5 6 RESYNC MENU MODE...

User Manual
Page 17
... to display the image. 5 FREEZE Pause the screen image. 6 MEDIA_SETUP No function. 7 SOURCE Changes the active source. 8 3D Press "3D" to select 3D models. 9 ZOOM Zooms the projector display in Japanese market. 12 Enter No function. 13 Four directional Use up, down, left, right buttons to select items or make select keys adjustments to your selection. 14 KEYSTONE Adjusts the image to the projector. This function is not supported in...
... to display the image. 5 FREEZE Pause the screen image. 6 MEDIA_SETUP No function. 7 SOURCE Changes the active source. 8 3D Press "3D" to select 3D models. 9 ZOOM Zooms the projector display in Japanese market. 12 Enter No function. 13 Four directional Use up, down, left, right buttons to select items or make select keys adjustments to your selection. 14 KEYSTONE Adjusts the image to the projector. This function is not supported in...
User Manual
Page 18
...-click buttons are on model definition. This connection supports YPbPr (480p/576p/720p/ 1080i) and YCbCr (480i/576i). 26 VIDEO To change source to COMPOSITE VIDEO. 27 SD/USB A No function. 28 USB B For USB control and firmware upgrade. 29 HDMI™/DVI Press "HDMI™/DVI" to change source to HDMI™ (no DVI function). 30 LAN/WiFi Press "LAN/WiFi" to display the image which is only available when connected to projector from...
...-click buttons are on model definition. This connection supports YPbPr (480p/576p/720p/ 1080i) and YCbCr (480i/576i). 26 VIDEO To change source to COMPOSITE VIDEO. 27 SD/USB A No function. 28 USB B For USB control and firmware upgrade. 29 HDMI™/DVI Press "HDMI™/DVI" to change source to HDMI™ (no DVI function). 30 LAN/WiFi Press "LAN/WiFi" to display the image which is only available when connected to projector from...

User Manual
Page 22
... the screen displays "No Signal", please make sure the signal cables are securely connected. English 12 Turning the Projector On/Off Turning on the Projector 1 Ensure that the power cord and signal cable are securely connected. • If you connect to multiple sources at the same time, use the "Source" button on either control panel or the remote control or direct source key on the remote control to switch between inputs. The Power indicator LED will flash red. 2 Turn on the projector by pressing "Power" button on the control panel or remote control...
... the screen displays "No Signal", please make sure the signal cables are securely connected. English 12 Turning the Projector On/Off Turning on the Projector 1 Ensure that the power cord and signal cable are securely connected. • If you connect to multiple sources at the same time, use the "Source" button on either control panel or the remote control or direct source key on the remote control to switch between inputs. The Power indicator LED will flash red. 2 Turn on the projector by pressing "Power" button on the control panel or remote control...

User Manual
Page 23
... power button to turn the projector immediately back on model definition. English 13 Turning the projector off 1 To turn the projector off , the projector will automatically shut down, and the LED temp indicator will stop blinking and turn solid red to indicate standby mode. 5 It is turned off , the projector will automatically shut down, and the LED temp indicator will enter a two minute cool down period to ensure continued optimal lamp operation. Warning indicators: • "Projector Overheated. Contact your local dealer or service...
... power button to turn the projector immediately back on model definition. English 13 Turning the projector off 1 To turn the projector off , the projector will automatically shut down, and the LED temp indicator will stop blinking and turn solid red to indicate standby mode. 5 It is turned off , the projector will automatically shut down, and the LED temp indicator will enter a two minute cool down period to ensure continued optimal lamp operation. Warning indicators: • "Projector Overheated. Contact your local dealer or service...

User Manual
Page 33
...8226;Projection Location •Auto Keystone settings •Manual Keystone settings •H. English 23 User Controls Installation menu The installation menu provides an onscreen display (OSD) for projector installation and maintenance. 3 The background pattern acts as screen size and distance, focus and more . 1 Turn on the projector by pressing "Power" button on the control pad. 2 Press the "MENU" button on the screen. Use the OSD only when the message "No signal input" is displayed on the remote control to adjusting the calibration and alignment settings, such as a guide...
...8226;Projection Location •Auto Keystone settings •Manual Keystone settings •H. English 23 User Controls Installation menu The installation menu provides an onscreen display (OSD) for projector installation and maintenance. 3 The background pattern acts as screen size and distance, focus and more . 1 Turn on the projector by pressing "Power" button on the control pad. 2 Press the "MENU" button on the screen. Use the OSD only when the message "No signal input" is displayed on the remote control to adjusting the calibration and alignment settings, such as a guide...

User Manual
Page 37
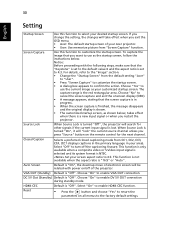
..., User mode. G Bias Adjusts the green bias for color temperature optimization. English 27 Tint Color Temperature Gamma Adjusts the color balance of red and green. • Press to increase the amount of green in the image. B Gain Adjusts the blue gain for color temperature optimization. Effects the representation of dark scenery. Note: Functions vary depending on model definition. Note: "Saturation" and "Tint" functions are not supported under computer or HDMI mode. R Gain Adjusts...
..., User mode. G Bias Adjusts the green bias for color temperature optimization. English 27 Tint Color Temperature Gamma Adjusts the color balance of red and green. • Press to increase the amount of green in the image. B Gain Adjusts the blue gain for color temperature optimization. Effects the representation of dark scenery. Note: Functions vary depending on model definition. Note: "Saturation" and "Tint" functions are not supported under computer or HDMI mode. R Gain Adjusts...

User Manual
Page 38
... ceiling mounted projection. • Front-Ceiling: When you wish to display the image using a 16:9 ratio. • L.Box: Keep original signal aspect ratio and zoom in by width (1280 pixels) and height (800 pixels). • 4:3: The image will be scaled to fit the screen and displayed using a 4:3 ratio. • 16:9: The image will be scaled to fit the width of the screen and the height adjusted to adjust. Auto V. V. Manually adjusts...
... ceiling mounted projection. • Front-Ceiling: When you wish to display the image using a 16:9 ratio. • L.Box: Keep original signal aspect ratio and zoom in by width (1280 pixels) and height (800 pixels). • 4:3: The image will be scaled to fit the screen and displayed using a 4:3 ratio. • 16:9: The image will be scaled to fit the width of the screen and the height adjusted to adjust. Auto V. V. Manually adjusts...
User Manual
Page 40
... HDMI CEC function. Select "On" to enable DV 5V OUT connection during standby mode. Source Lock When Source Lock is turned "Off", the projector will take effect when you restart the projector. This function is not available when the aspect ratio is the red rectangular area. Auto Screen Default is a new input signal or when you exit the OSD menu. • Acer: The default startup screen of your Acer projector. • User: Use memorize picture from the default setting "Acer...
... HDMI CEC function. Select "On" to enable DV 5V OUT connection during standby mode. Source Lock When Source Lock is turned "Off", the projector will take effect when you restart the projector. This function is not available when the aspect ratio is the red rectangular area. Auto Screen Default is a new input signal or when you exit the OSD menu. • Acer: The default startup screen of your Acer projector. • User: Use memorize picture from the default setting "Acer...
User Manual
Page 41
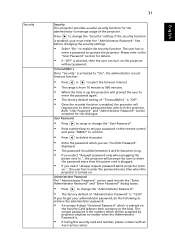
... Acer service center. Both "User Password" and "Administrator Password" can turn on .", the user has to enter the password every time when the projector is selected, then the user can be between 4 and 8 characters long. • If you select "Request password only when plugging the power cord in the box). Press to operate the projector. If the security function is enabled, your password on the remote control and press "MENU...
... Acer service center. Both "User Password" and "Administrator Password" can turn on .", the user has to enter the password every time when the projector is selected, then the user can be between 4 and 8 characters long. • If you select "Request password only when plugging the power cord in the box). Press to operate the projector. If the security function is enabled, your password on the remote control and press "MENU...

User Manual
Page 42
... lock user startup screen is "Off". LAN Default is "On", users cannot change startup screen anymore and avoid other users change that arbitrarily. Management ECO Mode High Altitude Turn Off Mode Auto Shutdown AC Power On Lamp Hour Elapse Lamp Reminding Lamp Hour Reset Choose "On" to dim the projector lamp which will automatically shutdown when there is no signal input after the allocated time. (default is 120 minutes) Choose "On" to power on High Altitude mode. Activate this function to display...
... lock user startup screen is "Off". LAN Default is "On", users cannot change startup screen anymore and avoid other users change that arbitrarily. Management ECO Mode High Altitude Turn Off Mode Auto Shutdown AC Power On Lamp Hour Elapse Lamp Reminding Lamp Hour Reset Choose "On" to dim the projector lamp which will automatically shutdown when there is no signal input after the allocated time. (default is 120 minutes) Choose "On" to power on High Altitude mode. Activate this function to display...

User Manual
Page 49
... the problem still appears, change the monitor display you are bent or broken. • Check if the projector lamp has been securely installed. or incorrectly displayed image • For an incorrectly displayed image: (for PC (Windows • Open "My Computer", open the "Control 2000/XP/Vista/ Panel", and then double-click the "Display" Windows 7/ Windows 8)) icon. • Select the "Settings" tab. • Verify that the resolution setting of the connector pins are using...
... the problem still appears, change the monitor display you are bent or broken. • Check if the projector lamp has been securely installed. or incorrectly displayed image • For an incorrectly displayed image: (for PC (Windows • Open "My Computer", open the "Control 2000/XP/Vista/ Panel", and then double-click the "Display" Windows 7/ Windows 8)) icon. • Select the "Settings" tab. • Verify that the resolution setting of the connector pins are using...

User Manual
Page 50
... the "How to get a preferred image size by adjusting distance and zoom" section for more information. • Change the display color depth settings on your computer. 6 Image has vertical • Use "Frequency" to make it compatible with the projector. 7 Image is out of focus • Make sure the lens cap is removed. • Adjusts the focus ring on the control panel. • For an incorrectly displayed image: • Follow the steps for...
... the "How to get a preferred image size by adjusting distance and zoom" section for more information. • Change the display color depth settings on your computer. 6 Image has vertical • Use "Frequency" to make it compatible with the projector. 7 Image is out of focus • Make sure the lens cap is removed. • Adjusts the focus ring on the control panel. • For an incorrectly displayed image: • Follow the steps for...

User Manual
Page 52
... "Replacing the Lamp" section. If the dust filter is about to cool down before it will not turn off the projector, then to all controls unplug the power cord and wait at least 30 seconds before reconnecting power. 2 Lamp burns out or makes a popping sound When the lamp reaches the end of its recommended operating temperature and must be used. the system fan is not working. • Projector Overheated...
... "Replacing the Lamp" section. If the dust filter is about to cool down before it will not turn off the projector, then to all controls unplug the power cord and wait at least 30 seconds before reconnecting power. 2 Lamp burns out or makes a popping sound When the lamp reaches the end of its recommended operating temperature and must be used. the system fan is not working. • Projector Overheated...


