
Quick Start Guide
Page 1
... Video Cable a. b. This sequence is properly connected to the computer. Test the electrical oulet by plugging in the monitor's power port and the electrical outlet. The monitor's power indicator is on but be blocked or covered. Make sure no image on the screen. Doing so may...Input Model)(Optional) 3. No Video - Ensure that the video connector is very important. 5. Ensure that the computer is on the monitor. Make sure the monitor power cable is fully inserted in a working electrical device such as a lamp. Turn off . Operation Detail Please refer to user's...
... Video Cable a. b. This sequence is properly connected to the computer. Test the electrical oulet by plugging in the monitor's power port and the electrical outlet. The monitor's power indicator is on but be blocked or covered. Make sure no image on the screen. Doing so may...Input Model)(Optional) 3. No Video - Ensure that the video connector is very important. 5. Ensure that the computer is on the monitor. Make sure the monitor power cable is fully inserted in a working electrical device such as a lamp. Turn off . Operation Detail Please refer to user's...

Quick Start Guide
Page 2
... to radio and TV reception. Operation with non-certified peripherals is your responsibility to dispose of your other relevant provisions of Conformity Hereby, Acer Inc., declares that interference will help . Notice: Canadian users This Class B digital apparatus complies with Part 15 of the following two ...cables to operate this device may cause undesired operation. For more of the FCC Rules. Operation is no guarantee that this LCD monitor is connected. • Consult the dealer or an experienced radio/television technician for help to this product must not be disposed ...
... to radio and TV reception. Operation with non-certified peripherals is your responsibility to dispose of your other relevant provisions of Conformity Hereby, Acer Inc., declares that interference will help . Notice: Canadian users This Class B digital apparatus complies with Part 15 of the following two ...cables to operate this device may cause undesired operation. For more of the FCC Rules. Operation is no guarantee that this LCD monitor is connected. • Consult the dealer or an experienced radio/television technician for help to this product must not be disposed ...

User Manual
Page 1
TABLE OF CONTENTS Special notes on LCD monitors 1 Information for your safety and comfort 2 Unpacking 5 Attaching/Removing the base 6 Screen position adjustment 6 Connecting the power cord 7 Safety precaution 7 Cleaning your monitor 7 Power saving 8 DDC 8 Connector Pin Assignment 9 Standard Timing Table 11 Installation 12 User controls 13 Troubleshooting 19
TABLE OF CONTENTS Special notes on LCD monitors 1 Information for your safety and comfort 2 Unpacking 5 Attaching/Removing the base 6 Screen position adjustment 6 Connecting the power cord 7 Safety precaution 7 Cleaning your monitor 7 Power saving 8 DDC 8 Connector Pin Assignment 9 Standard Timing Table 11 Installation 12 User controls 13 Troubleshooting 19

User Manual
Page 2
... screen depending on again to the nature of 99.99% or more. In this case, the screen is displayed for hours. SPECIAL NOTES ON LCD MONITORS The following symptoms are normal with LCD monitor and do not indicate a problem. EN-1
... screen depending on again to the nature of 99.99% or more. In this case, the screen is displayed for hours. SPECIAL NOTES ON LCD MONITORS The following symptoms are normal with LCD monitor and do not indicate a problem. EN-1

User Manual
Page 4
... refer servicing to qualified service person- Incorrect computer usage may occasionally misfire or appear as opening or removing covers may result in front of the monitor, using a footrest, or raising your company's health and safety department. Finding your comfort zone Find your leg muscles EN-3 nel when: • the power cord...
... refer servicing to qualified service person- Incorrect computer usage may occasionally misfire or appear as opening or removing covers may result in front of the monitor, using a footrest, or raising your company's health and safety department. Finding your comfort zone Find your leg muscles EN-3 nel when: • the power cord...

User Manual
Page 5
...very small typefaces and low-contrast displays could stress your eyes. The following websites: Worldwide: http://www.acer-group.com/public/Sustainability/sustainability01.htm http://www.acer-group.com/public/Sustainability/sustainability04.htm EN-4 Eyes • Rest your eyes frequently. • Give...exercises. • take breaks regularly, and do not recommend using a display visor, such as a piece of cardboard extended from the monitor and focusing on a couch or bed. We do some stretching exercises. • Breathe fresh air as often as open windows, for...
...very small typefaces and low-contrast displays could stress your eyes. The following websites: Worldwide: http://www.acer-group.com/public/Sustainability/sustainability01.htm http://www.acer-group.com/public/Sustainability/sustainability04.htm EN-4 Eyes • Rest your eyes frequently. • Give...exercises. • take breaks regularly, and do not recommend using a display visor, such as a piece of cardboard extended from the monitor and focusing on a couch or bed. We do some stretching exercises. • Breathe fresh air as often as open windows, for...

User Manual
Page 6
UNPACKING Please check the following items are present when you unpack the box, and save the packing materials in case you will need to ship or transport the monitor in future. • LCD Monitor • AC Power Cord • D-Sub Cable (Optional) • DVI Cable (Optional) • Audio Cable (Optional) • User Manual • Quick Start Guide EN-5
UNPACKING Please check the following items are present when you unpack the box, and save the packing materials in case you will need to ship or transport the monitor in future. • LCD Monitor • AC Power Cord • D-Sub Cable (Optional) • DVI Cable (Optional) • Audio Cable (Optional) • User Manual • Quick Start Guide EN-5

User Manual
Page 7
... release hooks as indicated first before removing the base and follow the arrow direction to avoid scratching the screen. EN-6 The monitor can adjust the tilt of the monitor by arrow below . SCREEN POSITION ADJUSTMENT In oder to optimize the best viewing position, you can be adjusted to hold the... edges of the monitor as indicated by using both of the monitor. Install: Align the base with the stand and push the base towards the top of your hands to 15 degrees up...
... release hooks as indicated first before removing the base and follow the arrow direction to avoid scratching the screen. EN-6 The monitor can adjust the tilt of the monitor by arrow below . SCREEN POSITION ADJUSTMENT In oder to optimize the best viewing position, you can be adjusted to hold the... edges of the monitor as indicated by using both of the monitor. Install: Align the base with the stand and push the base towards the top of your hands to 15 degrees up...

User Manual
Page 8
...a universal power supply that the power cord you use is adequate ventilation. • Avoid placing the monitor against a bright background or where sun- Place the monitor just below guidelines when cleaning the monitor. • Always unplug the monitor before cleaning. • Use a soft cloth to wipe the screen and cabinet front and sides. ... any other light sources may reflect on the power cord to avoid damage to the cable. • Do not expose the monitor to a proper AC outlet. • For unit using at 120 V AC: Use a UL Listed Cord Set, Type SVT wire and plug rated 10 A/125 V. &#...
...a universal power supply that the power cord you use is adequate ventilation. • Avoid placing the monitor against a bright background or where sun- Place the monitor just below guidelines when cleaning the monitor. • Always unplug the monitor before cleaning. • Use a soft cloth to wipe the screen and cabinet front and sides. ... any other light sources may reflect on the power cord to avoid damage to the cable. • Do not expose the monitor to a proper AC outlet. • For unit using at 120 V AC: Use a UL Listed Cord Set, Type SVT wire and plug rated 10 A/125 V. &#...

User Manual
Page 9
...DDC (Display Data Channel) is able to ON state is around 3 seconds. DDC To make your installation easier, the monitor is a communication protocol through which the monitor automatically informs the host system about its capabilities, for example, supported resolutions and corresponding timing. EN-8 The recovery time from ...signal from Active OFF state back to Plug and Play with your system if your system also supports DDC protocol. Power saving The monitor will be driven into Power Saving" mode by the amber-color power LED. State ON Power Saving Mode LED Light Blue Amber ...
...DDC (Display Data Channel) is able to ON state is around 3 seconds. DDC To make your installation easier, the monitor is a communication protocol through which the monitor automatically informs the host system about its capabilities, for example, supported resolutions and corresponding timing. EN-8 The recovery time from ...signal from Active OFF state back to Plug and Play with your system if your system also supports DDC protocol. Power saving The monitor will be driven into Power Saving" mode by the amber-color power LED. State ON Power Saving Mode LED Light Blue Amber ...
User Manual
Page 10
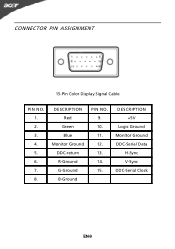
CONNECTOR PIN ASSIGNMENT 15-Pin Color Display Signal Cable PIN NO. 1. 2. 3. 4. 5. 6. 7. 8. DESCRIPTION Red Green Blue Monitor Ground DDC-return R-Ground G-Ground B-Ground PIN NO. 9. 10. 11. 12. 13. 14. 15. DESCRIPTION +5V Logic Ground Monitor Ground DDC-Serial Data H-Sync V-Sync DDC-Serial Clock EN-9
CONNECTOR PIN ASSIGNMENT 15-Pin Color Display Signal Cable PIN NO. 1. 2. 3. 4. 5. 6. 7. 8. DESCRIPTION Red Green Blue Monitor Ground DDC-return R-Ground G-Ground B-Ground PIN NO. 9. 10. 11. 12. 13. 14. 15. DESCRIPTION +5V Logic Ground Monitor Ground DDC-Serial Data H-Sync V-Sync DDC-Serial Clock EN-9

User Manual
Page 13
...cord Connect the power cord to the monitor, then to diagnose the problem. Power-ON Monitor and Computer Power-ON the monitor first, then power-ON the computer. EN-12 Make sure both the monitor and computer are powered-OFF. This sequence is very important. 5. If the monitor still does not function properly, please ...'s port. 2. Connect the Audio Cable(Only Audio-Input Model)(Optional) 3. b. Connect one end of the 24-pin DVI cable to the back of the monitor and connect the other end to the computer. 1-2 Connect digital Cable (Only Dual-Input Model) a. INSTALLATION To install the...
...cord Connect the power cord to the monitor, then to diagnose the problem. Power-ON Monitor and Computer Power-ON the monitor first, then power-ON the computer. EN-12 Make sure both the monitor and computer are powered-OFF. This sequence is very important. 5. If the monitor still does not function properly, please ...'s port. 2. Connect the Audio Cable(Only Audio-Input Model)(Optional) 3. b. Connect one end of the 24-pin DVI cable to the back of the monitor and connect the other end to the computer. 1-2 Connect digital Cable (Only Dual-Input Model) a. INSTALLATION To install the...
User Manual
Page 14
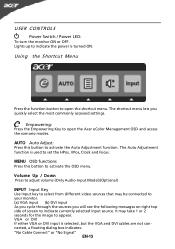
...the HPos, VPos, Clock and Focus. MENU OSD functions Press this button to open the Acer eColor Management OSD and access the scenario modes. VGA or DVI If either VGA or DVI input is used to your monitor. (a) VGA input (b) DVI input As you cycle through the sources you quickly select ...the most commonly accessed settings. USER CONTROLS Power Switch / Power LED: To turn the monitor ON or OFF. Lights up to appear. The Auto Adjustment function is selected ,but the VGA and DVI cables are not connected, a floating dialog box...
...the HPos, VPos, Clock and Focus. MENU OSD functions Press this button to open the Acer eColor Management OSD and access the scenario modes. VGA or DVI If either VGA or DVI input is used to your monitor. (a) VGA input (b) DVI input As you cycle through the sources you quickly select ...the most commonly accessed settings. USER CONTROLS Power Switch / Power LED: To turn the monitor ON or OFF. Lights up to appear. The Auto Adjustment function is selected ,but the VGA and DVI cables are not connected, a floating dialog box...

User Manual
Page 16
... OSD. 2 Using the / keys, select Picture from the OSD. For advanced settings, please refer to following content is for adjusting the settings of your LCD Monitor. EN-15 Press the MENU key to adjust the current Brightness, Contrast, Colour Temp, Auto Config and other image-related qualities. Actual product specifications may...
... OSD. 2 Using the / keys, select Picture from the OSD. For advanced settings, please refer to following content is for adjusting the settings of your LCD Monitor. EN-15 Press the MENU key to adjust the current Brightness, Contrast, Colour Temp, Auto Config and other image-related qualities. Actual product specifications may...

User Manual
Page 19
Then the basic information of LCD monitor will show up the OSD. 2 Using the / keys, select Information from the OSD. EN-18 Product information 1 Press the MENU key to bring up for current input.
Then the basic information of LCD monitor will show up the OSD. 2 Using the / keys, select Information from the OSD. EN-18 Product information 1 Press the MENU key to bring up for current input.

User Manual
Page 20
... the problem. (VGA Mode) Problems Current Status Remedy LED ON · Using OSD, adjust brightness and contrast to maximum or reset to the monitor. EN-19 Abnormal Picture Display is properly connected to their default settings. No Picture · Check if AC power cord is · Using OSD...mismatch. shift, or too POSITION with the host PC is connected. · Check if the volume setup of graphics adapter and monitor is properly connected at the back of monitor. · Check if the power of the image before changing or disconnecting the signal cable or powering OFF the...
... the problem. (VGA Mode) Problems Current Status Remedy LED ON · Using OSD, adjust brightness and contrast to maximum or reset to the monitor. EN-19 Abnormal Picture Display is properly connected to their default settings. No Picture · Check if AC power cord is · Using OSD...mismatch. shift, or too POSITION with the host PC is connected. · Check if the volume setup of graphics adapter and monitor is properly connected at the back of monitor. · Check if the power of the image before changing or disconnecting the signal cable or powering OFF the...

User Manual
Page 21
... power switch. EN-20 (DVI Mode) Problems Current Status Remedy LED ON · Using OSD, adjust brightness and contrast to maximum or reset to the monitor. Abnormal Sound (Only AudioInput model) (Optional) No sound, or sound level is too low · Check the audio cable with the host PC is connected... position and try to raise the volume level. LED displays amber color · Check if video signal cable is properly connected at the back of monitor. · Check if the power of the host PC is ON. No Picture · Check if AC power cord is properly connected to their ...
... power switch. EN-20 (DVI Mode) Problems Current Status Remedy LED ON · Using OSD, adjust brightness and contrast to maximum or reset to the monitor. Abnormal Sound (Only AudioInput model) (Optional) No sound, or sound level is too low · Check the audio cable with the host PC is connected... position and try to raise the volume level. LED displays amber color · Check if video signal cable is properly connected at the back of monitor. · Check if the power of the host PC is ON. No Picture · Check if AC power cord is properly connected to their ...

User Manual
Page 22
... SA Via Cantonale, Centro Galleria 2 6928 Manno Switzerland Hereby declare that: Product: Trade Name: Model Number: SKU Number: LCD Monitor Acer P186HL;P196HQL P186HLxxxxx;P196HQLxxxxx("x" = 0~9, a ~ z, or A ~ Z) Is compliant with the essential requirements and other relevant provisions of the following EC directives, and that production units of the ... by conformity with the following harmonized standard: -. EMC Directive 2004/108/EC as attested by conformity with the following harmonized standards: -. Easy Lai /Manager Regulation, Acer Inc.
... SA Via Cantonale, Centro Galleria 2 6928 Manno Switzerland Hereby declare that: Product: Trade Name: Model Number: SKU Number: LCD Monitor Acer P186HL;P196HQL P186HLxxxxx;P196HQLxxxxx("x" = 0~9, a ~ z, or A ~ Z) Is compliant with the essential requirements and other relevant provisions of the following EC directives, and that production units of the ... by conformity with the following harmonized standard: -. EMC Directive 2004/108/EC as attested by conformity with the following harmonized standards: -. Easy Lai /Manager Regulation, Acer Inc.

User Manual
Page 23
... This device complies with Part 15 of Responsible Party: 333 West San Carlos St. San Jose, CA 95110 U. A. Contact Person: Acer Representative Phone No.: 254-298-4000 Fax No.: 254-298-4147 The following local Manufacturer /Importer is subject to the following two conditions:...device must accept any interference received, including interference that may not cause harmful interference, and (2) this declaration: Product: LCD Monitor Trade Name: Acer Model Number: P186HL;P196HQL SKU Number: P186HLxxxxx;P196HQLxxxxx ("x" = 0~9, a ~ z, A ~ Z or Blank) Name of Responsible Party...
... This device complies with Part 15 of Responsible Party: 333 West San Carlos St. San Jose, CA 95110 U. A. Contact Person: Acer Representative Phone No.: 254-298-4000 Fax No.: 254-298-4147 The following local Manufacturer /Importer is subject to the following two conditions:...device must accept any interference received, including interference that may not cause harmful interference, and (2) this declaration: Product: LCD Monitor Trade Name: Acer Model Number: P186HL;P196HQL SKU Number: P186HLxxxxx;P196HQLxxxxx ("x" = 0~9, a ~ z, A ~ Z or Blank) Name of Responsible Party...


