
Aspire 6530/6530G Quick Guide
Page 7
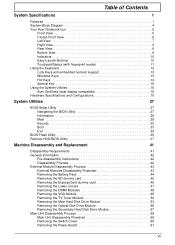
... View 9 Indicators 10 Easy-Launch Buttons 10 Touchpad Basics (with fingerprint reader 11 Using the Keyboard 12 Lock Keys and embedded numeric keypad 12 Windows Keys 13 Hot Keys 14 Special Key 15 Using the System Utilities 16 Acer GridVista (dual-display compatible 16 Hardware Specifications and Configurations 18 System Utilities 27 BIOS Setup Utility 27 Navigating the BIOS Utility 27 Information 28 Main 29 Security 30 Boot 33 Exit 34 BIOS Flash Utility 35 Remove HDD/BIOS Utility 37 Machine Disassembly and Replacement 41 Disassembly Requirements...
... View 9 Indicators 10 Easy-Launch Buttons 10 Touchpad Basics (with fingerprint reader 11 Using the Keyboard 12 Lock Keys and embedded numeric keypad 12 Windows Keys 13 Hot Keys 14 Special Key 15 Using the System Utilities 16 Acer GridVista (dual-display compatible 16 Hardware Specifications and Configurations 18 System Utilities 27 BIOS Setup Utility 27 Navigating the BIOS Utility 27 Information 28 Main 29 Security 30 Boot 33 Exit 34 BIOS Flash Utility 35 Remove HDD/BIOS Utility 37 Machine Disassembly and Replacement 41 Disassembly Requirements...

Aspire 6530/6530G Quick Guide
Page 8
... Replacing the Main Hard Disk Drive Module 112 Replacing the WLAN Module 113 Replacing the TV Tuner Module 114 Replacing the VGA Module 114 Replacing the DIMM Modules 115 Replacing the Lower Covers 115 Replacing the ExpressCard and SD Card Dummy Trays 116 Troubleshooting 117 Common Problems 117 Power On Issue 118 No Display Issue 119 Random Loss of BIOS Settings 120 LCD Failure 121 Built-In Keyboard Failure 121 Touchpad Failure 122 Internal Speaker Failure 122 Internal Microphone...
... Replacing the Main Hard Disk Drive Module 112 Replacing the WLAN Module 113 Replacing the TV Tuner Module 114 Replacing the VGA Module 114 Replacing the DIMM Modules 115 Replacing the Lower Covers 115 Replacing the ExpressCard and SD Card Dummy Trays 116 Troubleshooting 117 Common Problems 117 Power On Issue 118 No Display Issue 119 Random Loss of BIOS Settings 120 LCD Failure 121 Built-In Keyboard Failure 121 Touchpad Failure 122 Internal Speaker Failure 122 Internal Microphone...
Aspire 6530/6530G Quick Guide
Page 9
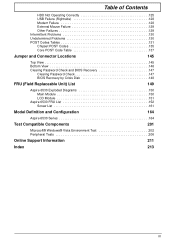
... Chipset POST Codes 135 Core POST Code Table 137 Jumper and Connector Locations 145 Top View 145 Bottom View 146 Clearing Password Check and BIOS Recovery 147 Clearing Password Check 147 BIOS Recovery by Crisis Disk 148 FRU (Field Replaceable Unit) List 149 Aspire 6530 Exploded Diagrams 150 Main Module 150 LCD Module 151 Aspire 6530 FRU List 152 Screw List 161 Model Definition and Configuration 164 Aspire 6530 Series 164 Test Compatible Components 201 Microsoft® Windows® Vista Environment...
... Chipset POST Codes 135 Core POST Code Table 137 Jumper and Connector Locations 145 Top View 145 Bottom View 146 Clearing Password Check and BIOS Recovery 147 Clearing Password Check 147 BIOS Recovery by Crisis Disk 148 FRU (Field Replaceable Unit) List 149 Aspire 6530 Exploded Diagrams 150 Main Module 150 LCD Module 151 Aspire 6530 FRU List 152 Screw List 161 Model Definition and Configuration 164 Aspire 6530 Series 164 Test Compatible Components 201 Microsoft® Windows® Vista Environment...
Aspire 6530/6530G Quick Guide
Page 20
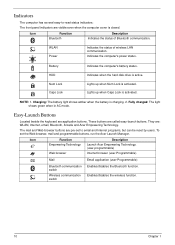
...-Launch Buttons Located beside the keyboard are called easy-launch buttons. To set to -read status indicators: The front panel indicators are pre-set the Web browser, mail and programmable buttons, run the Acer Launch Manager. Indicators The computer has several easy-to email and Internet programs, but can be reset by users. Battery HDD Num Lock Caps Lock Indicates the computer's battery status. Indicates when the hard disk drive is activated. Icon Function Bluetooth Description Indicates the status of wireless LAN...
...-Launch Buttons Located beside the keyboard are called easy-launch buttons. To set to -read status indicators: The front panel indicators are pre-set the Web browser, mail and programmable buttons, run the Acer Launch Manager. Indicators The computer has several easy-to email and Internet programs, but can be reset by users. Battery HDD Num Lock Caps Lock Indicates the computer's battery status. Indicates when the hard disk drive is activated. Icon Function Bluetooth Description Indicates the status of wireless LAN...
Aspire 6530/6530G Quick Guide
Page 38
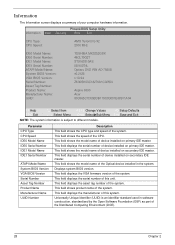
... the model name of this system. PhoenixBIOS Setup Utility Information Main Security Boot Exit CPU Type: CPU Speed: AMD Turion(tm) X2 2300 MHz IDE0 Model Name: IDE0 Serial Number: IDE1 Model Name: IDE1 Serial Number: ATAPI Model Name: System BIOS Version: VGA BIOS Version: Serial Number: Asset Tag Number: Product Name: Manufacturer Name: UUID: TOSHIBA MK3252GSX 48CLT0G2T ST9160310AS 5SV00T4L Optiarc DVD RW AD-7560S v0.2126 v.10.94 ZK30SK03C18270A1C02500 Aspire 6530 Acer 00C565C7D09BDB119C0D001E68911A04...
... the model name of this system. PhoenixBIOS Setup Utility Information Main Security Boot Exit CPU Type: CPU Speed: AMD Turion(tm) X2 2300 MHz IDE0 Model Name: IDE0 Serial Number: IDE1 Model Name: IDE1 Serial Number: ATAPI Model Name: System BIOS Version: VGA BIOS Version: Serial Number: Asset Tag Number: Product Name: Manufacturer Name: UUID: TOSHIBA MK3252GSX 48CLT0G2T ST9160310AS 5SV00T4L Optiarc DVD RW AD-7560S v0.2126 v.10.94 ZK30SK03C18270A1C02500 Aspire 6530 Acer 00C565C7D09BDB119C0D001E68911A04...
Aspire 6530/6530G Quick Guide
Page 41
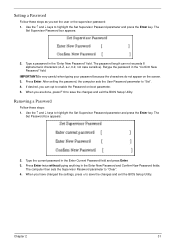
... save the changes and exit the BIOS Setup Utility. Type a password in the Enter New Password and Confirm New Password fields. Use the ↑ and ↓ keys to "Clear". 4. Press Enter twice without typing anything in the "Enter New Password" field. The password length can opt to enable the Password on the screen. 3. The computer then sets the Supervisor Password parameter to highlight the Set Supervisor Password parameter and press the Enter key. Chapter 2 31 The Set Supervisor Password box appears...
... save the changes and exit the BIOS Setup Utility. Type a password in the Enter New Password and Confirm New Password fields. Use the ↑ and ↓ keys to "Clear". 4. Press Enter twice without typing anything in the "Enter New Password" field. The password length can opt to enable the Password on the screen. 3. The computer then sets the Supervisor Password parameter to highlight the Set Supervisor Password parameter and press the Enter key. Chapter 2 31 The Set Supervisor Password box appears...
Aspire 6530/6530G Quick Guide
Page 42
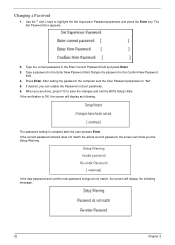
... Setup Warning. The password setting is OK, the screen will display the following . Changing a Password 1. After setting the password, the computer sets the User Password parameter to highlight the Set Supervisor Password parameter and press the Enter key. If the current password entered does not match the actual current password, the screen will show you can enable the Password on boot parameter. 6. Type a password in the Confirm New Password field. 4. The Set Password box appears. 2. Type the current password in the Enter...
... Setup Warning. The password setting is OK, the screen will display the following . Changing a Password 1. After setting the password, the computer sets the User Password parameter to highlight the Set Supervisor Password parameter and press the Enter key. If the current password entered does not match the actual current password, the screen will show you can enable the Password on boot parameter. 6. Type a password in the Confirm New Password field. 4. The Set Password box appears. 2. Type the current password in the Enter...
Aspire 6530/6530G Quick Guide
Page 44
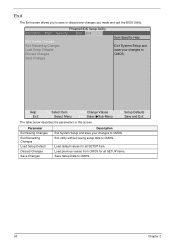
... Menu F5/F6 Change Values Enter SelectXSub-Menu F9 Setup Defaults F10 Save and Exit The table below describes the parameters in this screen. Load previous values from CMOS for all SETUP items. Save Setup Data to CMOS. PhoenixBIOS Setup Utility Information Main Security Boot Exit Exit Saving Changes Exit Discarding Changes Load Setup Defaults Discard Changes Save Changes Item Specific Help Exit System Setup and save your changes to CMOS. Exit The Exit screen...
... Menu F5/F6 Change Values Enter SelectXSub-Menu F9 Setup Defaults F10 Save and Exit The table below describes the parameters in this screen. Load previous values from CMOS for all SETUP items. Save Setup Data to CMOS. PhoenixBIOS Setup Utility Information Main Security Boot Exit Exit Saving Changes Exit Discarding Changes Load Setup Defaults Discard Changes Save Changes Item Specific Help Exit System Setup and save your changes to CMOS. Exit The Exit screen...
Aspire 6530/6530G Quick Guide
Page 45
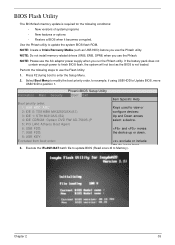
... 7: USB FDD: the device up or down. 8: USB KEY: Excluded from boot order: exclude or include the de ice to enter the Setup Menu. 2. Execute the IFLASH.BAT batch file to update BIOS (Read xxxxx.fd to use the Phlash utility. NOTE: Do not install memory-related drivers (XMS, EMS, DPMI) when you use the AC adaptor power supply when you use the Flash Utility: 1. BIOS Flash Utility The BIOS flash memory update is not loaded. NOTE: Create a Crisis Recovery Media...
... 7: USB FDD: the device up or down. 8: USB KEY: Excluded from boot order: exclude or include the de ice to enter the Setup Menu. 2. Execute the IFLASH.BAT batch file to update BIOS (Read xxxxx.fd to use the Phlash utility. NOTE: Do not install memory-related drivers (XMS, EMS, DPMI) when you use the AC adaptor power supply when you use the Flash Utility: 1. BIOS Flash Utility The BIOS flash memory update is not loaded. NOTE: Create a Crisis Recovery Media...
Aspire 6530/6530G Quick Guide
Page 127
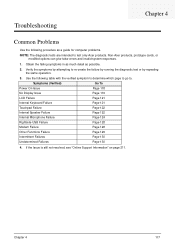
... computer problems. NOTE: The diagnostic tests are intended to test only Acer products. Chapter 4 117 Symptoms (Verified) Go To Power On Issue Page 118 No Display Issue Page 119 LCD Failure Page 121 Internal Keyboard Failure Page 121 Touchpad Failure Page 122 Internal Speaker Failure Page 122 Internal Microphone Failure Page 124 Rightside USB Failure Page 128 Modem Failure Page 128 Other Functions...
... computer problems. NOTE: The diagnostic tests are intended to test only Acer products. Chapter 4 117 Symptoms (Verified) Go To Power On Issue Page 118 No Display Issue Page 119 LCD Failure Page 121 Internal Keyboard Failure Page 121 Touchpad Failure Page 122 Internal Speaker Failure Page 122 Internal Microphone Failure Page 124 Rightside USB Failure Page 128 Modem Failure Page 128 Other Functions...
Aspire 6530/6530G Quick Guide
Page 129
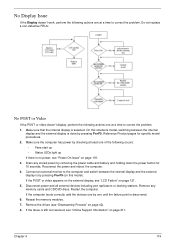
... by removing the power cable and battery and holding down the power button for specific model procedures. 2. If the computer boots correctly, add the devices one until the failure point is discovered. 6. No Display Issue If the Display doesn't work, perform the following occurs: • Fans start up • Status LEDs light up If there is no power, see "Power On Issue" on page 118. 3. Drain any memory cards and CD/DVD discs...
... by removing the power cable and battery and holding down the power button for specific model procedures. 2. If the computer boots correctly, add the devices one until the failure point is discovered. 6. No Display Issue If the Display doesn't work, perform the following occurs: • Fans start up • Status LEDs light up If there is no power, see "Power On Issue" on page 118. 3. Drain any memory cards and CD/DVD discs...

Aspire 6530/6530G Quick Guide
Page 130
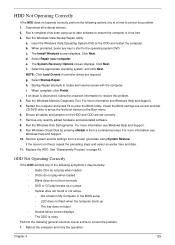
... screen), the LCD is faulty and should be replaced. If the computer is more than one at a time to correct the problem. 1. See "Disassembly Process" on adjusting settings. Minimize or close all Windows. Run the Windows Memory Diagnostic from the BIOS, the drive may reduce display brightness. Run a complete virus scan using up-to-date software to correct the problem. 1. NOTE: Ensure that : • The device is properly installed...
... screen), the LCD is faulty and should be replaced. If the computer is more than one at a time to correct the problem. 1. See "Disassembly Process" on adjusting settings. Minimize or close all Windows. Run the Windows Memory Diagnostic from the BIOS, the drive may reduce display brightness. Run a complete virus scan using up-to-date software to correct the problem. 1. NOTE: Ensure that : • The device is properly installed...
Aspire 6530/6530G Quick Guide
Page 135
... BIOS Utility. Check the BIOS settings are correct and that CD/DVD drive is noisy Perform the following actions one at a time to correct the problem. 1. See "Disassembly Process" on the HDD and ODD are required. b. f. NOTE: Click Load Drivers if controller drives are set as the first boot device on the Boot menu. 6. Select Startup Repair. For more information see Windows Help and Support. 5. Restore system and file settings from a command prompt. Replace...
... BIOS Utility. Check the BIOS settings are correct and that CD/DVD drive is noisy Perform the following actions one at a time to correct the problem. 1. See "Disassembly Process" on the HDD and ODD are required. b. f. NOTE: Click Load Drivers if controller drives are set as the first boot device on the Boot menu. 6. Select Startup Repair. For more information see Windows Help and Support. 5. Restore system and file settings from a command prompt. Replace...

Aspire 6530/6530G Quick Guide
Page 137
... the drive works with the new cable, the original cable should be replaced. 4. Drive Read Failure If discs cannot be replaced. 3. Test the drive using other ATA Devices shown if applicable. Replace the ODD. Double-click IDE ATA/ATAPI controllers, then right-click ATA Device 0. NOTE: Check that the ODD controller transfer mode is set to correct the problem. 1. Turn off the power and remove the cover to inspect the connections to enter the BIOS Utility. 2. b. Try...
... the drive works with the new cable, the original cable should be replaced. 4. Drive Read Failure If discs cannot be replaced. 3. Test the drive using other ATA Devices shown if applicable. Replace the ODD. Double-click IDE ATA/ATAPI controllers, then right-click ATA Device 0. NOTE: Check that the ODD controller transfer mode is set to correct the problem. 1. Turn off the power and remove the cover to inspect the connections to enter the BIOS Utility. 2. b. Try...

Aspire 6530/6530G Quick Guide
Page 139
... properly installed. If the mouse uses a USB connection, try an alternate USB port. 4. Remove any recently added hardware and associated software. 7. Check the Device Manager to Try. Do not replace a non-defective FRUs: 1. If the mouse uses a wireless connection, insert new batteries and confirm there is ok. 3. If the issue is OK. 2. Chapter 4 129 External Mouse Failure If an external Mouse fails, perform the following general steps to correct the problem. Roll back the mouse driver...
... properly installed. If the mouse uses a USB connection, try an alternate USB port. 4. Remove any recently added hardware and associated software. 7. Check the Device Manager to Try. Do not replace a non-defective FRUs: 1. If the mouse uses a wireless connection, insert new batteries and confirm there is ok. 3. If the issue is OK. 2. Chapter 4 129 External Mouse Failure If an external Mouse fails, perform the following general steps to correct the problem. Roll back the mouse driver...
Aspire 6530/6530G Quick Guide
Page 142
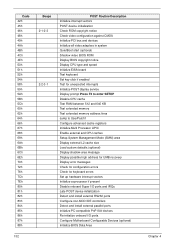
... vectors POST device initialization Check ROM copyright notice Check video configuration against CMOS Initialize PCI bus and devices Initialize all video adapters in system QuietBoot start (optional) Shadow video BIOS ROM Display BIOS copyright notice Display CPU type and speed Initialize EISA board Test keyboard Set key click if enabled Test for unexpected interrupts Initialize POST display service Display prompt Press F2 to enter SETUP Disable CPU cache Test RAM between 512 and 640 KB Test extended memory Test extended memory address lines...
... vectors POST device initialization Check ROM copyright notice Check video configuration against CMOS Initialize PCI bus and devices Initialize all video adapters in system QuietBoot start (optional) Shadow video BIOS ROM Display BIOS copyright notice Display CPU type and speed Initialize EISA board Test keyboard Set key click if enabled Test for unexpected interrupts Initialize POST display service Display prompt Press F2 to enter SETUP Disable CPU cache Test RAM between 512 and 640 KB Test extended memory Test extended memory address lines...
Aspire 6530/6530G Quick Guide
Page 144
... in Flash ROM Initialize the chipset Initialize the bridge Initialize the CPU Initialize system timer Initialize system I/O Check force recovery boot Checksum BIOS ROM Go to BIOS Set Huge Segment Initialize Multi Processor Initialize OEM special code Initialize PIC and DMA Initialize Memory type Initialize Memory size Shadow Boot Block System memory test Initialize interrupt vectors Initialize Run Time Clock Initialize video Initialize System Management Mode Output one set...
... in Flash ROM Initialize the chipset Initialize the bridge Initialize the CPU Initialize system timer Initialize system I/O Check force recovery boot Checksum BIOS ROM Go to BIOS Set Huge Segment Initialize Multi Processor Initialize OEM special code Initialize PIC and DMA Initialize Memory type Initialize Memory size Shadow Boot Block System memory test Initialize interrupt vectors Initialize Run Time Clock Initialize video Initialize System Management Mode Output one set...

Aspire 6530/6530G Quick Guide
Page 150
... the CMOS matches the hardware currently installed. If the monitor type is set bridge bus numbers. 2. Initialize Extended BIOS Data Area and initialize the mouse. USB Initialization Verify keyboard reset. Display error messages on the screen. Initialize all motherboard devices. 1. Register POST Display Services, fonts, and languages with CMOS values Initialize interrupt vectors 0 thru 77h Verify the ROM copyright notice Initialize all video adapters in Setup. Thirdly, enable the parity checkers and read from flash into CMOS.
... the CMOS matches the hardware currently installed. If the monitor type is set bridge bus numbers. 2. Initialize Extended BIOS Data Area and initialize the mouse. USB Initialization Verify keyboard reset. Display error messages on the screen. Initialize all motherboard devices. 1. Register POST Display Services, fonts, and languages with CMOS values Initialize interrupt vectors 0 thru 77h Verify the ROM copyright notice Initialize all video adapters in Setup. Thirdly, enable the parity checkers and read from flash into CMOS.
Aspire 6530/6530G Quick Guide
Page 152
... media present 3. Check Boot Type (Server BIOS) Disable onboard COM and LPT ports before testing for presence of BCP_ROM_Scan_Size (or to Memory Technologies Devices such as ROM, RAM, PCMCIA, and serial disk (PICO BIOS). Test and identify RS232 ports. Initialize hard-disk controller. Check CMOS for validity 5. Activate the drive by default) on every 2K boundary, looking for PCMCIA (PICO BIOS). Check the boot catalog for CD-ROM drive present 2. If the user does not enter a valid password, Setup...
... media present 3. Check Boot Type (Server BIOS) Disable onboard COM and LPT ports before testing for presence of BCP_ROM_Scan_Size (or to Memory Technologies Devices such as ROM, RAM, PCMCIA, and serial disk (PICO BIOS). Test and identify RS232 ports. Initialize hard-disk controller. Check CMOS for validity 5. Activate the drive by default) on every 2K boundary, looking for PCMCIA (PICO BIOS). Check the boot catalog for CD-ROM drive present 2. If the user does not enter a valid password, Setup...
Aspire 6530/6530G Quick Guide
Page 153
... key switch is found, set a flag. Initialize the SMBIOS header and sub-structures. Fade out OEM Logo or post string End hotkey detection (Server BIOS) If BCP option is installed and hotkey pressed. Overwrite the "Press F2 for Setup" prompt with spaces, erasing it . If the user does not enter a valid password, Setup does not return. Enable CPU management (Geyserville I) Display Boot First menu if MultiBoot is enabled, clear the screen before booting. Display...
... key switch is found, set a flag. Initialize the SMBIOS header and sub-structures. Fade out OEM Logo or post string End hotkey detection (Server BIOS) If BCP option is installed and hotkey pressed. Overwrite the "Press F2 for Setup" prompt with spaces, erasing it . If the user does not enter a valid password, Setup does not return. Enable CPU management (Geyserville I) Display Boot First menu if MultiBoot is enabled, clear the screen before booting. Display...


