
User Manual with DVI
Page 2
Such changes will be incorporated in the space provided below. Acer LCD Monitor User's Guide Original Issue: 09/2017 Changes may be made periodically to the information in any form or by photocopy, recording or otherwise, ..., stored in a retrieval system, or transmitted, in this publication without the prior written permission of Acer Incorporated. Acer LCD Monitor User's Guide Model number Serial number Date of purchase Place of purchase Acer and the Acer logo are registered trademarks of merchantability or fitness for identification purposes only and belong to notify any...
Such changes will be incorporated in the space provided below. Acer LCD Monitor User's Guide Original Issue: 09/2017 Changes may be made periodically to the information in any form or by photocopy, recording or otherwise, ..., stored in a retrieval system, or transmitted, in this publication without the prior written permission of Acer Incorporated. Acer LCD Monitor User's Guide Model number Serial number Date of purchase Place of purchase Acer and the Acer logo are registered trademarks of merchantability or fitness for identification purposes only and belong to notify any...

User Manual with DVI
Page 3
...flicker disappears. • You may find slightly uneven brightness on the screen depending on the desktop pattern you use . Information for your monitor Please carefully follow these instructions carefully. Connecting/disconnecting the device Observe the following are turned off before connecting the power cord to the ...or turning off the power switch and then turn it on the product. Turn off the power switch for a few hours. • Acer monitor is purposed for video and visual display of the previous screen may remain after switching the image, when the same image is attached to...
...flicker disappears. • You may find slightly uneven brightness on the screen depending on the desktop pattern you use . Information for your monitor Please carefully follow these instructions carefully. Connecting/disconnecting the device Observe the following are turned off before connecting the power cord to the ...or turning off the power switch and then turn it on the product. Turn off the power switch for a few hours. • Acer monitor is purposed for video and visual display of the previous screen may remain after switching the image, when the same image is attached to...

User Manual with DVI
Page 8
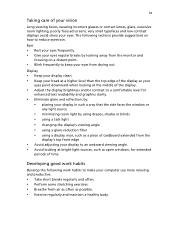
... from Sleep mode by adjusting the viewing angle of a computer. Long work periods, bad posture, poor work habits, stress, inadequate working in front of the monitor, using a footrest, or raising your sitting height to achieve maximum comfort. Finding your comfort zone Find your comfort zone by pushing the power button. Observe...
... from Sleep mode by adjusting the viewing angle of a computer. Long work periods, bad posture, poor work habits, stress, inadequate working in front of the monitor, using a footrest, or raising your sitting height to achieve maximum comfort. Finding your comfort zone Find your comfort zone by pushing the power button. Observe...
User Manual with DVI
Page 9
... a display visor, such as a piece of cardboard extended from the display's top front edge • Avoid adjusting your display to make your eyes from the monitor and focusing on how to keep your computer use more relaxing and productive: • Take short breaks regularly and often. • Perform some stretching exercises...
... a display visor, such as a piece of cardboard extended from the display's top front edge • Avoid adjusting your display to make your eyes from the monitor and focusing on how to keep your computer use more relaxing and productive: • Take short breaks regularly and often. • Perform some stretching exercises...

User Manual with DVI
Page 12
... for your safety and comfort Safety instructions Cleaning your monitor Connecting/disconnecting the device Accessibility Safe listening Warnings Using electrical power Product servicing Additional safety information IT equipment recycling information Disposal instructions LCD pixel ...position adjustment Connecting the power cord Power saving Display Data Channel (DDC) Connector pin assignment Standard timing table Installation User controls How to adjust a setting Acer eColor Management User Troubleshooting VGA mode DVI mode HDMI mode 1 iii iii iii iii iii iv iv iv iv v vi vi vii vii viii xi...
... for your safety and comfort Safety instructions Cleaning your monitor Connecting/disconnecting the device Accessibility Safe listening Warnings Using electrical power Product servicing Additional safety information IT equipment recycling information Disposal instructions LCD pixel ...position adjustment Connecting the power cord Power saving Display Data Channel (DDC) Connector pin assignment Standard timing table Installation User controls How to adjust a setting Acer eColor Management User Troubleshooting VGA mode DVI mode HDMI mode 1 iii iii iii iii iii iv iv iv iv v vi vi vii vii viii xi...

User Manual with DVI
Page 13
LCD monitor Quick start guide HDMI cable (Option) D-sub cable (Option) DVI cable (Option) AC power cord Audio Cable (Option) English 1 Unpacking Please check that the following items are present when you unpack the box, and save the packing materials in case you need to ship or transport the monitor in the future.
LCD monitor Quick start guide HDMI cable (Option) D-sub cable (Option) DVI cable (Option) AC power cord Audio Cable (Option) English 1 Unpacking Please check that the following items are present when you unpack the box, and save the packing materials in case you need to ship or transport the monitor in the future.
User Manual with DVI
Page 14
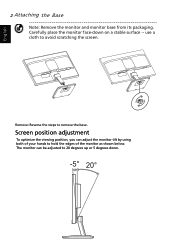
Remove: Reverse the steps to avoid scratching the screen. Carefully place the monitor face-down . -5° 20° Screen position adjustment To optimize the viewing position, you can be adjusted to hold the edges of your hands to 20 degrees up or 5 degrees down on a stable surface -- use a cloth to remove the base. English 2 Attaching the Base Note: Remove the monitor and monitor base from its packaging. The monitor can adjust the monitor tilt by using both of the monitor as shown below.
Remove: Reverse the steps to avoid scratching the screen. Carefully place the monitor face-down . -5° 20° Screen position adjustment To optimize the viewing position, you can be adjusted to hold the edges of your hands to 20 degrees up or 5 degrees down on a stable surface -- use a cloth to remove the base. English 2 Attaching the Base Note: Remove the monitor and monitor base from its packaging. The monitor can adjust the monitor tilt by using both of the monitor as shown below.

User Manual with DVI
Page 15
...• For units using 220/240 V AC: Use a cord set should have the appropriate safety approvals for the country in which the monitor automatically informs the host system about its capabilities; The DDC is the correct type required for example, supported resolutions and corresponding timing. The cord ...set consisting of H05VV-F cord and plug rated 10 A/250 V. The monitor supports the DDC2B standard. The recovery time from "power saving" mode back to "on" is required. • Plug one end of the...
...• For units using 220/240 V AC: Use a cord set should have the appropriate safety approvals for the country in which the monitor automatically informs the host system about its capabilities; The DDC is the correct type required for example, supported resolutions and corresponding timing. The cord ...set consisting of H05VV-F cord and plug rated 10 A/250 V. The monitor supports the DDC2B standard. The recovery time from "power saving" mode back to "on" is required. • Plug one end of the...

User Manual with DVI
Page 16
Description 9 +5 V 10 Logic ground 11 Monitor ground 12 DDC-serial data 13 H-sync 14 V-sync 15 DDC-serial clock 1917151311 9 7 5 3 1 1816141210 8 6 4 2 19-pin Color Display Signal cable* PIN No. Description 1 TMDS ... Data0+ 9 TMDS Data0- 11 TMDS Clock Shield 13 CEC 15 SCL 17 DDC/CEC Ground 19 Hot Plug Detect PIN No. Description 1 Red 2 Green 3 Blue 4 Monitor ground 5 DDC-return 6 R-ground 7 G-ground 8 B-ground PIN No. on device) 16 SDA 18 +5V Power * only for certain models Description 2 TMDS Data2 Shield 4 TMDS Data1...
Description 9 +5 V 10 Logic ground 11 Monitor ground 12 DDC-serial data 13 H-sync 14 V-sync 15 DDC-serial clock 1917151311 9 7 5 3 1 1816141210 8 6 4 2 19-pin Color Display Signal cable* PIN No. Description 1 TMDS ... Data0+ 9 TMDS Data0- 11 TMDS Clock Shield 13 CEC 15 SCL 17 DDC/CEC Ground 19 Hot Plug Detect PIN No. Description 1 Red 2 Green 3 Blue 4 Monitor ground 5 DDC-return 6 R-ground 7 G-ground 8 B-ground PIN No. on device) 16 SDA 18 +5V Power * only for certain models Description 2 TMDS Data2 Shield 4 TMDS Data1...
User Manual with DVI
Page 19
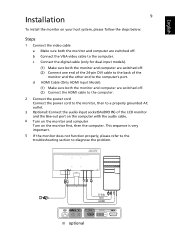
...off . b Connect the VGA video cable to diagnose the problem. English Installation To install the monitor on the monitor first, then the computer. d HDMI Cable (Only HDMI Input Model). (1) Make sure both the monitor and computer are switched off. (2) Connect the HDMI cable to the computer. 2 Connect the ...power cord Connect the power cord to the monitor, then to a properly grounded AC outlet. 3 e Turn on the monitor and computer Turn on your host system, please follow the steps below: Steps 1 Connect the video cable a Make ...
...off . b Connect the VGA video cable to diagnose the problem. English Installation To install the monitor on the monitor first, then the computer. d HDMI Cable (Only HDMI Input Model). (1) Make sure both the monitor and computer are switched off. (2) Connect the HDMI cable to the computer. 2 Connect the ...power cord Connect the power cord to the monitor, then to a properly grounded AC outlet. 3 e Turn on the monitor and computer Turn on your host system, please follow the steps below: Steps 1 Connect the video cable a Make ...

User Manual with DVI
Page 20
... "No Signal" EN-13 VGA or DVI or +'0, If either VGA or DVI input is turned ON. AUTO Auto Adjust: Press this botton to your monitor. (a) VGA input (b) DVI input (c) +'0, input As you cycle through the sources you quickly select the most commonly accessed settings. It may be connected... to activate the OSD menu. MENU OSD functions Press this button to open the Acer eColor Management OSD and access the scenario modes. The Auto Adjustment function is used to appear. Using the Shortcut Menu Press the function button...
... "No Signal" EN-13 VGA or DVI or +'0, If either VGA or DVI input is turned ON. AUTO Auto Adjust: Press this botton to your monitor. (a) VGA input (b) DVI input (c) +'0, input As you cycle through the sources you quickly select the most commonly accessed settings. It may be connected... to activate the OSD menu. MENU OSD functions Press this button to open the Acer eColor Management OSD and access the scenario modes. The Auto Adjustment function is used to appear. Using the Shortcut Menu Press the function button...

User Manual with DVI
Page 22
... can be used to adjust the current Brightness, Contrast, Colour Temp, Auto Config and other image-related qualities. 5 6 axis Saturate: Adjust saturation of your LCD Monitor. You can be used for adjusting the settings of red, green, blue, yellow, magenta and cyan 6 axis; E Hue: Adjust hue for general reference only. Actual...
... can be used to adjust the current Brightness, Contrast, Colour Temp, Auto Config and other image-related qualities. 5 6 axis Saturate: Adjust saturation of your LCD Monitor. You can be used for adjusting the settings of red, green, blue, yellow, magenta and cyan 6 axis; E Hue: Adjust hue for general reference only. Actual...

User Manual with DVI
Page 25
Product information 1 Press the MENU key to bring up for current input. EN-18 Then the basic information of LCD monitor will show up the OSD. 2 Using the / keys, select Information from the OSD.
Product information 1 Press the MENU key to bring up for current input. EN-18 Then the basic information of LCD monitor will show up the OSD. 2 Using the / keys, select Information from the OSD.
User Manual with DVI
Page 26
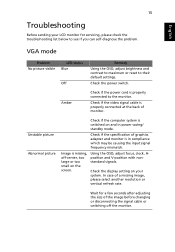
...causing the input signal frequency mismatch. Check the power switch. Unstable picture Abnormal picture Check if the computer system is missing, off the monitor. Check the display setting on the screen. In case of the image before changing or disconnecting the signal cable or switching off -center,... too large or too small on your LCD monitor for a few seconds after adjusting the size of a missing image, please select another resolution or vertical refresh rate. VGA mode Problem No...
...causing the input signal frequency mismatch. Check the power switch. Unstable picture Abnormal picture Check if the computer system is missing, off the monitor. Check the display setting on the screen. In case of the image before changing or disconnecting the signal cable or switching off -center,... too large or too small on your LCD monitor for a few seconds after adjusting the size of a missing image, please select another resolution or vertical refresh rate. VGA mode Problem No...

User Manual with DVI
Page 27
Check if the video signal cable is properly connected at the back of monitor. Check if the video signal cable is properly connected at the back of monitor. English 16 DVI mode Problem No picture visible LED status Blue Off Remedy Using the OSD, adjust brightness and contrast to maximum... or reset to their default settings. Check the power switch. Check that the computer system is properly connected to the monitor. Amber Check if the AC power cord is switched on and in power saving/ standby mode. Check that the computer system is properly ...
Check if the video signal cable is properly connected at the back of monitor. Check if the video signal cable is properly connected at the back of monitor. English 16 DVI mode Problem No picture visible LED status Blue Off Remedy Using the OSD, adjust brightness and contrast to maximum... or reset to their default settings. Check the power switch. Check that the computer system is properly connected to the monitor. Amber Check if the AC power cord is switched on and in power saving/ standby mode. Check that the computer system is properly ...

User Manual without DVI
Page 2
... your computer. Other companies' product names or trademarks are registered trademarks of such revisions or changes. All Rights Reserved. Acer LCD Monitor User's Guide Model number Serial number Date of purchase Place of Acer Incorporated. The serial number and model number are recorded on the label affixed to notify any means, electronically, mechanically...
... your computer. Other companies' product names or trademarks are registered trademarks of such revisions or changes. All Rights Reserved. Acer LCD Monitor User's Guide Model number Serial number Date of purchase Place of Acer Incorporated. The serial number and model number are recorded on the label affixed to notify any means, electronically, mechanically...

User Manual without DVI
Page 3
... following guidelines when connecting and disconnecting power from electronic devices. Turn off the power switch for a few hours. • Acer monitor is purposed for video and visual display of the previous screen may flicker during initial use . • The LCD screen has ...image is displayed for hours. It may find slightly uneven brightness on the screen depending on the product. In this document for your monitor Please carefully follow these instructions carefully. Follow all power cords from the power supplies. Cleaning your safety and comfort Safety instructions Read ...
... following guidelines when connecting and disconnecting power from electronic devices. Turn off the power switch for a few hours. • Acer monitor is purposed for video and visual display of the previous screen may flicker during initial use . • The LCD screen has ...image is displayed for hours. It may find slightly uneven brightness on the screen depending on the product. In this document for your monitor Please carefully follow these instructions carefully. Follow all power cords from the power supplies. Cleaning your safety and comfort Safety instructions Read ...

User Manual without DVI
Page 8
... around regularly to remove the strain on your sitting height to carpal tunnel syndrome, tendonitis, tenosynovitis or other factors greatly increase the risk of the monitor, using a footrest, or raising your leg muscles Observe the following section provides tips for power management: • Activate display's Sleep mode within 15 minutes of...
... around regularly to remove the strain on your sitting height to carpal tunnel syndrome, tendonitis, tenosynovitis or other factors greatly increase the risk of the monitor, using a footrest, or raising your leg muscles Observe the following section provides tips for power management: • Activate display's Sleep mode within 15 minutes of...

User Manual without DVI
Page 9
... incorrect glasses or contact lenses, glare, excessive room lighting, poorly focused screens, very small typefaces and low-contrast displays could stress your eyes from the monitor and focusing on how to make your eyes point downward when looking at bright light sources, such as possible. • Exercise regularly and maintain a healthy...
... incorrect glasses or contact lenses, glare, excessive room lighting, poorly focused screens, very small typefaces and low-contrast displays could stress your eyes from the monitor and focusing on how to make your eyes point downward when looking at bright light sources, such as possible. • Exercise regularly and maintain a healthy...

User Manual without DVI
Page 10
TABLE OF CONTENTS UNPACKING 1 ATTACHING / REMOVING THE BASE 2 SCREEN POSITION ADJUSTMENT 3 CONNECTING THE POWER CORD 4 SAFETY PRECAUTION 4 CLEANING YOUR MONITOR 4 POWER SAVING 5 DDC...5 CONNECTOR PIN ASSIGNMENT 6 STANDARD TIMING TABLE 9 INSTALLATION 10 USER CONTROLS 11 TROUBLESHOOTING 20
TABLE OF CONTENTS UNPACKING 1 ATTACHING / REMOVING THE BASE 2 SCREEN POSITION ADJUSTMENT 3 CONNECTING THE POWER CORD 4 SAFETY PRECAUTION 4 CLEANING YOUR MONITOR 4 POWER SAVING 5 DDC...5 CONNECTOR PIN ASSIGNMENT 6 STANDARD TIMING TABLE 9 INSTALLATION 10 USER CONTROLS 11 TROUBLESHOOTING 20


