

User Manual
Page 13
LCD monitor Quick start guide HDMI Cable (Optional) D-sub cable (Option) DVI cable (Option) AC power cord EN-1 Unpacking Please check that the following items are present when you unpack the box, and save the packing materials in case you need to ship or transport the monitor in the future.
LCD monitor Quick start guide HDMI Cable (Optional) D-sub cable (Option) DVI cable (Option) AC power cord EN-1 Unpacking Please check that the following items are present when you unpack the box, and save the packing materials in case you need to ship or transport the monitor in the future.
User Manual
Page 19
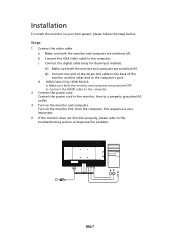
Installation To install the monitor on the monitor first, then the computer. d HDMI Cable (Only HDMI Model) a. Connect the HDMI cable to the computer. 2 Connect the power cord Connect the power cord to the monitor, then to a properly grounded AC outlet. 3 Turn on the monitor ...
Installation To install the monitor on the monitor first, then the computer. d HDMI Cable (Only HDMI Model) a. Connect the HDMI cable to the computer. 2 Connect the power cord Connect the power cord to the monitor, then to a properly grounded AC outlet. 3 Turn on the monitor ...
User Manual
Page 20
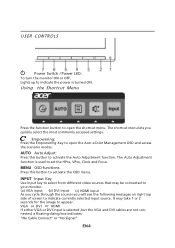
... the HPos, VPos, Clock and Focus. The Auto Adjustment function is used to open the Acer eColor Management OSD and access the scenario modes. It may be connected to your monitor. (a) VGA input (b) DVI input (c) HDMI input As you cycle through the sources you quickly select the most commonly accessed settings. VGA... or DVI or HDMI If either VGA or DVI input is turned ON. Empowering: Press the Empowering Key to appear. MENU OSD functions Press this button to indicate the ...
... the HPos, VPos, Clock and Focus. The Auto Adjustment function is used to open the Acer eColor Management OSD and access the scenario modes. It may be connected to your monitor. (a) VGA input (b) DVI input (c) HDMI input As you cycle through the sources you quickly select the most commonly accessed settings. VGA... or DVI or HDMI If either VGA or DVI input is turned ON. Empowering: Press the Empowering Key to appear. MENU OSD functions Press this button to indicate the ...


