

User Guide
Page 3
... and openings are provided for plug as possible. Caution for Your Safety and Comfort Read these instructions carefully. Keep this product from the wall outlet before removing the power supply unit from the power supplies. Use a damp cloth for future reference. When you plug the power cord into the product. Follow all power cords from the projector. • If the system has multiple sources of...
... and openings are provided for plug as possible. Caution for Your Safety and Comfort Read these instructions carefully. Keep this product from the wall outlet before removing the power supply unit from the power supplies. Use a damp cloth for future reference. When you plug the power cord into the product. Follow all power cords from the projector. • If the system has multiple sources of...
User Guide
Page 5
.... • Locations where temperatures may become excessively high, such as opening or removing covers may expose you to dangerous voltage points or other controls may result in damage and will often require extensive work by the operating instructions, since improper adjustment of other risks. For safety reasons, do not use non-compliant parts when adding or changing components. Consult your eyes. Refer all windows rolled...
.... • Locations where temperatures may become excessively high, such as opening or removing covers may expose you to dangerous voltage points or other controls may result in damage and will often require extensive work by the operating instructions, since improper adjustment of other risks. For safety reasons, do not use non-compliant parts when adding or changing components. Consult your eyes. Refer all windows rolled...
User Guide
Page 6
... the air outlet grille when projector is operating. In this case, unplug immediately and contact your dealer for ceiling mount installation. To temporarily turn off . • Do not touch the air outlet grille and bottom plate which may cause the projector to break or drop it is securely installed. Please contact your local dealer or Acer service center for changing the lamp, when lamp warning message displays. •...
... the air outlet grille when projector is operating. In this case, unplug immediately and contact your dealer for ceiling mount installation. To temporarily turn off . • Do not touch the air outlet grille and bottom plate which may cause the projector to break or drop it is securely installed. Please contact your local dealer or Acer service center for changing the lamp, when lamp warning message displays. •...
User Guide
Page 8
... clean the display housing. • Disconnect the power plug from AC outlet if the product is not being used for changing the lamp, when lamp warning message displays. • When switching the projector off, please ensure the projector completes its life, it will burn out and may cause electric shock. • The product will detect the life of time. To replace the lamp, contact your local dealer or Acer service...
... clean the display housing. • Disconnect the power plug from AC outlet if the product is not being used for changing the lamp, when lamp warning message displays. • When switching the projector off, please ensure the projector completes its life, it will burn out and may cause electric shock. • The product will detect the life of time. To replace the lamp, contact your local dealer or Acer service...

User Guide
Page 9
... 3 Projector Overview 4 Projector Outlook 4 Control Panel 5 Remote Control Layout 6 MHL Feature Introduction 8 Getting Started 9 Connecting the Projector 9 Turning the Projector On/Off 14 Turning On the Projector 14 Turning Off the Projector 15 Adjusting the Projected Image 16 Adjusting the Height of the Projected Image 16 How to Optimize Image Size and Distance 17 How to Get a Preferred Image Size by Adjusting Distance and Zoom 25 User Controls 33 Installation Menu 33 Onscreen Display (OSD) Menus 34 Color 35 Image 38 Setting 40 Management 44 Audio...
... 3 Projector Overview 4 Projector Outlook 4 Control Panel 5 Remote Control Layout 6 MHL Feature Introduction 8 Getting Started 9 Connecting the Projector 9 Turning the Projector On/Off 14 Turning On the Projector 14 Turning Off the Projector 15 Adjusting the Projected Image 16 Adjusting the Height of the Projected Image 16 How to Optimize Image Size and Distance 17 How to Get a Preferred Image Size by Adjusting Distance and Zoom 25 User Controls 33 Installation Menu 33 Onscreen Display (OSD) Menus 34 Color 35 Image 38 Setting 40 Management 44 Audio...
User Guide
Page 11
... supported • Enables projecting 3D content via DLP Link Technology: Blu-Ray 3D supported (P1185/P1285/P1385W/H5381BD/H5383BD/X1385WH/H6518BD/ H6502BD/P1525/H6525BD/P1623) • One-touch "3D" button on , the projector dynamically adjusts the power consumption of the lamp according to the brightness of the lamp by up to the 3D functions • Acer ColorBoost technology delivers vivid, life-like images • High...
... supported • Enables projecting 3D content via DLP Link Technology: Blu-Ray 3D supported (P1185/P1285/P1385W/H5381BD/H5383BD/X1385WH/H6518BD/ H6502BD/P1525/H6525BD/P1623) • One-touch "3D" button on , the projector dynamically adjusts the power consumption of the lamp according to the brightness of the lamp by up to the 3D functions • Acer ColorBoost technology delivers vivid, life-like images • High...

User Guide
Page 14
... 1 Control panel 5 Micro USB cable 2 Power key and Power indicator LED 6 Projection lens 3 Zoom ring and Focus ring Focus ring 7 Remote control receiver 4 HDMI (MHL) connector 8 Lens cap Rear side S1285N 47 USB MINI-B VGA IN -2 VGA IN -1 8 VGA-OUT 9 RS232 X1185N/X1285N 14 7 89 AUDIO IN -1 AUDIO IN -2 AUDIO OUT USB MINI-B VGA IN -2 VGA IN -1 VGA-OUT RS232 X1185/X1285/S1285 1 24 7 89 AUDIO IN -1 AUDIO IN -2 AUDIO OUT S-VIDEO USB MINI-B VGA IN -2 VIDEO VGA IN -1 VGA-OUT RS232 10 # Description 1 Audio input connector Audio output connector 2 S-Video input...
... 1 Control panel 5 Micro USB cable 2 Power key and Power indicator LED 6 Projection lens 3 Zoom ring and Focus ring Focus ring 7 Remote control receiver 4 HDMI (MHL) connector 8 Lens cap Rear side S1285N 47 USB MINI-B VGA IN -2 VGA IN -1 8 VGA-OUT 9 RS232 X1185N/X1285N 14 7 89 AUDIO IN -1 AUDIO IN -2 AUDIO OUT USB MINI-B VGA IN -2 VGA IN -1 VGA-OUT RS232 X1185/X1285/S1285 1 24 7 89 AUDIO IN -1 AUDIO IN -2 AUDIO OUT S-VIDEO USB MINI-B VGA IN -2 VIDEO VGA IN -1 VGA-OUT RS232 10 # Description 1 Audio input connector Audio output connector 2 S-Video input...
User Guide
Page 16
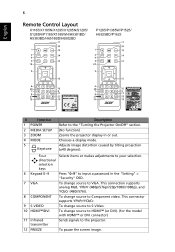
English 6 Remote Control Layout X1185/X1185N/X1285/X1285N/S1285/ S1285N/P1185/X1385WH/H5381BD/ H5383BD/H6518BD/H6502BD P1285/P1385W/P1525/ H6525BD/P1623 # Function 1 POWER 2 MEDIA SETUP 3 ZOOM 4 MODE 5 Keystone Description Refer to the "Turning the Projector On/Off" section. (No function) Zooms the projector display in the "Setting" > "Security" OSD. 7 VGA To change source to VGA. This connector supports YPbPr/YCbCr. 9 S-VIDEO To change source to S-Video. 10 HDMI™/DVI To change source to Component video. This connection supports analog...
English 6 Remote Control Layout X1185/X1185N/X1285/X1285N/S1285/ S1285N/P1185/X1385WH/H5381BD/ H5383BD/H6518BD/H6502BD P1285/P1385W/P1525/ H6525BD/P1623 # Function 1 POWER 2 MEDIA SETUP 3 ZOOM 4 MODE 5 Keystone Description Refer to the "Turning the Projector On/Off" section. (No function) Zooms the projector display in the "Setting" > "Security" OSD. 7 VGA To change source to VGA. This connector supports YPbPr/YCbCr. 9 S-VIDEO To change source to S-Video. 10 HDMI™/DVI To change source to Component video. This connection supports analog...

User Guide
Page 24
.../H5383BD/ H6518BD/H6502BD/P1525/H6525BD/ P1623 The Power LED will light red. 2 Turn on the projector by pressing (POWER) on the control panel or remote control, and the Power indicator LED will detect your source automatically (when the Source Lock function is disabled). • If the screen displays "No Signal", please make sure the signal cables are securely connected. The projector will turn blue. 3 Turn on the remote control to multiple sources at the same time, use "SOURCE" on the control panel or remote control, or the direct source...
.../H5383BD/ H6518BD/H6502BD/P1525/H6525BD/ P1623 The Power LED will light red. 2 Turn on the projector by pressing (POWER) on the control panel or remote control, and the Power indicator LED will detect your source automatically (when the Source Lock function is disabled). • If the screen displays "No Signal", please make sure the signal cables are securely connected. The projector will turn blue. 3 Turn on the remote control to multiple sources at the same time, use "SOURCE" on the control panel or remote control, or the direct source...

User Guide
Page 43
.... The new settings will be saved automatically upon exiting the menu. 5 Press "MENU" anytime to exit the menu and return to enter a submenu for projector installation and maintenance. Note: The OSD screenshot is displayed on the screen. 1 Turn on the projector by pressing remote control. (POWER) on the control panel or 2 Press "MENU" on the control panel or remote control to adjusting the calibration and alignment settings, such as screen size and distance, focus and more. Use the...
.... The new settings will be saved automatically upon exiting the menu. 5 Press "MENU" anytime to exit the menu and return to enter a submenu for projector installation and maintenance. Note: The OSD screenshot is displayed on the screen. 1 Turn on the projector by pressing remote control. (POWER) on the control panel or 2 Press "MENU" on the control panel or remote control to adjusting the calibration and alignment settings, such as screen size and distance, focus and more. Use the...

User Guide
Page 46
... Controls the degree of difference between the lightest and darkest parts of the image being projected. Adjusting the contrast changes the amount of color in the image. • Press to decrease the contrast. • Press to increase the amount of dark scenery. At higher color temperatures, the screen looks colder; When projecting darker images the power consumption will be enhanced. Adjusts the color balance of red and green...
... Controls the degree of difference between the lightest and darkest parts of the image being projected. Adjusting the contrast changes the amount of color in the image. • Press to decrease the contrast. • Press to increase the amount of dark scenery. At higher color temperatures, the screen looks colder; When projecting darker images the power consumption will be enhanced. Adjusts the color balance of red and green...

User Guide
Page 48
..., the projector reverses and inverts the image at same time. Projection Location Aspect Ratio Auto Keystone • Auto: Automatically adjusts projection location of the horizontal and vertical pixels. • 4:3: The image will be displayed making full use of image. • Desktop • Ceiling: Turns the image upside down for WXGA/1080p models): Keeps the original signal aspect ratio and zooms in by tilting projection (±40 degrees). Projection Mode • Front: The factory default setting. • Rear: Reverses the image so...
..., the projector reverses and inverts the image at same time. Projection Location Aspect Ratio Auto Keystone • Auto: Automatically adjusts projection location of the horizontal and vertical pixels. • 4:3: The image will be displayed making full use of image. • Desktop • Ceiling: Turns the image upside down for WXGA/1080p models): Keeps the original signal aspect ratio and zooms in by tilting projection (±40 degrees). Projection Mode • Front: The factory default setting. • Rear: Reverses the image so...

User Guide
Page 49
... input image as limited color range data. • Full Range: Processes the input image as full color range data. Position", "V. Position", "Frequency" and "Tracking" functions are not supported under video mode. V. HDMI Color Range • Auto: Automatically adjusts the color range by tilting projection (±40 degrees). If you experience a vertical flickering bar in the projected image, use this function to prevent color display error. to correct it . Manual Keystone This function is unavailable when Auto Keystone is set...
... input image as limited color range data. • Full Range: Processes the input image as full color range data. Position", "V. Position", "Frequency" and "Tracking" functions are not supported under video mode. V. HDMI Color Range • Auto: Automatically adjusts the color range by tilting projection (±40 degrees). If you experience a vertical flickering bar in the projected image, use this function to prevent color display error. to correct it . Manual Keystone This function is unavailable when Auto Keystone is set...

User Guide
Page 50
... display is HDMI. Source Lock In the unlikely event that the "Keystone" is set to customize the startup screen. Choose "No" to press "SOURCE" on the control panel or remote control, or the direct source key on the remote control. Selecting "On" enables the function and when switching input signals, you want to the "Image" section. • Change the "Startup Screen" from the "Screen Capture" function. For details, refer to use the current image...
... display is HDMI. Source Lock In the unlikely event that the "Keystone" is set to customize the startup screen. Choose "No" to press "SOURCE" on the control panel or remote control, or the direct source key on the remote control. Selecting "On" enables the function and when switching input signals, you want to the "Image" section. • Change the "Startup Screen" from the "Screen Capture" function. For details, refer to use the current image...

User Guide
Page 51
... the factory default settings. You have to turn off the captioning feature. Selecting "On" enables the function. Both micro USB cable inside the projector and the DC 5V out port/USB A port (if available) on the "Security Mode". Select "Off" to enter password depending on the back of "Administrator Password" is in standby mode and the VGA IN (or VGA IN 1) and VGA OUT sockets are correctly connected to change...
... the factory default settings. You have to turn off the captioning feature. Selecting "On" enables the function. Both micro USB cable inside the projector and the DC 5V out port/USB A port (if available) on the "Security Mode". Select "Off" to enter password depending on the back of "Administrator Password" is in standby mode and the VGA IN (or VGA IN 1) and VGA OUT sockets are correctly connected to change...

User Guide
Page 52
... or change "User Password". • Use the numerical keys on the remote control to set up , the projector will request you to enter the password again. • The factory default setting of "Timeout (Min.)" is "Off". • Once the security function is enabled, the projector will request you are requested to input the password every time the power cord is plugged. • If you select "Always request password while projector turns...
... or change "User Password". • Use the numerical keys on the remote control to set up , the projector will request you to enter the password again. • The factory default setting of "Timeout (Min.)" is "Off". • Once the security function is enabled, the projector will request you are requested to input the password every time the power cord is plugged. • If you select "Always request password while projector turns...

User Guide
Page 53
... enter "Administrator Password" when the "Enter Administrator Password" or "Enter Password" dialogue box displays. • Press to "ON", the startup screen is locked and cannot be accepted by the projector no matter what the administrator password is. • If the Security Card is lost, please contact your projector. Lock User Startup Screen This function is set to change "Administrator Password". • The factory default of "Administrator Password" is...
... enter "Administrator Password" when the "Enter Administrator Password" or "Enter Password" dialogue box displays. • Press to "ON", the startup screen is locked and cannot be accepted by the projector no matter what the administrator password is. • If the Security Card is lost, please contact your projector. Lock User Startup Screen This function is set to change "Administrator Password". • The factory default of "Administrator Password" is...

User Guide
Page 54
... the lamp life. 44 English Management ECO Mode High Altitude Turn Off Mode Choose "On" to dim the projector lamp, which will show or hide warning message Lamp Reminding when the changing lamp message is by pressing the power button twice. • Instant Resume: Enables you to show up 30 hours before end of time the OSD menu Menu Display Time (Seconds) • will automatically shut down the projector's temperature. • Instant Off: Enables you set...
... the lamp life. 44 English Management ECO Mode High Altitude Turn Off Mode Choose "On" to dim the projector lamp, which will show or hide warning message Lamp Reminding when the changing lamp message is by pressing the power button twice. • Instant Resume: Enables you to show up 30 hours before end of time the OSD menu Menu Display Time (Seconds) • will automatically shut down the projector's temperature. • Instant Off: Enables you set...
User Guide
Page 62
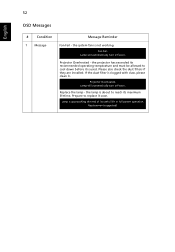
... filters if they are installed. Projector Overheated. the lamp is approaching the end of its useful life in full power operation. Lamp is about to reach its recommended operating temperature and must be allowed to replace it . If the dust filter is used. the projector has exceeded its maximum lifetime. Replacement suggested! Projector Overheated - Lamp will automatically turn off soon. Replace the lamp - 52 English OSD Messages # Condition 1 Message Message Reminder Fan Fail - the system fan is not working...
... filters if they are installed. Projector Overheated. the lamp is approaching the end of its useful life in full power operation. Lamp is about to reach its recommended operating temperature and must be allowed to replace it . If the dust filter is used. the projector has exceeded its maximum lifetime. Replacement suggested! Projector Overheated - Lamp will automatically turn off soon. Replace the lamp - 52 English OSD Messages # Condition 1 Message Message Reminder Fan Fail - the system fan is not working...

User Guide
Page 63
Error (Lamp breakdown) -- V Quick flashing --- V LAMP LED Red -- ---- -- --- Error (Color wheel -- Quick flashing V V Quick flashing -- -- -- V -- failure) V V V Quick flashing TEMP LED Red -- --- -- -- 53 LED & Alarm Definition Listing LED Messages English Message Standby (Power cord plugged in) Power on Lamp retry Turning off (Cooling state) Turning off (Cooling completed) Error (Thermal failure) Error (Fan lock failure) Power LED Red Blue V -- ---
Error (Lamp breakdown) -- V Quick flashing --- V LAMP LED Red -- ---- -- --- Error (Color wheel -- Quick flashing V V Quick flashing -- -- -- V -- failure) V V V Quick flashing TEMP LED Red -- --- -- -- 53 LED & Alarm Definition Listing LED Messages English Message Standby (Power cord plugged in) Power on Lamp retry Turning off (Cooling state) Turning off (Cooling completed) Error (Thermal failure) Error (Fan lock failure) Power LED Red Blue V -- ---


