User Manual
Page 3
... by changing the image or turning off the power switch and then turn it on again to make sure the flicker disappears. • You may find slightly uneven brightness on the screen depending on the product. Turn off the power switch for a few hours. In this document for future reference. Special notes on LCD monitors The following are normal with the LCD monitor and do not indicate a problem...
... by changing the image or turning off the power switch and then turn it on again to make sure the flicker disappears. • You may find slightly uneven brightness on the screen depending on the product. Turn off the power switch for a few hours. In this document for future reference. Special notes on LCD monitors The following are normal with the LCD monitor and do not indicate a problem...
User Manual
Page 4
... ( Fujian)C.O., LTD, Model: ADPC1965 (H276HL) ADS-65LSI-19-1 19065G (H276HL) Using electrical power • This product should never be placed near or over a radiator or heat register, or in a built-in installation unless proper ventilation is only used for ventilation to ensure reliable operation of time listening to music at high volume. • Avoid turning up the volume to block...
... ( Fujian)C.O., LTD, Model: ADPC1965 (H276HL) ADS-65LSI-19-1 19065G (H276HL) Using electrical power • This product should never be placed near or over a radiator or heat register, or in a built-in installation unless proper ventilation is only used for ventilation to ensure reliable operation of time listening to music at high volume. • Avoid turning up the volume to block...

User Manual
Page 5
... replace the power cord set . Also, make sure that the total rating of all servicing to qualified service personnel when: • the power cord or plug is not properly grounded may interfere with the performance of this product yourself, as opening or removing covers may expose you need for details. If power strips are used, the load should not exceed 80% of the power strip's input rating. • This product's power cord...
... replace the power cord set . Also, make sure that the total rating of all servicing to qualified service personnel when: • the power cord or plug is not properly grounded may interfere with the performance of this product yourself, as opening or removing covers may expose you need for details. If power strips are used, the load should not exceed 80% of the power strip's input rating. • This product's power cord...
User Manual
Page 6
...service stations. To minimize pollution and ensure utmost protection of small children. Keep them out of the reach of the global environment, please recycle. Switch off your device in bodily injury or even death. Areas with a potentially explosive atmosphere and obey all signs and instructions...our business and strive to identify and provide the best working procedures to avoid disturbing reflections from the screen'"For indoor use in Office environments with special controlled illumination to environmental protection and views recycling, in the form of salvaging and disposal ...
...service stations. To minimize pollution and ensure utmost protection of small children. Keep them out of the reach of the global environment, please recycle. Switch off your device in bodily injury or even death. Areas with a potentially explosive atmosphere and obey all signs and instructions...our business and strive to identify and provide the best working procedures to avoid disturbing reflections from the screen'"For indoor use in Office environments with special controlled illumination to environmental protection and views recycling, in the form of salvaging and disposal ...
User Manual
Page 7
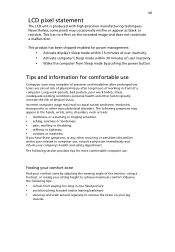
...: • Activate display's Sleep mode within 15 minutes of user inactivity. • Activate computer's Sleep mode within 30 minutes of the monitor, using a footrest, or raising your leg muscles This product has been shipped enabled for more comfortable computer use , consult a physician immediately and inform your comfort zone by pushing the power button. Nevertheless, some pixels may appear in one fixed posture •...
...: • Activate display's Sleep mode within 15 minutes of user inactivity. • Activate computer's Sleep mode within 30 minutes of the monitor, using a footrest, or raising your leg muscles This product has been shipped enabled for more comfortable computer use , consult a physician immediately and inform your comfort zone by pushing the power button. Nevertheless, some pixels may appear in one fixed posture •...
User Manual
Page 8
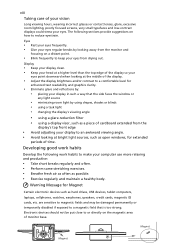
... computers, laptops, cellphones, watches, earphones, speakers, credit cards, magnetic ID cards, etc. Electronic devices should not be damaged permanently or temporarily disabled if exposed to a magnetic field that the side faces the window or any light source • minimizing room light by looking at the middle of the display. • Adjust the display brightness and/or contrast to a comfortable level for enhanced text...
... computers, laptops, cellphones, watches, earphones, speakers, credit cards, magnetic ID cards, etc. Electronic devices should not be damaged permanently or temporarily disabled if exposed to a magnetic field that the side faces the window or any light source • minimizing room light by looking at the middle of the display. • Adjust the display brightness and/or contrast to a comfortable level for enhanced text...
User Manual
Page 9
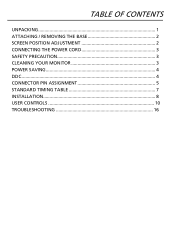
TABLE OF CONTENTS UNPACKING 1 ATTACHING / REMOVING THE BASE 2 SCREEN POSITION ADJUSTMENT 2 CONNECTING THE POWER CORD 3 SAFETY PRECAUTION 3 CLEANING YOUR MONITOR 3 POWER SAVING 4 DDC...4 CONNECTOR PIN ASSIGNMENT 5 STANDARD TIMING TABLE 7 INSTALLATION 8 USER CONTROLS 10 TROUBLESHOOTING 16
TABLE OF CONTENTS UNPACKING 1 ATTACHING / REMOVING THE BASE 2 SCREEN POSITION ADJUSTMENT 2 CONNECTING THE POWER CORD 3 SAFETY PRECAUTION 3 CLEANING YOUR MONITOR 3 POWER SAVING 4 DDC...4 CONNECTOR PIN ASSIGNMENT 5 STANDARD TIMING TABLE 7 INSTALLATION 8 USER CONTROLS 10 TROUBLESHOOTING 16
User Manual
Page 10
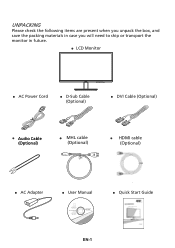
...; User's manual • Quick Start Guide • Acrobat Reader • Register your product WWW.acer.com z Quick Start Guide H236HL/H226HQL/H276HL EN-1 All rights reserved. z LCD Monitor z AC Power Cord z D-Sub Cable (Optional) z DVI Cable (Optional) z Audio Cable (Optional) z MHL cable (Optional) MHL z HDMI cable (Optional) z AC Adapter z User Manual ©2012, Acer Inc. UNPACKING Please check the following items are present when you unpack the box, and save the packing materials in case you will need to...
...; User's manual • Quick Start Guide • Acrobat Reader • Register your product WWW.acer.com z Quick Start Guide H236HL/H226HQL/H276HL EN-1 All rights reserved. z LCD Monitor z AC Power Cord z D-Sub Cable (Optional) z DVI Cable (Optional) z Audio Cable (Optional) z MHL cable (Optional) MHL z HDMI cable (Optional) z AC Adapter z User Manual ©2012, Acer Inc. UNPACKING Please check the following items are present when you unpack the box, and save the packing materials in case you will need to...
User Manual
Page 11
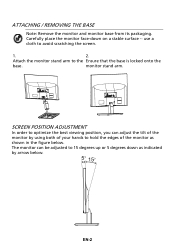
... monitor stand arm to avoid scratching the screen. 1. 2. monitor stand arm. ATTACHING / REMOVING THE BASE Note: Remove the monitor and monitor base from its packaging. The monitor can adjust the tilt of the monitor as shown in the figure below . Carefully place the monitor face-down as indicated by using both of your hands to hold the edges of the monitor by arrow below . SCREEN POSITION ADJUSTMENT In order to optimize the best viewing position...
... monitor stand arm to avoid scratching the screen. 1. 2. monitor stand arm. ATTACHING / REMOVING THE BASE Note: Remove the monitor and monitor base from its packaging. The monitor can adjust the tilt of the monitor as shown in the figure below . Carefully place the monitor face-down as indicated by using both of your hands to hold the edges of the monitor by arrow below . SCREEN POSITION ADJUSTMENT In order to optimize the best viewing position...
User Manual
Page 12
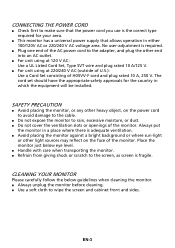
... openings of the AC power cord to the adapter, and plug the other light sources may reflect on the power cord to avoid damage to the cable. z For unit using at 120 V AC: Use a UL Listed Cord Set, Type SVT wire and plug rated 10 A/125 V. z Handle with care when transporting the monitor. EN-3 Place the monitor just below guidelines when cleaning the monitor. z Always unplug the monitor before cleaning. z For unit using...
... openings of the AC power cord to the adapter, and plug the other light sources may reflect on the power cord to avoid damage to the cable. z For unit using at 120 V AC: Use a UL Listed Cord Set, Type SVT wire and plug rated 10 A/125 V. z Handle with care when transporting the monitor. EN-3 Place the monitor just below guidelines when cleaning the monitor. z Always unplug the monitor before cleaning. z For unit using...

User Manual
Page 13
POWER SAVING The monitor will be driven into Power Saving" mode by the control signal from Active OFF state back to Plug and Play with your system if your installation easier, the monitor is able to ON state is a communication protocol through which the monitor automatically informs the host system about its capabilities, for example, supported resolutions and corresponding timing. State ON Power Saving Mode LED Light Blue Amber The power saving states...
POWER SAVING The monitor will be driven into Power Saving" mode by the control signal from Active OFF state back to Plug and Play with your system if your installation easier, the monitor is able to ON state is a communication protocol through which the monitor automatically informs the host system about its capabilities, for example, supported resolutions and corresponding timing. State ON Power Saving Mode LED Light Blue Amber The power saving states...
User Manual
Page 14
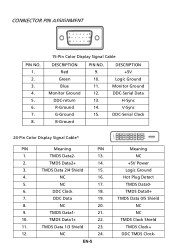
EN-5 Meaning NC +5V Power Logic Ground Hot Plug Detect TMDS Data0TMDS Data0+ TMDS Data 0/5 Shield NC NC TMDS Clock Shield TMDS Clock+ DDC TMDS Clock- DDC Data 19....21. 10. TMDS Data1+ 22. 11. NC 16. 5. NC 17. 6. DESCRIPTION +5V Logic Ground Monitor Ground DDC-Serial Data H-Sync V-Sync DDC-Serial Clock 24-Pin Color Display Signal Cable* PIN Meaning PIN 1. CONNECTOR PIN ASSIGNMENT PIN NO. 1. 2. 3. 4. 5. 6. 7. 8. 15-Pin Color Display Signal Cable DESCRIPTION Red Green Blue Monitor Ground DDC-return R-Ground G-Ground B-Ground PIN NO. 9. 10. 11. 12. 13. 14. 15.
EN-5 Meaning NC +5V Power Logic Ground Hot Plug Detect TMDS Data0TMDS Data0+ TMDS Data 0/5 Shield NC NC TMDS Clock Shield TMDS Clock+ DDC TMDS Clock- DDC Data 19....21. 10. TMDS Data1+ 22. 11. NC 16. 5. NC 17. 6. DESCRIPTION +5V Logic Ground Monitor Ground DDC-Serial Data H-Sync V-Sync DDC-Serial Clock 24-Pin Color Display Signal Cable* PIN Meaning PIN 1. CONNECTOR PIN ASSIGNMENT PIN NO. 1. 2. 3. 4. 5. 6. 7. 8. 15-Pin Color Display Signal Cable DESCRIPTION Red Green Blue Monitor Ground DDC-return R-Ground G-Ground B-Ground PIN NO. 9. 10. 11. 12. 13. 14. 15.
User Manual
Page 17
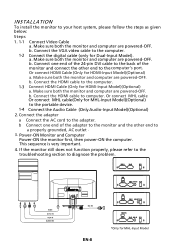
... 1. 1-1 1-2 Connect Video Cable a. Connect the adapter a Connect the AC cord to the portable device. 1-4 Connect the Audio Cable (Only Audio-Input Model)(Optional) 2. Make the digital cable (only sure both the monitor and computer are powered-OFF. b. HDMI DVI-D IN VGA IN AUDIO IN DC-IN VGA EN-8 *Only for MHL-Input Model)(Optional) to the adapter. b. b. Make sure both the monitor afonrdDcuoaml-pInupteurtaMreopdoelw).ered-OFF. b. Or connect MHL cable Or connect MHL cable(Only for MHL-Input Model Power-ON Monitor and Computer Power-ON the monitor...
... 1. 1-1 1-2 Connect Video Cable a. Connect the adapter a Connect the AC cord to the portable device. 1-4 Connect the Audio Cable (Only Audio-Input Model)(Optional) 2. Make the digital cable (only sure both the monitor and computer are powered-OFF. b. HDMI DVI-D IN VGA IN AUDIO IN DC-IN VGA EN-8 *Only for MHL-Input Model)(Optional) to the adapter. b. b. Make sure both the monitor afonrdDcuoaml-pInupteurtaMreopdoelw).ered-OFF. b. Or connect MHL cable Or connect MHL cable(Only for MHL-Input Model Power-ON Monitor and Computer Power-ON the monitor...

User Manual
Page 18
... video and audio from the portable device. EN-9 MHL (Mobile High-Definition Link) (Only for MHL-input Models) Mobile High-Definition Link is not capable of charging a portable device (5 V @ 500 mA). MHL Using MHL MHL-certified portable devices will show a black screen or turn to the portable device changing the output format. Connecting the devices Plug the MHL-certified cable into the display's HDMI...
... video and audio from the portable device. EN-9 MHL (Mobile High-Definition Link) (Only for MHL-input Models) Mobile High-Definition Link is not capable of charging a portable device (5 V @ 500 mA). MHL Using MHL MHL-certified portable devices will show a black screen or turn to the portable device changing the output format. Connecting the devices Plug the MHL-certified cable into the display's HDMI...
User Manual
Page 19
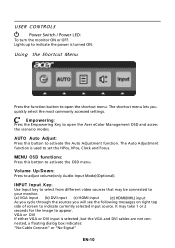
... Acer eColor Management OSD and access the scenario modes. Using the Shortcut Menu Press the function button to indicate currently selected input source. Volume Up/Down: Press to activate the Auto Adjustment function. nected, a floating dialog box indicates: "No Cable Connect" or "No Signal" EN-10 It may be connected to open the shortcut menu. Lights up to appear. USER CONTROLS Power Switch / Power LED: To turn the monitor ON or OFF. VGA or DVI If either VGA or DVI input...
... Acer eColor Management OSD and access the scenario modes. Using the Shortcut Menu Press the function button to indicate currently selected input source. Volume Up/Down: Press to activate the Auto Adjustment function. nected, a floating dialog box indicates: "No Cable Connect" or "No Signal" EN-10 It may be connected to open the shortcut menu. Lights up to appear. USER CONTROLS Power Switch / Power LED: To turn the monitor ON or OFF. VGA or DVI If either VGA or DVI input...
User Manual
Page 20
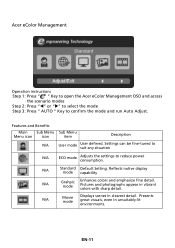
... mode Displays scenes in vibrant colors with sharp detail. Presents great visuals, even in unsuitably-lit environments. Features and Benefits Main Sub Menu Sub Menu Menu icon icon item Description N/A User mode User defined. Settings can be fine-tuned to suit any situation N/A ECO mode Adjusts the settings to confirm the mode and run Auto Adjust. Acer eColor Management Operation instructions Step 1: Press " " Key to open the Acer eColor Management OSD...
... mode Displays scenes in vibrant colors with sharp detail. Presents great visuals, even in unsuitably-lit environments. Features and Benefits Main Sub Menu Sub Menu Menu icon icon item Description N/A User mode User defined. Settings can be fine-tuned to suit any situation N/A ECO mode Adjusts the settings to confirm the mode and run Auto Adjust. Acer eColor Management Operation instructions Step 1: Press " " Key to open the Acer eColor Management OSD...
User Manual
Page 21
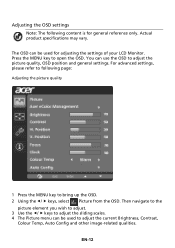
... to the picture element you wish to adjust. 3 Use the e/ f keys to adjust the sliding scales. 4 The Picture menu can be used for general reference only. For advanced settings, please refer to following content is for adjusting the settings of your LCD Monitor. Adjusting the OSD settings Note: The following page: Adjusting the picture quality 1 Press the MENU key to adjust the current Brightness, Contrast, Colour Temp, Auto Config and other image-related...
... to the picture element you wish to adjust. 3 Use the e/ f keys to adjust the sliding scales. 4 The Picture menu can be used for general reference only. For advanced settings, please refer to following content is for adjusting the settings of your LCD Monitor. Adjusting the OSD settings Note: The following page: Adjusting the picture quality 1 Press the MENU key to adjust the current Brightness, Contrast, Colour Temp, Auto Config and other image-related...
User Manual
Page 23
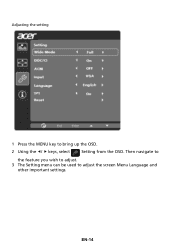
EN-14 Then navigate to the feature you wish to adjust. 3 The Setting menu can be used to bring up the OSD. 2 Using the e/ f keys, select Setting from the OSD. Adjusting the setting 1 Press the MENU key to adjust the screen Menu Language and other important settings.
EN-14 Then navigate to the feature you wish to adjust. 3 The Setting menu can be used to bring up the OSD. 2 Using the e/ f keys, select Setting from the OSD. Adjusting the setting 1 Press the MENU key to adjust the screen Menu Language and other important settings.
User Manual
Page 25
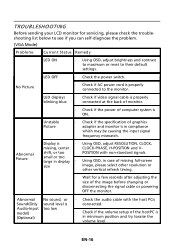
... problem. (VGA Mode) Problems Current Status Remedy LED ON · Using OSD, adjust brightness and contrast to maximum or reset to the monitor. LED OFF · Check the power switch. EN-16 No Picture · Check if AC power cord is ON. LED displays blinking blue · Check if video signal cable is properly connected at the back of monitor. · Check if the power of computer system is properly connected to their default settings. shift, or too POSITION with the host PCis connected. · Check if the volume setup...
... problem. (VGA Mode) Problems Current Status Remedy LED ON · Using OSD, adjust brightness and contrast to maximum or reset to the monitor. LED OFF · Check the power switch. EN-16 No Picture · Check if AC power cord is ON. LED displays blinking blue · Check if video signal cable is properly connected at the back of monitor. · Check if the power of computer system is properly connected to their default settings. shift, or too POSITION with the host PCis connected. · Check if the volume setup...
User Manual
Page 26
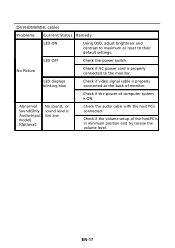
No Picture LED OFF LED displays blinking blue · Check the power switch. · Check if AC power cord is properly connected to their default settings. Abnormal Sound(Only Audio-Input model) (Optional) No sound, or sound level is too low · Check the audio cable with the host PCis connected. · Check if the volume setup of computer system is in minimum position and try toraise the volume level. (DVI/HDMI/MHL cable) Problems Current Status Remedy LED ON · Using OSD, adjust brightness and contrast to maximum or reset to...
No Picture LED OFF LED displays blinking blue · Check the power switch. · Check if AC power cord is properly connected to their default settings. Abnormal Sound(Only Audio-Input model) (Optional) No sound, or sound level is too low · Check the audio cable with the host PCis connected. · Check if the volume setup of computer system is in minimum position and try toraise the volume level. (DVI/HDMI/MHL cable) Problems Current Status Remedy LED ON · Using OSD, adjust brightness and contrast to maximum or reset to...

