User Manual
Page 2
...Record the model number, serial number, purchase date and place of Acer Incorporated. Acer Incorporated. Acer LCD Monitor User Guide Model number Serial number Date of purchase Place of such revisions or changes. Copyright © 2008. Acer LCD Monitor User Guide Original Issue: 08/2008 Changes may be reproduced, ...stored in a retrieval system, or transmitted, in any form or by any person of purchase Acer and the Acer logo are recorded on the label affixed ...
...Record the model number, serial number, purchase date and place of Acer Incorporated. Acer Incorporated. Acer LCD Monitor User Guide Model number Serial number Date of purchase Place of such revisions or changes. Copyright © 2008. Acer LCD Monitor User Guide Original Issue: 08/2008 Changes may be reproduced, ...stored in a retrieval system, or transmitted, in any form or by any person of purchase Acer and the Acer logo are recorded on the label affixed ...
User Manual
Page 3
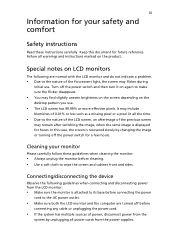
...and comfort Safety instructions Read these guidelines when cleaning the monitor: • Always unplug the monitor before connecting the power cord to the AC power outlet. • Make sure both the LCD monitor and the computer are normal with the LCD monitor and do not indicate a problem. • Due to... may find slightly uneven brightness on the screen depending on the desktop pattern you use . Follow all power cords from the LCD monitor: • Make sure the monitor is attached to its base before cleaning. • Use a soft cloth to make sure the flicker disappears. • ...
...and comfort Safety instructions Read these guidelines when cleaning the monitor: • Always unplug the monitor before connecting the power cord to the AC power outlet. • Make sure both the LCD monitor and the computer are normal with the LCD monitor and do not indicate a problem. • Due to... may find slightly uneven brightness on the screen depending on the desktop pattern you use . Follow all power cords from the LCD monitor: • Make sure the monitor is attached to its base before cleaning. • Use a soft cloth to make sure the flicker disappears. • ...
User Manual
Page 7
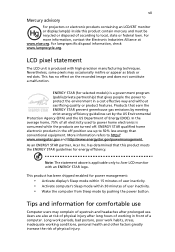
...30 minutes of according to local, state or federal laws. vii Mercury advisory For projectors or electronic products containing an LCD/CRT monitor or display:lamp(s) inside this product meets the ENERGY STAR guidelines for selected models) is consumed while the products are... www.energystar.gov and http://www.energystar.gov/powermanagement. ENERGY STAR (for energy efficiency. Products that gives people the power to Acer LCD monitor with high-precision manufacturing techniques. In the average home, 75% of physical injury. ENERGY STAR qualified home electronic products in front...
...30 minutes of according to local, state or federal laws. vii Mercury advisory For projectors or electronic products containing an LCD/CRT monitor or display:lamp(s) inside this product meets the ENERGY STAR guidelines for selected models) is consumed while the products are... www.energystar.gov and http://www.energystar.gov/powermanagement. ENERGY STAR (for energy efficiency. Products that gives people the power to Acer LCD monitor with high-precision manufacturing techniques. In the average home, 75% of physical injury. ENERGY STAR qualified home electronic products in front...
User Manual
Page 8
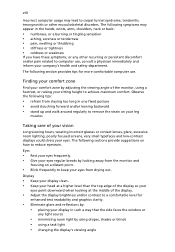
... stand up and walk around regularly to achieve maximum comfort. Finding your comfort zone Find your comfort zone by adjusting the viewing angle of the monitor, using a task light • changing the display's viewing angle Display • Keep your display clean. • Keep your head at ... regular breaks by looking at the middle of the display. • Adjust the display brightness and/or contrast to keep your eyes from the monitor and focusing on a distant point. • Blink frequently to a comfortable level for more comfortable computer use , consult a physician immediately and ...
... stand up and walk around regularly to achieve maximum comfort. Finding your comfort zone Find your comfort zone by adjusting the viewing angle of the monitor, using a task light • changing the display's viewing angle Display • Keep your display clean. • Keep your head at ... regular breaks by looking at the middle of the display. • Adjust the display brightness and/or contrast to keep your eyes from the monitor and focusing on a distant point. • Blink frequently to a comfortable level for more comfortable computer use , consult a physician immediately and ...

User Manual
Page 9
...District, Shanghai, China Contact Person: Mr. Easy Lai Tel: 886-2-8691-3089 Fax: 886-2-8691-3000 E-mail: easy_lai@acer.com.tw Hereby declare that: Product: LCD Monitor Trade Name: Acer Model Number: H213H SKU Number: H213Hxxx("x" = 0~9, a ~ z, or A ~ Z) or blank Is compliant with ...the requirements. Easy Lai / Director Acer Computer (Shanghai) Limited ix • using a glare-reduction filter • using a display ...
...District, Shanghai, China Contact Person: Mr. Easy Lai Tel: 886-2-8691-3089 Fax: 886-2-8691-3000 E-mail: easy_lai@acer.com.tw Hereby declare that: Product: LCD Monitor Trade Name: Acer Model Number: H213H SKU Number: H213Hxxx("x" = 0~9, a ~ z, or A ~ Z) or blank Is compliant with ...the requirements. Easy Lai / Director Acer Computer (Shanghai) Limited ix • using a glare-reduction filter • using a display ...
User Manual
Page 10
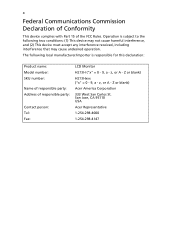
... may cause undesired operation. z, or A - x Federal Communications Commission Declaration of Conformity This device complies with Part 15 of responsible party: Contact person: Tel: Fax: LCD Monitor H213H ("x" = 0 - 9, a - Z or blank) Acer America Corporation 333 West San Carlos St. San Jose, CA 95110 USA Acer Representative 1-254-298-4000 1-254-298-4147 Z or blank) H213Hxxx ("x" = 0 - 9, a - z, or A -
... may cause undesired operation. z, or A - x Federal Communications Commission Declaration of Conformity This device complies with Part 15 of responsible party: Contact person: Tel: Fax: LCD Monitor H213H ("x" = 0 - 9, a - Z or blank) Acer America Corporation 333 West San Carlos St. San Jose, CA 95110 USA Acer Representative 1-254-298-4000 1-254-298-4147 Z or blank) H213Hxxx ("x" = 0 - 9, a - z, or A -
User Manual
Page 11
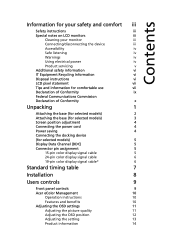
... on LCD monitors iii Cleaning your monitor iii Connecting/disconnecting the device iii Accessibility iv Safe listening iv Warnings iv Using electrical power iv Product servicing v Additional safety information vi IT Equipment Recycling Information vi Disposal instructions vi LCD pixel...6 19-pin color display signal cable* 6 Standard timing table 7 Installation 8 Users controls 9 Front panel controls 9 Acer eColor Management 10 Operation instructions 10 Features and benefits 10 Adjusting the OSD settings 11 Adjusting the picture quality 11 Adjusting the...
... on LCD monitors iii Cleaning your monitor iii Connecting/disconnecting the device iii Accessibility iv Safe listening iv Warnings iv Using electrical power iv Product servicing v Additional safety information vi IT Equipment Recycling Information vi Disposal instructions vi LCD pixel...6 19-pin color display signal cable* 6 Standard timing table 7 Installation 8 Users controls 9 Front panel controls 9 Acer eColor Management 10 Operation instructions 10 Features and benefits 10 Adjusting the OSD settings 11 Adjusting the picture quality 11 Adjusting the...
User Manual
Page 13
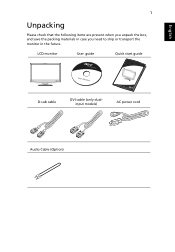
LCD monitor User guide Quick start guide D-sub cable DVI cable (only dualinput models) AC power cord Audio Cable (Option) English 1 Unpacking Please check that the following items are present when you unpack the box, and save the packing materials in case you need to ship or transport the monitor in the future.
LCD monitor User guide Quick start guide D-sub cable DVI cable (only dualinput models) AC power cord Audio Cable (Option) English 1 Unpacking Please check that the following items are present when you unpack the box, and save the packing materials in case you need to ship or transport the monitor in the future.
User Manual
Page 14
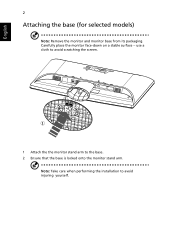
Note: Take care when performing the installation to the base. 2 Ensure that the base is locked onto the monitor stand arm. use a cloth to avoid scratching the screen. 2 1 1 Attach the the monitor stand arm to avoid injuring yourself. English 2 Attaching the base (for selected models) Note: Remove the monitor and monitor base from its packaging. Carefully place the monitor face-down on a stable surface --
Note: Take care when performing the installation to the base. 2 Ensure that the base is locked onto the monitor stand arm. use a cloth to avoid scratching the screen. 2 1 1 Attach the the monitor stand arm to avoid injuring yourself. English 2 Attaching the base (for selected models) Note: Remove the monitor and monitor base from its packaging. Carefully place the monitor face-down on a stable surface --
User Manual
Page 15
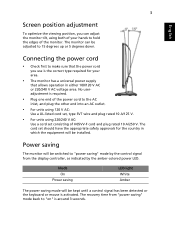
...controller, as indicated by the control signal from "power saving" mode back to "power saving" mode by the amber-colored power LED. Power saving The monitor will be switched to "on" is around 3 seconds. 3 English Screen position adjustment To optimize the viewing position, you use is the correct type ...or the keyboard or mouse is required. • Plug one end of the power cord to 15 degrees up or 5 degrees down. The monitor can adjust the monitor tilt, using 220/240 V AC: Use a cord set should have the appropriate safety approvals for your hands to hold the edges of ...
...controller, as indicated by the control signal from "power saving" mode back to "power saving" mode by the amber-colored power LED. Power saving The monitor will be switched to "on" is around 3 seconds. 3 English Screen position adjustment To optimize the viewing position, you use is the correct type ...or the keyboard or mouse is required. • Plug one end of the power cord to 15 degrees up or 5 degrees down. The monitor can adjust the monitor tilt, using 220/240 V AC: Use a cord set should have the appropriate safety approvals for your hands to hold the edges of ...
User Manual
Page 16
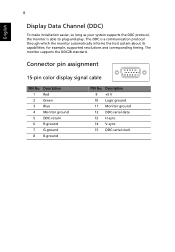
... Data Channel (DDC) To make installation easier, so long as your system supports the DDC protocol, the monitor is a communication protocol through which the monitor automatically informs the host system about its capabilities; Description 9 +5 V 10 Logic ground 11 Monitor ground 12 DDC-serial data 13 H-sync 14 V-sync 15 DDC-serial clock The...
... Data Channel (DDC) To make installation easier, so long as your system supports the DDC protocol, the monitor is a communication protocol through which the monitor automatically informs the host system about its capabilities; Description 9 +5 V 10 Logic ground 11 Monitor ground 12 DDC-serial data 13 H-sync 14 V-sync 15 DDC-serial clock The...
User Manual
Page 19
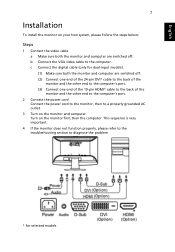
... VGA video cable to diagnose the problem * for dual-input models). (1) Make sure both the monitor and computer are switched off. (2) Connect one end of the 24-pin DVI* cable to the back of the monitor and the other end to the computer's port. (3) Connect one end of the 19-pin HDMI...* cable to the back of the monitor and the other end to the computer's port. 2 Connect the power cord Connect the...
... VGA video cable to diagnose the problem * for dual-input models). (1) Make sure both the monitor and computer are switched off. (2) Connect one end of the 24-pin DVI* cable to the back of the monitor and the other end to the computer's port. (3) Connect one end of the 19-pin HDMI...* cable to the back of the monitor and the other end to the computer's port. 2 Connect the power cord Connect the...
User Manual
Page 20
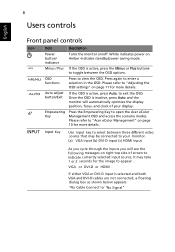
...-D or HDMI If either VGA or DVI-D input is active, press Auto to "Adjusting the OSD settings" on . Empowering Key Press the Empowering Key to "Acer eColor Management" on /off. White indicates power on page 11 for more details. Auto adjust button/Exit If the OSD is selected and both VGA... below appears: "No Cable Connect"or "No S ignal" Amber indicates standby/power saving mode. / Minus / Plus If the OSD is inactive, press Auto and the monitor will see the following messages on right top side of your display. Please refer to exit the OSD. It may be connected to your...
...-D or HDMI If either VGA or DVI-D input is active, press Auto to "Adjusting the OSD settings" on . Empowering Key Press the Empowering Key to "Acer eColor Management" on /off. White indicates power on page 11 for more details. Auto adjust button/Exit If the OSD is selected and both VGA... below appears: "No Cable Connect"or "No S ignal" Amber indicates standby/power saving mode. / Minus / Plus If the OSD is inactive, press Auto and the monitor will see the following messages on right top side of your display. Please refer to exit the OSD. It may be connected to your...
User Manual
Page 22
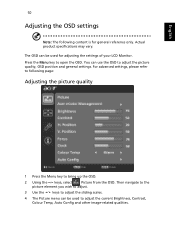
... to adjust the picture quality, OSD position and general settings. For advanced settings, please refer to following content is for adjusting the settings of your LCD Monitor. You can be used for general reference only. Actual product specifications may vary. The OSD can use the OSD to bring up the OSD. 2 Using...
... to adjust the picture quality, OSD position and general settings. For advanced settings, please refer to following content is for adjusting the settings of your LCD Monitor. You can be used for general reference only. Actual product specifications may vary. The OSD can use the OSD to bring up the OSD. 2 Using...
User Manual
Page 25
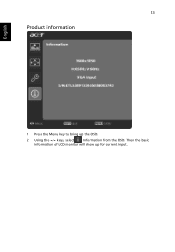
13 Product information English 1 Press the Menu key to bring up for current input. Then the basic information of LCD monitor will show up the OSD. 2 Using the / keys, select Information from the OSD.
13 Product information English 1 Press the Menu key to bring up for current input. Then the basic information of LCD monitor will show up the OSD. 2 Using the / keys, select Information from the OSD.
User Manual
Page 26
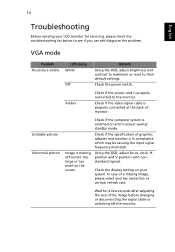
...please check the troubleshooting list below to their default settings. 14 English Troubleshooting Before sending your system. Check if the specification of monitor. In case of the image before changing or disconnecting the signal cable or switching off -center, too large or too small on your... LCD monitor for a few seconds after adjusting the size of a missing image, please select another resolution or vertical refresh rate. Unstable picture Abnormal ...
...please check the troubleshooting list below to their default settings. 14 English Troubleshooting Before sending your system. Check if the specification of monitor. In case of the image before changing or disconnecting the signal cable or switching off -center, too large or too small on your... LCD monitor for a few seconds after adjusting the size of a missing image, please select another resolution or vertical refresh rate. Unstable picture Abnormal ...
User Manual
Page 27
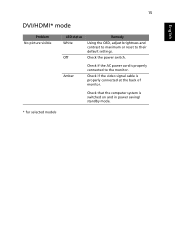
Check the power switch. Check if the video signal cable is switched on and in power saving/ standby mode. * for selected models Check that the computer system is properly connected at the back of monitor. Amber Check if the AC power cord is properly connected to their default settings. 15 English DVI/HDMI* mode Problem No picture visible LED status White Off Remedy Using the OSD, adjust brightness and contrast to maximum or reset to the monitor.
Check the power switch. Check if the video signal cable is switched on and in power saving/ standby mode. * for selected models Check that the computer system is properly connected at the back of monitor. Amber Check if the AC power cord is properly connected to their default settings. 15 English DVI/HDMI* mode Problem No picture visible LED status White Off Remedy Using the OSD, adjust brightness and contrast to maximum or reset to the monitor.


