Altos G540 User's Guide EN
Page 8
...cage 41 Removing a HDD cage 44 Installing an additional hard drive 45 Configuring a 5-25 inch storage device 48 Upgrading the processor 50 Upgrading the system memory 55 Installing an expansion card 60 Installing the SAS controller board 62 Installing the BMC module 63...71 Entering BIOS setup 72 BIOS setup primary menus 72 BIOS setup navigation keys 73 Main menu 74 Advanced menu 75 Advanced Processor Options 76 Memory Configuration 78 Advanced Chipset Control 79 PCI Configuration 80 I/O Device Configuration 81 IDE Configuration 83 Floppy Configuration 85...
...cage 41 Removing a HDD cage 44 Installing an additional hard drive 45 Configuring a 5-25 inch storage device 48 Upgrading the processor 50 Upgrading the system memory 55 Installing an expansion card 60 Installing the SAS controller board 62 Installing the BMC module 63...71 Entering BIOS setup 72 BIOS setup primary menus 72 BIOS setup navigation keys 73 Main menu 74 Advanced menu 75 Advanced Processor Options 76 Memory Configuration 78 Advanced Chipset Control 79 PCI Configuration 80 I/O Device Configuration 81 IDE Configuration 83 Floppy Configuration 85...

Altos G540 User's Guide EN
Page 12
It host a range of various network environments. From simple networking functions to meet the needs of powerful and flexible features designed to computing intensive applications, the Altos G540 delivers. The Acer Altos G540 server is a fully modular dual-processor system featuring the latest in computing technology.
It host a range of various network environments. From simple networking functions to meet the needs of powerful and flexible features designed to computing intensive applications, the Altos G540 delivers. The Acer Altos G540 server is a fully modular dual-processor system featuring the latest in computing technology.
Altos G540 User's Guide EN
Page 13
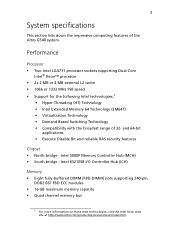
... Eight fully-buffered DIMM (FBD-DIMM) slots supporting 240-pin, DDR2 667 FBD ECC modules • 16 GB maximum memory capacity • Quad channel memory bus 1 For more information on these Intel technologies, visit the Intel...processor • 2x 2 MB or 4 MB external L2 cache • 1066 or 1333 MHz FSB speed • Support for the following Intel technologies:1 • Hyper-Threading (HT) Technology • Intel Extended Memory 64 Technology (EM64T) • Virtualization Technology • Demand Based Switching Technology • Compatibility with the broadest range of the Altos G540...
... Eight fully-buffered DIMM (FBD-DIMM) slots supporting 240-pin, DDR2 667 FBD ECC modules • 16 GB maximum memory capacity • Quad channel memory bus 1 For more information on these Intel technologies, visit the Intel...processor • 2x 2 MB or 4 MB external L2 cache • 1066 or 1333 MHz FSB speed • Support for the following Intel technologies:1 • Hyper-Threading (HT) Technology • Intel Extended Memory 64 Technology (EM64T) • Virtualization Technology • Demand Based Switching Technology • Compatibility with the broadest range of the Altos G540...
Altos G540 User's Guide EN
Page 25
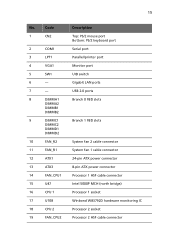
... USB 2.0 ports Branch 0 FBD slots Branch 1 FBD slots System fan 2 cable connector System fan 1 cable connector 24-pin ATX power connector 8-pin ATX power connector Processor 1 HSF cable connector Intel 5000P MCH (north bridge) Processor 1 socket Winbond W83792D hardware monitoring IC Processor 2 socket Processor 2 HSF cable connector
... USB 2.0 ports Branch 0 FBD slots Branch 1 FBD slots System fan 2 cable connector System fan 1 cable connector 24-pin ATX power connector 8-pin ATX power connector Processor 1 HSF cable connector Intel 5000P MCH (north bridge) Processor 1 socket Winbond W83792D hardware monitoring IC Processor 2 socket Processor 2 HSF cable connector
Altos G540 User's Guide EN
Page 47
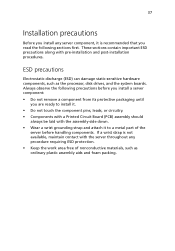
Always observe the following sections first. 37 Installation precautions Before you are ready to a metal part of nonconductive materials, such as the processor, disk drives, and the system boards. ESD precautions Electrostatic discharge (ESD) can damage static-sensitive hardware components, such as ordinary plastic assembly aids and foam ...
Always observe the following sections first. 37 Installation precautions Before you are ready to a metal part of nonconductive materials, such as the processor, disk drives, and the system boards. ESD precautions Electrostatic discharge (ESD) can damage static-sensitive hardware components, such as ordinary plastic assembly aids and foam ...
Altos G540 User's Guide EN
Page 60
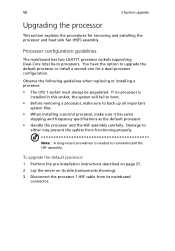
... the option to back up all important system files. • When installing a second processor, make sure to upgrade the default processor or install a second one for removing and installing the processor and heat sink fan (HSF) assembly. Note: A long-nosed screwdriver is installed in... system will fail to boot. • Before removing a processor, make sure it has same stepping and frequency specifications as the default processor. • Handle the processor and the HSF assembly carefully. To upgrade the default processor: 1 Perform the pre-installation instructions described on page 37....
... the option to back up all important system files. • When installing a second processor, make sure to upgrade the default processor or install a second one for removing and installing the processor and heat sink fan (HSF) assembly. Note: A long-nosed screwdriver is installed in... system will fail to boot. • Before removing a processor, make sure it has same stepping and frequency specifications as the default processor. • Handle the processor and the HSF assembly carefully. To upgrade the default processor: 1 Perform the pre-installation instructions described on page 37....
Altos G540 User's Guide EN
Page 61
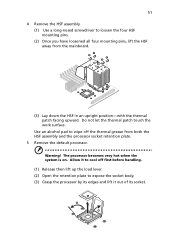
Warning! Use an alcohol pad to expose the socket body. (3) Grasp the processor by its edges and lift it to cool off first before handling. (1) Release then lift up the load lever. (2) Open the retention plate to wipe ... loosen the four HSF mounting pins. (2) Once you have loosened all four mounting pins, lift the HSF away from both the HSF assembly and the processor socket retention plate. 5 Remove the default processor. The processor becomes very hot when the system is on. Do not let the thermal patch touch the work surface.
Warning! Use an alcohol pad to expose the socket body. (3) Grasp the processor by its edges and lift it to cool off first before handling. (1) Release then lift up the load lever. (2) Open the retention plate to wipe ... loosen the four HSF mounting pins. (2) Once you have loosened all four mounting pins, lift the HSF away from both the HSF assembly and the processor socket retention plate. 5 Remove the default processor. The processor becomes very hot when the system is on. Do not let the thermal patch touch the work surface.

Altos G540 User's Guide EN
Page 62
... the processor by its edges, then insert it in such a way that the alignment tabs on the socket fit the two notch located on the edge of an Acer-approved thermal interface material before installing the HSF. Make sure that only a very thin layer is applied so that both the HSF assembly... and the processor socket retention plate. (2) Apply a thin layer of the...
... the processor by its edges, then insert it in such a way that the alignment tabs on the socket fit the two notch located on the edge of an Acer-approved thermal interface material before installing the HSF. Make sure that only a very thin layer is applied so that both the HSF assembly... and the processor socket retention plate. (2) Apply a thin layer of the...
Altos G540 User's Guide EN
Page 63
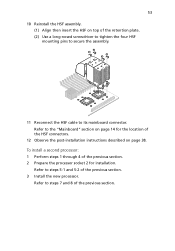
53 10 Reinstall the HSF assembly. (1) Align then insert the HSF on page 38. To install a second processor: 1 Perform steps 1 through 4 of the retention plate. (2) Use a long-nosed screwdriver to tighten the four HSF mounting pins to secure the assembly. 11 Reconnect the ... on page 14 for the location of the HSF connectors. 12 Observe the post-installation instructions described on top of the previous section. 2 Prepare the processor socket 2 for installation. Refer to steps 7 and 8 of the previous section. 3 Install the new...
53 10 Reinstall the HSF assembly. (1) Align then insert the HSF on page 38. To install a second processor: 1 Perform steps 1 through 4 of the retention plate. (2) Use a long-nosed screwdriver to tighten the four HSF mounting pins to secure the assembly. 11 Reconnect the ... on page 14 for the location of the HSF connectors. 12 Observe the post-installation instructions described on top of the previous section. 2 Prepare the processor socket 2 for installation. Refer to steps 7 and 8 of the previous section. 3 Install the new...
Altos G540 User's Guide EN
Page 70
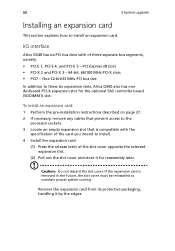
...slot cover. Remove the expansion card from its protective packaging, handling it for the optional SAS controller board (SODIMM1) slot. I/O interface Altos G540 has six PCI bus slots with the specification of the card you intend to maintain proper system cooling. To install an expansion card: ...1 Perform the pre-installation instructions described on page 37. 2 If necessary, remove any cables that prevent access to the processor sockets. 3 Locate an empty expansion slot that is removed in the future, the slot cover must be reinstalled to install. 4 Install the...
...slot cover. Remove the expansion card from its protective packaging, handling it for the optional SAS controller board (SODIMM1) slot. I/O interface Altos G540 has six PCI bus slots with the specification of the card you intend to maintain proper system cooling. To install an expansion card: ...1 Perform the pre-installation instructions described on page 37. 2 If necessary, remove any cables that prevent access to the processor sockets. 3 Locate an empty expansion slot that is removed in the future, the slot cover must be reinstalled to install. 4 Install the...
Altos G540 User's Guide EN
Page 84
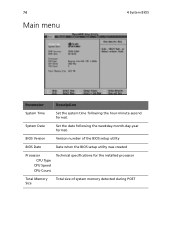
74 Main menu 4 System BIOS Parameter Description System Time Set the system time following the weekday-month-day-year format. BIOS Version Version number of the BIOS setup utility BIOS Date Date when the BIOS setup utility was created Processor CPU Type CPU Speed CPU Count Technical specifications for the installed processor Total Memory Size Total size of system memory detected during POST System Date Set the date following the hour-minute-second format.
74 Main menu 4 System BIOS Parameter Description System Time Set the system time following the weekday-month-day-year format. BIOS Version Version number of the BIOS setup utility BIOS Date Date when the BIOS setup utility was created Processor CPU Type CPU Speed CPU Count Technical specifications for the installed processor Total Memory Size Total size of system memory detected during POST System Date Set the date following the hour-minute-second format.
Altos G540 User's Guide EN
Page 86
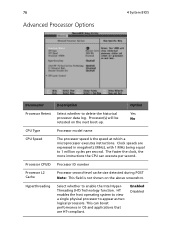
... can boost performance in OS and applications that are expressed in megahertz (MHz), with 1 MHz being equal to delete the historical Yes processor data log. Processor CPUID Processor ID number Processor L2 Cache Processor second-level cache size detected during POST Note: This field is the speed at which a microprocessor executes instructions. Clock speeds are...
... can boost performance in OS and applications that are expressed in megahertz (MHz), with 1 MHz being equal to delete the historical Yes processor data log. Processor CPUID Processor ID number Processor L2 Cache Processor second-level cache size detected during POST Note: This field is the speed at which a microprocessor executes instructions. Clock speeds are...

Altos G540 User's Guide EN
Page 87
... Virtualization Technology C1 Enhanced Mode CPU Cache Control Description Option Select whether to enable the C1 Enhanced mode for the processor. VT allows a single platform to run in independent partitions. Enabled Disabled Select whether to enable the Intel Virtualization ...Technology function. Press Enter to enable the speculative prefetch unit of the processor. If enabled, all logical processors in a physical processor will run during system debugging. Adjacent Cache Line Prefetch When enabled, cache lines are fetched in pairs....
... Virtualization Technology C1 Enhanced Mode CPU Cache Control Description Option Select whether to enable the C1 Enhanced mode for the processor. VT allows a single platform to run in independent partitions. Enabled Disabled Select whether to enable the Intel Virtualization ...Technology function. Press Enter to enable the speculative prefetch unit of the processor. If enabled, all logical processors in a physical processor will run during system debugging. Adjacent Cache Line Prefetch When enabled, cache lines are fetched in pairs....

Altos G540 User's Guide EN
Page 113
If applicable, ensure that comes with the tested components lists? • Are all internal cables correctly connected and secured? • Are the processors fully seated in their mainboard sockets? • Are all standoffs in the proper location and not touching any components, causing a potential short? • Are all ...
If applicable, ensure that comes with the tested components lists? • Are all internal cables correctly connected and secured? • Are the processors fully seated in their mainboard sockets? • Are all standoffs in the proper location and not touching any components, causing a potential short? • Are all ...
Altos G540 User's Guide EN
Page 116
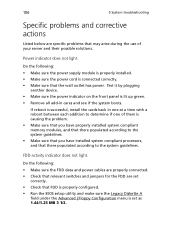
... have properly installed system compliant memory modules, and that there populated according to the system guidelines. • Make sure that you have installed system compliant processors, and that there populated according to determine if one of your server and their possible solutions. Power indicator does not light. Do the following : •...
... have properly installed system compliant memory modules, and that there populated according to the system guidelines. • Make sure that you have installed system compliant processors, and that there populated according to determine if one of your server and their possible solutions. Power indicator does not light. Do the following : •...
Altos G540 User's Guide EN
Page 119
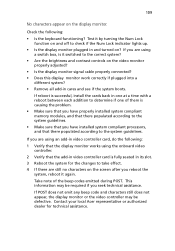
...one of the beep codes emitted during POST. Take note of them is causing the problem. • Make sure that you have installed system compliant processors, and that the add-in video controller card is successful, install the cards back in one at a time with a reboot between each addition ...to the system guidelines. Contact your local Acer representative or authorized dealer for the changes to check if the Num Lock indicator lights up. • Is the display monitor plugged in its slot...
...one of the beep codes emitted during POST. Take note of them is causing the problem. • Make sure that you have installed system compliant processors, and that the add-in video controller card is successful, install the cards back in one at a time with a reboot between each addition ...to the system guidelines. Contact your local Acer representative or authorized dealer for the changes to check if the Num Lock indicator lights up. • Is the display monitor plugged in its slot...
Altos G540 User's Guide EN
Page 123
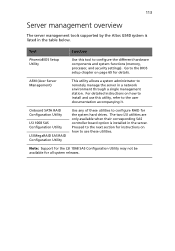
... Use this utility, refer to configure the different hardware components and system functions (memory, processor, and security settings). For detailed instructions on page 69 for instructions on how to use...LSI 1068 SAS Configuration Utility may not be available for the system hard drives. ASM (Acer Server Management) This utility allows a system administrator to configure RAID for all system releases....of these utilities. 113 Server management overview The server management tools supported by the Altos G540 system is installed in the server. Go to the BIOS setup chapter on how...
... Use this utility, refer to configure the different hardware components and system functions (memory, processor, and security settings). For detailed instructions on page 69 for instructions on how to use...LSI 1068 SAS Configuration Utility may not be available for the system hard drives. ASM (Acer Server Management) This utility allows a system administrator to configure RAID for all system releases....of these utilities. 113 Server management overview The server management tools supported by the Altos G540 system is installed in the server. Go to the BIOS setup chapter on how...

Altos G540 User's Guide EN
Page 143
... Numerics 5.25 inch device bays install 48 location 9 supported devices 4 A Acer EasyBUILD scope 31 using 31 air duct location 13 remove 57 ARMC/3 module ...connections 42 Basic Input/Output System, see BIOS 71 BIOS CMOS RAM 71 configure 72 overview 71 BIOS Setup Advanced Chipset Control 79 Advanced menu 75 Advanced Processor Options 76 Boot Configuration 86 Boot menu 96 Console Redirection 93...time diagnostic screen 86 boot-up sequence 96 C cable arm 130 CMOS battery 16 CMOS clear jumper 16 CMOS RAM 71 console redirection 93 D DMI event log BIOS settings 87 view 88 DVD-ROM drive location 9 remove ...
... Numerics 5.25 inch device bays install 48 location 9 supported devices 4 A Acer EasyBUILD scope 31 using 31 air duct location 13 remove 57 ARMC/3 module ...connections 42 Basic Input/Output System, see BIOS 71 BIOS CMOS RAM 71 configure 72 overview 71 BIOS Setup Advanced Chipset Control 79 Advanced menu 75 Advanced Processor Options 76 Boot Configuration 86 Boot menu 96 Console Redirection 93...time diagnostic screen 86 boot-up sequence 96 C cable arm 130 CMOS battery 16 CMOS clear jumper 16 CMOS RAM 71 console redirection 93 D DMI event log BIOS settings 87 view 88 DVD-ROM drive location 9 remove ...
Altos G540 User's Guide EN
Page 145
...status indicator, description 23 status indicator, location 12 power-on password 89 power-on self-test, see POST 29 processor BIOS information 74 BIOS settings 76 configuration guidelines 50 remove 51 sockets location 15 upgrade 50 PS/2 keyboard port 11 ...chipset 3 environmental 6 hardware monitoring 5 I/O ports 5 mechanical 6 media storage 4 memory 3 networking 4 operating system 5 PCI interface 4 power supply 5 processor 3 server management 5 system fan 5 video controller 4 status/fault indicator description 21 location 9 supervisor password 89 system boards ARMC/3 module 20 backplane board 17...
...status indicator, description 23 status indicator, location 12 power-on password 89 power-on self-test, see POST 29 processor BIOS information 74 BIOS settings 76 configuration guidelines 50 remove 51 sockets location 15 upgrade 50 PS/2 keyboard port 11 ...chipset 3 environmental 6 hardware monitoring 5 I/O ports 5 mechanical 6 media storage 4 memory 3 networking 4 operating system 5 PCI interface 4 power supply 5 processor 3 server management 5 system fan 5 video controller 4 status/fault indicator description 21 location 9 supervisor password 89 system boards ARMC/3 module 20 backplane board 17...

Altos G540 User's Guide EN
Page 146
... 64 BMC module 63 ESD precautions 37 expansion card 60 hard drive 41 installation precautions 37 memory 55 post-installation instructions 38 preinstallation instructions 38 processor 50 redundant power supply module 66 SAS controller board 62 T thermal grease 52 troubleshooting display problems 109 DVD-ROM drive problems 107 FAQ 106 FDD...
... 64 BMC module 63 ESD precautions 37 expansion card 60 hard drive 41 installation precautions 37 memory 55 post-installation instructions 38 preinstallation instructions 38 processor 50 redundant power supply module 66 SAS controller board 62 T thermal grease 52 troubleshooting display problems 109 DVD-ROM drive problems 107 FAQ 106 FDD...


