
User Manual
Page 1
TABLE OF CONTENTS Special notes on LCD monitors 1 Information for your safety and comfort 2 Unpacking 5 Attaching/Removing the base 6 Screen position adjustment 6 Connecting the power cord 7 Safety precaution 7 Cleaning your monitor 7 Power saving 8 DDC 8 Connector Pin Assignment 9 Standard Timing Table 11 Installation 14 User controls 15 Troubleshooting 21
TABLE OF CONTENTS Special notes on LCD monitors 1 Information for your safety and comfort 2 Unpacking 5 Attaching/Removing the base 6 Screen position adjustment 6 Connecting the power cord 7 Safety precaution 7 Cleaning your monitor 7 Power saving 8 DDC 8 Connector Pin Assignment 9 Standard Timing Table 11 Installation 14 User controls 15 Troubleshooting 21
User Manual
Page 4
... work by a qualified technician to restore the product to normal condition. nel when: • the power cord or plug is produced with high-precision manufacturing techniques. Users are covered by adjusting the viewing angle of the monitor, using a footrest, or raising your sitting height to achieve maximum comfort. Finding your comfort zone Find...
... work by a qualified technician to restore the product to normal condition. nel when: • the power cord or plug is produced with high-precision manufacturing techniques. Users are covered by adjusting the viewing angle of the monitor, using a footrest, or raising your sitting height to achieve maximum comfort. Finding your comfort zone Find...
User Manual
Page 6
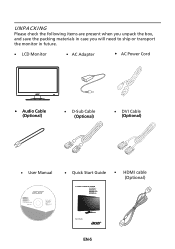
UNPACKING Please check the following items are present when you unpack the box, and save the packing materials in case you will need to ship or transport the monitor in future. LCD Monitor AC Adapter AC Power Cord · Audio Cable (Optional) D-Sub Cable (Optional) DVI Cable (Optional) User Manual G196WL G206HL G226HQL G236HL LCD monitor MU.LUZ00.001 Quick Start Guide HDMI cable (Optional) G196WL EN-5
UNPACKING Please check the following items are present when you unpack the box, and save the packing materials in case you will need to ship or transport the monitor in future. LCD Monitor AC Adapter AC Power Cord · Audio Cable (Optional) D-Sub Cable (Optional) DVI Cable (Optional) User Manual G196WL G206HL G226HQL G236HL LCD monitor MU.LUZ00.001 Quick Start Guide HDMI cable (Optional) G196WL EN-5
User Manual
Page 8
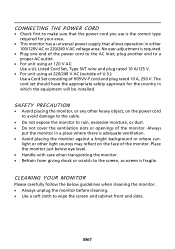
... wipe the screen and cabinet front and sides. CONNECTING THE POWER CORD · Check first to make sure that the power cord you use is adequate ventilation. · Avoid placing the monitor against a bright background or where sun- No user-adjustment is fragile. The cord set should have the appropriate safety approvals for your area. ·...
... wipe the screen and cabinet front and sides. CONNECTING THE POWER CORD · Check first to make sure that the power cord you use is adequate ventilation. · Avoid placing the monitor against a bright background or where sun- No user-adjustment is fragile. The cord set should have the appropriate safety approvals for your area. ·...
User Manual
Page 15
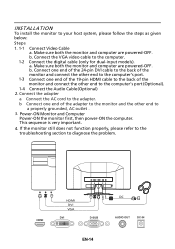
...Power-ON Monitor and Computer Power-ON the monitor first, then power-ON the computer. Mnnaekcet stuhreedbiogtithatlhceabmleo(noitnolyr afonrddcuoaml-pinupteurt amreodpeolws).ered-OFF. Connect one end of the 24-pin DVI cable to the back of the monitor and connect the other end to the computer's port. 1-3 Connect one end of the monitor... and connect the other end to the computer's port (Optional). 1-4 Connect the Audio Cable(Optional) 2. Connect the adapter a Connect the AC cord to diagnose the problem. b Connect one end of ...
...Power-ON Monitor and Computer Power-ON the monitor first, then power-ON the computer. Mnnaekcet stuhreedbiogtithatlhceabmleo(noitnolyr afonrddcuoaml-pinupteurt amreodpeolws).ered-OFF. Connect one end of the 24-pin DVI cable to the back of the monitor and connect the other end to the computer's port. 1-3 Connect one end of the monitor... and connect the other end to the computer's port (Optional). 1-4 Connect the Audio Cable(Optional) 2. Connect the adapter a Connect the AC cord to diagnose the problem. b Connect one end of ...
User Manual
Page 22
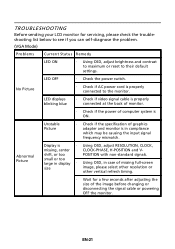
...adjust brightness and contrast to maximum or reset to the monitor. TROUBLESHOOTING Before sending your LCD monitor for a few seconds after adjusting the size of computer system is ON. No Picture · Check if AC power cord is properly connected to their default settings. Unstable Picture ...· Check if the specification of graphics adapter and monitor is · Using OSD, adjust RESOLUTION, CLOCK, missing, center CLOCK-PHASE,...
...adjust brightness and contrast to maximum or reset to the monitor. TROUBLESHOOTING Before sending your LCD monitor for a few seconds after adjusting the size of computer system is ON. No Picture · Check if AC power cord is properly connected to their default settings. Unstable Picture ...· Check if the specification of graphics adapter and monitor is · Using OSD, adjust RESOLUTION, CLOCK, missing, center CLOCK-PHASE,...

User Manual
Page 23
LED OFF · Check the power switch. · Check if AC power cord is ON. EN-22 (DVI mode) Problems No Picture Current Status Remedy LED ON · Using OSD, adjust brightness and contrast to maximum or reset to the monitor. LED displays blinking blue · Check if video signal cable is properly connected at the back of monitor. · Check if the power of computer system is properly connected to their default settings.
LED OFF · Check the power switch. · Check if AC power cord is ON. EN-22 (DVI mode) Problems No Picture Current Status Remedy LED ON · Using OSD, adjust brightness and contrast to maximum or reset to the monitor. LED displays blinking blue · Check if video signal cable is properly connected at the back of monitor. · Check if the power of computer system is properly connected to their default settings.


