Quick Start Guide
Page 1
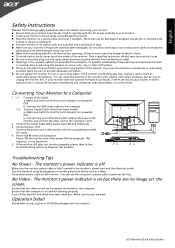
.... 1-2 Connect Digital Cable (Only Dual-input model) a. Connect the Audio Cable (Only Audio-Input Model) (Optional) 3. This sequence is on but be sure to the back of the cabinet. You can clean the exterior of the monitor with the AC power available in your location. Locate your monitor near water. The monitor's power indicator is very important. 5. LCD Monitor Quick Setup Guide The screen can be damaged if dropped, sharply hit, or touched...
.... 1-2 Connect Digital Cable (Only Dual-input model) a. Connect the Audio Cable (Only Audio-Input Model) (Optional) 3. This sequence is on but be sure to the back of the cabinet. You can clean the exterior of the monitor with the AC power available in your location. Locate your monitor near water. The monitor's power indicator is very important. 5. LCD Monitor Quick Setup Guide The screen can be damaged if dropped, sharply hit, or touched...
Quick Start Guide
Page 2
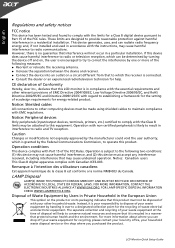
Notice: Shielded cables All connections to other computing devices must not be attached to this product. LCD Monitor Quick Setup Guide However, there is no guarantee that protects human health and the ...users This Class B digital apparatus complies with non-certified peripherals is recycled in a manner that interference will not occur in a residential installation. FOR LAMP SPECIFIC DISPOSAL INFORMATION CHECK WWW.LAMPRECYCLE.ORG. This device generates, uses, and can be made using shielded cables to maintain compliance with Part 15 of disposal will help . English...
Notice: Shielded cables All connections to other computing devices must not be attached to this product. LCD Monitor Quick Setup Guide However, there is no guarantee that protects human health and the ...users This Class B digital apparatus complies with non-certified peripherals is recycled in a manner that interference will not occur in a residential installation. FOR LAMP SPECIFIC DISPOSAL INFORMATION CHECK WWW.LAMPRECYCLE.ORG. This device generates, uses, and can be made using shielded cables to maintain compliance with Part 15 of disposal will help . English...
User Manual
Page 1
TABLE OF CONTENTS SPECIAL NOTES ON LCD MONITORS 1 INFORMATION FOR YOUR SAFETY AND COMFORT 2 UNPACKING 5 ATTACHING / REMOVING THE BASE 6 SCREEN POSITION ADJUSTMENT 6 CONNECTING THE POWER CORD 7 SAFETY PRECAUTION 7 CLEANING YOUR MONITOR 7 POWER SAVING 8 DDC...8 CONNECTOR PIN ASSIGNMENT 9 STANDARD TIMING TABLE 11 INSTALLATION 12 USER CONTROLS 13 TROUBLESHOOTING 19
TABLE OF CONTENTS SPECIAL NOTES ON LCD MONITORS 1 INFORMATION FOR YOUR SAFETY AND COMFORT 2 UNPACKING 5 ATTACHING / REMOVING THE BASE 6 SCREEN POSITION ADJUSTMENT 6 CONNECTING THE POWER CORD 7 SAFETY PRECAUTION 7 CLEANING YOUR MONITOR 7 POWER SAVING 8 DDC...8 CONNECTOR PIN ASSIGNMENT 9 STANDARD TIMING TABLE 11 INSTALLATION 12 USER CONTROLS 13 TROUBLESHOOTING 19
User Manual
Page 2
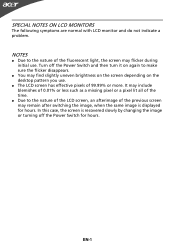
... by changing the image or turning off the Power Switch for hours. EN-1 It may include blemishes of 0.01% or less such as a missing pixel or a pixel lit all of the time. Due to the nature of the fluorescent light, the screen may flicker during initial use . The LCD screen has effective pixels of the previous screen may find slightly uneven brightness on the screen...
... by changing the image or turning off the Power Switch for hours. EN-1 It may include blemishes of 0.01% or less such as a missing pixel or a pixel lit all of the time. Due to the nature of the fluorescent light, the screen may flicker during initial use . The LCD screen has effective pixels of the previous screen may find slightly uneven brightness on the screen...

User Manual
Page 3
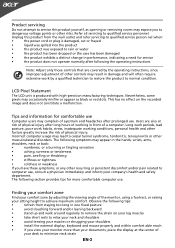
... or short-out parts that the power outlet you need to disconnect power to the equipment, be sure to unplug the power cord from lithium battery pack. The openings should never be blocked by hearing experts, to protect your ears adjust. • Limit the amount of internal components and to block out noisy surroundings. • Turn the volume down if...
... or short-out parts that the power outlet you need to disconnect power to the equipment, be sure to unplug the power cord from lithium battery pack. The openings should never be blocked by hearing experts, to protect your ears adjust. • Limit the amount of internal components and to block out noisy surroundings. • Turn the volume down if...
User Manual
Page 4
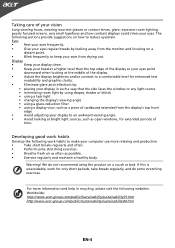
... the monitor, using a footrest, or raising your monitor more comfortable computer use. Long work periods, bad posture, poor work by adjusting the viewing angle of eyestrain and headaches after prolonged use , consult a physician immediately and inform your desk to qualified service personnel. The following tips: • refrain from the wall outlet and refer servicing to qualified service person-nel when: • the power cord or plug...
... the monitor, using a footrest, or raising your monitor more comfortable computer use. Long work periods, bad posture, poor work by adjusting the viewing angle of eyestrain and headaches after prolonged use , consult a physician immediately and inform your desk to qualified service personnel. The following tips: • refrain from the wall outlet and refer servicing to qualified service person-nel when: • the power cord or plug...
User Manual
Page 5
... the monitor and focusing on a distant point. • Blink frequently to make your eyes from drying out. If this is unavoidable, work habits to keep your computer use more information and help in such a way that the side faces the window or any light source • minimizing room light by using drapes, shades or blinds • using a task light • changing the display's viewing angle • using a glare...
... the monitor and focusing on a distant point. • Blink frequently to make your eyes from drying out. If this is unavoidable, work habits to keep your computer use more information and help in such a way that the side faces the window or any light source • minimizing room light by using drapes, shades or blinds • using a task light • changing the display's viewing angle • using a glare...
User Manual
Page 7
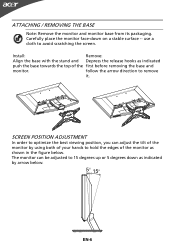
... 5 degrees down on a stable surface -- ATTACHING / REMOVING THE BASE Note: Remove the monitor and monitor base from its packaging. The monitor can adjust the tilt of the first before removing the base and monitor. use a cloth to remove it. SCREEN POSITION ADJUSTMENT In order to optimize the best viewing position, you can be adjusted to hold the edges of the monitor as indicated push the base towards the top of the monitor by arrow below .
... 5 degrees down on a stable surface -- ATTACHING / REMOVING THE BASE Note: Remove the monitor and monitor base from its packaging. The monitor can adjust the tilt of the first before removing the base and monitor. use a cloth to remove it. SCREEN POSITION ADJUSTMENT In order to optimize the best viewing position, you can be adjusted to hold the edges of the monitor as indicated push the base towards the top of the monitor by arrow below .
User Manual
Page 8
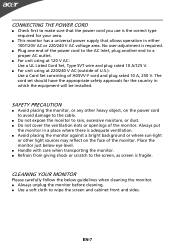
... to the cable. Do not expose the monitor to rain, excessive moisture, or dust. Do not cover the ventilation slots or openings of the monitor. Place the monitor just below guidelines when cleaning the monitor. Always unplug the monitor before cleaning. Use a soft cloth to wipe the screen and cabinet front and sides. CONNECTING THE POWER CORD Check first to make sure...
... to the cable. Do not expose the monitor to rain, excessive moisture, or dust. Do not cover the ventilation slots or openings of the monitor. Place the monitor just below guidelines when cleaning the monitor. Always unplug the monitor before cleaning. Use a soft cloth to wipe the screen and cabinet front and sides. CONNECTING THE POWER CORD Check first to make sure...
User Manual
Page 9
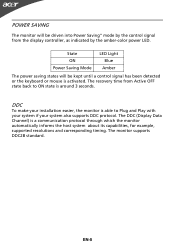
... its capabilities, for example, supported resolutions and corresponding timing. The DDC (Display Data Channel) is able to ON state is around 3 seconds. The monitor supports DDC2B standard. EN-8 State ON Power Saving Mode LED Light Blue Amber The power saving states will be kept until a control signal has been detected or the keyboard or mouse is activated. POWER SAVING The monitor will be driven into Power Saving" mode by the amber-color power LED.
... its capabilities, for example, supported resolutions and corresponding timing. The DDC (Display Data Channel) is able to ON state is around 3 seconds. The monitor supports DDC2B standard. EN-8 State ON Power Saving Mode LED Light Blue Amber The power saving states will be kept until a control signal has been detected or the keyboard or mouse is activated. POWER SAVING The monitor will be driven into Power Saving" mode by the amber-color power LED.

User Manual
Page 10
DESCRIPTION +5V Logic Ground Monitor Ground DDC-Serial Data H-Sync V-Sync DDC-Serial Clock EN-9 DESCRIPTION Red Green Blue Monitor Ground DDC-return R-Ground G-Ground B-Ground PIN NO. 9. 10. 11. 12. 13. 14. 15. CONNECTOR PIN ASSIGNMENT 15-Pin Color Display Signal Cable PIN NO. 1. 2. 3. 4. 5. 6. 7. 8.
DESCRIPTION +5V Logic Ground Monitor Ground DDC-Serial Data H-Sync V-Sync DDC-Serial Clock EN-9 DESCRIPTION Red Green Blue Monitor Ground DDC-return R-Ground G-Ground B-Ground PIN NO. 9. 10. 11. 12. 13. 14. 15. CONNECTOR PIN ASSIGNMENT 15-Pin Color Display Signal Cable PIN NO. 1. 2. 3. 4. 5. 6. 7. 8.

User Manual
Page 11
NC 2. Logic Ground 4. TMDS Data0- 6. DDC Data 19. TMDS Data 1/3 Shield 23. TMDS Data2+ 14. +5V Power 3. Hot Plug Detect 5. TMDS Data0+ 7. NC 9. DDC TMDS Clock- * only for certain models EN-10 TMDS Data 2/4 Shield 15. TMDS Data 0/5 Shield 8. NC 10. TMDS Clock+ 12. DDC Clock 18. NC 20. TMDS Data1+ 22. 24-Pin Color Display Signal Cable* PIN Meaning PIN Meaning 1. TMDS Data2- 13. NC 17. TMDS Data1- 21. NC 16. TMDS Clock Shield 11. NC 24.
NC 2. Logic Ground 4. TMDS Data0- 6. DDC Data 19. TMDS Data 1/3 Shield 23. TMDS Data2+ 14. +5V Power 3. Hot Plug Detect 5. TMDS Data0+ 7. NC 9. DDC TMDS Clock- * only for certain models EN-10 TMDS Data 2/4 Shield 15. TMDS Data 0/5 Shield 8. NC 10. TMDS Clock+ 12. DDC Clock 18. NC 20. TMDS Data1+ 22. 24-Pin Color Display Signal Cable* PIN Meaning PIN Meaning 1. TMDS Data2- 13. NC 17. TMDS Data1- 21. NC 16. TMDS Clock Shield 11. NC 24.
User Manual
Page 13
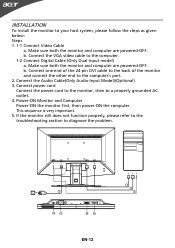
..., please refer to the troubleshooting section to the computer's port. 2. Connect the VGA video cable to your host system, please follow the steps as given below: Steps 1. 1-1 Connect Video Cable a. Connect the Audio Cable(Only Audio-Input Model)(Optional) 3. Make sure both the monitor and computer are powered-OFF. This sequence is very important. 5. INSTALLATION To install the monitor to the computer. 1-2 Connect Digital Cable (Only Dual-input model) a. Connect power cord Connect the power cord to the monitor, then to a properly grounded...
..., please refer to the troubleshooting section to the computer's port. 2. Connect the VGA video cable to your host system, please follow the steps as given below: Steps 1. 1-1 Connect Video Cable a. Connect the Audio Cable(Only Audio-Input Model)(Optional) 3. Make sure both the monitor and computer are powered-OFF. This sequence is very important. 5. INSTALLATION To install the monitor to the computer. 1-2 Connect Digital Cable (Only Dual-input model) a. Connect power cord Connect the power cord to the monitor, then to a properly grounded...
User Manual
Page 14
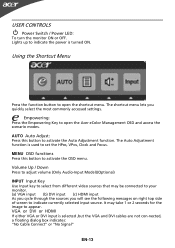
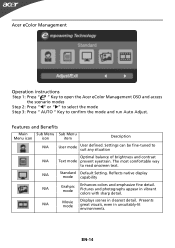
... currently selected input source. USER CONTROLS Power Switch / Power LED: To turn the monitor ON or OFF. Using the Shortcut Menu Press the function button to activate the OSD menu. AUTO Auto Adjust: Press this botton to open the Acer eColor Management OSD and access the scenario modes. MENU OSD functions Press this button to your monitor. (a) VGA input (b) DVI input (c) HDMI input As you cycle through the sources you quickly select the most commonly accessed settings. It may be connected to activate the Auto Adjustment function. Volume Up...
... currently selected input source. USER CONTROLS Power Switch / Power LED: To turn the monitor ON or OFF. Using the Shortcut Menu Press the function button to activate the OSD menu. AUTO Auto Adjust: Press this botton to open the Acer eColor Management OSD and access the scenario modes. MENU OSD functions Press this button to your monitor. (a) VGA input (b) DVI input (c) HDMI input As you cycle through the sources you quickly select the most commonly accessed settings. It may be connected to activate the Auto Adjustment function. Volume Up...
User Manual
Page 15
... Optimal balance of brightness and contrast N/A Text mode prevent eyestrain. Pictures and photographs appear in clearest detail. Presents great visuals, even in unsuitably-lit environments. Features and Benefits Main Sub Menu Sub Menu Menu icon icon item Description N/A User mode User defined. Reflects native display mode capability N/A Grahpic mode Enhances colors and emphasize fine detail. Settings can be fine-tuned to read onscreen text. N/A Standard Default Setting. EN-14 Acer...
... Optimal balance of brightness and contrast N/A Text mode prevent eyestrain. Pictures and photographs appear in clearest detail. Presents great visuals, even in unsuitably-lit environments. Features and Benefits Main Sub Menu Sub Menu Menu icon icon item Description N/A User mode User defined. Reflects native display mode capability N/A Grahpic mode Enhances colors and emphasize fine detail. Settings can be fine-tuned to read onscreen text. N/A Standard Default Setting. EN-14 Acer...
User Manual
Page 16
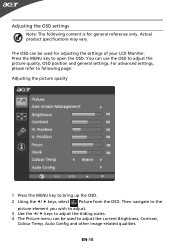
Actual product specifications may vary. The OSD can use the OSD to open the OSD. You can be used for general reference only. EN-15 Adjusting the OSD settings Note: The following page: Adjusting the picture quality 1 Press the MENU key to adjust the current Brightness, Contrast, Colour Temp, Auto Config and other image-related qualities. For advanced settings, please refer to following content is for adjusting the settings of your LCD Monitor. Then...
Actual product specifications may vary. The OSD can use the OSD to open the OSD. You can be used for general reference only. EN-15 Adjusting the OSD settings Note: The following page: Adjusting the picture quality 1 Press the MENU key to adjust the current Brightness, Contrast, Colour Temp, Auto Config and other image-related qualities. For advanced settings, please refer to following content is for adjusting the settings of your LCD Monitor. Then...
User Manual
Page 18
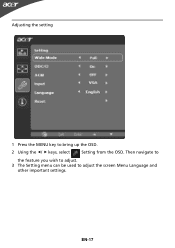
EN-17 Adjusting the setting 1 Press the MENU key to adjust the screen Menu Language and other important settings. Then navigate to the feature you wish to adjust. 3 The Setting menu can be used to bring up the OSD. 2 Using the / keys, select Setting from the OSD.
EN-17 Adjusting the setting 1 Press the MENU key to adjust the screen Menu Language and other important settings. Then navigate to the feature you wish to adjust. 3 The Setting menu can be used to bring up the OSD. 2 Using the / keys, select Setting from the OSD.
User Manual
Page 20
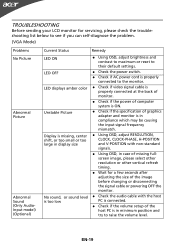
... Picture Check if the specification of missing fullscreen image, please select other resolution or other vertical refresh timing. Wait for servicing, please check the troubleshooting list below to see if you can self-diagnose the problem. (VGA Mode) Problems No Picture Abnormal Picture Abnormal Sound (Only AudioInput model) (Optional) Current Status Remedy LED ON Using OSD, adjust brightness and contrast to maximum or reset to the monitor. LED displays amber color Check if video signal cable is properly connected at...
... Picture Check if the specification of missing fullscreen image, please select other resolution or other vertical refresh timing. Wait for servicing, please check the troubleshooting list below to see if you can self-diagnose the problem. (VGA Mode) Problems No Picture Abnormal Picture Abnormal Sound (Only AudioInput model) (Optional) Current Status Remedy LED ON Using OSD, adjust brightness and contrast to maximum or reset to the monitor. LED displays amber color Check if video signal cable is properly connected at...
User Manual
Page 21
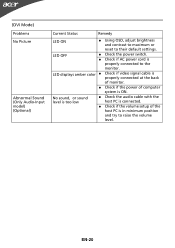
(DVI Mode) Problems No Picture Abnormal Sound (Only Audio-Input model) (Optional) Current Status Remedy LED ON Using OSD, adjust brightness and contrast to maximum or reset to the monitor. LED OFF Check the power switch. Check if AC power cord is ON. LED displays amber color Check if video signal cable is properly connected at the back of monitor. Check if the power of the host PC is in minimum position and try to raise the volume level. No sound, or sound level...
(DVI Mode) Problems No Picture Abnormal Sound (Only Audio-Input model) (Optional) Current Status Remedy LED ON Using OSD, adjust brightness and contrast to maximum or reset to the monitor. LED OFF Check the power switch. Check if AC power cord is ON. LED displays amber color Check if video signal cable is properly connected at the back of monitor. Check if the power of the host PC is in minimum position and try to raise the volume level. No sound, or sound level...
User Manual
Page 22
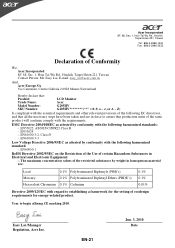
... Hsien 221, Taiwan Contact Person: Mr. Easy Lai, E-mail: easy_lai@acer.com.tw And, Acer Europe SA Via Cantonale, Centro Galleria 2 6928 Manno Switzerland Hereby declare that: Product: Trade Name: Model Number: SKU Number: LCD Monitor Acer G205HV G205HV 0~9, a ~ z, or A ~ Z) Is compliant with the essential requirements...Chromium 0.1% Cadmium 0.1% 0.1% 0.01% Directive 2009/125/EC with the requirements. Year to establishing a framework for the setting of certain Hazardous Substances in force to assure that production units of the same product will continue comply with regard to begin...
... Hsien 221, Taiwan Contact Person: Mr. Easy Lai, E-mail: easy_lai@acer.com.tw And, Acer Europe SA Via Cantonale, Centro Galleria 2 6928 Manno Switzerland Hereby declare that: Product: Trade Name: Model Number: SKU Number: LCD Monitor Acer G205HV G205HV 0~9, a ~ z, or A ~ Z) Is compliant with the essential requirements...Chromium 0.1% Cadmium 0.1% 0.1% 0.01% Directive 2009/125/EC with the requirements. Year to establishing a framework for the setting of certain Hazardous Substances in force to assure that production units of the same product will continue comply with regard to begin...


