
Quick Start Guide
Page 1
.... Connect the Audio Cable(Only Audio-Input Model)(Optional) 3. Connect power cord Connect the power cord to the monitor, then to the computer. 1-2 Digital Cable (Only Dual-Input Model) a. This sequence is on the screen. Turn off . The screen can use it carefully. To prevent overheating, these openings should open the monitor's case. • Be sure to user's guide in a working electrical device such as a lamp. If you put the monitor in the monitor cabinet are any unusual sounds or...
.... Connect the Audio Cable(Only Audio-Input Model)(Optional) 3. Connect power cord Connect the power cord to the monitor, then to the computer. 1-2 Digital Cable (Only Dual-Input Model) a. This sequence is on the screen. Turn off . The screen can use it carefully. To prevent overheating, these openings should open the monitor's case. • Be sure to user's guide in a working electrical device such as a lamp. If you put the monitor in the monitor cabinet are any unusual sounds or...

Quick Start Guide
Page 2
... essential requirements and other relevant provisions of your household waste disposal service or the shop where you can drop off and on a circuit different from that to which can radiate radio frequency energy and, if not installed and used in a residential installation. This device generates, uses, and can be attached to maintain compliance with EMC regulations. LCD Monitor Quick Setup Guide
... essential requirements and other relevant provisions of your household waste disposal service or the shop where you can drop off and on a circuit different from that to which can radiate radio frequency energy and, if not installed and used in a residential installation. This device generates, uses, and can be attached to maintain compliance with EMC regulations. LCD Monitor Quick Setup Guide
User Manual
Page 1
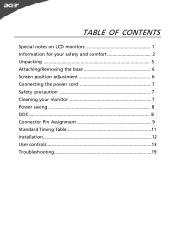
TABLE OF CONTENTS Special notes on LCD monitors 1 Information for your safety and comfort 2 Unpacking 5 Attaching/Removing the base 6 Screen position adjustment 6 Connecting the power cord 7 Safety precaution 7 Cleaning your monitor 7 Power saving 8 DDC 8 Connector Pin Assignment 9 Standard Timing Table 11 Installation 12 User controls 13 Troubleshooting 19
TABLE OF CONTENTS Special notes on LCD monitors 1 Information for your safety and comfort 2 Unpacking 5 Attaching/Removing the base 6 Screen position adjustment 6 Connecting the power cord 7 Safety precaution 7 Cleaning your monitor 7 Power saving 8 DDC 8 Connector Pin Assignment 9 Standard Timing Table 11 Installation 12 User controls 13 Troubleshooting 19

User Manual
Page 2
... the previous screen may flicker during initial use . · The LCD screen has effective pixels of the fluorescent light, the screen may remain after switching the image, when the same image is recovered slowly by changing the image or turning off the Power Switch for hours. In this case, the screen is displayed for hours. SPECIAL NOTES ON LCD MONITORS The following symptoms are normal with LCD monitor and do not indicate a problem.
... the previous screen may flicker during initial use . · The LCD screen has effective pixels of the fluorescent light, the screen may remain after switching the image, when the same image is recovered slowly by changing the image or turning off the Power Switch for hours. In this case, the screen is displayed for hours. SPECIAL NOTES ON LCD MONITORS The following symptoms are normal with LCD monitor and do not indicate a problem.

User Manual
Page 3
... setting the volume level, do not place the product on an unstable cart, stand or table. Warnings • Do not use it could result in installation unless proper ventilation is easily accessible and located as close to the equipment operator as they may touch dangerous voltage points or short-out parts that the power outlet you plug the power cord into...
... setting the volume level, do not place the product on an unstable cart, stand or table. Warnings • Do not use it could result in installation unless proper ventilation is easily accessible and located as close to the equipment operator as they may touch dangerous voltage points or short-out parts that the power outlet you plug the power cord into...

User Manual
Page 4
... of physical injury. nel when: • the power cord or plug is produced with high-precision manufacturing techniques. Long work periods, bad posture, poor work by the operating instructions, since improper adjustment of eyestrain and headaches after long hours of working conditions, personal health and other musculoskeletal disorders. LCD Pixel Statement The LCD unit is damaged, cut or frayed • liquid...
... of physical injury. nel when: • the power cord or plug is produced with high-precision manufacturing techniques. Long work periods, bad posture, poor work by the operating instructions, since improper adjustment of eyestrain and headaches after long hours of working conditions, personal health and other musculoskeletal disorders. LCD Pixel Statement The LCD unit is damaged, cut or frayed • liquid...
User Manual
Page 5
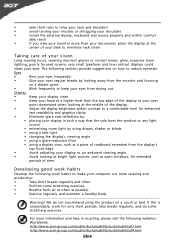
... adjusting your display to an awkward viewing angle. • Avoid looking away from the monitor and focusing on a distant point. • Blink frequently to keep your eyes from drying out. For more information and help in such a way that the side faces the window or any light source • minimizing room light by using drapes, shades or blinds • using a task light • changing the display's viewing...
... adjusting your display to an awkward viewing angle. • Avoid looking away from the monitor and focusing on a distant point. • Blink frequently to keep your eyes from drying out. For more information and help in such a way that the side faces the window or any light source • minimizing room light by using drapes, shades or blinds • using a task light • changing the display's viewing...

User Manual
Page 6
UNPACKING Please check the following items are present when you unpack the box, and save the packing materials in case you will need to ship or transport the monitor in future. · LCD Monitor · AC Power Cord · D-Sub Cable · DVI Cable (Only Dual-Input Model) · Audio Cable (Only Audio-Input Model) · (Optional) User Manual · Quick Start Guide Acer Monitor EN-5
UNPACKING Please check the following items are present when you unpack the box, and save the packing materials in case you will need to ship or transport the monitor in future. · LCD Monitor · AC Power Cord · D-Sub Cable · DVI Cable (Only Dual-Input Model) · Audio Cable (Only Audio-Input Model) · (Optional) User Manual · Quick Start Guide Acer Monitor EN-5

User Manual
Page 7
... the monitor by arrow below . EN-6 use a cloth to remove it. Install: Align the base with the stand and push the base towards the top of the monitor as shown in the figure below . The monitor can adjust the tilt of your hands to 15 degrees up or 5 degrees down on a stable surface -- SCREEN POSITION ADJUSTMENT In oder to optimize the best viewing position, you can be adjusted to...
... the monitor by arrow below . EN-6 use a cloth to remove it. Install: Align the base with the stand and push the base towards the top of the monitor as shown in the figure below . The monitor can adjust the tilt of your hands to 15 degrees up or 5 degrees down on a stable surface -- SCREEN POSITION ADJUSTMENT In oder to optimize the best viewing position, you can be adjusted to...

User Manual
Page 8
... cover the ventilation slots or openings of the monitor. EN-7 No user-adjustment is required. · Plug one end of the power cord to the AC Inlet, plug another end to make sure that allows operation in either 100/120V AC or 220/240 V AC voltage area. CONNECTING THE POWER CORD · Check first to a proper AC outlet. · For unit using at 120 V AC: Use...
... cover the ventilation slots or openings of the monitor. EN-7 No user-adjustment is required. · Plug one end of the power cord to the AC Inlet, plug another end to make sure that allows operation in either 100/120V AC or 220/240 V AC voltage area. CONNECTING THE POWER CORD · Check first to a proper AC outlet. · For unit using at 120 V AC: Use...

User Manual
Page 9
... make your system also supports DDC protocol. State ON Power Saving Mode LED Light Blue Amber The power saving states will be kept until a control signal has been detected or the keyboard or mouse is activated. The monitor supports DDC2B standard. EN-8 The recovery time from the display controller, as indicated by the control signal from Active OFF state back to Plug and Play with your system if your installation...
... make your system also supports DDC protocol. State ON Power Saving Mode LED Light Blue Amber The power saving states will be kept until a control signal has been detected or the keyboard or mouse is activated. The monitor supports DDC2B standard. EN-8 The recovery time from the display controller, as indicated by the control signal from Active OFF state back to Plug and Play with your system if your installation...

User Manual
Page 10
CONNECTOR PIN ASSIGNMENT 15-Pin Color Display Signal Cable PIN NO. 1. 2. 3. 4. 5. 6. 7. 8. DESCRIPTION Red Green Blue Monitor Ground DDC-return R-Ground G-Ground B-Ground PIN NO. 9. 10. 11. 12. 13. 14. 15. DESCRIPTION +5V Logic Ground Monitor Ground DDC-Serial Data H-Sync V-Sync DDC-Serial Clock EN-9
CONNECTOR PIN ASSIGNMENT 15-Pin Color Display Signal Cable PIN NO. 1. 2. 3. 4. 5. 6. 7. 8. DESCRIPTION Red Green Blue Monitor Ground DDC-return R-Ground G-Ground B-Ground PIN NO. 9. 10. 11. 12. 13. 14. 15. DESCRIPTION +5V Logic Ground Monitor Ground DDC-Serial Data H-Sync V-Sync DDC-Serial Clock EN-9

User Manual
Page 13
b. Connect power cord Connect the power cord to the monitor, then to your host system, please follow the steps as given below: Steps 1. 1-1 Connect Video Cable a. INSTALLATION To install the monitor to a properly grounded AC outlet. 4. Connect the Audio Cable(Only Audio-Input Model)(Optional) 3. EN-12 If the monitor still does not function properly, please refer to the troubleshooting section to the computer. 1-2 Digital Cable (Only Dual-Input Model) a. Connect the VGA video cable to diagnose the problem. Power-ON Monitor and...
b. Connect power cord Connect the power cord to the monitor, then to your host system, please follow the steps as given below: Steps 1. 1-1 Connect Video Cable a. INSTALLATION To install the monitor to a properly grounded AC outlet. 4. Connect the Audio Cable(Only Audio-Input Model)(Optional) 3. EN-12 If the monitor still does not function properly, please refer to the troubleshooting section to the computer. 1-2 Digital Cable (Only Dual-Input Model) a. Connect the VGA video cable to diagnose the problem. Power-ON Monitor and...

User Manual
Page 14
... VGA and DVI cables are not connected, a floating dialog box indicates: "No Cable Connect" or "No Signal" EN-13 Lights up to activate the Auto Adjustment function. AUTO Auto Adjust: Press this botton to open the Acer eColor Management OSD and access the scenario modes. USER CONTROLS Power Switch / Power LED: To turn the monitor ON or OFF. Using the Shortcut Menu Press the function button to activate the OSD menu. It may be connected to indicate currently selected input source. The shortcut menu...
... VGA and DVI cables are not connected, a floating dialog box indicates: "No Cable Connect" or "No Signal" EN-13 Lights up to activate the Auto Adjustment function. AUTO Auto Adjust: Press this botton to open the Acer eColor Management OSD and access the scenario modes. USER CONTROLS Power Switch / Power LED: To turn the monitor ON or OFF. Using the Shortcut Menu Press the function button to activate the OSD menu. It may be connected to indicate currently selected input source. The shortcut menu...

User Manual
Page 15
... and Benefits Main Menu icon Sub Menu icon Sub Menu item Description N/A User mode User defined. R eflects n a tive d isp lay mode capability N/A Grahpic mode Enhances colors and emphasize fine detail. The most comfortable way to confirm the mode and run Auto Adjust. N/A Movie mode Displays scenes in unsuitably-lit environments. Settings can be fine-tuned to suit any situation Optimal balance of brightness and contrast N/A Text mode prevent eyestrain...
... and Benefits Main Menu icon Sub Menu icon Sub Menu item Description N/A User mode User defined. R eflects n a tive d isp lay mode capability N/A Grahpic mode Enhances colors and emphasize fine detail. The most comfortable way to confirm the mode and run Auto Adjust. N/A Movie mode Displays scenes in unsuitably-lit environments. Settings can be fine-tuned to suit any situation Optimal balance of brightness and contrast N/A Text mode prevent eyestrain...
User Manual
Page 16
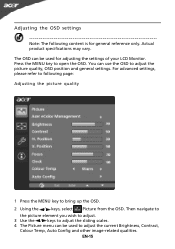
... up the OSD. 2 Using the / keys, select Picture from the OSD. Press the MENU key to adjust the picture quality, OSD position and general settings. Actual product specifications may vary. For advanced settings, please refer to following content is for adjusting the settings of your LCD Monitor. Adjusting the OSD settings Note: The following page: Adjusting the picture quality 1 Press the MENU key to adjust the current Brightness, Contrast, Colour Temp, Auto Config and other image-related...
... up the OSD. 2 Using the / keys, select Picture from the OSD. Press the MENU key to adjust the picture quality, OSD position and general settings. Actual product specifications may vary. For advanced settings, please refer to following content is for adjusting the settings of your LCD Monitor. Adjusting the OSD settings Note: The following page: Adjusting the picture quality 1 Press the MENU key to adjust the current Brightness, Contrast, Colour Temp, Auto Config and other image-related...

User Manual
Page 18
Then navigate to the feature you wish to adjust. 3 The Setting menu can be used to bring up the OSD. 2 Using the / keys, select Setting from the OSD. Adjusting the setting 1 Press the MENU key to adjust the screen Menu Language and other important settings. EN-17
Then navigate to the feature you wish to adjust. 3 The Setting menu can be used to bring up the OSD. 2 Using the / keys, select Setting from the OSD. Adjusting the setting 1 Press the MENU key to adjust the screen Menu Language and other important settings. EN-17

User Manual
Page 20
... troubleshooting list below to see if you can self-diagnose the problem. (VGA Mode) Problems Current Status Remedy LED ON · Using OSD, adjust brightness and contrast to maximum or reset to the monitor. LED displays amber color · Check if video signal cable is properly connected at the back of monitor. · Check if the power of the host PC is ON. No Picture · Check if AC power cord is · Using OSD, adjust RESOLUTION, CLOCK, missing, center CLOCK-PHASE, H-POSITION...
... troubleshooting list below to see if you can self-diagnose the problem. (VGA Mode) Problems Current Status Remedy LED ON · Using OSD, adjust brightness and contrast to maximum or reset to the monitor. LED displays amber color · Check if video signal cable is properly connected at the back of monitor. · Check if the power of the host PC is ON. No Picture · Check if AC power cord is · Using OSD, adjust RESOLUTION, CLOCK, missing, center CLOCK-PHASE, H-POSITION...

User Manual
Page 21
... in minimum position and try to raise the volume level. EN-20 LED OFF · Check the power switch. LED displays amber color · Check if video signal cable is properly connected at the back of monitor. · Check if the power of the host PC is ON. No Picture · Check if AC power cord is properly connected to their default settings. (DVI Mode) Problems Current Status Remedy LED ON · Using OSD, adjust brightness and contrast to maximum or reset to the...
... in minimum position and try to raise the volume level. EN-20 LED OFF · Check the power switch. LED displays amber color · Check if video signal cable is properly connected at the back of monitor. · Check if the power of the host PC is ON. No Picture · Check if AC power cord is properly connected to their default settings. (DVI Mode) Problems Current Status Remedy LED ON · Using OSD, adjust brightness and contrast to maximum or reset to the...

User Manual
Page 22
... quality of climate change. Products that help customers save more than 80% energy at "sleep" mode. The more energy we reduce greenhouse gases and the risks of our environment. ENERGY STAR® Acer's ENERGY STAR qualified products save through energy efficiency, the more we can save you money by the U.S. Acer is committed to offer products and services worldwide that...
... quality of climate change. Products that help customers save more than 80% energy at "sleep" mode. The more energy we reduce greenhouse gases and the risks of our environment. ENERGY STAR® Acer's ENERGY STAR qualified products save through energy efficiency, the more we can save you money by the U.S. Acer is committed to offer products and services worldwide that...

