
User Guide
Page 3
Contents Using Your Gateway Flat-Panel Monitor 1 Connecting the monitor 2 Attaching the stand 2 Connecting video inputs 2 Connecting USB cables 4 Setting up the optional speaker bar 5 Connecting power 7 Connecting a security ... 17 Using the speaker bar 18 Power management 18 Energy declaration 18 Maintaining 18 Troubleshooting 19 Troubleshooting symptoms 19 No power 19 No picture 19 Display colors are wrong 20 Picture has shadows or "ghosts 20 Color is not uniform 20 Image is not sized or centered correctly 20 The monitor...
Contents Using Your Gateway Flat-Panel Monitor 1 Connecting the monitor 2 Attaching the stand 2 Connecting video inputs 2 Connecting USB cables 4 Setting up the optional speaker bar 5 Connecting power 7 Connecting a security ... 17 Using the speaker bar 18 Power management 18 Energy declaration 18 Maintaining 18 Troubleshooting 19 Troubleshooting symptoms 19 No power 19 No picture 19 Display colors are wrong 20 Picture has shadows or "ghosts 20 Color is not uniform 20 Image is not sized or centered correctly 20 The monitor...

User Guide
Page 5
Using Your Gateway Flat-Panel Monitor • Connecting the monitor • Adjusting the stand • Starting the monitor • Adjusting monitor settings • Changing Windows screen settings • Using the speaker bar • Power management • Maintaining • Troubleshooting • FAQs • Specifications 1
Using Your Gateway Flat-Panel Monitor • Connecting the monitor • Adjusting the stand • Starting the monitor • Adjusting monitor settings • Changing Windows screen settings • Using the speaker bar • Power management • Maintaining • Troubleshooting • FAQs • Specifications 1
User Guide
Page 6
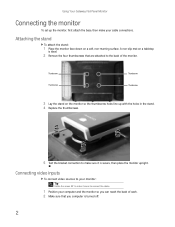
.... 2 Make sure that you can reach the back of the monitor. Thumbscrew Thumbscrew Thumbscrew Thumbscrew 3 Lay the stand on a soft, non-marring surface. Using Your Gateway Flat-Panel Monitor Connecting the monitor To set up with the holes in the stand. 4 Replace the thumbscrews. 5 Test the bracket connection to make sure...
.... 2 Make sure that you can reach the back of the monitor. Thumbscrew Thumbscrew Thumbscrew Thumbscrew 3 Lay the stand on a soft, non-marring surface. Using Your Gateway Flat-Panel Monitor Connecting the monitor To set up with the holes in the stand. 4 Replace the thumbscrews. 5 Test the bracket connection to make sure...

User Guide
Page 7
...cable can be purchased from various Internet retailers and electronic retail stores. - www.gateway.com 3 If your computer has an HDMI digital audio/video connector, connect an HDMI cable to the HDMI connector under the back of the display. - OR If your computer has a digital video connector (DVI), connect a... DVI video cable to the matching video port on the back of the display. Important An HDMI cable has not been included with your computer. 3 only) or from www.gateway.com (available in the U.S. OR If your computer has only an analog VGA (blue) port, ...
...cable can be purchased from various Internet retailers and electronic retail stores. - www.gateway.com 3 If your computer has an HDMI digital audio/video connector, connect an HDMI cable to the HDMI connector under the back of the display. - OR If your computer has a digital video connector (DVI), connect a... DVI video cable to the matching video port on the back of the display. Important An HDMI cable has not been included with your computer. 3 only) or from www.gateway.com (available in the U.S. OR If your computer has only an analog VGA (blue) port, ...

User Guide
Page 8
... USB cable to the USB in ("B" type) port on your computer. Connecting USB cables Your monitor has a built-in ("B" type) port USB ports 4 Using Your Gateway Flat-Panel Monitor 5 Connect other end of the cable to access. HDMI port DVI port VGA port Blue component video jack S-Video jack Green Red...
... USB cable to the USB in ("B" type) port on your computer. Connecting USB cables Your monitor has a built-in ("B" type) port USB ports 4 Using Your Gateway Flat-Panel Monitor 5 Connect other end of the cable to access. HDMI port DVI port VGA port Blue component video jack S-Video jack Green Red...

User Guide
Page 9
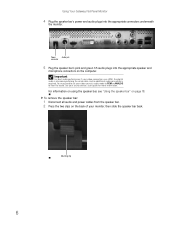
... monitor off the monitor. Important If you connect the speaker bar to the monitor while the monitor is available for mounting underneath your monitor. www.gateway.com 2 Connect any USB device to one of the available USB 2.0 ports on , the speaker bar will not initialize and will not work correctly....the mounting slots underneath the monitor. Make sure that it is secure by pulling it snaps into place. You can order a speaker bar from www.gateway.com. Mounting slot Mounting clip 3 Slide the speaker bar onto the bottom of the monitor. USB ports Setting up the optional speaker bar An ...
... monitor off the monitor. Important If you connect the speaker bar to the monitor while the monitor is available for mounting underneath your monitor. www.gateway.com 2 Connect any USB device to one of the available USB 2.0 ports on , the speaker bar will not initialize and will not work correctly....the mounting slots underneath the monitor. Make sure that it is secure by pulling it snaps into place. You can order a speaker bar from www.gateway.com. Mounting slot Mounting clip 3 Slide the speaker bar onto the bottom of the monitor. USB ports Setting up the optional speaker bar An ...
User Guide
Page 10
... your source device's user guide for more information. You may need to set your monitor, then slide the speaker bar back. Mounting clip 6 Using Your Gateway Flat-Panel Monitor 4 Plug the speaker bar's power and audio plugs into the appropriate speaker and microphone connectors on the computer. Power Audio jack connector...
... your source device's user guide for more information. You may need to set your monitor, then slide the speaker bar back. Mounting clip 6 Using Your Gateway Flat-Panel Monitor 4 Plug the speaker bar's power and audio plugs into the appropriate speaker and microphone connectors on the computer. Power Audio jack connector...

User Guide
Page 11
... power icon is not visible, power is correctly connected, check the power button on the power button should be glowing purple. Kensington lock slot 7 www.gateway.com Connecting power To connect power: 1 Position your computer desk (or to another heavy object) with a cable lock. We recommend using a surge protector to the...
... power icon is not visible, power is correctly connected, check the power button on the power button should be glowing purple. Kensington lock slot 7 www.gateway.com Connecting power To connect power: 1 Position your computer desk (or to another heavy object) with a cable lock. We recommend using a surge protector to the...

User Guide
Page 12
... top of the screen. These guidelines are sitting in a comfortable working posture. If the display has multiple users, the screen height should be easily adjustable to the screen. Using Your Gateway Flat-Panel Monitor Adjusting the stand Rotating the screen Tip To rotate the screen while the ...optional speaker bar is attached, first tilt the screen back for more clearance between landscape and portrait views. When the display is rotated to portrait mode...
... top of the screen. These guidelines are sitting in a comfortable working posture. If the display has multiple users, the screen height should be easily adjustable to the screen. Using Your Gateway Flat-Panel Monitor Adjusting the stand Rotating the screen Tip To rotate the screen while the ...optional speaker bar is attached, first tilt the screen back for more clearance between landscape and portrait views. When the display is rotated to portrait mode...

User Guide
Page 13
...Check the brightness setting. You must select a default language for the best viewing angle. 5 For VGA input only: After you can proceed. www.gateway.com Screen distance from user The screen should be blue, indicating that the monitor has detected a video source. Make sure that the monitor is not... do not see the Windows desktop, touch the (Menu) button on the front of your monitor, then touch (Auto) to automatically adjust your display image to suit individual preference. If you cannot access the Advanced menu because you chose a language you select at arm's length from the power ...
...Check the brightness setting. You must select a default language for the best viewing angle. 5 For VGA input only: After you can proceed. www.gateway.com Screen distance from user The screen should be blue, indicating that the monitor has detected a video source. Make sure that the monitor is not... do not see the Windows desktop, touch the (Menu) button on the front of your monitor, then touch (Auto) to automatically adjust your display image to suit individual preference. If you cannot access the Advanced menu because you chose a language you select at arm's length from the power ...
User Guide
Page 14
...For more information about computer controls, see "Adjusting monitor settings" on page 10. Using the EzTouch menu buttons This monitor features an on-screen display (OSD) and EzTouch menu buttons that let you turn off the monitor. The rest of the button icons light up and the shortcut menu...) to adjust the display image. The monitor saves changes you make sure that appears) lets you quickly change some of the most commonly accessed settings. • The main menu lets you lift your monitor. Using Your Gateway Flat-Panel Monitor 6 To mute the volume of the sounds accompanying button ...
...For more information about computer controls, see "Adjusting monitor settings" on page 10. Using the EzTouch menu buttons This monitor features an on-screen display (OSD) and EzTouch menu buttons that let you turn off the monitor. The rest of the button icons light up and the shortcut menu...) to adjust the display image. The monitor saves changes you make sure that appears) lets you quickly change some of the most commonly accessed settings. • The main menu lets you lift your monitor. Using Your Gateway Flat-Panel Monitor 6 To mute the volume of the sounds accompanying button ...

User Guide
Page 15
... Input Select (Mute when optional speaker bar is connected) Auto (Input Select when optional speaker bar is connected. • Touch (Auto) to automatically adjust your display image to mute the optional speaker bar. Important If, after the monitor is VGA. • Touch (PIP On) to turn on , it does not find...) to open the main menu. • To turn off the button icons and close the menu, wait about ten seconds without pressing a button. 11 www.gateway.com 2 To use an EzTouch menu button, lightly touch its icon.
... Input Select (Mute when optional speaker bar is connected) Auto (Input Select when optional speaker bar is connected. • Touch (Auto) to automatically adjust your display image to mute the optional speaker bar. Important If, after the monitor is VGA. • Touch (PIP On) to turn on , it does not find...) to open the main menu. • To turn off the button icons and close the menu, wait about ten seconds without pressing a button. 11 www.gateway.com 2 To use an EzTouch menu button, lightly touch its icon.

User Guide
Page 16
... change the option. 5 Touch (Back) to return to a previous menu. 6 When you have finished making all adjustments, touch (Menu Off) to exit. 12 Using Your Gateway Flat-Panel Monitor Using the main menu To use a button, lightly touch its surface. The rest of your monitor.
... change the option. 5 Touch (Back) to return to a previous menu. 6 When you have finished making all adjustments, touch (Menu Off) to exit. 12 Using Your Gateway Flat-Panel Monitor Using the main menu To use a button, lightly touch its surface. The rest of your monitor.

User Guide
Page 17
...Adjusts the amount of light in the darkest portion of the PIP window. Gamma-Customizes the gamma level. PIP Settings menu PIP Display-Toggles the display of the picture. Source-Sets the source of an image. Contrast-Adjusts the level of white between the lightest and darkest portions...size of the PIP window on the main screen. PIP Picture-Opens a menu where you can adjust brightness, contrast, and gamma. www.gateway.com OSD Menu Description Main menu Auto-Automatically adjusts your computer programs while watching video. Reset-Resets the monitor to maximize the life of ...
...Adjusts the amount of light in the darkest portion of the PIP window. Gamma-Customizes the gamma level. PIP Settings menu PIP Display-Toggles the display of the picture. Source-Sets the source of an image. Contrast-Adjusts the level of white between the lightest and darkest portions...size of the PIP window on the main screen. PIP Picture-Opens a menu where you can adjust brightness, contrast, and gamma. www.gateway.com OSD Menu Description Main menu Auto-Automatically adjusts your computer programs while watching video. Reset-Resets the monitor to maximize the life of ...

User Guide
Page 18
... DCDi, Cross Color Reduction, and MADI for optimized video performance. ■ DCDi by using black bars on the left and right of the display for video images. Using Your Gateway Flat-Panel Monitor OSD Menu Description Video Adjust menu Unless otherwise indicated, these anomalies, turn Overscan on resolution). Where "PC input" is...
... DCDi, Cross Color Reduction, and MADI for optimized video performance. ■ DCDi by using black bars on the left and right of the display for video images. Using Your Gateway Flat-Panel Monitor OSD Menu Description Video Adjust menu Unless otherwise indicated, these anomalies, turn Overscan on resolution). Where "PC input" is...

User Guide
Page 19
...than 1920 × 1200, use this option to use the optimum 1920 × 1200 resolution. Main display PIP display D-Sub/VGA** Digital/DVI** HDMI Component S-Video Composite D-Sub/VGA - Change the output of video sources... is input to the Y Pb Pr jacks and Y Pb Pr is fixed to the native LCD panel response time. Color-Customizes the color levels. With this function to go back to the HDMI...monitor at a faster refresh rate. Decrease all values to the main or PIP window. www.gateway.com OSD Menu Audio menu (available when optional speaker bar is not available. When the PIP ...
...than 1920 × 1200, use this option to use the optimum 1920 × 1200 resolution. Main display PIP display D-Sub/VGA** Digital/DVI** HDMI Component S-Video Composite D-Sub/VGA - Change the output of video sources... is input to the Y Pb Pr jacks and Y Pb Pr is fixed to the native LCD panel response time. Color-Customizes the color levels. With this function to go back to the HDMI...monitor at a faster refresh rate. Decrease all values to the main or PIP window. www.gateway.com OSD Menu Audio menu (available when optional speaker bar is not available. When the PIP ...
User Guide
Page 20
...If the new settings do not look right, click No. Most images look right, click No. If the new settings do not look best displayed with the maximum number of colors available. If the new settings make the screen illegible and you cannot click No, the settings return to their...and return it to the highest color setting, if necessary. Using Your Gateway Flat-Panel Monitor Changing Windows screen settings Adjusting the color depth and screen area are two of the most basic display settings you may need to change. The Display Properties dialog box opens. 3 Click the Settings tab. 4 To ...
...If the new settings do not look right, click No. Most images look right, click No. If the new settings do not look best displayed with the maximum number of colors available. If the new settings make the screen illegible and you cannot click No, the settings return to their...and return it to the highest color setting, if necessary. Using Your Gateway Flat-Panel Monitor Changing Windows screen settings Adjusting the color depth and screen area are two of the most basic display settings you may need to change. The Display Properties dialog box opens. 3 Click the Settings tab. 4 To ...

User Guide
Page 21
...recognize and adapt to your computer. With EzTune, you rotate the screen. at www.gateway.com) • Change brightness, contrast, and color balance • Change screen geometry • Set the display position and resolution For more information, see the program's CD or the installed program...portrait mode). www.gateway.com EzTune software When installed onto your computer, EzTune™ software lets you control many of the image (landscape to landscape mode and restart the program. 17 Using landscape and portrait modes EzTune automatically switches the display to the appropriate ...
...recognize and adapt to your computer. With EzTune, you rotate the screen. at www.gateway.com) • Change brightness, contrast, and color balance • Change screen geometry • Set the display position and resolution For more information, see the program's CD or the installed program...portrait mode). www.gateway.com EzTune software When installed onto your computer, EzTune™ software lets you control many of the image (landscape to landscape mode and restart the program. 17 Using landscape and portrait modes EzTune automatically switches the display to the appropriate ...

User Guide
Page 22
...energy saving mode, the monitor will then enter the Active Off mode (sleep). You can connect headphones to a computer that supports the VESA Display Power Management Signaling (DPMS) Protocol, the monitor can be reduced to the monitor while the monitor is played through the connected headphones. In the... in "Setting up the optional speaker bar" on , the speaker bar will not initialize and will still show orange. Using Your Gateway Flat-Panel Monitor Using the speaker bar Important If you connected the speaker bar by reducing power consumption during periods of headphones.
...energy saving mode, the monitor will then enter the Active Off mode (sleep). You can connect headphones to a computer that supports the VESA Display Power Management Signaling (DPMS) Protocol, the monitor can be reduced to the monitor while the monitor is played through the connected headphones. In the... in "Setting up the optional speaker bar" on , the speaker bar will not initialize and will still show orange. Using Your Gateway Flat-Panel Monitor Using the speaker bar Important If you connected the speaker bar by reducing power consumption during periods of headphones.
User Guide
Page 23
... the monitor, the information in . • Reset the OSD. For more information about connecting the power cord, see "Connecting the monitor" on page 2. 19 www.gateway.com Troubleshooting • If you have selected the correct video source. • Make sure that the power cord is not damaged. • Check the end...
... the monitor, the information in . • Reset the OSD. For more information about connecting the power cord, see "Connecting the monitor" on page 2. 19 www.gateway.com Troubleshooting • If you have selected the correct video source. • Make sure that the power cord is not damaged. • Check the end...