
User Guide
Page 3
Contents Using Your Gateway Flat-Panel Monitor 1 Connecting the monitor 2 Attaching the stand 2 Connecting video inputs 2 Connecting USB cables 4 Setting up the optional speaker bar 5 Connecting power 7 Connecting a security cable 7 Adjusting the stand 8 Rotating the screen 8 Ergonomic guidelines 8 Starting the monitor 9 Turning on the ...18 Power management 18 Energy declaration 18 Maintaining 18 Troubleshooting 19 Troubleshooting symptoms 19 No power 19 No picture 19 Display colors are wrong 20 Picture has shadows or "ghosts 20 Color is not uniform 20 Image is not sized or...
Contents Using Your Gateway Flat-Panel Monitor 1 Connecting the monitor 2 Attaching the stand 2 Connecting video inputs 2 Connecting USB cables 4 Setting up the optional speaker bar 5 Connecting power 7 Connecting a security cable 7 Adjusting the stand 8 Rotating the screen 8 Ergonomic guidelines 8 Starting the monitor 9 Turning on the ...18 Power management 18 Energy declaration 18 Maintaining 18 Troubleshooting 19 Troubleshooting symptoms 19 No power 19 No picture 19 Display colors are wrong 20 Picture has shadows or "ghosts 20 Color is not uniform 20 Image is not sized or...

User Guide
Page 5
Using Your Gateway Flat-Panel Monitor • Connecting the monitor • Adjusting the stand • Starting the monitor • Adjusting monitor settings • Changing Windows screen settings • Using the speaker bar • Power management • Maintaining • Troubleshooting • FAQs • Specifications 1
Using Your Gateway Flat-Panel Monitor • Connecting the monitor • Adjusting the stand • Starting the monitor • Adjusting monitor settings • Changing Windows screen settings • Using the speaker bar • Power management • Maintaining • Troubleshooting • FAQs • Specifications 1
User Guide
Page 6
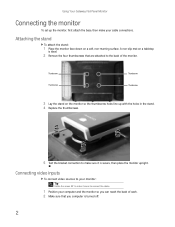
... the monitor so the thumbscrew holes line up the monitor, first attach the base, then make your cable connections. Attaching the stand To attach the stand: 1 Place the monitor face-down on a tabletop is ideal. 2 Remove the four thumbscrews that you can reach the back of each. 2 Make sure...is secure, then place the monitor upright. A non-slip mat on a soft, non-marring surface. Using Your Gateway Flat-Panel Monitor Connecting the monitor To set up with the holes in the stand. 4 Replace the thumbscrews. 5 Test the bracket connection to make sure it easier to connect the cables. 1 Position...
... the monitor so the thumbscrew holes line up the monitor, first attach the base, then make your cable connections. Attaching the stand To attach the stand: 1 Place the monitor face-down on a tabletop is ideal. 2 Remove the four thumbscrews that you can reach the back of each. 2 Make sure...is secure, then place the monitor upright. A non-slip mat on a soft, non-marring surface. Using Your Gateway Flat-Panel Monitor Connecting the monitor To set up with the holes in the stand. 4 Replace the thumbscrews. 5 Test the bracket connection to make sure it easier to connect the cables. 1 Position...

User Guide
Page 8
... to the corresponding jacks on the back of your monitor (cables not included). 6 Route the cables through the cable clip on the side of the stand. Because the USB hub uses power from the monitor, it does not require its USB in ("B" type) port USB ports 4 To connect USB cables: ... included). • For best video quality, connect your video device's component video (green Y, blue Pb, and red Pr) or HDMI jacks to access. Using Your Gateway Flat-Panel Monitor 5 Connect other end of the cable to a USB 2.0 port on the back of the time, such as a DVD player, video camera, or...
... to the corresponding jacks on the back of your monitor (cables not included). 6 Route the cables through the cable clip on the side of the stand. Because the USB hub uses power from the monitor, it does not require its USB in ("B" type) port USB ports 4 To connect USB cables: ... included). • For best video quality, connect your video device's component video (green Y, blue Pb, and red Pr) or HDMI jacks to access. Using Your Gateway Flat-Panel Monitor 5 Connect other end of the cable to a USB 2.0 port on the back of the time, such as a DVD player, video camera, or...

User Guide
Page 12
... landscape and portrait views. You can rotate the screen clockwise 90° to change between the speaker bar and the tabletop. When the display is rotated to portrait mode, the side-to-side viewing angle may need to adjust lighting to avoid screen glare when the screen is ...about 1 inch or 25 mm) your eye level while you are based on available scientific literature and published standards. Using Your Gateway Flat-Panel Monitor Adjusting the stand Rotating the screen Tip To rotate the screen while the optional speaker bar is attached, first tilt the screen back for most consistent...
... landscape and portrait views. You can rotate the screen clockwise 90° to change between the speaker bar and the tabletop. When the display is rotated to portrait mode, the side-to-side viewing angle may need to adjust lighting to avoid screen glare when the screen is ...about 1 inch or 25 mm) your eye level while you are based on available scientific literature and published standards. Using Your Gateway Flat-Panel Monitor Adjusting the stand Rotating the screen Tip To rotate the screen while the optional speaker bar is attached, first tilt the screen back for most consistent...

User Guide
Page 21
... brightness, contrast, and color balance • Change screen geometry • Set the display position and resolution For more information, see the program's CD or the installed program's online help. www.gateway.com EzTune software When installed onto your computer, EzTune™ software lets you control... the screen (requires the optional height-adjustable stand available in the U.S. While using VGA, DVI, or HDMI input (the OSD itself does not rotate into portrait mode). Using landscape and portrait modes EzTune automatically switches the display to your computer. If you can: &#...
... brightness, contrast, and color balance • Change screen geometry • Set the display position and resolution For more information, see the program's CD or the installed program's online help. www.gateway.com EzTune software When installed onto your computer, EzTune™ software lets you control... the screen (requires the optional height-adjustable stand available in the U.S. While using VGA, DVI, or HDMI input (the OSD itself does not rotate into portrait mode). Using landscape and portrait modes EzTune automatically switches the display to your computer. If you can: &#...

User Guide
Page 26
... edge transitions and fills in Windows XP, see no image on the screen. For information on adjusting settings in any of the gaps that stands for the major video card manufacturers are: ATI®: http://www.ati.com Intel®: http://www.intel.com Nvidia®: http://www.... See Windows Help to learn how to my computer, I see 1920 × 1200 available in extended desktop multi-monitor mode. On Gateway notebooks, this monitor as your video card can display at full speed. • This can also use the notebook's screen. I connect the monitor to my computer? • You ...
... edge transitions and fills in Windows XP, see no image on the screen. For information on adjusting settings in any of the gaps that stands for the major video card manufacturers are: ATI®: http://www.ati.com Intel®: http://www.intel.com Nvidia®: http://www.... See Windows Help to learn how to my computer, I see 1920 × 1200 available in extended desktop multi-monitor mode. On Gateway notebooks, this monitor as your video card can display at full speed. • This can also use the notebook's screen. I connect the monitor to my computer? • You ...

User Guide
Page 29
www.gateway.com Included cables 15-pin mini d-sub analog VGA DVI cable USB A-B Power Power consumption Normal operation:
www.gateway.com Included cables 15-pin mini d-sub analog VGA DVI cable USB A-B Power Power consumption Normal operation:


