
Acer Extensa Notebook Series Generic User Guide
Page 19
... High-Definition Multimedia Interface (only for certain models) 39 PC Card slot 39 ExpressCard 40 Installing memory 41 BIOS utility 43 Boot sequence 43 Enable disk-to RF fields (RSS-102) 63 LCD panel ergonomic specifications 64 Index 65 Low-power license-exempt... 43 Using software 44 Playing DVD movies 44 Power management 45 Acer eRecovery Management 46 Burn backup discs 47 Create a user backup 48 Manage user backups 50 Restore 51 Restore Windows Vista from backup discs 52 Troubleshooting 55 Troubleshooting tips 55 Error messages 55 Regulations and ...
... High-Definition Multimedia Interface (only for certain models) 39 PC Card slot 39 ExpressCard 40 Installing memory 41 BIOS utility 43 Boot sequence 43 Enable disk-to RF fields (RSS-102) 63 LCD panel ergonomic specifications 64 Index 65 Low-power license-exempt... 43 Using software 44 Playing DVD movies 44 Power management 45 Acer eRecovery Management 46 Burn backup discs 47 Create a user backup 48 Manage user backups 50 Restore 51 Restore Windows Vista from backup discs 52 Troubleshooting 55 Troubleshooting tips 55 Error messages 55 Regulations and ...
Acer Extensa Notebook Series Generic User Guide
Page 72
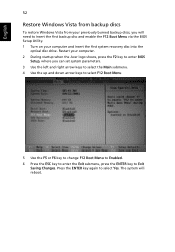
...computer. 2 During startup when the Acer logo shows, press the F2 key to enter BIOS Setup, where you will reboot. The system will need to insert the first backup disc and enable the F12 Boot Menu via the BIOS Setup Utility. 1 Turn on your previously burned backup discs, you can set system parameters. ...F5 or F6 key to change F12 Boot Menu to Enabled. 6 Press the ESC key to enter the Exit submenu, press the ENTER key to Exit Saving Changes. Press the ENTER key again to select Yes. English 52 Restore Windows Vista from backup discs To restore Windows Vista from your computer and ...
...computer. 2 During startup when the Acer logo shows, press the F2 key to enter BIOS Setup, where you will reboot. The system will need to insert the first backup disc and enable the F12 Boot Menu via the BIOS Setup Utility. 1 Turn on your previously burned backup discs, you can set system parameters. ...F5 or F6 key to change F12 Boot Menu to Enabled. 6 Press the ESC key to enter the Exit submenu, press the ENTER key to Exit Saving Changes. Press the ENTER key again to select Yes. English 52 Restore Windows Vista from backup discs To restore Windows Vista from your computer and ...

Acer Extensa Notebook Series Generic User Guide
Page 73
English 53 7 After rebooting, when the Acer logo shows, press the F12 key to select the IDE CD, then press the ENTER key. Here you can select which device to boot from the optical drive once the restore is only available on certain models. Do this before rebooting your computer. Windows will be installed from the recovery disc. 9 Insert the second recovery disc when prompted, then follow the onscreen prompts to complete the restore. 10 Remove the recovery disc from . 8 Use the arrow keys to open the Boot Menu. Note: This feature is complete.
English 53 7 After rebooting, when the Acer logo shows, press the F12 key to select the IDE CD, then press the ENTER key. Here you can select which device to boot from the optical drive once the restore is only available on certain models. Do this before rebooting your computer. Windows will be installed from the recovery disc. 9 Insert the second recovery disc when prompted, then follow the onscreen prompts to complete the restore. 10 Remove the recovery disc from . 8 Use the arrow keys to open the Boot Menu. Note: This feature is complete.

Acer Extensa Notebook Series Generic User Guide
Page 74
Do this before rebooting your computer. 2 During startup when the Acer logo shows, press the F2 key to enter BIOS Setup, where you can set the boot priority for long-term use the F5 key to move other devices to select Yes. Ensure that the IDE CD device is...ENTER key again to a lower boot priority. The system will reboot. 7 When you reboot, Windows will be installed from the recovery disc. 8 Insert the second recovery disc when prompted, then follow the onscreen prompts to complete the restore. 9 Remove the recovery disc from the optical drive once the restore is the highest priority. 6...
Do this before rebooting your computer. 2 During startup when the Acer logo shows, press the F2 key to enter BIOS Setup, where you can set the boot priority for long-term use the F5 key to move other devices to select Yes. Ensure that the IDE CD device is...ENTER key again to a lower boot priority. The system will reboot. 7 When you reboot, Windows will be installed from the recovery disc. 8 Insert the second recovery disc when prompted, then follow the onscreen prompts to complete the restore. 9 Remove the recovery disc from the optical drive once the restore is the highest priority. 6...


