User Manual
Page 18
...) 74 IEEE 1394 port (for selected models) 74 PC Card slot 75 Installing memory 75 BIOS utility 76 Boot sequence 76 Enable disk-to-disk recovery 77 Password 77 Using software 78 Playing DVD movies 78 Acer eRecovery Management 79 Create backup 79 Burn backup disc 80 Restore and recovery 80 Troubleshooting...
...) 74 IEEE 1394 port (for selected models) 74 PC Card slot 75 Installing memory 75 BIOS utility 76 Boot sequence 76 Enable disk-to-disk recovery 77 Password 77 Using software 78 Playing DVD movies 78 Acer eRecovery Management 79 Create backup 79 Burn backup disc 80 Restore and recovery 80 Troubleshooting...
User Manual
Page 30
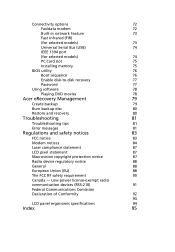
Empowering Technology 12 Acer eSettings Management Acer eSettings Management allows you set BIOS passwords and modify boot options. Acer eSettings Management also: • Provides a simple graphical user interface for navigation. • Prints and saves hardware specifications. • Lets you to inspect hardware specifications, set an asset tag for your system.
Empowering Technology 12 Acer eSettings Management Acer eSettings Management allows you set BIOS passwords and modify boot options. Acer eSettings Management also: • Provides a simple graphical user interface for navigation. • Prints and saves hardware specifications. • Lets you to inspect hardware specifications, set an asset tag for your system.
User Manual
Page 50
... Icon + Function Hotkey help + Acer eSettings + Acer ePower Management + + Sleep Display toggle + Screen blank Description Displays help on page 1. See "Acer Empowering Technology" on page 1. Launches Acer eSettings in Sleep mode. Puts the computer in Acer Empowering Technology. Turns the display screen...off to return. To activate hotkeys, press and hold the key before pressing the other key in Acer Empowering Technology. Launches Acer ePower Management in the hotkey combination. English 32 Hotkeys The computer employs hotkeys or key combinations to ...
... Icon + Function Hotkey help + Acer eSettings + Acer ePower Management + + Sleep Display toggle + Screen blank Description Displays help on page 1. See "Acer Empowering Technology" on page 1. Launches Acer eSettings in Sleep mode. Puts the computer in Acer Empowering Technology. Turns the display screen...off to return. To activate hotkeys, press and hold the key before pressing the other key in Acer Empowering Technology. Launches Acer ePower Management in the hotkey combination. English 32 Hotkeys The computer employs hotkeys or key combinations to ...
User Manual
Page 64
See "Hotkeys" on page 32 for printing to an infrared printer). • During the POST, press to access the BIOS utility and verify that the infrared ports of the two devices are facing each other (+/- 15 degrees) a maximum of a pen or paperclip into the hole ...
See "Hotkeys" on page 32 for printing to an infrared printer). • During the POST, press to access the BIOS utility and verify that the infrared ports of the two devices are facing each other (+/- 15 degrees) a maximum of a pen or paperclip into the hole ...
User Manual
Page 65
... and save changes. The system will be the only option for future recovery operations. Before performing a restore operation, please check the BIOS settings. 1 Check to see if Acer disk-to-disk recovery is enabled or not. 2 Make sure the D2D Recovery setting in Main is the multilingual version, the operating system and...
... and save changes. The system will be the only option for future recovery operations. Before performing a restore operation, please check the BIOS settings. 1 Check to see if Acer disk-to-disk recovery is enabled or not. 2 Make sure the D2D Recovery setting in Main is the multilingual version, the operating system and...
User Manual
Page 88
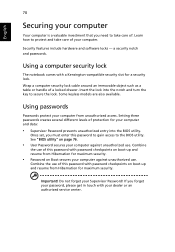
... authorized service center. Do not forget your computer from Hibernation for your computer against unauthorized use of this password to gain access to the BIOS utility. Some keyless models are also available. Combine the use . Using passwords Passwords protect your Supervisor Password! Using a computer security lock... Learn how to secure the lock. a security notch and passwords. Security features include hardware and software locks - Insert the lock into the BIOS utility. Wrap a computer security lock cable around an immovable object such as a table or handle of . See...
... authorized service center. Do not forget your computer from Hibernation for your computer against unauthorized use of this password to gain access to the BIOS utility. Some keyless models are also available. Combine the use . Using passwords Passwords protect your Supervisor Password! Using a computer security lock... Learn how to secure the lock. a security notch and passwords. Security features include hardware and software locks - Insert the lock into the BIOS utility. Wrap a computer security lock cable around an immovable object such as a table or handle of . See...
User Manual
Page 89
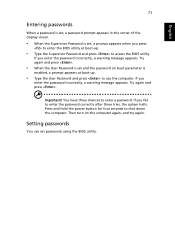
...password correctly after three tries, the system halts. If you enter the password incorrectly, a warning message appears. If you press to enter the BIOS utility at boot-up . • Type the Supervisor Password and press to use the computer. You have three chances to shut down the computer...• When the User Password is set and the password on the computer again, and try again. Setting passwords You can set passwords using the BIOS utility. English 71 Entering passwords When a password is set, a password prompt appears in the center of the display screen. • When the ...
...password correctly after three tries, the system halts. If you enter the password incorrectly, a warning message appears. If you press to enter the BIOS utility at boot-up . • Type the Supervisor Password and press to use the computer. You have three chances to shut down the computer...• When the User Password is set and the password on the computer again, and try again. Setting passwords You can set passwords using the BIOS utility. English 71 Entering passwords When a password is set, a password prompt appears in the center of the display screen. • When the ...

User Manual
Page 94
... a qualified technician or contact your computer's BIOS. then lift up and remove the memory cover. 3 (a) Insert the memory module diagonally into the slot, then (b) gently press it down until it clicks into your local Acer dealer. BIOS utility The BIOS utility is a hardware configuration program built into... place. 4 Replace the memory cover and secure it . To activate the BIOS utility, press during the POST; Boot sequence To set the boot...
... a qualified technician or contact your computer's BIOS. then lift up and remove the memory cover. 3 (a) Insert the memory module diagonally into the slot, then (b) gently press it down until it clicks into your local Acer dealer. BIOS utility The BIOS utility is a hardware configuration program built into... place. 4 Replace the memory cover and secure it . To activate the BIOS utility, press during the POST; Boot sequence To set the boot...

User Manual
Page 95
Find Password on boot, activate the BIOS utility, then select Security from the categories listed at the top of the screen. English 77 Enable disk-to-disk recovery To enable disk-to enable this value to Enabled. Password To set a password on boot: and use the and keys to -disk recovery (hard disk recovery), activate the BIOS utility, then select Main from the categories listed at the bottom of the screen. Find D2D Recovery at the top of the screen and use the and keys to set this feature.
Find Password on boot, activate the BIOS utility, then select Security from the categories listed at the top of the screen. English 77 Enable disk-to-disk recovery To enable disk-to enable this value to Enabled. Password To set a password on boot: and use the and keys to -disk recovery (hard disk recovery), activate the BIOS utility, then select Main from the categories listed at the bottom of the screen. Find D2D Recovery at the top of the screen and use the and keys to set this feature.
User Manual
Page 99
.... Read it before calling a technician if a problem occurs. Memory size mismatch Press (during POST) to enter the BIOS utility, then press Exit in the BIOS utility to reboot. Solutions to reboot. contact your dealer. Do not attempt to open the computer yourself; Hard disk ...0 extended Contact your dealer or an authorized service center. Equipment configuration error Press (during POST) to enter the BIOS utility, then press Exit in the BIOS utility to reboot. Keyboard error or no Contact your dealer or an authorized service center. 81 English English Troubleshooting ...
.... Read it before calling a technician if a problem occurs. Memory size mismatch Press (during POST) to enter the BIOS utility, then press Exit in the BIOS utility to reboot. Solutions to reboot. contact your dealer. Do not attempt to open the computer yourself; Hard disk ...0 extended Contact your dealer or an authorized service center. Equipment configuration error Press (during POST) to enter the BIOS utility, then press Exit in the BIOS utility to reboot. Keyboard error or no Contact your dealer or an authorized service center. 81 English English Troubleshooting ...

User Manual
Page 100
82 If you still encounter problems after going through the corrective measures, please contact your dealer or an authorized service center for assistance. English Some problems may be solved using the BIOS utility.
82 If you still encounter problems after going through the corrective measures, please contact your dealer or an authorized service center for assistance. English Some problems may be solved using the BIOS utility.

User Manual
Page 113
... characteristics 49 charging 51 checking charge level 51 installing 50 low conditions 52 maximizing life 49 optimizing 51 removing 51 using the first time 49 BIOS utility 76 brightness hotkeys 33 C caps lock 30 on indicator 26 care AC adapter xiii battery pack xiv computer xiii CD-ROM ejecting manually 46...
... characteristics 49 charging 51 checking charge level 51 installing 50 low conditions 52 maximizing life 49 optimizing 51 removing 51 using the first time 49 BIOS utility 76 brightness hotkeys 33 C caps lock 30 on indicator 26 care AC adapter xiii battery pack xiv computer xiii CD-ROM ejecting manually 46...


