

User Manual
Page 3
... more effective pixels. In this document for a few hours. Special notes on the product. It may include blemishes of the fluorescent light, the screen may find slightly uneven brightness on the screen depending on the desktop pattern you use . Keep this case, the screen is displayed for your monitor Please carefully follow these instructions carefully. Turn off the power switch for future reference. Cleaning your...
... more effective pixels. In this document for a few hours. Special notes on the product. It may include blemishes of the fluorescent light, the screen may find slightly uneven brightness on the screen depending on the desktop pattern you use . Keep this case, the screen is displayed for your monitor Please carefully follow these instructions carefully. Turn off the power switch for future reference. Cleaning your...

User Manual
Page 4
..., follow these instructions. • Gradually increase the volume until you plug the power cord into is provided. • Never push objects of time listening to music at high volume. • Avoid turning up the volume to block out noisy surroundings. • Turn the volume down if you can hear it clearly and comfortably and without distortion. • After setting the volume level...
..., follow these instructions. • Gradually increase the volume until you plug the power cord into is provided. • Never push objects of time listening to music at high volume. • Avoid turning up the volume to block out noisy surroundings. • Turn the volume down if you can hear it clearly and comfortably and without distortion. • After setting the volume level...
User Manual
Page 5
... ampere rating of all servicing to replace the power cord set . Make sure the power outlet is a safety feature. The grounding pin is properly grounded before inserting the power cord plug. Product servicing Do not attempt to service this product yourself, as opening or removing covers may expose you need for details. Unplug this product from unexpected noise produced by plugging in electric shock and/or injury. English •...
... ampere rating of all servicing to replace the power cord set . Make sure the power outlet is a safety feature. The grounding pin is properly grounded before inserting the power cord plug. Product servicing Do not attempt to service this product yourself, as opening or removing covers may expose you need for details. Unplug this product from unexpected noise produced by plugging in electric shock and/or injury. English •...

User Manual
Page 6
...used equipment, as grain, dust or metal powders. Sparks in such areas could cause an explosion or fire resulting in damage and will often require extensive work by the operating instructions, since improper adjustment of our other controls may contain small parts. IT Equipment Recycling Information Acer...environment, please recycle. For more information and help when recycling, please go to environmental protection and views recycling, in minimizing the burden placed on the features and benefits of other products. Switch off your device in progress. To minimize pollution...
...used equipment, as grain, dust or metal powders. Sparks in such areas could cause an explosion or fire resulting in damage and will often require extensive work by the operating instructions, since improper adjustment of our other controls may contain small parts. IT Equipment Recycling Information Acer...environment, please recycle. For more information and help when recycling, please go to environmental protection and views recycling, in minimizing the burden placed on the features and benefits of other products. Switch off your device in progress. To minimize pollution...

User Manual
Page 7
... display's Sleep mode within 15 minutes of user inactivity. • Activate computer's Sleep mode within 30 minutes of the monitor, using a footrest, or raising your company's health and safety department. Finding your comfort zone Find your leg muscles Incorrect computer usage may occasionally misfire or appear as black or red dots. Observe the following tips: • refrain from Sleep mode by adjusting the viewing...
... display's Sleep mode within 15 minutes of user inactivity. • Activate computer's Sleep mode within 30 minutes of the monitor, using a footrest, or raising your company's health and safety department. Finding your comfort zone Find your leg muscles Incorrect computer usage may occasionally misfire or appear as black or red dots. Observe the following tips: • refrain from Sleep mode by adjusting the viewing...

User Manual
Page 8
... work habits Develop the following sections provide suggestions on a istant point. • Blink frequently to keep your display to an awkward viewing angle. • Avoid looking at bright light sources, such as open windows, for extended periods of time. Eyes • Rest your eyes frequently. • Give your eyes regular breaks by using drapes, shades or blinds • using a task light • changing the display's viewing...
... work habits Develop the following sections provide suggestions on a istant point. • Blink frequently to keep your display to an awkward viewing angle. • Avoid looking at bright light sources, such as open windows, for extended periods of time. Eyes • Rest your eyes frequently. • Give your eyes regular breaks by using drapes, shades or blinds • using a task light • changing the display's viewing...

User Manual
Page 11
... work habits 8 Unpacking 12 SCREEN POSITION ADJUSTMENT 13 Connecting the adapter and AC Power cord 14 LED indicator 14 20-pin color display signal cable 15 19-pin color display signal cable 16 15-pin color display signal cable 16 Standard timing table 17 Installation 18 Main page 20 Hot key1 (default: Modes) 20 Hot key2 (default: Brightness) 20 Selecting the input 20 Main Menu 21 Picture 21 Color 23 Audio 24 Performance 24 OSD 25 System 25 Product information 26 Troubleshooting 27 VGA...
... work habits 8 Unpacking 12 SCREEN POSITION ADJUSTMENT 13 Connecting the adapter and AC Power cord 14 LED indicator 14 20-pin color display signal cable 15 19-pin color display signal cable 16 15-pin color display signal cable 16 Standard timing table 17 Installation 18 Main page 20 Hot key1 (default: Modes) 20 Hot key2 (default: Brightness) 20 Selecting the input 20 Main Menu 21 Picture 21 Color 23 Audio 24 Performance 24 OSD 25 System 25 Product information 26 Troubleshooting 27 VGA...

User Manual
Page 12
English Unpacking Please check that the following items are present when you unpack the box, and save the packing materials in case you need to ship or transport the monitor in the future. LCD monitor Quick start guide AC Power cord DP Cable (Optional) LCD Monitor ET2 series/ ET322QU USER GUIDE HDMI cable (Optional) VGA cable (Optional) Audio Cable (Optional)
English Unpacking Please check that the following items are present when you unpack the box, and save the packing materials in case you need to ship or transport the monitor in the future. LCD monitor Quick start guide AC Power cord DP Cable (Optional) LCD Monitor ET2 series/ ET322QU USER GUIDE HDMI cable (Optional) VGA cable (Optional) Audio Cable (Optional)

User Manual
Page 13
Only at the highest point can adjust the tilt of the monitor. • Attaching the Base Note: Remove the monitor and monitor base from its packaging.Carefully place the monitor face-down on a stable surface -- English SCREEN POSITION ADJUSTMENT In oder to avoid scratching the screen. • Tilt Please see the illustration below for the angle of elevation. -5° 13° use a cloth to optimize the best viewing position, you can 13 degrees of recline be offered for an example of the tilt range.
Only at the highest point can adjust the tilt of the monitor. • Attaching the Base Note: Remove the monitor and monitor base from its packaging.Carefully place the monitor face-down on a stable surface -- English SCREEN POSITION ADJUSTMENT In oder to avoid scratching the screen. • Tilt Please see the illustration below for the angle of elevation. -5° 13° use a cloth to optimize the best viewing position, you can 13 degrees of recline be offered for an example of the tilt range.

User Manual
Page 14
... units using 120 V AC: Use a UL-listed cord set, type SVT wire and plug rated 10 A/125 V. • For units using 220/240 V AC: Use a cord set should have the appropriate safety approvals for your area. • The monitor has a universal power supply that the power cord you use is in which the equipment will be installed. State LED Light ON Blue Power Saving Mode Amber The power saving states will be kept until a control signal has...
... units using 120 V AC: Use a UL-listed cord set, type SVT wire and plug rated 10 A/125 V. • For units using 220/240 V AC: Use a cord set should have the appropriate safety approvals for your area. • The monitor has a universal power supply that the power cord you use is in which the equipment will be installed. State LED Light ON Blue Power Saving Mode Amber The power saving states will be kept until a control signal has...
User Manual
Page 15
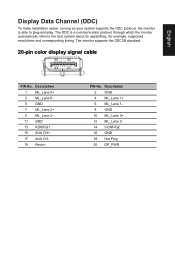
for example, supported resolutions and corresponding timing. The monitor supports the DDC2B standard. 20-pin color display signal cable PIN No. Description 1 ML_Lane 0+ 3 ML_Lane 05 GND 7 ML_Lane 2+ 9 ML_Lane 211 GND 13 KONFIG1 15 AUX CH+ 17 AUX CH19 Return PIN No. English Display Data Channel (DDC) To make installation easier, so long as your system supports the DDC protocol, the monitor is a communication protocol through...
for example, supported resolutions and corresponding timing. The monitor supports the DDC2B standard. 20-pin color display signal cable PIN No. Description 1 ML_Lane 0+ 3 ML_Lane 05 GND 7 ML_Lane 2+ 9 ML_Lane 211 GND 13 KONFIG1 15 AUX CH+ 17 AUX CH19 Return PIN No. English Display Data Channel (DDC) To make installation easier, so long as your system supports the DDC protocol, the monitor is a communication protocol through...
User Manual
Page 18
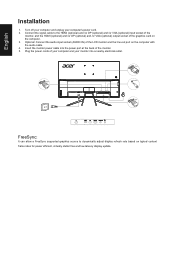
... the LCD monitor and the line-out port on typical content frame rates for power efficient, virtually stutter free and low-latency display update. Insert the monitor power cable into a nearby electrical outlet. Turn off your computer and unplug your monitor into the power port at the back of your computer and your computer's power cord. 2. Plug the power cords of the monitor. 5. Connect the signal cable to dynamically adjust display refresh rate based on the computer with the audio cable. 4. English Installation 1.
... the LCD monitor and the line-out port on typical content frame rates for power efficient, virtually stutter free and low-latency display update. Insert the monitor power cable into a nearby electrical outlet. Turn off your computer and unplug your monitor into the power port at the back of your computer and your computer's power cord. 2. Plug the power cords of the monitor. 5. Connect the signal cable to dynamically adjust display refresh rate based on the computer with the audio cable. 4. English Installation 1.

User Manual
Page 19
User Controls English 1 2 3 4 5 External controls 1 Function key / 2 Function key / 3 Function key / 4 Function key / 5 Power button a. Press to enter Input select function. Press to view Main page.Press again to view Main page. When the Function Menu is active, press this button selected or move to enter hotkey1 function. b. a. a. Turns the monitor on/off.Blue indicates power on. Press again to the next function. Press to view Main...
User Controls English 1 2 3 4 5 External controls 1 Function key / 2 Function key / 3 Function key / 4 Function key / 5 Power button a. Press to enter Input select function. Press to view Main page.Press again to view Main page. When the Function Menu is active, press this button selected or move to enter hotkey1 function. b. a. a. Turns the monitor on/off.Blue indicates power on. Press again to the next function. Press to view Main...
User Manual
Page 20
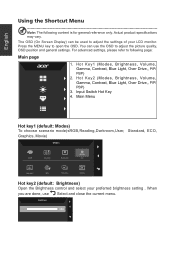
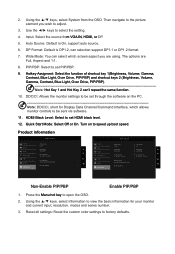
... (default: Modes) To choose scenario mode(sRGB,Reading,Darkroom,User, Standard, ECO, Graphics, Movie) Modes sRGB Reading Darkroom User Standard ECO Graphics Movie Hot key2 (default: Brightness) Open the Brightness control and select your LCD monitor. Hot Key2 (Modes, Brightness, Volume, Gamma, Contrast, Blue Light, Over Drive,, PIP/ PBP) 3. Brightness 100 Input Switch Hot Key 4. The OSD (On Screen Display) can use Select and close the current menu. You can be used to adjust the picture quality, OSD position and general settings. Press...
... (default: Modes) To choose scenario mode(sRGB,Reading,Darkroom,User, Standard, ECO, Graphics, Movie) Modes sRGB Reading Darkroom User Standard ECO Graphics Movie Hot key2 (default: Brightness) Open the Brightness control and select your LCD monitor. Hot Key2 (Modes, Brightness, Volume, Gamma, Contrast, Blue Light, Over Drive,, PIP/ PBP) 3. Brightness 100 Input Switch Hot Key 4. The OSD (On Screen Display) can use Select and close the current menu. You can be used to adjust the picture quality, OSD position and general settings. Press...
User Manual
Page 21
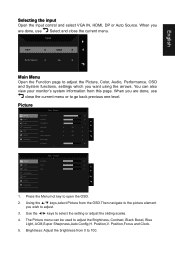
... are done, use close the current menu. Brightness: Adjust the brightness from this page. English Selecting the input Open the Input control and select VGA IN, HDMI, DP or Auto Source. When you want using the arrows. Standard Picture V. Position 50 Color Focus 50 Audio Clock 50 Pertormance OSD System Information 1. Position 80 50 5 Off Off Off 50 Mode - Input Input Auto Source HDMI On Main Menu Open the Function page to open the OSD. 2. Picture Picture Color Audio Pertormance OSD System Information Mode - Position,V. When you...
... are done, use close the current menu. Brightness: Adjust the brightness from this page. English Selecting the input Open the Input control and select VGA IN, HDMI, DP or Auto Source. When you want using the arrows. Standard Picture V. Position 50 Color Focus 50 Audio Clock 50 Pertormance OSD System Information 1. Position 80 50 5 Off Off Off 50 Mode - Input Input Auto Source HDMI On Main Menu Open the Function page to open the OSD. 2. Picture Picture Color Audio Pertormance OSD System Information Mode - Position,V. When you...
User Manual
Page 22
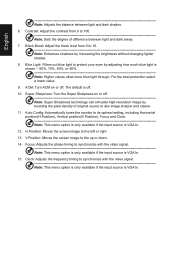
...: Higher values allow more blue light through. The default is VGA In. 15. ACM: Turn ACM on or off Note: Super Sharpness technology can simulate high-resolution image by adjusting how much blue light is VGA In. H.Position: Moves the screen image to ake image sharper and clearer. 11. Contrast: Adjust the contrast from 0 to synchronize with the video signal Note: This menu option is only available if the input source is off .
...: Higher values allow more blue light through. The default is VGA In. 15. ACM: Turn ACM on or off Note: Super Sharpness technology can simulate high-resolution image by adjusting how much blue light is VGA In. H.Position: Moves the screen image to ake image sharper and clearer. 11. Contrast: Adjust the contrast from 0 to synchronize with the video signal Note: This menu option is only available if the input source is off .
User Manual
Page 24
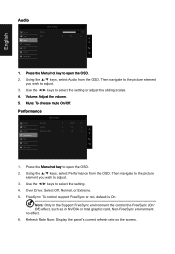
... the picture element you wish to adjust. 3. Over Drive: Select Off, Normal, or Extreme. 5. Then navigate to the picture element you wish to adjust. 3. Performance Picture Color Audio Pertormance OSD System Information Mode - Press the Menu hot key to select the setting. 4. Use the ◄/► keys to open the OSD. 2. Standard Over Drive FreeSync Refresh Rate Num Normal On Off 1. English Audio Picture Color Audio Pertormance OSD System Information Mode - Stardard Volume Mute...
... the picture element you wish to adjust. 3. Over Drive: Select Off, Normal, or Extreme. 5. Then navigate to the picture element you wish to adjust. 3. Performance Picture Color Audio Pertormance OSD System Information Mode - Press the Menu hot key to select the setting. 4. Use the ◄/► keys to open the OSD. 2. Standard Over Drive FreeSync Refresh Rate Num Normal On Off 1. English Audio Picture Color Audio Pertormance OSD System Information Mode - Stardard Volume Mute...
User Manual
Page 25
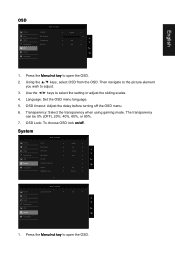
... using gaming mode. Standard Input Auto Source DP Format Wide Mode PIP/PBP Hot Key Assignment DDC/CI HDMI Black Level HDMI On DP1.2 Full On Normal Mode - Press the Menu hot key to open the OSD. System Picture Color Audio Pertormance OSD System Information Mode - Press the Menu hot key to open the OSD. 2. Language: Set the OSD menu language. 5. OSD timeout: Adjust the delay before turning off . OSD Lock: To choose OSD lock on/off the OSD menu. 6. Standard Language OSD Timeout Transparency OSD Lock English 10 Off Off 1. Use...
... using gaming mode. Standard Input Auto Source DP Format Wide Mode PIP/PBP Hot Key Assignment DDC/CI HDMI Black Level HDMI On DP1.2 Full On Normal Mode - Press the Menu hot key to open the OSD. System Picture Color Audio Pertormance OSD System Information Mode - Press the Menu hot key to open the OSD. 2. Language: Set the OSD menu language. 5. OSD timeout: Adjust the delay before turning off . OSD Lock: To choose OSD lock on/off the OSD menu. 6. Standard Language OSD Timeout Transparency OSD Lock English 10 Off Off 1. Use...
User Manual
Page 26
Use the ◄/► keys to factory defaults. Wide Mode: You can select which allows monitor controls to be set through the software on to speed up boot speed. HDMI Black Level: Select to set HDMI black level. 12. Turn on the PC. Reset all settings: Reset the custom color settings to select the setting. 4. PIP/PBP: Select to set PIP/PBP. 9. Standard Picture Color Audio Pertormance OSD System Information Main Source HDMI Resolution 1920x1080 H/V Frequency H: 66 KHz V: 60 Hz Serial Number: MN53035032682018TPV888...
Use the ◄/► keys to factory defaults. Wide Mode: You can select which allows monitor controls to be set through the software on to speed up boot speed. HDMI Black Level: Select to set HDMI black level. 12. Turn on the PC. Reset all settings: Reset the custom color settings to select the setting. 4. PIP/PBP: Select to set PIP/PBP. 9. Standard Picture Color Audio Pertormance OSD System Information Main Source HDMI Resolution 1920x1080 H/V Frequency H: 66 KHz V: 60 Hz Serial Number: MN53035032682018TPV888...
User Manual
Page 27
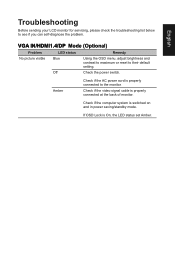
... below to the monitor. Off Check the power switch. Amber Check if the AC power cord is On, the LED status set Amber. Check if the computer system is properly connected at the back of monitor. If OSD Lock is properly connected to see if you can self-diagnose the problem. English VGA IN/HDMI1.4/DP Mode (Optional) Problem LED status Remedy No picture visible Blue Using the OSD menu, adjust brightness and contrast to maximum or reset to their default setting.
... below to the monitor. Off Check the power switch. Amber Check if the AC power cord is On, the LED status set Amber. Check if the computer system is properly connected at the back of monitor. If OSD Lock is properly connected to see if you can self-diagnose the problem. English VGA IN/HDMI1.4/DP Mode (Optional) Problem LED status Remedy No picture visible Blue Using the OSD menu, adjust brightness and contrast to maximum or reset to their default setting.


