
User Manual
Page 3
... the monitor before cleaning. • Use a soft cloth to the nature of the fluorescent light, the screen may include blemishes of 0.01% or less such as a missing pixel or a pixel lit all warnings and instructions marked on LCD monitors The following guidelines when connecting and disconnecting power from the system by changing the image or turning off the power switch for your monitor Please carefully follow these instructions carefully. Connecting...
... the monitor before cleaning. • Use a soft cloth to the nature of the fluorescent light, the screen may include blemishes of 0.01% or less such as a missing pixel or a pixel lit all warnings and instructions marked on LCD monitors The following guidelines when connecting and disconnecting power from the system by changing the image or turning off the power switch for your monitor Please carefully follow these instructions carefully. Connecting...

User Manual
Page 4
...; Turn the volume down if you can't hear people speaking near you need to disconnect power from the equipment, be sure to unplug the power cord from the electrical outlet. If you plug the power cord into is easily accessible and located as close to the equipment operator as they may touch dangerous voltage points or short-out parts that the power...
...; Turn the volume down if you can't hear people speaking near you need to disconnect power from the equipment, be sure to unplug the power cord from the electrical outlet. If you plug the power cord into is easily accessible and located as close to the equipment operator as they may touch dangerous voltage points or short-out parts that the power...
User Manual
Page 5
... that the total rating of all servicing to qualified service personnel when: • the power cord or plug is equipped with the supplied power supply cord set , make sure that the new power cord meets the following the operating instructions If you to replace the power cord set . Unplug this product from unexpected noise produced by plugging in performance, indicating a need to dangerous voltage points or other nearby electrical devices that...
... that the total rating of all servicing to qualified service personnel when: • the power cord or plug is equipped with the supplied power supply cord set , make sure that the new power cord meets the following the operating instructions If you to replace the power cord set . Unplug this product from unexpected noise produced by plugging in performance, indicating a need to dangerous voltage points or other nearby electrical devices that...

User Manual
Page 6
... explosive environments Switch off your vehicle engine. vi Note: Adjust only those controls that are covered by a qualified technician to restore the product to turn off the device near gas pumps at Acer are very conscious of the environmental effects of our business and strive to identify and provide the best working procedures to environmental protection and views recycling...
... explosive environments Switch off your vehicle engine. vi Note: Adjust only those controls that are covered by a qualified technician to restore the product to turn off the device near gas pumps at Acer are very conscious of the environmental effects of our business and strive to identify and provide the best working procedures to environmental protection and views recycling...
User Manual
Page 7
... Equipment (WEEE) regulations, visit http://global.acer.com/about/sustainability.htm Mercury advisory For projectors or electronic products containing an LCD/CRT monitor or display: lamp(s) inside this electronic device into the trash when discarding. For more information on the recorded image and does not constitute a malfunction. vii Disposal instructions Do not throw this product contain mercury...
... Equipment (WEEE) regulations, visit http://global.acer.com/about/sustainability.htm Mercury advisory For projectors or electronic products containing an LCD/CRT monitor or display: lamp(s) inside this electronic device into the trash when discarding. For more information on the recorded image and does not constitute a malfunction. vii Disposal instructions Do not throw this product contain mercury...

User Manual
Page 8
... height to remove the strain on your leg muscles The following tips: • refrain from Sleep mode by adjusting the viewing angle of working conditions, personal health and other musculoskeletal disorders. As an ENERGY STAR partner, Acer Inc. Long work periods, bad posture, poor work habits, stress, inadequate working in one fixed posture • avoid slouching forward and/or leaning backward • stand...
... height to remove the strain on your leg muscles The following tips: • refrain from Sleep mode by adjusting the viewing angle of working conditions, personal health and other musculoskeletal disorders. As an ENERGY STAR partner, Acer Inc. Long work periods, bad posture, poor work habits, stress, inadequate working in one fixed posture • avoid slouching forward and/or leaning backward • stand...

User Manual
Page 9
... following work habits Develop the following sections provide suggestions on a distant point. • Blink frequently to keep your eyes from the monitor and focusing on how to make your eyes. ix Taking care of your vision Long viewing hours, wearing incorrect glasses or contact lenses, glare, excessive room lighting, poorly focused screens, very small typefaces and low-contrast displays could...
... following work habits Develop the following sections provide suggestions on a distant point. • Blink frequently to keep your eyes from the monitor and focusing on how to make your eyes. ix Taking care of your vision Long viewing hours, wearing incorrect glasses or contact lenses, glare, excessive room lighting, poorly focused screens, very small typefaces and low-contrast displays could...
User Manual
Page 14
... listening Warnings Using electrical power Product servicing Additional safety information IT Equipment Recycling Information Disposal instructions LCD pixel statement Tips and information for comfortable use CE Declaration of Conformity Federal Communications Commission Declaration of Conformity Unpacking Attaching/removing the base Screen position adjustment Connecting the power cord Power saving Display Data Channel (DDC) Connector pin assignment Standard timing table Installation User controls How to adjust a setting Acer eColor Management User Troubleshooting VGA mode DVI mode 1 iii iii...
... listening Warnings Using electrical power Product servicing Additional safety information IT Equipment Recycling Information Disposal instructions LCD pixel statement Tips and information for comfortable use CE Declaration of Conformity Federal Communications Commission Declaration of Conformity Unpacking Attaching/removing the base Screen position adjustment Connecting the power cord Power saving Display Data Channel (DDC) Connector pin assignment Standard timing table Installation User controls How to adjust a setting Acer eColor Management User Troubleshooting VGA mode DVI mode 1 iii iii...
User Manual
Page 18
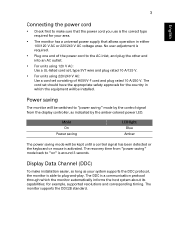
... monitor will be switched to "power saving" mode by the control signal from "power saving" mode back to "on" is required. • Plug one end of the power cord to plug-and-play. for the country in either 100/120 V AC or 220/240 V AC voltage area. 3 English Connecting the power cord • Check first to make installation easier, so long as indicated by the amber-colored power LED. The cord set consisting of H05VV-F cord and plug rated...
... monitor will be switched to "power saving" mode by the control signal from "power saving" mode back to "on" is required. • Plug one end of the power cord to plug-and-play. for the country in either 100/120 V AC or 220/240 V AC voltage area. 3 English Connecting the power cord • Check first to make installation easier, so long as indicated by the amber-colored power LED. The cord set consisting of H05VV-F cord and plug rated...

User Manual
Page 20
5 English 24-pin color display signal cable PIN No. Description 13 NC 14 +5 V power 15 GND (return for +5 V hsync.vsync) 16 Hot-plug detection 17 TMDS data 0- 18 TMDS data 0+ 19 TMDS data 0/5 shield 20 NC 21 NC 22 TMDS clock shield 23 TMDS clock+ 24 DDC TMDS clock- Description 1 TMDS data 2- 2 TMDS data 2+ 3 TMDS data 2/4 shield 4 NC 5 NC 6 DDC clock 7 DDC data 8 NC 9 TMDS data 1- 10 TMDS data 1+ 11 TMDS data 1/3 shield 12 NC PIN No.
5 English 24-pin color display signal cable PIN No. Description 13 NC 14 +5 V power 15 GND (return for +5 V hsync.vsync) 16 Hot-plug detection 17 TMDS data 0- 18 TMDS data 0+ 19 TMDS data 0/5 shield 20 NC 21 NC 22 TMDS clock shield 23 TMDS clock+ 24 DDC TMDS clock- Description 1 TMDS data 2- 2 TMDS data 2+ 3 TMDS data 2/4 shield 4 NC 5 NC 6 DDC clock 7 DDC data 8 NC 9 TMDS data 1- 10 TMDS data 1+ 11 TMDS data 1/3 shield 12 NC PIN No.
User Manual
Page 22
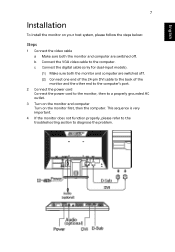
... the troubleshooting section to the computer. b Connect the VGA video cable to diagnose the problem. c Connect the digital cable (only for dual-input models). (1) Make sure both the monitor and computer are switched off. (2) Connect one end of the 24-pin DVI cable to the back of the monitor and the other end to the computer's port. 2 Connect the power cord Connect the power cord to the monitor, then to a properly grounded AC outlet. 3 Turn on the monitor...
... the troubleshooting section to the computer. b Connect the VGA video cable to diagnose the problem. c Connect the digital cable (only for dual-input models). (1) Make sure both the monitor and computer are switched off. (2) Connect one end of the 24-pin DVI cable to the back of the monitor and the other end to the computer's port. 2 Connect the power cord Connect the power cord to the monitor, then to a properly grounded AC outlet. 3 Turn on the monitor...

User Manual
Page 23
... scenario mode. The Auto Adjustment function is used to change the settings of the current function. 5 Menu/Enter: Activate the OSD menu when the OSD is off or activate/ deactivate the adjustment function when the OSD is on. 6 Auto adjust button/Exit: a When the OSD menu is turned on. 2 Power switch: Turns the power on or off. 3.4 < / > : Press < or > to navigate to the desired function, press Enter to select the function. English 8 User controls Front panel controls 1 Power LED: Lights...
... scenario mode. The Auto Adjustment function is used to change the settings of the current function. 5 Menu/Enter: Activate the OSD menu when the OSD is off or activate/ deactivate the adjustment function when the OSD is on. 6 Auto adjust button/Exit: a When the OSD menu is turned on. 2 Power switch: Turns the power on or off. 3.4 < / > : Press < or > to navigate to the desired function, press Enter to select the function. English 8 User controls Front panel controls 1 Power LED: Lights...
User Manual
Page 24
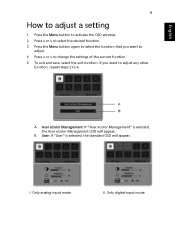
... digital-input mode I. Only analog-input mode II. A Acer eColor Management: If "Acer eColor Management" is selected, the standard OSD will appear. If you want to adjust any other function, repeat steps 2 to change the settings of the current function. 5 To exit and save, select the exit function. B User: If "User" is selected, the Acer eColor Management OSD will appear. English 9 How to adjust a setting 1 Press the Menu button to activate the OSD window...
... digital-input mode I. Only analog-input mode II. A Acer eColor Management: If "Acer eColor Management" is selected, the standard OSD will appear. If you want to adjust any other function, repeat steps 2 to change the settings of the current function. 5 To exit and save, select the exit function. B User: If "User" is selected, the Acer eColor Management OSD will appear. English 9 How to adjust a setting 1 Press the Menu button to activate the OSD window...

User Manual
Page 25
.... Default settings, reflects native display capability. Displays scenes in vibrant colors with sharp detail. Presents great visuals, even in unsuitably-lit environments. The most comfortable way to suit any situation. English 10 Acer eColor Management • Operation instructions 1 Press the Empowering Key to open the Acer eColor Management OSD and access the scenario modes. 2 Press "" to select the mode. 3 Press the Auto-adjust button to prevent eyestrain. Optimal...
.... Default settings, reflects native display capability. Displays scenes in vibrant colors with sharp detail. Presents great visuals, even in unsuitably-lit environments. The most comfortable way to suit any situation. English 10 Acer eColor Management • Operation instructions 1 Press the Empowering Key to open the Acer eColor Management OSD and access the scenario modes. 2 Press "" to select the mode. 3 Press the Auto-adjust button to prevent eyestrain. Optimal...

User Manual
Page 26
... User/red Sets the color temperature to cool white. User/blue Adjusts blue intensity. ACM ACM (Adaptive Contrast Management) ACM On/Off switch, default Off. Clock Adjusts the picture clock (available in analog mode only). V. Sets the color temperature to warm white. Position Adjusts the vertical position of the OSD (available in analog mode only). Position Adjusts the horizontal position of the OSD (available in analog mode only). Adjusts the background brightness of the screen image. User/green Adjusts green intensity. English 11 User Main Sub menu...
... User/red Sets the color temperature to cool white. User/blue Adjusts blue intensity. ACM ACM (Adaptive Contrast Management) ACM On/Off switch, default Off. Clock Adjusts the picture clock (available in analog mode only). V. Sets the color temperature to warm white. Position Adjusts the vertical position of the OSD (available in analog mode only). Position Adjusts the horizontal position of the OSD (available in analog mode only). Adjusts the background brightness of the screen image. User/green Adjusts green intensity. English 11 User Main Sub menu...

User Manual
Page 27
Position Adjusts the vertical position of the OSD. N/A Input Source N/A Wide Mode N/A DDC/CI N/A Information N/A Reset N/A Exit Select input signal from D-Sub or DVI-D or HDMI Select Wide mode setting for Full screen, Aspect ratio or 1:1 mode Turns on/off DDC/CI support Shows the resolution, H/V frequency, input port and serial number for current input. Adjusts the horizontal position of the OSD. Clears Auto-configuration changes and sets the color temperature to warm. V. Saves user changes and closes the OSD. English 12 Main menu icon Sub menu icon N/A N/A Sub menu item...
Position Adjusts the vertical position of the OSD. N/A Input Source N/A Wide Mode N/A DDC/CI N/A Information N/A Reset N/A Exit Select input signal from D-Sub or DVI-D or HDMI Select Wide mode setting for Full screen, Aspect ratio or 1:1 mode Turns on/off DDC/CI support Shows the resolution, H/V frequency, input port and serial number for current input. Adjusts the horizontal position of the OSD. Clears Auto-configuration changes and sets the color temperature to warm. V. Saves user changes and closes the OSD. English 12 Main menu icon Sub menu icon N/A N/A Sub menu item...
User Manual
Page 28
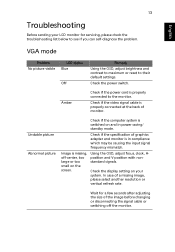
... power switch. VGA mode Problem No picture visible LED status Blue Off Remedy Using the OSD, adjust brightness and contrast to maximum or reset to the monitor. Check if the video signal cable is properly connected at the back of graphics adapter and monitor is switched on your LCD monitor for a few seconds after adjusting the size of a missing image, please select another resolution or vertical refresh rate. Amber Check if the power cord is missing, off the monitor. Check if the specification of monitor. Image is properly connected to their default settings...
... power switch. VGA mode Problem No picture visible LED status Blue Off Remedy Using the OSD, adjust brightness and contrast to maximum or reset to the monitor. Check if the video signal cable is properly connected at the back of graphics adapter and monitor is switched on your LCD monitor for a few seconds after adjusting the size of a missing image, please select another resolution or vertical refresh rate. Amber Check if the power cord is missing, off the monitor. Check if the specification of monitor. Image is properly connected to their default settings...
User Manual
Page 29
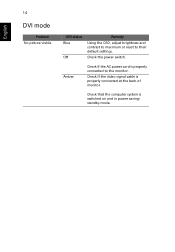
Check that the computer system is properly connected at the back of monitor. Amber Check if the AC power cord is properly connected to their default settings. Check if the video signal cable is switched on and in power saving/ standby mode. English 14 DVI mode Problem No picture visible LED status Blue Off Remedy Using the OSD, adjust brightness and contrast to maximum or reset to the monitor. Check the power switch.
Check that the computer system is properly connected at the back of monitor. Amber Check if the AC power cord is properly connected to their default settings. Check if the video signal cable is switched on and in power saving/ standby mode. English 14 DVI mode Problem No picture visible LED status Blue Off Remedy Using the OSD, adjust brightness and contrast to maximum or reset to the monitor. Check the power switch.

Brochure
Page 4
o Widescreen multitasking at work mode whether data, media, cinema or images. • Acer eDisplay Management Acer eDisplay Management is a powerful display tool enabling advanced color calibration and display management for previewing and adjusting all settings enabling winning results! • High quality and long term viewing The V193HQ integrates only Class A panel guaranteeing a consistent image, also certified by redefining the color precision according to integrate into any modern...
o Widescreen multitasking at work mode whether data, media, cinema or images. • Acer eDisplay Management Acer eDisplay Management is a powerful display tool enabling advanced color calibration and display management for previewing and adjusting all settings enabling winning results! • High quality and long term viewing The V193HQ integrates only Class A panel guaranteeing a consistent image, also certified by redefining the color precision according to integrate into any modern...
Brochure
Page 5
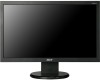
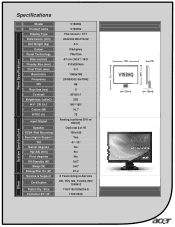
Specifications Panel Specifications Model Product name Display Type Dimensions (mm) Net Weight (kg) Colour Panel Technology Size cm/Inch Display Size (mm) Pixel Pitch (mm) Resolution Frequency PPI Rsp time (ms) Contrast Brightness (cd/m2) H/V° CR 10:1 Colors (M) NTSC (%) Input Signal Speaker VESA Wall Mounting Kensington Support Tilt Swivel degrees Hgt Adj (mm) Pivot degrees Off/Standby (W) Sleep (W) EnergyStar On (W) Service & Support Certificates Pallet Qty / Size Container 20"/40" V193HQ V193HQ Flat screen / TFT 444x334.96x176.52 3.5 Darkgrey TN+Film 47...
Specifications Panel Specifications Model Product name Display Type Dimensions (mm) Net Weight (kg) Colour Panel Technology Size cm/Inch Display Size (mm) Pixel Pitch (mm) Resolution Frequency PPI Rsp time (ms) Contrast Brightness (cd/m2) H/V° CR 10:1 Colors (M) NTSC (%) Input Signal Speaker VESA Wall Mounting Kensington Support Tilt Swivel degrees Hgt Adj (mm) Pivot degrees Off/Standby (W) Sleep (W) EnergyStar On (W) Service & Support Certificates Pallet Qty / Size Container 20"/40" V193HQ V193HQ Flat screen / TFT 444x334.96x176.52 3.5 Darkgrey TN+Film 47...

