User Manual
Page 2
..., mechanically, by photocopy, recording or otherwise, without obligation to notify any person of purchase Acer and the Acer logo are recorded on the label affixed to the contents hereof and specifically disclaims the implied warranties of Acer Incorporated. Copyright © 2008. All correspondence concerning your computer. Acer LCD Monitor User Guide Model number Serial number Date of purchase Place of such revisions or changes.
..., mechanically, by photocopy, recording or otherwise, without obligation to notify any person of purchase Acer and the Acer logo are recorded on the label affixed to the contents hereof and specifically disclaims the implied warranties of Acer Incorporated. Copyright © 2008. All correspondence concerning your computer. Acer LCD Monitor User Guide Model number Serial number Date of purchase Place of such revisions or changes.

User Manual
Page 3
... light, the screen may flicker during initial use . • The LCD screen has 99.99% or more effective pixels. Follow all warnings and instructions marked on LCD monitors The following guidelines when connecting and disconnecting power from the power supplies. iii Information for your monitor Please carefully follow these instructions carefully. Turn off before cleaning. • Use a soft cloth to make sure the flicker disappears. • You may remain after switching the image...
... light, the screen may flicker during initial use . • The LCD screen has 99.99% or more effective pixels. Follow all warnings and instructions marked on LCD monitors The following guidelines when connecting and disconnecting power from the power supplies. iii Information for your monitor Please carefully follow these instructions carefully. Turn off before cleaning. • Use a soft cloth to make sure the flicker disappears. • You may remain after switching the image...
User Manual
Page 4
...power outlet you plug the power cord into is easily accessible and located as close to the equipment operator as they may touch dangerous voltage points or short-out parts that the total Do not locate this product through cabinet slots as possible. If you need to disconnect power... and openings are not sure of the type of power available, consult your hearing, follow these instructions. • Gradually increase the volume until you can hear it clearly and comfortably and without distortion. • After setting the volume level, do not place the product on the power cord. Safe...
...power outlet you plug the power cord into is easily accessible and located as close to the equipment operator as they may touch dangerous voltage points or short-out parts that the total Do not locate this product through cabinet slots as possible. If you need to disconnect power... and openings are not sure of the type of power available, consult your hearing, follow these instructions. • Gradually increase the volume until you can hear it clearly and comfortably and without distortion. • After setting the volume level, do not place the product on the power cord. Safe...

User Manual
Page 5
... the supplied power supply cord set. Product servicing Do not attempt to service this product. • Use the product only with a three-wire grounded plug. Using a power outlet that the total rating of the power strip's input rating. • This product's power cord is not properly grounded may expose you need for details. Also, make sure that may interfere with the performance of this product yourself, as opening or removing covers may...
... the supplied power supply cord set. Product servicing Do not attempt to service this product. • Use the product only with a three-wire grounded plug. Using a power outlet that the total rating of the power strip's input rating. • This product's power cord is not properly grounded may expose you need for details. Also, make sure that may interfere with the performance of this product yourself, as opening or removing covers may...

User Manual
Page 6
... the best working procedures to reduce the environmental impact of our products. Areas with a potentially explosive atmosphere and obey all signs and instructions. They include below deck on the features and benefits of our other controls may contain small parts. Keep them ...acer.com for further information on boats, chemical transfer or storage facilities, vehicles using liquefied petroleum gas (such as propane or butane), and areas where the air contains chemicals or particles such as one of small children. We at service stations. Potentially explosive environments Switch...
... the best working procedures to reduce the environmental impact of our products. Areas with a potentially explosive atmosphere and obey all signs and instructions. They include below deck on the features and benefits of our other controls may contain small parts. Keep them ...acer.com for further information on boats, chemical transfer or storage facilities, vehicles using liquefied petroleum gas (such as propane or butane), and areas where the air contains chemicals or particles such as one of small children. We at service stations. Potentially explosive environments Switch...

User Manual
Page 7
For lamp-specific disposal information, check www.lamprecycle.org. ENERGY STAR (for comfortable use Computer users may occasionally misfire or appear as black or red dots. Note: The statement ...power to Acer LCD monitor with high-precision manufacturing techniques. As an ENERGY STAR partner, Acer Inc. This product has been shipped enabled for energy efficiency. vii Mercury advisory For projectors or electronic products containing an LCD/CRT monitor or display:lamp(s) inside this product meets the ENERGY STAR guidelines for power management: • Activate display's Sleep mode...
For lamp-specific disposal information, check www.lamprecycle.org. ENERGY STAR (for comfortable use Computer users may occasionally misfire or appear as black or red dots. Note: The statement ...power to Acer LCD monitor with high-precision manufacturing techniques. As an ENERGY STAR partner, Acer Inc. This product has been shipped enabled for energy efficiency. vii Mercury advisory For projectors or electronic products containing an LCD/CRT monitor or display:lamp(s) inside this product meets the ENERGY STAR guidelines for power management: • Activate display's Sleep mode...
User Manual
Page 8
... provides tips for enhanced text readability and graphics clarity. • Eliminate glare and reflections by looking at a higher level than the top edge of the monitor, using a task light • changing the display's viewing angle The following sections provide suggestions on your leg muscles Taking care of the display. • Adjust the display brightness and/or contrast to computer...
... provides tips for enhanced text readability and graphics clarity. • Eliminate glare and reflections by looking at a higher level than the top edge of the monitor, using a task light • changing the display's viewing angle The following sections provide suggestions on your leg muscles Taking care of the display. • Adjust the display brightness and/or contrast to computer...

User Manual
Page 9
... from the display's top front edge • Avoid adjusting your computer use more relaxing and productive: • Take short breaks regularly and often. • Perform some stretching exercises. • Breathe fresh air as often as open windows, for extended periods of certain Hazardous Substances in force to an awkward viewing angle. • Avoid looking at bright light sources, such...
... from the display's top front edge • Avoid adjusting your computer use more relaxing and productive: • Take short breaks regularly and often. • Perform some stretching exercises. • Breathe fresh air as often as open windows, for extended periods of certain Hazardous Substances in force to an awkward viewing angle. • Avoid looking at bright light sources, such...
User Manual
Page 11
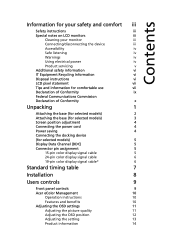
... the base (for selected models) 3 Screen position adjustment 4 Connecting the power cord 4 Power saving 4 Connecting the docking device (for selected models) 5 Display Data Channel (DDC) 5 Connector pin assignment 5 15-pin color display signal cable 5 24-pin color display signal cable 6 19-pin color display signal cable* 6 Standard timing table 7 Installation 8 Users controls 9 Front panel controls 9 Acer eColor Management 10 Operation instructions 10 Features and benefits 10 Adjusting the OSD settings 11 Adjusting the picture quality 11 Adjusting the OSD...
... the base (for selected models) 3 Screen position adjustment 4 Connecting the power cord 4 Power saving 4 Connecting the docking device (for selected models) 5 Display Data Channel (DDC) 5 Connector pin assignment 5 15-pin color display signal cable 5 24-pin color display signal cable 6 19-pin color display signal cable* 6 Standard timing table 7 Installation 8 Users controls 9 Front panel controls 9 Acer eColor Management 10 Operation instructions 10 Features and benefits 10 Adjusting the OSD settings 11 Adjusting the picture quality 11 Adjusting the OSD...
User Manual
Page 13
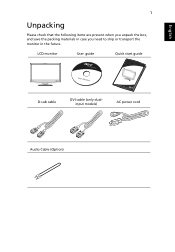
LCD monitor User guide Quick start guide D-sub cable DVI cable (only dualinput models) AC power cord Audio Cable (Option) English 1 Unpacking Please check that the following items are present when you unpack the box, and save the packing materials in case you need to ship or transport the monitor in the future.
LCD monitor User guide Quick start guide D-sub cable DVI cable (only dualinput models) AC power cord Audio Cable (Option) English 1 Unpacking Please check that the following items are present when you unpack the box, and save the packing materials in case you need to ship or transport the monitor in the future.
User Manual
Page 14
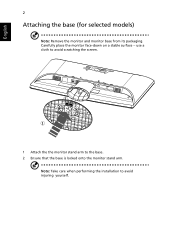
Note: Take care when performing the installation to the base. 2 Ensure that the base is locked onto the monitor stand arm. use a cloth to avoid scratching the screen. 2 1 1 Attach the the monitor stand arm to avoid injuring yourself. Carefully place the monitor face-down on a stable surface -- English 2 Attaching the base (for selected models) Note: Remove the monitor and monitor base from its packaging.
Note: Take care when performing the installation to the base. 2 Ensure that the base is locked onto the monitor stand arm. use a cloth to avoid scratching the screen. 2 1 1 Attach the the monitor stand arm to avoid injuring yourself. Carefully place the monitor face-down on a stable surface -- English 2 Attaching the base (for selected models) Note: Remove the monitor and monitor base from its packaging.
User Manual
Page 15
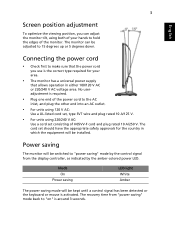
...; The monitor has a universal power supply that the power cord you can be adjusted to 15 degrees up or 5 degrees down. Connecting the power cord • Check first to make sure that allows operation in which the equipment will be kept until a control signal has been detected or the keyboard or mouse is activated. Mode On Power saving LED light White Amber The power saving mode will be installed. 3 English Screen position adjustment To optimize the viewing position, you use is...
...; The monitor has a universal power supply that the power cord you can be adjusted to 15 degrees up or 5 degrees down. Connecting the power cord • Check first to make sure that allows operation in which the equipment will be kept until a control signal has been detected or the keyboard or mouse is activated. Mode On Power saving LED light White Amber The power saving mode will be installed. 3 English Screen position adjustment To optimize the viewing position, you use is...
User Manual
Page 16
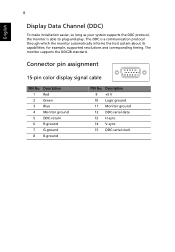
... its capabilities; The DDC is able to plug-and-play. Description 1 Red 2 Green 3 Blue 4 Monitor ground 5 DDC-return 6 R-ground 7 G-ground 8 B-ground PIN No. for example, supported resolutions and corresponding timing. Connector pin assignment 15-pin color display signal cable 1 5 6 10 11 15 PIN No. The monitor supports the DDC2B standard. Description 9 +5 V 10 Logic ground 11 Monitor ground 12 DDC-serial data 13 H-sync 14 V-sync 15 DDC-serial clock
... its capabilities; The DDC is able to plug-and-play. Description 1 Red 2 Green 3 Blue 4 Monitor ground 5 DDC-return 6 R-ground 7 G-ground 8 B-ground PIN No. for example, supported resolutions and corresponding timing. Connector pin assignment 15-pin color display signal cable 1 5 6 10 11 15 PIN No. The monitor supports the DDC2B standard. Description 9 +5 V 10 Logic ground 11 Monitor ground 12 DDC-serial data 13 H-sync 14 V-sync 15 DDC-serial clock

User Manual
Page 17
... 10 TMDS Clock+ 12 TMDS Clock- 14 Reserved (N.C. 5 24-pin color display signal cable English PIN No. on device) 16 SDA 18 +5V Power * only for +5 V hsync.vsync) 16 Hot-plug detection 17 TMDS data 0- 18 TMDS data 0+ 19 TMDS data 0/5 ...shield 20 NC 21 NC 22 TMDS clock shield 23 TMDS clock+ 24 DDC TMDS clock- 19-pin color display signal cable* 1917151311 9 7 5 3 1 1816141210 8 6 4 2 PIN No. Description 13 NC 14 +5 V power 15 GND (return for certain models...
... 10 TMDS Clock+ 12 TMDS Clock- 14 Reserved (N.C. 5 24-pin color display signal cable English PIN No. on device) 16 SDA 18 +5V Power * only for +5 V hsync.vsync) 16 Hot-plug detection 17 TMDS data 0- 18 TMDS data 0+ 19 TMDS data 0/5 ...shield 20 NC 21 NC 22 TMDS clock shield 23 TMDS clock+ 24 DDC TMDS clock- 19-pin color display signal cable* 1917151311 9 7 5 3 1 1816141210 8 6 4 2 PIN No. Description 13 NC 14 +5 V power 15 GND (return for certain models...
User Manual
Page 19
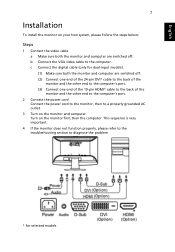
... DVI* cable to the back of the monitor and the other end to the computer's port. (3) Connect one end of the 19-pin HDMI* cable to the back of the monitor and the other end to the computer's port. 2 Connect the power cord Connect the power cord to the monitor, then to diagnose the problem * for selected models c Connect the digital cable (only for dual-input models). (1) Make sure both the monitor and computer are switched...
... DVI* cable to the back of the monitor and the other end to the computer's port. (3) Connect one end of the 19-pin HDMI* cable to the back of the monitor and the other end to the computer's port. 2 Connect the power cord Connect the power cord to the monitor, then to diagnose the problem * for selected models c Connect the digital cable (only for dual-input models). (1) Make sure both the monitor and computer are switched...
User Manual
Page 20
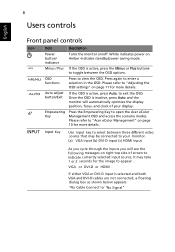
... scenario modes. Auto adjust button/Exit If the OSD is selected and both VGA and DVI-D cables are not connected, a floating dialog box as shown below appears: "No Cable Connect"or "No S ignal" Please refer to "Adjusting the OSD settings" on page 11 for more details. VGA or DVI-D or HDMI If either VGA or DVI-D input is active, press Auto to indicate currently selected input source. 8 Users controls English Front panel controls Icon Item Description Power button/ indicator Turns the monitor...
... scenario modes. Auto adjust button/Exit If the OSD is selected and both VGA and DVI-D cables are not connected, a floating dialog box as shown below appears: "No Cable Connect"or "No S ignal" Please refer to "Adjusting the OSD settings" on page 11 for more details. VGA or DVI-D or HDMI If either VGA or DVI-D input is active, press Auto to indicate currently selected input source. 8 Users controls English Front panel controls Icon Item Description Power button/ indicator Turns the monitor...

User Manual
Page 21
... Main menu Sub menu item Description icon User mode User-defined. The most comfortable way to confirm the mode and exit Acer eColor Management. Graphic mode Movie mode Enhances colors and emphasizes fine detail. Pictures and photographs appear in vibrant colors with sharp detail. Settings can be fine-tuned to prevent eyestrain. Text mode Optimal balance of brightness and contrast to suit any situation. Reflects native display capability. Standard mode Default settings.
... Main menu Sub menu item Description icon User mode User-defined. The most comfortable way to confirm the mode and exit Acer eColor Management. Graphic mode Movie mode Enhances colors and emphasizes fine detail. Pictures and photographs appear in vibrant colors with sharp detail. Settings can be fine-tuned to prevent eyestrain. Text mode Optimal balance of brightness and contrast to suit any situation. Reflects native display capability. Standard mode Default settings.
User Manual
Page 22
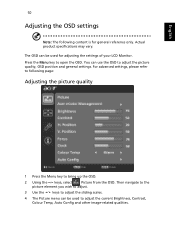
... adjust. 3 Use the / keys to adjust the sliding scales. 4 The Picture menu can use the OSD to adjust the picture quality, OSD position and general settings. Press the Menu key to open the OSD. You can be used to adjust the current Brightness, Contrast, Colour Temp, Auto Config and other image-related qualities. For advanced settings, please refer to following content is for adjusting the settings of your LCD Monitor. Actual product specifications may vary. English 10 Adjusting the OSD settings...
... adjust. 3 Use the / keys to adjust the sliding scales. 4 The Picture menu can use the OSD to adjust the picture quality, OSD position and general settings. Press the Menu key to open the OSD. You can be used to adjust the current Brightness, Contrast, Colour Temp, Auto Config and other image-related qualities. For advanced settings, please refer to following content is for adjusting the settings of your LCD Monitor. Actual product specifications may vary. English 10 Adjusting the OSD settings...
User Manual
Page 26
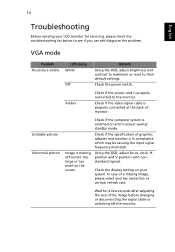
... the input signal frequency mismatch. Check the power switch. Unstable picture Abnormal picture Check if the computer system is properly connected to the monitor. Wait for servicing, please check the troubleshooting list below to their default settings. Amber Check if the power cord is switched on the screen. VGA mode Problem No picture visible LED status White Off Remedy Using the OSD, adjust brightness and contrast to maximum or reset to see if you can self-diagnose the problem. Check if the video signal cable is properly connected at...
... the input signal frequency mismatch. Check the power switch. Unstable picture Abnormal picture Check if the computer system is properly connected to the monitor. Wait for servicing, please check the troubleshooting list below to their default settings. Amber Check if the power cord is switched on the screen. VGA mode Problem No picture visible LED status White Off Remedy Using the OSD, adjust brightness and contrast to maximum or reset to see if you can self-diagnose the problem. Check if the video signal cable is properly connected at...
User Manual
Page 27
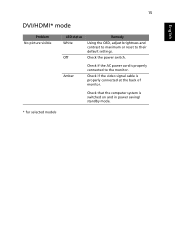
Check that the computer system is properly connected to their default settings. Amber Check if the AC power cord is switched on and in power saving/ standby mode. * for selected models Check if the video signal cable is properly connected at the back of monitor. Check the power switch. 15 English DVI/HDMI* mode Problem No picture visible LED status White Off Remedy Using the OSD, adjust brightness and contrast to maximum or reset to the monitor.
Check that the computer system is properly connected to their default settings. Amber Check if the AC power cord is switched on and in power saving/ standby mode. * for selected models Check if the video signal cable is properly connected at the back of monitor. Check the power switch. 15 English DVI/HDMI* mode Problem No picture visible LED status White Off Remedy Using the OSD, adjust brightness and contrast to maximum or reset to the monitor.

