User Manual
Page 3
... pixel or a pixel lit all warnings and instructions marked on the desktop pattern you use . Follow all the time. • Due to make sure the flicker disappears. • You may include blemishes of the fluorescent light, the screen may remain after switching the image, when the same image is recovered slowly by changing the image or turning off the power switch and then turn it on LCD monitors The...
... pixel or a pixel lit all warnings and instructions marked on the desktop pattern you use . Follow all the time. • Due to make sure the flicker disappears. • You may include blemishes of the fluorescent light, the screen may remain after switching the image, when the same image is recovered slowly by changing the image or turning off the power switch and then turn it on LCD monitors The...

User Manual
Page 4
.... • Your device uses one of the following power supplies: Manufacturer: Asian Power Devices Inc., Model: DA-40A19 Manufacturer: Delta Electronics Inc., Model: ADP-40PH BB Using electrical power • This product should never be blocked or covered. These openings must not be blocked by placing the product on the cord. • If an extension cord is only used for ventilation to rest...
.... • Your device uses one of the following power supplies: Manufacturer: Asian Power Devices Inc., Model: DA-40A19 Manufacturer: Delta Electronics Inc., Model: ADP-40PH BB Using electrical power • This product should never be blocked or covered. These openings must not be blocked by placing the product on the cord. • If an extension cord is only used for ventilation to rest...
User Manual
Page 5
... new power cord meets the following the operating instructions Refer all products plugged into the product • the product was exposed to service this product. • Use the product only with a three-wire grounded plug. Also, make sure that is not properly grounded may interfere with the performance of this product yourself, as opening or removing covers may expose you need for...
... new power cord meets the following the operating instructions Refer all products plugged into the product • the product was exposed to service this product. • Use the product only with a three-wire grounded plug. Also, make sure that is not properly grounded may interfere with the performance of this product yourself, as opening or removing covers may expose you need for...

User Manual
Page 6
...Disposal instructions Do not throw this website: http://www.acer-group.com/public/Sustainability/sustainability01.htm Visit www.acer-group.com for further information on the features and benefits of our other controls may contain small parts. Switch off...best working procedures to reduce the environmental impact of our products. IT Equipment Recycling Information Acer is strongly committed to environmental protection and views recycling, in the form of salvaging and disposal of used equipment, as grain, dust or metal powders. vi Note: Adjust only those controls that are covered...
...Disposal instructions Do not throw this website: http://www.acer-group.com/public/Sustainability/sustainability01.htm Visit www.acer-group.com for further information on the features and benefits of our other controls may contain small parts. Switch off...best working procedures to reduce the environmental impact of our products. IT Equipment Recycling Information Acer is strongly committed to environmental protection and views recycling, in the form of salvaging and disposal of used equipment, as grain, dust or metal powders. vi Note: Adjust only those controls that are covered...
User Manual
Page 7
... on your sitting height to remove the strain on the recorded image and does not constitute a malfunction. The following section provides tips for power management: • Activate display's Sleep mode within 15 minutes of user inactivity. • Activate computer's Sleep mode within 30 minutes of user inactivity. • Wake the computer from staying too long in front of the monitor, using a footrest, or...
... on your sitting height to remove the strain on the recorded image and does not constitute a malfunction. The following section provides tips for power management: • Activate display's Sleep mode within 15 minutes of user inactivity. • Activate computer's Sleep mode within 30 minutes of user inactivity. • Wake the computer from staying too long in front of the monitor, using a footrest, or...
User Manual
Page 8
... or blinds • using a task light • changing the display's viewing angle • using a glare-reduction filter • using a display visor, such as possible. • Exercise regularly and maintain a healthy body. Display • Keep your display clean. • Keep your head at a higher level than the top edge of the display so your eyes point downward when looking at bright light sources, such as open windows, for enhanced text...
... or blinds • using a task light • changing the display's viewing angle • using a glare-reduction filter • using a display visor, such as possible. • Exercise regularly and maintain a healthy body. Display • Keep your display clean. • Keep your head at a higher level than the top edge of the display so your eyes point downward when looking at bright light sources, such as open windows, for enhanced text...
User Manual
Page 9
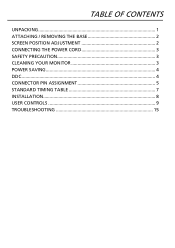
TABLE OF CONTENTS UNPACKING 1 ATTACHING / REMOVING THE BASE 2 SCREEN POSITION ADJUSTMENT 2 CONNECTING THE POWER CORD 3 SAFETY PRECAUTION 3 CLEANING YOUR MONITOR 3 POWER SAVING 4 DDC...4 CONNECTOR PIN ASSIGNMENT 5 STANDARD TIMING TABLE 7 INSTALLATION 8 USER CONTROLS 9 TROUBLESHOOTING 15
TABLE OF CONTENTS UNPACKING 1 ATTACHING / REMOVING THE BASE 2 SCREEN POSITION ADJUSTMENT 2 CONNECTING THE POWER CORD 3 SAFETY PRECAUTION 3 CLEANING YOUR MONITOR 3 POWER SAVING 4 DDC...4 CONNECTOR PIN ASSIGNMENT 5 STANDARD TIMING TABLE 7 INSTALLATION 8 USER CONTROLS 9 TROUBLESHOOTING 15
User Manual
Page 12
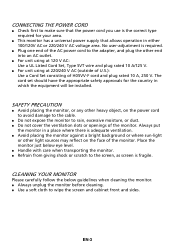
... screen is fragile. CONNECTING THE POWER CORD Check first to make sure that the power cord you use is the correct type required for the country in either 100/120V AC or 220/240 V AC voltage area. No user-adjustment is required. Plug one end of the monitor. Place the monitor just below guidelines when cleaning the monitor. Always unplug the monitor before cleaning. Use...
... screen is fragile. CONNECTING THE POWER CORD Check first to make sure that the power cord you use is the correct type required for the country in either 100/120V AC or 220/240 V AC voltage area. No user-adjustment is required. Plug one end of the monitor. Place the monitor just below guidelines when cleaning the monitor. Always unplug the monitor before cleaning. Use...
User Manual
Page 13
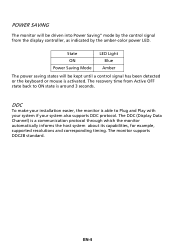
EN-4 POWER SAVING The monitor will be driven into Power Saving" mode by the amber-color power LED. State ON Power Saving Mode LED Light Blue Amber The power saving states will be kept until a control signal has been detected or the keyboard or mouse is a communication protocol through which the monitor automatically informs the host system about its capabilities, for example, supported resolutions and corresponding timing. The DDC (Display Data Channel) is activated...
EN-4 POWER SAVING The monitor will be driven into Power Saving" mode by the amber-color power LED. State ON Power Saving Mode LED Light Blue Amber The power saving states will be kept until a control signal has been detected or the keyboard or mouse is a communication protocol through which the monitor automatically informs the host system about its capabilities, for example, supported resolutions and corresponding timing. The DDC (Display Data Channel) is activated...
User Manual
Page 14
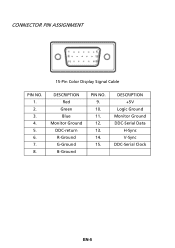
CONNECTOR PIN ASSIGNMENT 15-Pin Color Display Signal Cable PIN NO. 1. 2. 3. 4. 5. 6. 7. 8. DESCRIPTION Red Green Blue Monitor Ground DDC-return R-Ground G-Ground B-Ground PIN NO. 9. 10. 11. 12. 13. 14. 15. DESCRIPTION +5V Logic Ground Monitor Ground DDC-Serial Data H-Sync V-Sync DDC-Serial Clock EN-5
CONNECTOR PIN ASSIGNMENT 15-Pin Color Display Signal Cable PIN NO. 1. 2. 3. 4. 5. 6. 7. 8. DESCRIPTION Red Green Blue Monitor Ground DDC-return R-Ground G-Ground B-Ground PIN NO. 9. 10. 11. 12. 13. 14. 15. DESCRIPTION +5V Logic Ground Monitor Ground DDC-Serial Data H-Sync V-Sync DDC-Serial Clock EN-5
User Manual
Page 17
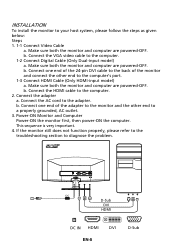
b. Connect the VGA video cable to diagnose the problem. Connect one end of the monitor and connect the other end to a properly grounded, AC outlet. 3. If the monitor still does not function properly, please refer to the troubleshooting section to the computer. 1-2 Connect Digital Cable (Only Dual-input model) a. DC D-Sub DVI HDMI D DC IN HDMI DVI EN-8 2 D-Sub Connect the HDMI cable to the adapter. Power-ON Monitor and Computer Power-ON the monitor first, then power-ON...
b. Connect the VGA video cable to diagnose the problem. Connect one end of the monitor and connect the other end to a properly grounded, AC outlet. 3. If the monitor still does not function properly, please refer to the troubleshooting section to the computer. 1-2 Connect Digital Cable (Only Dual-input model) a. DC D-Sub DVI HDMI D DC IN HDMI DVI EN-8 2 D-Sub Connect the HDMI cable to the adapter. Power-ON Monitor and Computer Power-ON the monitor first, then power-ON...

User Manual
Page 18
... OSD and access the scenario modes. The Auto Adjustment function is active, press the Minus or Plus buttons to set the HPos, VPos, Clock and Focus. EN-9 Lights up to indicate the power is turned ON. / Minus / Plus: If the OSD is used to toggle between the OSD options. Empowering: Press the Empowering Key to activate the Auto Adjustment function. USER CONTROLS Base Controls Power Switch / Power LED: To turn the monitor...
... OSD and access the scenario modes. The Auto Adjustment function is active, press the Minus or Plus buttons to set the HPos, VPos, Clock and Focus. EN-9 Lights up to indicate the power is turned ON. / Minus / Plus: If the OSD is used to toggle between the OSD options. Empowering: Press the Empowering Key to activate the Auto Adjustment function. USER CONTROLS Base Controls Power Switch / Power LED: To turn the monitor...
User Manual
Page 19
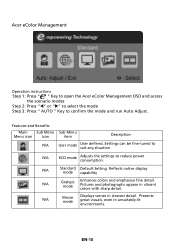
... Default Setting. Settings can be fine-tuned to suit any situation N/A ECO mode Adjusts the settings to confirm the mode and run Auto Adjust. Pictures and photographs appear in clearest detail. N/A Movie mode Displays scenes in vibrant colors with sharp detail. Reflects native display mode capability N/A Grahpic mode Enhances colors and emphasize fine detail. Acer eColor Management Operation instructions Step 1: Press " " Key to open the Acer eColor Management OSD and access the scenario modes...
... Default Setting. Settings can be fine-tuned to suit any situation N/A ECO mode Adjusts the settings to confirm the mode and run Auto Adjust. Pictures and photographs appear in clearest detail. N/A Movie mode Displays scenes in vibrant colors with sharp detail. Reflects native display mode capability N/A Grahpic mode Enhances colors and emphasize fine detail. Acer eColor Management Operation instructions Step 1: Press " " Key to open the Acer eColor Management OSD and access the scenario modes...
User Manual
Page 20
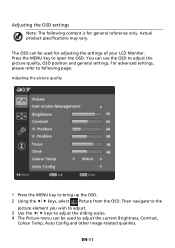
... used to adjust the current Brightness, Contrast, Colour Temp, Auto Config and other image-related qualities. Then navigate to the picture element you wish to adjust. 3 Use the / keys to adjust the sliding scales. 4 The Picture menu can be used for general reference only. For advanced settings, please refer to following content is for adjusting the settings of your LCD Monitor. You can use the OSD to open the OSD...
... used to adjust the current Brightness, Contrast, Colour Temp, Auto Config and other image-related qualities. Then navigate to the picture element you wish to adjust. 3 Use the / keys to adjust the sliding scales. 4 The Picture menu can be used for general reference only. For advanced settings, please refer to following content is for adjusting the settings of your LCD Monitor. You can use the OSD to open the OSD...
User Manual
Page 22
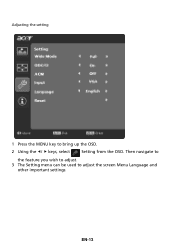
EN-13 Then navigate to the feature you wish to adjust. 3 The Setting menu can be used to bring up the OSD. 2 Using the / keys, select Setting from the OSD. Adjusting the setting 1 Press the MENU key to adjust the screen Menu Language and other important settings.
EN-13 Then navigate to the feature you wish to adjust. 3 The Setting menu can be used to bring up the OSD. 2 Using the / keys, select Setting from the OSD. Adjusting the setting 1 Press the MENU key to adjust the screen Menu Language and other important settings.
User Manual
Page 24
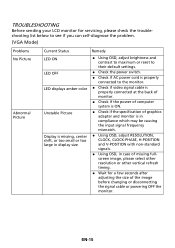
... LED OFF LED displays amber color Unstable Picture Display is missing, center shift, or too small or too large in display size Remedy Using OSD, adjust brightness and contrast to maximum or reset to their default settings. Check the power switch. Check if AC power cord is properly connected to the monitor. Check if video signal cable is properly connected at the back of monitor. Check if the power of computer system is ON. Check if the specification...
... LED OFF LED displays amber color Unstable Picture Display is missing, center shift, or too small or too large in display size Remedy Using OSD, adjust brightness and contrast to maximum or reset to their default settings. Check the power switch. Check if AC power cord is properly connected to the monitor. Check if video signal cable is properly connected at the back of monitor. Check if the power of computer system is ON. Check if the specification...
User Manual
Page 25
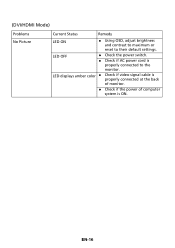
(DVI/HDMI Mode) Problems No Picture Current Status Remedy LED ON Using OSD, adjust brightness and contrast to maximum or reset to the monitor. LED OFF Check the power switch. Check if AC power cord is ON. EN-16 LED displays amber color Check if video signal cable is properly connected at the back of monitor. Check if the power of computer system is properly connected to their default settings.
(DVI/HDMI Mode) Problems No Picture Current Status Remedy LED ON Using OSD, adjust brightness and contrast to maximum or reset to the monitor. LED OFF Check the power switch. Check if AC power cord is ON. EN-16 LED displays amber color Check if video signal cable is properly connected at the back of monitor. Check if the power of computer system is properly connected to their default settings.
Brochure
Page 2
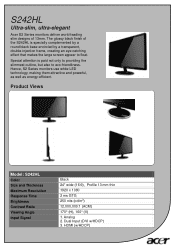
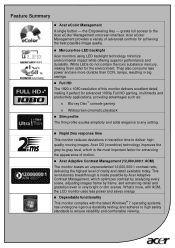
Dual Input (DVI w/HDCP) 3. Hence, S2 Series monitors use white LED technology, making them attractive and powerful, as well as energy-efficient. The glossy black finish of 13mm. Product Views Model: S242HL Color Size and Thickness Maximum Resolution Response Time Brightness Contrast Ratio Viewing Angle Input Signal Black 24" wide (16:9), Profile 13 mm thin 1920 x 1080 2 ms GTG 250 nits (cd/m2) 12,000,000:1 (ACM) 170° (H), 160° (V) 1. HDMI (w/HDCP) Special...
Dual Input (DVI w/HDCP) 3. Hence, S2 Series monitors use white LED technology, making them attractive and powerful, as well as energy-efficient. The glossy black finish of 13mm. Product Views Model: S242HL Color Size and Thickness Maximum Resolution Response Time Brightness Contrast Ratio Viewing Angle Input Signal Black 24" wide (16:9), Profile 13 mm thin 1920 x 1080 2 ms GTG 250 nits (cd/m2) 12,000,000:1 (ACM) 170° (H), 160° (V) 1. HDMI (w/HDCP) Special...
Brochure
Page 3
...,000,000:1 contrast ratio, delivering the highest level of advanced controls for achieving the best possible image quality. „ Mercury-free LED backlight Acer monitors using LED backlight technology minimize environmental impact while offering superior performance and durability. Acer eColor Management provides a variety of clarity and detail available today. They also consume less power and are more , with ACM, the LCD monitor uses less power and saves energy. „...
...,000,000:1 contrast ratio, delivering the highest level of advanced controls for achieving the best possible image quality. „ Mercury-free LED backlight Acer monitors using LED backlight technology minimize environmental impact while offering superior performance and durability. Acer eColor Management provides a variety of clarity and detail available today. They also consume less power and are more , with ACM, the LCD monitor uses less power and saves energy. „...

Brochure
Page 4
Specifications Panel Specifications Model No. „ Amazingly thin and attractive design • The glossy black frame and stand are built around a sense of the display is smooth and clean, without any visible vents. HDMI (w/HDCP) VESA Wall Mounting N/A Speaker N/A Tilt Power Supply (100 - 240 V) Power Consumption (ENERGY STAR®) Off Sleep On -5° to assemble/disassemble, without tools. • The rear view of simple modernism. • The glossy black, oval-shaped base is encircled...
Specifications Panel Specifications Model No. „ Amazingly thin and attractive design • The glossy black frame and stand are built around a sense of the display is smooth and clean, without any visible vents. HDMI (w/HDCP) VESA Wall Mounting N/A Speaker N/A Tilt Power Supply (100 - 240 V) Power Consumption (ENERGY STAR®) Off Sleep On -5° to assemble/disassemble, without tools. • The rear view of simple modernism. • The glossy black, oval-shaped base is encircled...

