
User Manual
Page 2
... serial number, model number and purchase information. No part of this publication may be made periodically to the information in new editions of this publication without the prior written permission of purchase Acer and the Acer logo are used herein for a particular purpose. Acer LCD Monitor User's Guide Model number Serial number Date of purchase Place of Acer Incorporated. Acer LCD Monitor User's Guide Original Issue: 03/2009 Changes may be incorporated in this manual...
... serial number, model number and purchase information. No part of this publication may be made periodically to the information in new editions of this publication without the prior written permission of purchase Acer and the Acer logo are used herein for a particular purpose. Acer LCD Monitor User's Guide Model number Serial number Date of purchase Place of Acer Incorporated. Acer LCD Monitor User's Guide Original Issue: 03/2009 Changes may be incorporated in this manual...

User Manual
Page 3
... switching the image, when the same image is recovered slowly by changing the image or turning off the power switch and then turn it on again to make sure the flicker disappears. • You may flicker during initial use . • The LCD screen has 99.99% or more effective pixels. Cleaning your safety and comfort Safety instructions Read these guidelines when cleaning the monitor: • Always unplug the monitor before cleaning. • Use...
... switching the image, when the same image is recovered slowly by changing the image or turning off the power switch and then turn it on again to make sure the flicker disappears. • You may flicker during initial use . • The LCD screen has 99.99% or more effective pixels. Cleaning your safety and comfort Safety instructions Read these guidelines when cleaning the monitor: • Always unplug the monitor before cleaning. • Use...

User Manual
Page 4
... openings are not sure of the type of power available, consult your hearing, follow these instructions. • Gradually increase the volume until you can hear it from the electrical outlet. Warnings • Do not use it after your ears have adjusted. • Limit the amount of time listening to music at high volume. • Avoid turning up the volume...
... openings are not sure of the type of power available, consult your hearing, follow these instructions. • Gradually increase the volume until you can hear it from the electrical outlet. Warnings • Do not use it after your ears have adjusted. • Limit the amount of time listening to music at high volume. • Avoid turning up the volume...

User Manual
Page 5
... the extension cord ampere rating. Note: The grounding pin also provides good protection from the wall outlet and refer servicing to qualified service personnel when: • the power cord or plug is not properly grounded may expose you need for details. Make sure the power outlet is a safety feature. Unplug this product yourself, as opening or removing covers may result in a grounded power outlet. Contact...
... the extension cord ampere rating. Note: The grounding pin also provides good protection from the wall outlet and refer servicing to qualified service personnel when: • the power cord or plug is not properly grounded may expose you need for details. Make sure the power outlet is a safety feature. Unplug this product yourself, as opening or removing covers may result in a grounded power outlet. Contact...

User Manual
Page 6
...Keep them out of the reach of our other controls may contain small parts. IT Equipment Recycling Information Acer is strongly committed to environmental protection and views recycling, in the form of salvaging and disposal of used equipment, as grain, dust or metal powders. Switch off the device near gas pumps at Acer... are very conscious of the environmental effects of our business and strive to identify and provide the best working ...
...Keep them out of the reach of our other controls may contain small parts. IT Equipment Recycling Information Acer is strongly committed to environmental protection and views recycling, in the form of salvaging and disposal of used equipment, as grain, dust or metal powders. Switch off the device near gas pumps at Acer... are very conscious of the environmental effects of our business and strive to identify and provide the best working ...
User Manual
Page 7
... containing an LCD/CRT monitor or display: lamp(s) inside this electronic device into the trash when discarding. More information refers to offer our customers products with high-precision manufacturing techniques. Environmental Protection Agency. Products that help customers save through energy efficiency, the more information, contact the Electronic Industries Alliance at www.eiae.org. vii Disposal instructions Do...
... containing an LCD/CRT monitor or display: lamp(s) inside this electronic device into the trash when discarding. More information refers to offer our customers products with high-precision manufacturing techniques. Environmental Protection Agency. Products that help customers save through energy efficiency, the more information, contact the Electronic Industries Alliance at www.eiae.org. vii Disposal instructions Do...

User Manual
Page 8
... injury. ENERGY STAR and the ENERGY STAR mark are also at "sleep" mode. The following tips: • refrain from Sleep mode by pushing the power button. Tips and information for power management: • Activate display's Sleep mode within 15 minutes of user inactivity. • Activate computer's Sleep mode within 30 minutes of the monitor, using a footrest, or raising your leg muscles Observe the following symptoms...
... injury. ENERGY STAR and the ENERGY STAR mark are also at "sleep" mode. The following tips: • refrain from Sleep mode by pushing the power button. Tips and information for power management: • Activate display's Sleep mode within 15 minutes of user inactivity. • Activate computer's Sleep mode within 30 minutes of the monitor, using a footrest, or raising your leg muscles Observe the following symptoms...

User Manual
Page 9
...; Give your eyes regular breaks by using drapes, shades or blinds • using a task light • changing the display's viewing angle • using a glare-reduction filter • using a display visor, such as a piece of time. Developing good work habits Develop the following sections provide suggestions on a distant point. • Blink frequently to keep your eyes from the monitor and focusing on how to...
...; Give your eyes regular breaks by using drapes, shades or blinds • using a task light • changing the display's viewing angle • using a glare-reduction filter • using a display visor, such as a piece of time. Developing good work habits Develop the following sections provide suggestions on a distant point. • Blink frequently to keep your eyes from the monitor and focusing on how to...

User Manual
Page 14
... Accessibility Safe listening Warnings Using electrical power Product servicing Additional safety information IT equipment recycling information Disposal instructions LCD pixel statement Tips and information for comfortable use Federal Communications Commission Declaration of Conformity Unpacking Attaching/removing the base Screen position adjustment Connecting the power cord Power saving Display Data Channel (DDC) Connector pin assignment Standard timing table Installation User controls How to adjust a setting Acer eColor Management User Troubleshooting VGA mode DVI mode 1 iii iii iii iii...
... Accessibility Safe listening Warnings Using electrical power Product servicing Additional safety information IT equipment recycling information Disposal instructions LCD pixel statement Tips and information for comfortable use Federal Communications Commission Declaration of Conformity Unpacking Attaching/removing the base Screen position adjustment Connecting the power cord Power saving Display Data Channel (DDC) Connector pin assignment Standard timing table Installation User controls How to adjust a setting Acer eColor Management User Troubleshooting VGA mode DVI mode 1 iii iii iii iii...

User Manual
Page 17
... monitor tilt,height and rotate the monitor horizontally and vertically, using the integrated tab or a suitable coin. Removing: Reverse the steps of the monitor as shown below. Ensure that the base in locked onto the stand. 3) Secure the base to the stand by turning the screw using both of your hands to hold the edges of assemble. Slovenščina Screen position adjustment To optimize the viewing position, you can be tilted to lock. 2 Attaching/removing...
... monitor tilt,height and rotate the monitor horizontally and vertically, using the integrated tab or a suitable coin. Removing: Reverse the steps of the monitor as shown below. Ensure that the base in locked onto the stand. 3) Secure the base to the stand by turning the screw using both of your hands to hold the edges of assemble. Slovenščina Screen position adjustment To optimize the viewing position, you can be tilted to lock. 2 Attaching/removing...

User Manual
Page 19
... be installed. Mode On Power saving LED light Blue Amber The power saving mode will be switched to "power saving" mode by the amber-colored power LED. The recovery time from the display controller, as your area. • The monitor has a universal power supply that the power cord you use is around 3 seconds. 4 Slovenščina Connecting the power cord • Check first to make installation easier, so long as indicated by the control signal from "power saving" mode back to the AC inlet, and plug...
... be installed. Mode On Power saving LED light Blue Amber The power saving mode will be switched to "power saving" mode by the amber-colored power LED. The recovery time from the display controller, as your area. • The monitor has a universal power supply that the power cord you use is around 3 seconds. 4 Slovenščina Connecting the power cord • Check first to make installation easier, so long as indicated by the control signal from "power saving" mode back to the AC inlet, and plug...

User Manual
Page 21
...device) 16 SDA 18 +5V Power * only for +5 V hsync.vsync) 16 Hot-plug detection 17 TMDS data 0- 18 TMDS data 0+ 19 TMDS data 0/5 shield 20 NC 21 NC 22 TMDS clock shield 23 TMDS clock+ 24 DDC TMDS clock- 19-pin color display signal cable* 1917151311 9 7 5 3... 1 1816141210 8 6 4 2 PIN No. Description 2 TMDS Data2 Shield 4 TMDS Data1+ 6 TMDS Data1- 8 TMDS Data0 Shield 10 TMDS Clock+ 12 TMDS Clock- 14 Reserved (N.C. Description 13 NC 14 +5 V power 15 GND (return for certain models Description 1 TMDS ...
...device) 16 SDA 18 +5V Power * only for +5 V hsync.vsync) 16 Hot-plug detection 17 TMDS data 0- 18 TMDS data 0+ 19 TMDS data 0/5 shield 20 NC 21 NC 22 TMDS clock shield 23 TMDS clock+ 24 DDC TMDS clock- 19-pin color display signal cable* 1917151311 9 7 5 3... 1 1816141210 8 6 4 2 PIN No. Description 2 TMDS Data2 Shield 4 TMDS Data1+ 6 TMDS Data1- 8 TMDS Data0 Shield 10 TMDS Clock+ 12 TMDS Clock- 14 Reserved (N.C. Description 13 NC 14 +5 V power 15 GND (return for certain models Description 1 TMDS ...

User Manual
Page 23
... monitor and computer are switched off . (2) Connect one end of the 24-pin DVI cable to the back of the monitor and the other end to the computer's port. 2 Connect the power cord Connect the power cord to the monitor, then to a properly grounded AC outlet. 3 Turn on the monitor and computer Turn on the monitor first, then the computer. b Connect the VGA video cable to diagnose the problem. c Connect the digital cable (only for dual-input models). (1) Make...
... monitor and computer are switched off . (2) Connect one end of the 24-pin DVI cable to the back of the monitor and the other end to the computer's port. 2 Connect the power cord Connect the power cord to the monitor, then to a properly grounded AC outlet. 3 Turn on the monitor and computer Turn on the monitor first, then the computer. b Connect the VGA video cable to diagnose the problem. c Connect the digital cable (only for dual-input models). (1) Make...
User Manual
Page 24
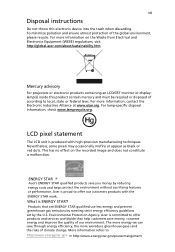
... change the settings of the current function. 5 Menu/Enter: Activate the OSD menu when the OSD is off or activate / deactivate the adjustment function when the OSD is on or off. 3.4 < / > : Press < or > to navigate to the desired function, press Enter to select the function. Slovenščina 9 User controls Front panel controls 1 Power LED: Lights up to indicate the power is turned on. 2 Power Switch: Turn the power on . 6 Auto adjust button...
... change the settings of the current function. 5 Menu/Enter: Activate the OSD menu when the OSD is off or activate / deactivate the adjustment function when the OSD is on or off. 3.4 < / > : Press < or > to navigate to the desired function, press Enter to select the function. Slovenščina 9 User controls Front panel controls 1 Power LED: Lights up to indicate the power is turned on. 2 Power Switch: Turn the power on . 6 Auto adjust button...

User Manual
Page 25
... OSD window. 2 Press < or > to select the desired function. 3 Press the Menu button again to select the function that you want to adjust. 4 Press < or > to 4. Only digital-input mode B. I. If you want to adjust any other function, repeat steps 2 to change the settings of the current function. 5 To exit and save, select the exit function. User: If "User" is selected, the Acer eColor Management OSD...
... OSD window. 2 Press < or > to select the desired function. 3 Press the Menu button again to select the function that you want to adjust. 4 Press < or > to 4. Only digital-input mode B. I. If you want to adjust any other function, repeat steps 2 to change the settings of the current function. 5 To exit and save, select the exit function. User: If "User" is selected, the Acer eColor Management OSD...

User Manual
Page 26
... open the Acer eColor Management OSD and access the scenario modes. 2 Press "" to select the mode. 3 Press the Auto-adjust button to suit any situation. Enhances colors and emphasizes fine detail. Presents great visuals, even in unsuitably-lit environments. Settings can be fine-tuned to confirm the mode. • Features Main menu icon Sub menu item User mode Text mode Standard mode Graphic mode Movie mode Description User-defined. Reflects native display...
... open the Acer eColor Management OSD and access the scenario modes. 2 Press "" to select the mode. 3 Press the Auto-adjust button to suit any situation. Enhances colors and emphasizes fine detail. Presents great visuals, even in unsuitably-lit environments. Settings can be fine-tuned to confirm the mode. • Features Main menu icon Sub menu item User mode Text mode Standard mode Graphic mode Movie mode Description User-defined. Reflects native display...

User Manual
Page 27
... picture clock (available in analog mode only). Position Adjusts the vertical position (available in analog mode only). Slovenščina 12 User Main Sub menu menu icon icon Sub menu item Contrast Brightness Description Adjusts the contrast between the foreground and background of the screen image. User/green Adjusts green intensity. Adjusts the background brightness of the screen image. V. Sets the color temperature to warm white. ACM ACM (Adaptive Contrast Management) ACM On/Off switch, default Off. Position Adjusts the horizontal position...
... picture clock (available in analog mode only). Position Adjusts the vertical position (available in analog mode only). Slovenščina 12 User Main Sub menu menu icon icon Sub menu item Contrast Brightness Description Adjusts the contrast between the foreground and background of the screen image. User/green Adjusts green intensity. Adjusts the background brightness of the screen image. V. Sets the color temperature to warm white. ACM ACM (Adaptive Contrast Management) ACM On/Off switch, default Off. Position Adjusts the horizontal position...

User Manual
Page 28
... Adjusts the OSD timeout. N/A Input Source N/A Wide Mode N/A DDC/CI N/A Information N/A Reset N/A Exit Select input signal from D-Sub or DVI-D or HDMI Select Wide mode setting for Full screen, Aspect ratio or 1:1 mode Turns on/off DDC/CI support Shows the resolution, H/V frequency, input port and serial number for current input. Adjusts the horizontal position of the OSD. Saves user changes and closes the OSD. Position Description Language selection. V. Clears Auto-configuration changes and sets the color temperature to warm. Position Adjusts the vertical position of the OSD...
... Adjusts the OSD timeout. N/A Input Source N/A Wide Mode N/A DDC/CI N/A Information N/A Reset N/A Exit Select input signal from D-Sub or DVI-D or HDMI Select Wide mode setting for Full screen, Aspect ratio or 1:1 mode Turns on/off DDC/CI support Shows the resolution, H/V frequency, input port and serial number for current input. Adjusts the horizontal position of the OSD. Saves user changes and closes the OSD. Position Description Language selection. V. Clears Auto-configuration changes and sets the color temperature to warm. Position Adjusts the vertical position of the OSD...

User Manual
Page 29
... properly connected to the monitor. Check if the video signal cable is missing, off the monitor. Wait for servicing, please check the troubleshooting list below to their default settings. Check the power switch. Check if the specification of monitor. Slovenščina VGA mode Problem No picture visible LED status Blue Off Remedy Using the OSD, adjust brightness and contrast to maximum or reset to see if you can self-diagnose the problem. Amber Check if the power cord is in power saving/ standby mode. 14 Troubleshooting...
... properly connected to the monitor. Check if the video signal cable is missing, off the monitor. Wait for servicing, please check the troubleshooting list below to their default settings. Check the power switch. Check if the specification of monitor. Slovenščina VGA mode Problem No picture visible LED status Blue Off Remedy Using the OSD, adjust brightness and contrast to maximum or reset to see if you can self-diagnose the problem. Amber Check if the power cord is in power saving/ standby mode. 14 Troubleshooting...
User Manual
Page 30
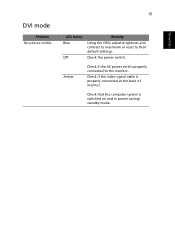
Check that the computer system is properly connected at the back of monitor. Check the power switch. Check if the video signal cable is switched on and in power saving/ standby mode. Slovenščina Amber Check if the AC power cord is properly connected to their default settings. DVI mode Problem No picture visible 15 LED status Blue Off Remedy Using the OSD, adjust brightness and contrast to maximum or reset to the monitor.
Check that the computer system is properly connected at the back of monitor. Check the power switch. Check if the video signal cable is switched on and in power saving/ standby mode. Slovenščina Amber Check if the AC power cord is properly connected to their default settings. DVI mode Problem No picture visible 15 LED status Blue Off Remedy Using the OSD, adjust brightness and contrast to maximum or reset to the monitor.

