User Manual
Page 3
... people speaking near you. When you plug the power cord into is recovered slowly by changing the image or turning off the power switch and then turn it clearly and comfortably and without distortion. • After setting the volume level, do not indicate a problem. • Due to unplug the power cord from the electrical outlet. Keep this case, the screen is easily accessible and located as...
... people speaking near you. When you plug the power cord into is recovered slowly by changing the image or turning off the power switch and then turn it clearly and comfortably and without distortion. • After setting the volume level, do not indicate a problem. • Due to unplug the power cord from the electrical outlet. Keep this case, the screen is easily accessible and located as...
User Manual
Page 4
...has been damaged • the product exhibits a distinct change in too many devices. Refer all products plugged into the extension cord does not exceed the extension cord ampere rating. English Warnings • Do not use it under sporting, exercising, or any vibrating environment ...make sure that may interfere with this product through cabinet slots as opening or removing covers may touch dangerous voltage points or short-out parts that the total ampere rating of the equipment plugged into the wall outlet does not exceed the fuse rating. • Do not overload a power ...
...has been damaged • the product exhibits a distinct change in too many devices. Refer all products plugged into the extension cord does not exceed the extension cord ampere rating. English Warnings • Do not use it under sporting, exercising, or any vibrating environment ...make sure that may interfere with this product through cabinet slots as opening or removing covers may touch dangerous voltage points or short-out parts that the total ampere rating of the equipment plugged into the wall outlet does not exceed the fuse rating. • Do not overload a power ...

User Manual
Page 5
... controls that are covered by a qualified technician to restore the product to turn off your device in any area with a potentially explosive atmosphere are in progress. Potentially explosive environments Switch off the device near gas pumps at Acer are very conscious of the environmental effects of our business and strive to identify and provide the best working...
... controls that are covered by a qualified technician to restore the product to turn off your device in any area with a potentially explosive atmosphere are in progress. Potentially explosive environments Switch off the device near gas pumps at Acer are very conscious of the environmental effects of our business and strive to identify and provide the best working...
User Manual
Page 6
...; Blink frequently to keep your sitting height to reduce eyestrain. English LCD pixel statement The LCD unit is in Active Off mode, move the mouse or press any other factors greatly increase the risk of user inactivity. • Wake the monitor when it is produced with high-precision manufacturing techniques. Observe the following section provides tips for power management: • Activate display's Sleep mode...
...; Blink frequently to keep your sitting height to reduce eyestrain. English LCD pixel statement The LCD unit is in Active Off mode, move the mouse or press any other factors greatly increase the risk of user inactivity. • Wake the monitor when it is produced with high-precision manufacturing techniques. Observe the following section provides tips for power management: • Activate display's Sleep mode...
User Manual
Page 7
.... vii English Display • Keep your display clean. • Keep your head at a higher level than the top edge of the display so your eyes point downward when looking at the middle of the display. • Adjust the display brightness and/or contrast to a comfortable level for extended periods of time. Developing good work habits Develop the following work habits to make your computer use more...
.... vii English Display • Keep your display clean. • Keep your head at a higher level than the top edge of the display so your eyes point downward when looking at the middle of the display. • Adjust the display brightness and/or contrast to a comfortable level for extended periods of time. Developing good work habits Develop the following work habits to make your computer use more...
User Manual
Page 10
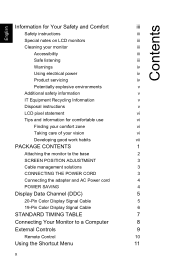
... Information v Disposal instructions v LCD pixel statement vi Tips and information for comfortable use vi Finding your comfort zone vi Taking care of your vision vi Developing good work habits vii PACKAGE CONTENTS 1 Attaching the monitor to the base 2 SCREEN POSITION ADJUSTMENT 3 Cable management solutions 3 CONNECTING THE POWER CORD 3 Connecting the adapter and AC Power cord 4 POWER SAVING 4 Display Data Channel (DDC) 5 20-Pin Color Display Signal Cable 5 19-Pin Color Display Signal Cable 6 STANDARD TIMING TABLE 7 Connecting Your Monitor to a Computer...
... Information v Disposal instructions v LCD pixel statement vi Tips and information for comfortable use vi Finding your comfort zone vi Taking care of your vision vi Developing good work habits vii PACKAGE CONTENTS 1 Attaching the monitor to the base 2 SCREEN POSITION ADJUSTMENT 3 Cable management solutions 3 CONNECTING THE POWER CORD 3 Connecting the adapter and AC Power cord 4 POWER SAVING 4 Display Data Channel (DDC) 5 20-Pin Color Display Signal Cable 5 19-Pin Color Display Signal Cable 6 STANDARD TIMING TABLE 7 Connecting Your Monitor to a Computer...
User Manual
Page 13
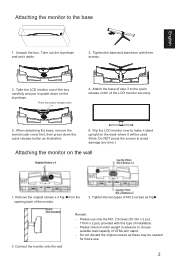
... stand arm with this button straight down the quick release button as illustrated. 6. When detaching the base, remove the semicircular cover first, then press down . 4. Connect the monitor onto the wall Remark: - English Attaching the monitor to avoid damage any time.) Attaching the monitor on the wall 1. Take out the styrofoam and set it upside down on the desk where it will be needed for future use...
... stand arm with this button straight down the quick release button as illustrated. 6. When detaching the base, remove the semicircular cover first, then press down . 4. Connect the monitor onto the wall Remark: - English Attaching the monitor to avoid damage any time.) Attaching the monitor on the wall 1. Take out the styrofoam and set it upside down on the desk where it will be needed for future use...
User Manual
Page 14
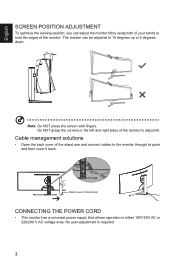
English SCREEN POSITION ADJUSTMENT To optimize the viewing position, you can be adjusted to 15 degrees up or 5 degrees down. 15 - Do NOT grasp the corners or the left and right sides of the stand arm and connect cables to the monitor through its ports and then cover it back. Cable management solutions • Open the back cover of the monitor to hold the edges of stand arm CONNECTING THE POWER CORD •...
English SCREEN POSITION ADJUSTMENT To optimize the viewing position, you can be adjusted to 15 degrees up or 5 degrees down. 15 - Do NOT grasp the corners or the left and right sides of the stand arm and connect cables to the monitor through its ports and then cover it back. Cable management solutions • Open the back cover of the monitor to hold the edges of stand arm CONNECTING THE POWER CORD •...
User Manual
Page 15
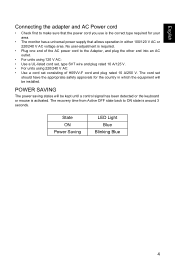
... in either 100/120 V AC or 220/240 V AC voltage area. The recovery time from Active OFF state back to ON state is around 3 seconds. English Connecting the adapter and AC Power cord • Check first to make sure that allows operation in which the equipment will be installed. State ON Power Saving LED Light Blue Blinking Blue 4
... in either 100/120 V AC or 220/240 V AC voltage area. The recovery time from Active OFF state back to ON state is around 3 seconds. English Connecting the adapter and AC Power cord • Check first to make sure that allows operation in which the equipment will be installed. State ON Power Saving LED Light Blue Blinking Blue 4
User Manual
Page 16
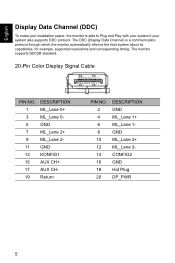
... ML_Lane 3+ ML_Lane 3CONFIG2 GND Hot Plug DP_PWR 5 The DDC (Display Data Channel) is able to Plug and Play with your system if your system also supports DDC protocol. English Display Data Channel (DDC) To make your installation easier, the monitor is a communication protocol through which the monitor automatically informs the host system about its capabilities, for example, supported resolutions and corresponding timing.
... ML_Lane 3+ ML_Lane 3CONFIG2 GND Hot Plug DP_PWR 5 The DDC (Display Data Channel) is able to Plug and Play with your system if your system also supports DDC protocol. English Display Data Channel (DDC) To make your installation easier, the monitor is a communication protocol through which the monitor automatically informs the host system about its capabilities, for example, supported resolutions and corresponding timing.
User Manual
Page 18
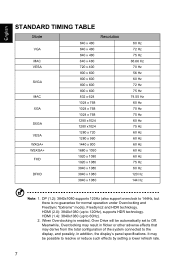
...setting a lower refresh rate. 7 DP (1.2): 3840x1080 supports 120Hz (also support overclock to 144Hz, but there is enabled, Over Drive will be possible to Off. HDMI (2.0): 3840x1080 (up to 120Hz), supports HDR technology. HDMI (1.4): 3840x1080 (up to 60Hz). 2. Meanwhile, Overclocking may result in addition, the display's panel specifications. English STANDARD TIMING TABLE Mode VGA MAC VESA SVGA MAC XGA SXGA VESA... 960 1440 x 900 1680 x 1050 1920 x 1080 1920 x 1080 3840 x 1080 3840 x 1080 3840 x 1080 Resolution 60 Hz 72 Hz 75 Hz 66.66 Hz 70 Hz 56 Hz 60 Hz 72 Hz 75 Hz 74.55 Hz ...
...setting a lower refresh rate. 7 DP (1.2): 3840x1080 supports 120Hz (also support overclock to 144Hz, but there is enabled, Over Drive will be possible to Off. HDMI (2.0): 3840x1080 (up to 120Hz), supports HDR technology. HDMI (1.4): 3840x1080 (up to 60Hz). 2. Meanwhile, Overclocking may result in addition, the display's panel specifications. English STANDARD TIMING TABLE Mode VGA MAC VESA SVGA MAC XGA SXGA VESA... 960 1440 x 900 1680 x 1050 1920 x 1080 1920 x 1080 3840 x 1080 3840 x 1080 3840 x 1080 Resolution 60 Hz 72 Hz 75 Hz 66.66 Hz 70 Hz 56 Hz 60 Hz 72 Hz 75 Hz 74.55 Hz ...
User Manual
Page 19
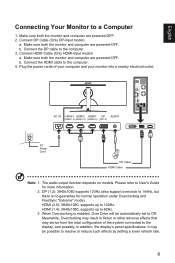
... User's Guide for normal operation under Overclocking and FreeSync "Extreme" mode). HDMI (2.0): 3840x1080, supports up to resolve or reduce such effects by setting a lower refresh rate. 8 When Overclocking is no guarantee for more information. 2. English Connecting Your Monitor to the computer. 4. Connect the HDMI cable to a Computer 1. Make sure both the monitor and computer are powered-OFF. 2. Plug the power cords of the system connected to Off. DP (1.2): 3840x1080 supports 120Hz (also support...
... User's Guide for normal operation under Overclocking and FreeSync "Extreme" mode). HDMI (2.0): 3840x1080, supports up to resolve or reduce such effects by setting a lower refresh rate. 8 When Overclocking is no guarantee for more information. 2. English Connecting Your Monitor to the computer. 4. Connect the HDMI cable to a Computer 1. Make sure both the monitor and computer are powered-OFF. 2. Plug the power cords of the system connected to Off. DP (1.2): 3840x1080 supports 120Hz (also support...
User Manual
Page 20
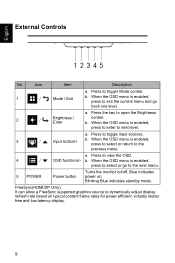
... menu. 5 POWER Power button Turns the monitor on/off. a. Press to toggle input sources. 3 / Input button/+ b. Blue indicates power on typical content frame rates for power efficient, virtually stutter free and low-latency display. 9 b. When the OSD menu is enabled, press to select or go to exit the current menu and go back one level. When the OSD menu is enabled, press to select or return to trigger Mode control. 1 / Mode / Exit b. a. Press to view...
... menu. 5 POWER Power button Turns the monitor on/off. a. Press to toggle input sources. 3 / Input button/+ b. Blue indicates power on typical content frame rates for power efficient, virtually stutter free and low-latency display. 9 b. When the OSD menu is enabled, press to select or go to exit the current menu and go back one level. When the OSD menu is enabled, press to select or return to trigger Mode control. 1 / Mode / Exit b. a. Press to view...
User Manual
Page 22
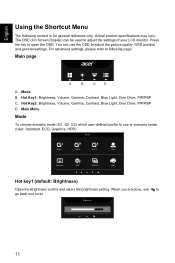
The OSD (On Screen Display) can use the OSD to adjust the picture quality, OSD position and general settings. When you are done, use or scenario mode (User, Standard, ECO, Graphics, HDR) Hot key1 (default: Brightness) Open the Brightness control and select the brightness setting. Actual product specifications may vary. Main Menu Mode To choose scenario mode (G1, G2, G3) which user-defined profile to use to following content is for general reference only. English Using the Shortcut Menu The...
The OSD (On Screen Display) can use the OSD to adjust the picture quality, OSD position and general settings. When you are done, use or scenario mode (User, Standard, ECO, Graphics, HDR) Hot key1 (default: Brightness) Open the Brightness control and select the brightness setting. Actual product specifications may vary. Main Menu Mode To choose scenario mode (G1, G2, G3) which user-defined profile to use to following content is for general reference only. English Using the Shortcut Menu The...

User Manual
Page 25
.... Using the !Ř 0 Ř button, select Color from the OSD. Color temperature: Default is off . Then navigate to the setting you to open the OSD. 2. You can simulate high-resolution images by adjusting different Blue Light showing ratio - 80%, 70%, 60%, 50%. HDR: Turn HDR on or off . 11. Color Picture Color Audio Gaming OSD System Information Mode - Press the MENU key to adjust the luminance tone. English 8. Super Sharpness technology can choose Normal, User...
.... Using the !Ř 0 Ř button, select Color from the OSD. Color temperature: Default is off . Then navigate to the setting you to open the OSD. 2. You can simulate high-resolution images by adjusting different Blue Light showing ratio - 80%, 70%, 60%, 50%. HDR: Turn HDR on or off . 11. Color Picture Color Audio Gaming OSD System Information Mode - Press the MENU key to adjust the luminance tone. English 8. Super Sharpness technology can choose Normal, User...
User Manual
Page 27
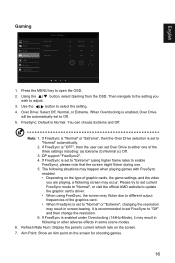
... FreeSync Refresh Rate Num AimPoint Normal Extreme Off Off Ř Ř 1. DP support "FreeSync2". 4. If FreeSync is set to "Extreme" (using FreeSync, the screen may flicker due to different output frequencies of the graphics card. • When FreeSync is recommended to set to "Normal" or "Extreme", changing the resolution may occur. Over Drive: Select Off, Normal, or Extreme. English Gaming Picture Color Audio Gaming OSD System Information Mode...
... FreeSync Refresh Rate Num AimPoint Normal Extreme Off Off Ř Ř 1. DP support "FreeSync2". 4. If FreeSync is set to "Extreme" (using FreeSync, the screen may flicker due to different output frequencies of the graphics card. • When FreeSync is recommended to set to "Normal" or "Extreme", changing the resolution may occur. Over Drive: Select Off, Normal, or Extreme. English Gaming Picture Color Audio Gaming OSD System Information Mode...

User Manual
Page 28
...; OSD Picture Color Audio Gaming OSD System Information Mode - Language: Set the OSD menu language. 5. OSD Locked: Set the OSD Lock to unlock OSD. Standard Language OSD Timeout Transparency OSD L ock English 10 Off Off 1. Then navigate to the setting you wish to prevent OSD button from the OSD. Note: 1. The "OSD Locked" message will appear in the middle of the screen, and LED lights will turn into blue. 17 The "OSD Unlocked" message will appear in the middle of the screen, and LED lights will indicate as blinking blue. OSD...
...; OSD Picture Color Audio Gaming OSD System Information Mode - Language: Set the OSD menu language. 5. OSD Locked: Set the OSD Lock to unlock OSD. Standard Language OSD Timeout Transparency OSD L ock English 10 Off Off 1. Then navigate to the setting you wish to prevent OSD button from the OSD. Note: 1. The "OSD Locked" message will appear in the middle of the screen, and LED lights will turn into blue. 17 The "OSD Unlocked" message will appear in the middle of the screen, and LED lights will indicate as blinking blue. OSD...
User Manual
Page 29
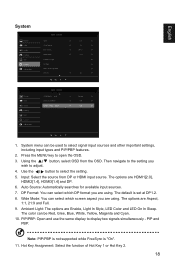
... LED On In Sleep. The options are using . The default is "On". 11. The color can be Red, Gree, Blue, White, Yellow, Magenta and Cyan. 10. Using the !Ř 0 Ř button, select OSD from DP or HDMI input source. Input: Select the source from the OSD. Auto Source: Automatically searches for available input sources. 7. PIP/PBP: Open and use the same display to select the setting. 5. Wide Mode: You can select which screen aspect you wish to select signal input sources...
... LED On In Sleep. The options are using . The default is "On". 11. The color can be Red, Gree, Blue, White, Yellow, Magenta and Cyan. 10. Using the !Ř 0 Ř button, select OSD from DP or HDMI input source. Input: Select the source from the OSD. Auto Source: Automatically searches for available input sources. 7. PIP/PBP: Open and use the same display to select the setting. 5. Wide Mode: You can select which screen aspect you wish to select signal input sources...
User Manual
Page 30
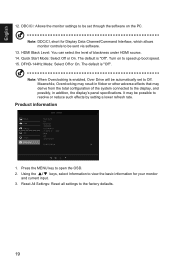
... refresh rate. HDMI Black Level: You can select the level of the system connected to be set to Off. Product information Picture Color Gaming OSD System Information Mode - Reset All Settings: Reset all settings to open the OSD. 2. Press the MENU key to the factory defaults. 19 Note: DDC/CI, short for your monitor and current input. 3. DFHD-144Hz Mode: Select Off or On. Standard Main Source DP Resoiution 3840x1080 H/V Frequency H: 67KHz V : 60Hz Mode SDR Series Number Reset...
... refresh rate. HDMI Black Level: You can select the level of the system connected to be set to Off. Product information Picture Color Gaming OSD System Information Mode - Reset All Settings: Reset all settings to open the OSD. 2. Press the MENU key to the factory defaults. 19 Note: DDC/CI, short for your monitor and current input. 3. DFHD-144Hz Mode: Select Off or On. Standard Main Source DP Resoiution 3840x1080 H/V Frequency H: 67KHz V : 60Hz Mode SDR Series Number Reset...
User Manual
Page 32
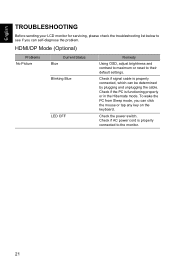
Check if signal cable is functioning properly or in the Hibernate mode. Check the power switch. Check if AC power cord is properly connected to their default settings. To wake the PC from Sleep mode, you can self-diagnose the problem. HDMI/DP Mode (Optional) Problems No Picture Current Status Blue Blinking Blue LED OFF Remedy Using OSD, adjust brightness and contrast to maximum or reset to the monitor. 21 English TROUBLESHOOTING Before sending your LCD monitor for servicing, please check the troubleshooting list below to see if you...
Check if signal cable is functioning properly or in the Hibernate mode. Check the power switch. Check if AC power cord is properly connected to their default settings. To wake the PC from Sleep mode, you can self-diagnose the problem. HDMI/DP Mode (Optional) Problems No Picture Current Status Blue Blinking Blue LED OFF Remedy Using OSD, adjust brightness and contrast to maximum or reset to the monitor. 21 English TROUBLESHOOTING Before sending your LCD monitor for servicing, please check the troubleshooting list below to see if you...


