

User Manual
Page 3
Contents Information for your safety and comfort 4 Safety instructions 4 Special notes on LCD monitors 4 Disposal instructions 6 Tips and information for comfortable use 6 Unpacking 9 Attaching / Removing the base 10 Adjusting the screen position 10 Setting up 12 Overview 13 Shortcut menu 14 Hardware Requirements 17 WiView Management 18 WiView Web Management 21 Connector pin assignment 25 15-pin color display signal cable 25 19-pin color display signal cable* 25 Standard timing table 26 Troubleshooting 27 VGA / HDMI mode 27 WiView mode 28
Contents Information for your safety and comfort 4 Safety instructions 4 Special notes on LCD monitors 4 Disposal instructions 6 Tips and information for comfortable use 6 Unpacking 9 Attaching / Removing the base 10 Adjusting the screen position 10 Setting up 12 Overview 13 Shortcut menu 14 Hardware Requirements 17 WiView Management 18 WiView Web Management 21 Connector pin assignment 25 15-pin color display signal cable 25 19-pin color display signal cable* 25 Standard timing table 26 Troubleshooting 27 VGA / HDMI mode 27 WiView mode 28

User Manual
Page 13
Supports high-definition digital video connections. Connects to a keyboard or mouse on WiView mode. 9 Shortcut buttons Onscreen control buttons. / Switches between / Source key WiView mode and PC mode. 10 Power button Turns the device on and off. Recovers WiView settings. 7 Kensington lock Connects to a Kensington-compatible security slot lock. 8 USB port Connects to external...
Supports high-definition digital video connections. Connects to a keyboard or mouse on WiView mode. 9 Shortcut buttons Onscreen control buttons. / Switches between / Source key WiView mode and PC mode. 10 Power button Turns the device on and off. Recovers WiView settings. 7 Kensington lock Connects to a Kensington-compatible security slot lock. 8 USB port Connects to external...

User Manual
Page 14
... Management • Press to open the Acer eColor Management OSD and access the scenario modes. Position, clock, and focus. Press this button to adjust the volume. Volume up/down Press to activate ... shortcut buttons to activate the Auto adjustment function. Press to select the mode. Item Name Empowering key Auto adjust Menu Description Press to open the Acer eColor Management OSD and access the scenario modes. • Press or to switch between...
... Management • Press to open the Acer eColor Management OSD and access the scenario modes. Position, clock, and focus. Press this button to adjust the volume. Volume up/down Press to activate ... shortcut buttons to activate the Auto adjustment function. Press to select the mode. Item Name Empowering key Auto adjust Menu Description Press to open the Acer eColor Management OSD and access the scenario modes. • Press or to switch between...
User Manual
Page 17
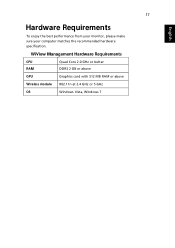
WiView Management Hardware Requirements CPU RAM Quad Core 2.0 GHz or better DDR3 2 GB or above GPU Graphics card with 512 MB RAM or above Wireless module 802.11n at 2.4 GHz or 5 GHz OS Windows Vista, Windows 7 17 English Hardware Requirements To enjoy the best performance from your monitor, please make sure your computer matches the recommended hardware specification.
WiView Management Hardware Requirements CPU RAM Quad Core 2.0 GHz or better DDR3 2 GB or above GPU Graphics card with 512 MB RAM or above Wireless module 802.11n at 2.4 GHz or 5 GHz OS Windows Vista, Windows 7 17 English Hardware Requirements To enjoy the best performance from your monitor, please make sure your computer matches the recommended hardware specification.
User Manual
Page 18
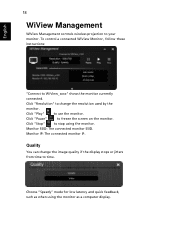
Click "Pause" to time. Quality You can change the resolution used by the monitor. To control a connected WiView Monitor, follow these instructions: "Connect to change the image quality if the display stops or jitters from time to freeze the screen on the monitor. ... "Speedy" mode for low latency and quick feedback, such as a computer display. Monitor IP: The connected monitor IP. Click "Play" to your monitor. English 18 WiView Management WiView Management controls wireless projection to use the monitor.
Click "Pause" to time. Quality You can change the resolution used by the monitor. To control a connected WiView Monitor, follow these instructions: "Connect to change the image quality if the display stops or jitters from time to freeze the screen on the monitor. ... "Speedy" mode for low latency and quick feedback, such as a computer display. Monitor IP: The connected monitor IP. Click "Play" to your monitor. English 18 WiView Management WiView Management controls wireless projection to use the monitor.
User Manual
Page 21
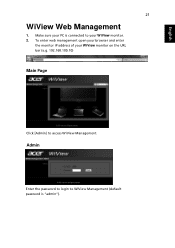
Admin Enter the password to login to access WiView Management. To enter web management open your browser and enter the monitor IP address of your WiView monitor on the URL bar (e.g. 192.168.100.10) Main Page Click [Admin] to WiView Management (default password is connected to your PC is "admin"). Make sure your WiView monitor. 2. English 21 WiView Web Management 1.
Admin Enter the password to login to access WiView Management. To enter web management open your browser and enter the monitor IP address of your WiView monitor on the URL bar (e.g. 192.168.100.10) Main Page Click [Admin] to WiView Management (default password is connected to your PC is "admin"). Make sure your WiView monitor. 2. English 21 WiView Web Management 1.

User Manual
Page 22
Connection Status: • Projecting Status: Current display status • Total Users: How many users have connected. Network Setup Click "Network Setup" to show current network settings. Versions: • Firmware Version: Product firmware version number. Network Status: • IP Address: IP address of WiView Monitor. • Subnet Mask: subnet mask • Default Gateway: default gateway • Wireless MAC Address: Network MAC address. Model Name: Product model name. English 22 System Status Click "System Status" to show current system status.
Connection Status: • Projecting Status: Current display status • Total Users: How many users have connected. Network Setup Click "Network Setup" to show current network settings. Versions: • Firmware Version: Product firmware version number. Network Status: • IP Address: IP address of WiView Monitor. • Subnet Mask: subnet mask • Default Gateway: default gateway • Wireless MAC Address: Network MAC address. Model Name: Product model name. English 22 System Status Click "System Status" to show current system status.

User Manual
Page 23
Enter New Password: Enter the new password you want to use to login to confirm. Confirm New Password: Enter the password a second time to WiView Management. English 23 Change Passwords Click "Change Passwords" to restore factory default settings. Reset to Default Click "Reset to Default" to change login password for WiView Management. Firmware Update Apply: Click "Apply" to confirm you want to reset all settings.
Enter New Password: Enter the new password you want to use to login to confirm. Confirm New Password: Enter the password a second time to WiView Management. English 23 Change Passwords Click "Change Passwords" to restore factory default settings. Reset to Default Click "Reset to Default" to change login password for WiView Management. Firmware Update Apply: Click "Apply" to confirm you want to reset all settings.

User Manual
Page 24
...The update process takes about five minutes. The WiView monitor will reboot automatically when the process is in process. Reboot: Start the restart process. English 24 Click "Firmware Update" to upgrade the monitor's firmware. 1. acer.display-xxxx.awi or similar). 3. Download the... latest firmware image file from the Acer download website. 2. This may damage your WiView monitor while the firmware update is completed.
...The update process takes about five minutes. The WiView monitor will reboot automatically when the process is in process. Reboot: Start the restart process. English 24 Click "Firmware Update" to upgrade the monitor's firmware. 1. acer.display-xxxx.awi or similar). 3. Download the... latest firmware image file from the Acer download website. 2. This may damage your WiView monitor while the firmware update is completed.

User Manual
Page 28
... when using wireless display mode. Check the system is using wireless display mode. Cannot find WiView monitor via clear.fi or DLNA software Connected to the network. 28 English WiView mode Problem Current status Cannot find WiView monitor access point after switching the wireless band to 5GHz System operates normally, but can't be.../ mouse do not work On media streaming or standby screen. Make sure your computer supports 5GHz wireless. 2. Remedy The network must be found by the WiView software. 1.
... when using wireless display mode. Check the system is using wireless display mode. Cannot find WiView monitor via clear.fi or DLNA software Connected to the network. 28 English WiView mode Problem Current status Cannot find WiView monitor access point after switching the wireless band to 5GHz System operates normally, but can't be.../ mouse do not work On media streaming or standby screen. Make sure your computer supports 5GHz wireless. 2. Remedy The network must be found by the WiView software. 1.