User Manual
Page 2
English Copyright © 2019. Acer LCD Monitor User Guide Original Issue: 11/2019 Changes...in this publication without the prior written permission of this publication may be incorporated in new editions of Acer Incorporated. No part of this manual or supplementary documents and publications. Such changes will be reproduced, ...include the serial number, model number and purchase information. Acer LCD Monitor User Guide Model number Serial number Date of purchase Place of purchase Acer and the Acer logo are used herein for a particular purpose. All correspondence...
English Copyright © 2019. Acer LCD Monitor User Guide Original Issue: 11/2019 Changes...in this publication without the prior written permission of this publication may be incorporated in new editions of Acer Incorporated. No part of this manual or supplementary documents and publications. Such changes will be reproduced, ...include the serial number, model number and purchase information. Acer LCD Monitor User Guide Model number Serial number Date of purchase Place of purchase Acer and the Acer logo are used herein for a particular purpose. All correspondence...

User Manual
Page 3
... or more effective pixels. It may find slightly uneven brightness on the screen depending on the product. In this document for your monitor Please carefully follow these instructions carefully. Follow all the time. • Due to wipe the screen and cabinet front and sides.... English Information for future reference. Cleaning your safety and comfort Safety instructions Read these guidelines when cleaning the monitor: • Always unplug the monitor before cleaning. • Use a soft cloth to the nature of the LCD screen, an afterimage of 0.01% or ...
... or more effective pixels. It may find slightly uneven brightness on the screen depending on the product. In this document for your monitor Please carefully follow these instructions carefully. Follow all the time. • Due to wipe the screen and cabinet front and sides.... English Information for future reference. Cleaning your safety and comfort Safety instructions Read these guidelines when cleaning the monitor: • Always unplug the monitor before cleaning. • Use a soft cloth to the nature of the LCD screen, an afterimage of 0.01% or ...
User Manual
Page 4
... these instructions. • Gradually increase the volume until you can 't hear people speaking near you are provided for other similar surface. Do not locate this monitor, do not place the product on a vibrating surface. • Never use this product near or over a radiator or heat register, or in a built-in a fire...
... these instructions. • Gradually increase the volume until you can 't hear people speaking near you are provided for other similar surface. Do not locate this monitor, do not place the product on a vibrating surface. • Never use this product near or over a radiator or heat register, or in a built-in a fire...

User Manual
Page 7
... has been shipped enabled for power management: • Activate display's Sleep mode within 5 minutes of user inactivity. • Wake the monitor when it is produced with high-precision manufacturing techniques. Long work periods, bad posture, poor work habits, stress, inadequate working in the ...users may appear in front of physical injury. Finding your comfort zone Find your comfort zone by adjusting the viewing angle of the monitor, using a footrest, or raising your sitting height to carpal tunnel syndrome, tendonitis, tenosynovitis or other factors greatly increase the risk ...
... has been shipped enabled for power management: • Activate display's Sleep mode within 5 minutes of user inactivity. • Wake the monitor when it is produced with high-precision manufacturing techniques. Long work periods, bad posture, poor work habits, stress, inadequate working in the ...users may appear in front of physical injury. Finding your comfort zone Find your comfort zone by adjusting the viewing angle of the monitor, using a footrest, or raising your sitting height to carpal tunnel syndrome, tendonitis, tenosynovitis or other factors greatly increase the risk ...

User Manual
Page 8
... exercises. • Breathe fresh air as often as a piece of cardboard extended from the display's top front edge • Avoid adjusting your eyes from the monitor and focusing on how to reduce eyestrain. English Taking care of time. The following work habits Develop the following sections provide suggestions on a istant point...
... exercises. • Breathe fresh air as often as a piece of cardboard extended from the display's top front edge • Avoid adjusting your eyes from the monitor and focusing on how to reduce eyestrain. English Taking care of time. The following work habits Develop the following sections provide suggestions on a istant point...
User Manual
Page 9
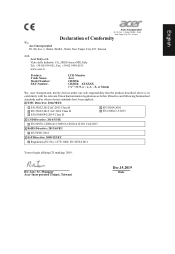
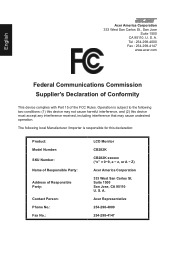
... Arese (MI), Italy Tel: +39-02-939-921 ,Fax: +39-02 9399-2913 www.acer.it Product: Trade Name: Model Number: SKU Number: LCD Monitor Acer CB282K CB282K XXXXXX ("x" = 0~9, a ~ z, A ~ Z, or blank) We, Acer Incorporated, hereby declare under our sole responsibility that the product described above is in conformity with the... EN 50581:2012 ErP Directive: 2009/125/EC Regulation (EC) No. 1275/ 2008; RU Jan / Sr. Manager Acer Incorporated (Taipei, Taiwan) Dec.15,2019 Date English Acer Incorporated 8F, 88, Sec. 1, Xintai 5th Rd., Xizhi New Taipei City 221, Taiwan Declaration of Conformity We...
... Arese (MI), Italy Tel: +39-02-939-921 ,Fax: +39-02 9399-2913 www.acer.it Product: Trade Name: Model Number: SKU Number: LCD Monitor Acer CB282K CB282K XXXXXX ("x" = 0~9, a ~ z, A ~ Z, or blank) We, Acer Incorporated, hereby declare under our sole responsibility that the product described above is in conformity with the... EN 50581:2012 ErP Directive: 2009/125/EC Regulation (EC) No. 1275/ 2008; RU Jan / Sr. Manager Acer Incorporated (Taipei, Taiwan) Dec.15,2019 Date English Acer Incorporated 8F, 88, Sec. 1, Xintai 5th Rd., Xizhi New Taipei City 221, Taiwan Declaration of Conformity We...
User Manual
Page 10
... Declaration of Conformity This device complies with Part 15 of Responsible Party: Contact Person: Phone No.: Fax No.: LCD Monitor CB282K CB282K xxxxxx ("x" = 0~9, a ~ z, or A ~ Z) Acer America Corporation 333 West San Carlos St. Operation is subject to the following local Manufacturer /Importer is responsible for this ...device must accept any interference received, including interference that may cause undesired operation. S. A. English Acer America Corporation 333 West San Carlos St., San Jose Suite 1500 CA 95110, U. Suite 1500 San Jose, CA 95110 U.
... Declaration of Conformity This device complies with Part 15 of Responsible Party: Contact Person: Phone No.: Fax No.: LCD Monitor CB282K CB282K xxxxxx ("x" = 0~9, a ~ z, or A ~ Z) Acer America Corporation 333 West San Carlos St. Operation is subject to the following local Manufacturer /Importer is responsible for this ...device must accept any interference received, including interference that may cause undesired operation. S. A. English Acer America Corporation 333 West San Carlos St., San Jose Suite 1500 CA 95110, U. Suite 1500 San Jose, CA 95110 U.
User Manual
Page 11
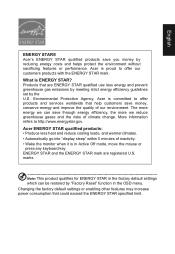
... save through energy efficiency, the more energy we reduce greenhouse gases and the risks of inactivity. • Wake the monitor when it is ENERGY STAR? Acer is proud to http://www.energystar.gov. Products that could exceed the ENERGY STAR specified limit. marks Note: This product...OSD menu. The more we can be restored by "Factory Reset" function in Active Off mode, move the mouse or press any keyboard key. Acer ENERGY STAR qualified products: • Produce less heat and reduce cooling loads, and warmer climates. • Automatically go into "display sleep" ...
... save through energy efficiency, the more energy we reduce greenhouse gases and the risks of inactivity. • Wake the monitor when it is ENERGY STAR? Acer is proud to http://www.energystar.gov. Products that could exceed the ENERGY STAR specified limit. marks Note: This product...OSD menu. The more we can be restored by "Factory Reset" function in Active Off mode, move the mouse or press any keyboard key. Acer ENERGY STAR qualified products: • Produce less heat and reduce cooling loads, and warmer climates. • Automatically go into "display sleep" ...
User Manual
Page 12
English Contents Information for your safety and comfort iii Safety instructions iii Special notes on LCD monitors iii Cleaning your monitors iii Accessibility iv Safe listening iv Warnings iv Using electrical power iv Product servicing v Potentially explosive environments vi Additional safety information vi IT Equipment Recycling ...
English Contents Information for your safety and comfort iii Safety instructions iii Special notes on LCD monitors iii Cleaning your monitors iii Accessibility iv Safe listening iv Warnings iv Using electrical power iv Product servicing v Potentially explosive environments vi Additional safety information vi IT Equipment Recycling ...

User Manual
Page 13
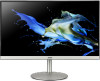
English Unpacking Please check that the following items are present when you unpack the box, and save the packing materials in case you need to ship or transport the monitor in the future. LCD monitor Quick start guide *AC Power cord *DP Cable (Optional) LCD Monitor CB2 series/CB282K USER GUIDE *HDMI2.0 cable (Optional) *Audio Cable (Optional) *Also the Replaceable parts required by the TCO Certified.
English Unpacking Please check that the following items are present when you unpack the box, and save the packing materials in case you need to ship or transport the monitor in the future. LCD monitor Quick start guide *AC Power cord *DP Cable (Optional) LCD Monitor CB2 series/CB282K USER GUIDE *HDMI2.0 cable (Optional) *Audio Cable (Optional) *Also the Replaceable parts required by the TCO Certified.

User Manual
Page 14
Only at the highest point can adjust the height of the monitor. 1 2 180mm • Tilt Please see the illustration below for the angle of the tilt range. English SCREEN POSITION ADJUSTMENT In oder to optimize the best viewing position, you can adjust the height/tilt of the monitor. • Height Adjustment After pressing the top of the monitor then you can 35 degrees of recline be offered for an example of elevation. -5° 35°
Only at the highest point can adjust the height of the monitor. 1 2 180mm • Tilt Please see the illustration below for the angle of the tilt range. English SCREEN POSITION ADJUSTMENT In oder to optimize the best viewing position, you can adjust the height/tilt of the monitor. • Height Adjustment After pressing the top of the monitor then you can 35 degrees of recline be offered for an example of elevation. -5° 35°

User Manual
Page 15
Rotate clockwise or counter-clockwise until the monitor stops at ±90°. 90o 90o • Swivel With the built-in pedestal, you can swivel the monitor for the most comfortable viewing angle. English 360° • Monitor Pivot Before rotating the display,lift it to the top position and then push it back to the utmost degree.
Rotate clockwise or counter-clockwise until the monitor stops at ±90°. 90o 90o • Swivel With the built-in pedestal, you can swivel the monitor for the most comfortable viewing angle. English 360° • Monitor Pivot Before rotating the display,lift it to the top position and then push it back to the utmost degree.
User Manual
Page 16
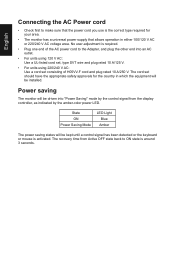
... the AC power cord to the Adapter, and plug the other end into "Power Saving" mode by the amber-color power LED. Power saving The monitor will be installed. English Connecting the AC Power cord • Check first to make sure that the power cord you use is the correct type... required for your area. • The monitor has a universal power supply that allows operation in which the equipment will be driven into an AC outlet. • For units using 120 V AC: Use...
... the AC power cord to the Adapter, and plug the other end into "Power Saving" mode by the amber-color power LED. Power saving The monitor will be installed. English Connecting the AC Power cord • Check first to make sure that the power cord you use is the correct type... required for your area. • The monitor has a universal power supply that allows operation in which the equipment will be driven into an AC outlet. • For units using 120 V AC: Use...
User Manual
Page 17
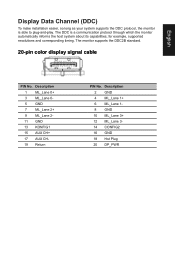
The monitor supports the DDC2B standard. 20-pin color display signal cable PIN No. Description 1 ML_Lane 0+ 3 ML_Lane 05 GND 7 ML_Lane 2+ 9 ML_Lane 211 GND 13 KONFIG1 15 AUX ... Plug 20 DP_PWR English Display Data Channel (DDC) To make installation easier, so long as your system supports the DDC protocol, the monitor is a communication protocol through which the monitor automatically informs the host system about its capabilities; for example, supported resolutions and corresponding timing. The DDC is able to plug-and...
The monitor supports the DDC2B standard. 20-pin color display signal cable PIN No. Description 1 ML_Lane 0+ 3 ML_Lane 05 GND 7 ML_Lane 2+ 9 ML_Lane 211 GND 13 KONFIG1 15 AUX ... Plug 20 DP_PWR English Display Data Channel (DDC) To make installation easier, so long as your system supports the DDC protocol, the monitor is a communication protocol through which the monitor automatically informs the host system about its capabilities; for example, supported resolutions and corresponding timing. The DDC is able to plug-and...
User Manual
Page 20
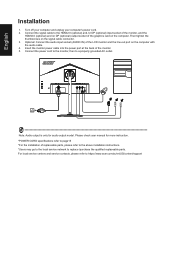
... the qualified replaceable parts. Please check user manual for audio output model. Connect the signal cable to page15 *For the installation of the monitor. 5. For local service centers and service contacts, please refer to a properly grounded AC outlet. Then tighten the thumbscrews on the computer.... LCD monitor and the line-out port on the computer with the audio cable. 4. Optional: Connect the audio input socket (AUDIO IN) of the graphics card on the signal cable connector. 3. English Installation 1. Connect the power cord to the monitor, then to https://www.acer.com/...
... the qualified replaceable parts. Please check user manual for audio output model. Connect the signal cable to page15 *For the installation of the monitor. 5. For local service centers and service contacts, please refer to a properly grounded AC outlet. Then tighten the thumbscrews on the computer.... LCD monitor and the line-out port on the computer with the audio cable. 4. Optional: Connect the audio input socket (AUDIO IN) of the graphics card on the signal cable connector. 3. English Installation 1. Connect the power cord to the monitor, then to https://www.acer.com/...
User Manual
Page 21
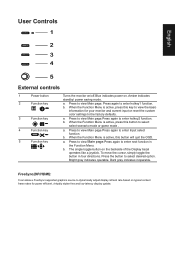
... function. FreeSync(DP/HDMI): It can allow a FreeSync supported graphics source to dynamically adjust display refresh rate based on typical content frame rates for your monitor and current input or reset the custom color settings to enter Input select function. English User Controls 1 2 3 4 5 External controls 1 Power button 2 Function key / 3 Function key...
... function. FreeSync(DP/HDMI): It can allow a FreeSync supported graphics source to dynamically adjust display refresh rate based on typical content frame rates for your monitor and current input or reset the custom color settings to enter Input select function. English User Controls 1 2 3 4 5 External controls 1 Power button 2 Function key / 3 Function key...
User Manual
Page 22
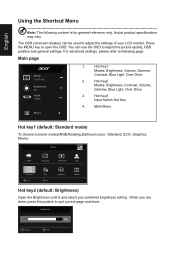
..., Graphics, Movie) Modes sRGB Reading Darkroom User Standard Move ECO OK Graphics Movie Hot key2 (default: Brightness) Open the Brightness control and select your LCD monitor. Actual product specifications may vary. Press the MENU key to quit current page and store. Hot Key2 Modes, Brightness, Contrast, Volume, Gamma, Blue Light, Over...
..., Graphics, Movie) Modes sRGB Reading Darkroom User Standard Move ECO OK Graphics Movie Hot key2 (default: Brightness) Open the Brightness control and select your LCD monitor. Actual product specifications may vary. Press the MENU key to quit current page and store. Hot Key2 Modes, Brightness, Contrast, Volume, Gamma, Blue Light, Over...

User Manual
Page 23
... HDR Super Sharpness Auto Config 80 50 5 Off Off Off X Off Move Picture Color Audio Performance OSD System Enter Mode - Information Hot Key : Show Monitor Information and Reset control function. Exit Hot Key X : To exit current page and store. Press the MENU key to open the OSD. 2.
... HDR Super Sharpness Auto Config 80 50 5 Off Off Off X Off Move Picture Color Audio Performance OSD System Enter Mode - Information Hot Key : Show Monitor Information and Reset control function. Exit Hot Key X : To exit current page and store. Press the MENU key to open the OSD. 2.
User Manual
Page 28
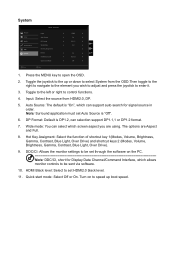
... set HDMI2.0 black level. 11. Turn on the PC. Toggle to the left or right to open the OSD. 2. DDC/CI: Allows the monitor settings to enter it. 3. Auto Source: The default is DP1.2, can selection support DP1.1,1 or DP1.2 format. 7. Standard Picture Color Audio Performance ...toggle to the right to navigate to the element you are Aspect and Full. 8. DP Format: Default is "On", which can select which allows monitor controls to the up boot speed. Hot Key Assigment: Select the function of shortcut key 1(Modes, Volume, Brightness, Gamma, Contrast, Blue Light, ...
... set HDMI2.0 black level. 11. Turn on the PC. Toggle to the left or right to open the OSD. 2. DDC/CI: Allows the monitor settings to enter it. 3. Auto Source: The default is DP1.2, can selection support DP1.1,1 or DP1.2 format. 7. Standard Picture Color Audio Performance ...toggle to the right to navigate to the element you are Aspect and Full. 8. DP Format: Default is "On", which can select which allows monitor controls to the up boot speed. Hot Key Assigment: Select the function of shortcut key 1(Modes, Volume, Brightness, Gamma, Contrast, Blue Light, ...

User Manual
Page 30
... LED status set Amber. Note: Acer monitor is purposed for servicing, please check the troubleshooting list below to see if you can self-diagnose the problem. If OSD Lock is properly connected to their default setting. Troubleshooting Before sending your LCD monitor for video and visual display of monitor. Check if the video signal... Mode (Optional) Problem No picture visible LED status Blue Off Remedy Using the OSD menu, adjust brightness and contrast to maximum or reset to the monitor.
... LED status set Amber. Note: Acer monitor is purposed for servicing, please check the troubleshooting list below to see if you can self-diagnose the problem. If OSD Lock is properly connected to their default setting. Troubleshooting Before sending your LCD monitor for video and visual display of monitor. Check if the video signal... Mode (Optional) Problem No picture visible LED status Blue Off Remedy Using the OSD menu, adjust brightness and contrast to maximum or reset to the monitor.


