
User Manual
Page 3
... a missing pixel or pixel lit all warnings and instructions marked on LCD monitors The following are normal with the LCD monitor and do not indicate a problem. • Due to the nature of the LCD screen, an afterimage of the fluorescent light, the screen may remain after switching the image, when the same image is recovered slowly by changing the image or turning off the power switch and then turn it on...
... a missing pixel or pixel lit all warnings and instructions marked on LCD monitors The following are normal with the LCD monitor and do not indicate a problem. • Due to the nature of the LCD screen, an afterimage of the fluorescent light, the screen may remain after switching the image, when the same image is recovered slowly by changing the image or turning off the power switch and then turn it on...
User Manual
Page 4
...; Turn the volume down if you can't hear people speaking near you plug the power cord into the product. • To avoid dmage of power indicated on an unstable cart, stand or table. If you need to disconnect power from the type of internal components and to the equipment operator as they may touch dangerous voltage points or short-out parts...
...; Turn the volume down if you can't hear people speaking near you plug the power cord into the product. • To avoid dmage of power indicated on an unstable cart, stand or table. If you need to disconnect power from the type of internal components and to the equipment operator as they may touch dangerous voltage points or short-out parts...
User Manual
Page 5
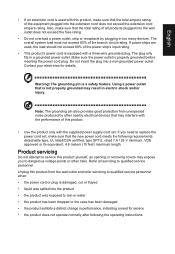
... product was exposed to replace the power cord set . The grounding pin is equipped with a three-wire grounded plug. If you to qualified service personnel. Warning! If power strips are used with the supplied power supply cord set , make sure that the total ampere rating of the branch circuit rating. Using a power outlet that the new power cord meets the following the operating instructions Unplug this product, make sure that is not...
... product was exposed to replace the power cord set . The grounding pin is equipped with a three-wire grounded plug. If you to qualified service personnel. Warning! If power strips are used with the supplied power supply cord set , make sure that the total ampere rating of the branch circuit rating. Using a power outlet that the new power cord meets the following the operating instructions Unplug this product, make sure that is not...

User Manual
Page 6
.... English Note: Adjust only those controls that are covered by a qualified technician to restore the product to normal condition. Sparks in such areas could cause an explosion or fire resulting in damage and will often require extensive work by the operating instructions, since improper adjustment of other products. Disposal instructions Do not throw this website: http://www.acer-group...
.... English Note: Adjust only those controls that are covered by a qualified technician to restore the product to normal condition. Sparks in such areas could cause an explosion or fire resulting in damage and will often require extensive work by the operating instructions, since improper adjustment of other products. Disposal instructions Do not throw this website: http://www.acer-group...

User Manual
Page 7
... the monitor, using a footrest, or raising your comfort zone by adjusting the viewing angle of eyestrain and headaches after long hours of user inactivity. • Wake the monitor when it is produced with high-precision manufacturing techniques. Incorrect computer usage may occasionally misfire or appear as black or red dots. English LCD pixel statement The LCD unit is in Active Off mode,move...
... the monitor, using a footrest, or raising your comfort zone by adjusting the viewing angle of eyestrain and headaches after long hours of user inactivity. • Wake the monitor when it is produced with high-precision manufacturing techniques. Incorrect computer usage may occasionally misfire or appear as black or red dots. English LCD pixel statement The LCD unit is in Active Off mode,move...

User Manual
Page 8
..., glare, excessive room lighting, poorly focused screens, very small typefaces and low-contrast displays could stress your eyes point downward when looking at bright light sources, such as possible. • Exercise regularly and maintain a healthy body. Developing good work habits Develop the following sections provide suggestions on a istant point. • Blink frequently to reduce eyestrain. English Taking care of time...
..., glare, excessive room lighting, poorly focused screens, very small typefaces and low-contrast displays could stress your eyes point downward when looking at bright light sources, such as possible. • Exercise regularly and maintain a healthy body. Developing good work habits Develop the following sections provide suggestions on a istant point. • Blink frequently to reduce eyestrain. English Taking care of time...
User Manual
Page 11
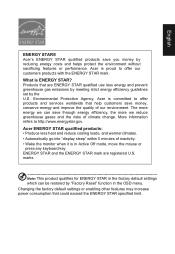
.... Changing the factory default settings or enabling other features may increase power consumption that are registered U.S. Acer ENERGY STAR qualified products: • Produce less heat and reduce cooling loads, and warmer climates. • Automatically go into "display sleep" within 5 minutes of inactivity. • Wake the monitor when it is ENERGY STAR? Environmental Protection Agency. What is in Active Off mode...
.... Changing the factory default settings or enabling other features may increase power consumption that are registered U.S. Acer ENERGY STAR qualified products: • Produce less heat and reduce cooling loads, and warmer climates. • Automatically go into "display sleep" within 5 minutes of inactivity. • Wake the monitor when it is ENERGY STAR? Environmental Protection Agency. What is in Active Off mode...
User Manual
Page 12
... Developing good work habits viii Declaration of Conformity ix Federal Communications Commission Declaration of Conformity x Unpacking 1 Attaching the base (for selected models) 2 Screen position adjustment 3 Connecting the adapter and AC Power cord 3 Power saving Display Data Channel (DDC) Connector pin assignment 4 19-pin color display signal cable 4 20-pin color display signal cable 5 Standard timing table 6 Installation 7 Users controls 8 Panel controls 8 Using the Shortcut Menu 9 The Function page 10 Troubleshooting 15 HDMI2.0/DP Mode (Optional) 15
... Developing good work habits viii Declaration of Conformity ix Federal Communications Commission Declaration of Conformity x Unpacking 1 Attaching the base (for selected models) 2 Screen position adjustment 3 Connecting the adapter and AC Power cord 3 Power saving Display Data Channel (DDC) Connector pin assignment 4 19-pin color display signal cable 4 20-pin color display signal cable 5 Standard timing table 6 Installation 7 Users controls 8 Panel controls 8 Using the Shortcut Menu 9 The Function page 10 Troubleshooting 15 HDMI2.0/DP Mode (Optional) 15

User Manual
Page 13
LCD monitor Quick start guide *AC Power cord *DP Cable (Optional) LCD Monitor CB2 series/CB282K USER GUIDE *HDMI2.0 cable (Optional) *Audio Cable (Optional) *Also the Replaceable parts required by the TCO Certified. English Unpacking Please check that the following items are present when you unpack the box, and save the packing materials in case you need to ship or transport the monitor in the future.
LCD monitor Quick start guide *AC Power cord *DP Cable (Optional) LCD Monitor CB2 series/CB282K USER GUIDE *HDMI2.0 cable (Optional) *Audio Cable (Optional) *Also the Replaceable parts required by the TCO Certified. English Unpacking Please check that the following items are present when you unpack the box, and save the packing materials in case you need to ship or transport the monitor in the future.

User Manual
Page 14
English SCREEN POSITION ADJUSTMENT In oder to optimize the best viewing position, you can adjust the height/tilt of the monitor. • Height Adjustment After pressing the top of the monitor then you can 35 degrees of recline be offered for an example of elevation. -5° 35° Only at the highest point can adjust the height of the monitor. 1 2 180mm • Tilt Please see the illustration below for the angle of the tilt range.
English SCREEN POSITION ADJUSTMENT In oder to optimize the best viewing position, you can adjust the height/tilt of the monitor. • Height Adjustment After pressing the top of the monitor then you can 35 degrees of recline be offered for an example of elevation. -5° 35° Only at the highest point can adjust the height of the monitor. 1 2 180mm • Tilt Please see the illustration below for the angle of the tilt range.
User Manual
Page 16
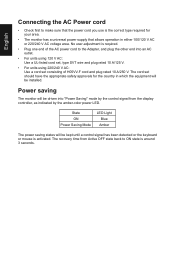
... your area. • The monitor has a universal power supply that allows operation in which the equipment will be installed. English Connecting the AC Power cord • Check first to make sure that the power cord you use is around 3 seconds. No user-adjustment is activated. The cord set consisting of H05VV-F cord and plug rated 10 A/250 V. The recovery time from the display controller, as indicated by the control signal from Active OFF state...
... your area. • The monitor has a universal power supply that allows operation in which the equipment will be installed. English Connecting the AC Power cord • Check first to make sure that the power cord you use is around 3 seconds. No user-adjustment is activated. The cord set consisting of H05VV-F cord and plug rated 10 A/250 V. The recovery time from the display controller, as indicated by the control signal from Active OFF state...
User Manual
Page 17
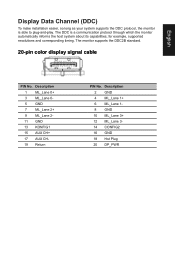
... CH+ 17 AUX CH19 Return PIN No. English Display Data Channel (DDC) To make installation easier, so long as your system supports the DDC protocol, the monitor is a communication protocol through which the monitor automatically informs the host system about its capabilities; The monitor supports the DDC2B standard. 20-pin color display signal cable PIN No. The DDC is able to plug-and-play.
... CH+ 17 AUX CH19 Return PIN No. English Display Data Channel (DDC) To make installation easier, so long as your system supports the DDC protocol, the monitor is a communication protocol through which the monitor automatically informs the host system about its capabilities; The monitor supports the DDC2B standard. 20-pin color display signal cable PIN No. The DDC is able to plug-and-play.
User Manual
Page 20
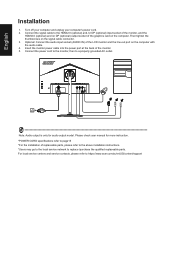
... check user manual for audio output model. Connect the power cord to the monitor, then to https://www.acer.com/ac/en/US/content/support Note: Audio output is only for more instruction. *POWER CORD specifications refer to replace /purchase the qualified replaceable parts. Then tighten the thumbscrews on the signal cable connector. 3. Turn off your computer and unplug your computer's power cord. 2. For local service centers and service contacts, please refer to a properly grounded AC outlet. English Installation...
... check user manual for audio output model. Connect the power cord to the monitor, then to https://www.acer.com/ac/en/US/content/support Note: Audio output is only for more instruction. *POWER CORD specifications refer to replace /purchase the qualified replaceable parts. Then tighten the thumbscrews on the signal cable connector. 3. Turn off your computer and unplug your computer's power cord. 2. For local service centers and service contacts, please refer to a properly grounded AC outlet. English Installation...
User Manual
Page 21
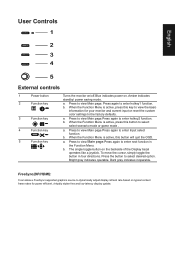
... adjust display refresh rate based on the backside of the Display bezel operates like a joystick. When the Function Menu is active, press this button to enter next function in four directions. Dark gray indicates inoperable. a. a. FreeSync(DP/HDMI): It can allow a FreeSync supported graphics source to enter Input select function. English User Controls 1 2 3 4 5 External controls 1 Power button 2 Function key / 3 Function key / 4 Function key /X 5 Function key / Turns the monitor on/off.Blue...
... adjust display refresh rate based on the backside of the Display bezel operates like a joystick. When the Function Menu is active, press this button to enter next function in four directions. Dark gray indicates inoperable. a. a. FreeSync(DP/HDMI): It can allow a FreeSync supported graphics source to enter Input select function. English User Controls 1 2 3 4 5 External controls 1 Power button 2 Function key / 3 Function key / 4 Function key /X 5 Function key / Turns the monitor on/off.Blue...
User Manual
Page 22
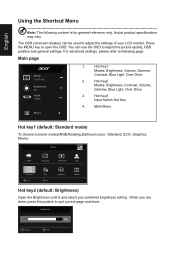
.... Main Menu Hot key1 (default: Standard mode) To choose scenario mode(sRGB,Reading,Darkroom,User, Standard, ECO, Graphics, Movie) Modes sRGB Reading Darkroom User Standard Move ECO OK Graphics Movie Hot key2 (default: Brightness) Open the Brightness control and select your LCD monitor. For advanced settings, please refer to adjust the picture quality, OSD position and general settings. English Using the Shortcut Menu Note: The following page: Main page Mode Standard Brightness 80 Input HDMI Menu 1. Brightness 80 Adjust OK
.... Main Menu Hot key1 (default: Standard mode) To choose scenario mode(sRGB,Reading,Darkroom,User, Standard, ECO, Graphics, Movie) Modes sRGB Reading Darkroom User Standard Move ECO OK Graphics Movie Hot key2 (default: Brightness) Open the Brightness control and select your LCD monitor. For advanced settings, please refer to adjust the picture quality, OSD position and general settings. English Using the Shortcut Menu Note: The following page: Main page Mode Standard Brightness 80 Input HDMI Menu 1. Brightness 80 Adjust OK

User Manual
Page 23
... change Modes Hot Key menu. Standard Brightness Contrast Black Boost Blue Light ACM HDR Super Sharpness Auto Config 80 50 5 Off Off Off X Off Move Picture Color Audio Performance OSD System Enter Mode - Toggle the joystick to the left or right to open the OSD. Press the MENU key to adjust the sliding scales. Picture Picture Color Audio Performance OSD System Mode - Input Input HDMI Auto Source On Move OK Exit Main menu 1. Information Hot Key : Show Monitor Information and Reset control...
... change Modes Hot Key menu. Standard Brightness Contrast Black Boost Blue Light ACM HDR Super Sharpness Auto Config 80 50 5 Off Off Off X Off Move Picture Color Audio Performance OSD System Enter Mode - Toggle the joystick to the left or right to open the OSD. Press the MENU key to adjust the sliding scales. Picture Picture Color Audio Performance OSD System Mode - Input Input HDMI Auto Source On Move OK Exit Main menu 1. Information Hot Key : Show Monitor Information and Reset control...

User Manual
Page 24
The Picture menu can simulate high-resolution images by increasing the brightness without changing lighter shades. 8. Position,V. Contrast: Adjust the contrast from 0 to auto will automatically detect and deal with HDR signal. Black Boost: Adjust the black level from 0 to make images sharper and clearer. 11. Enhances shadows by boosting the pixel density of the original source to 100 Note: Sets the degree of difference between light and dark shades. 6. ACM: Turn ACM...
The Picture menu can simulate high-resolution images by increasing the brightness without changing lighter shades. 8. Position,V. Contrast: Adjust the contrast from 0 to auto will automatically detect and deal with HDR signal. Black Boost: Adjust the black level from 0 to make images sharper and clearer. 11. Enhances shadows by boosting the pixel density of the original source to 100 Note: Sets the degree of difference between light and dark shades. 6. ACM: Turn ACM...

User Manual
Page 27
... using gaming mode. Refresh rate num: Display the panel's current refresh rate on /off the OSD menu. 6. OSD Lock: To choose OSD lock on the screen. Note: If FreeSync set "On" you wish to adjust and press the joystick to blue light. English OSD Picture Color Audio Performance OSD System Mode - Toggle to the left or right to open the OSD. 2. OSD Unlocked: • In normal display condition to press the "Navi Key" in the middle of the screen. • LED lights will be changed...
... using gaming mode. Refresh rate num: Display the panel's current refresh rate on /off the OSD menu. 6. OSD Lock: To choose OSD lock on the screen. Note: If FreeSync set "On" you wish to adjust and press the joystick to blue light. English OSD Picture Color Audio Performance OSD System Mode - Toggle to the left or right to open the OSD. 2. OSD Unlocked: • In normal display condition to press the "Navi Key" in the middle of the screen. • LED lights will be changed...
User Manual
Page 28
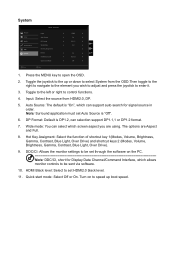
... Picture Color Audio Performance OSD System Input Auto Source DP Format Wide Mode Hot Key Assignment DDC/CI HDMI Black Level Quick Start Mode HDMI On DP 1.2 Full On X Normal Off Move Enter Quick Start Mode 1. Note: DDC/CI, short for Display Data Channel/Command Interface, which can support auto search for signal source in order. Toggle to the left or right to open the OSD. 2. Turn on the PC. Auto Source: The default is "On", which allows monitor controls to...
... Picture Color Audio Performance OSD System Input Auto Source DP Format Wide Mode Hot Key Assignment DDC/CI HDMI Black Level Quick Start Mode HDMI On DP 1.2 Full On X Normal Off Move Enter Quick Start Mode 1. Note: DDC/CI, short for Display Data Channel/Command Interface, which can support auto search for signal source in order. Toggle to the left or right to open the OSD. 2. Turn on the PC. Auto Source: The default is "On", which allows monitor controls to...

User Manual
Page 30
... AC power cord is properly connected to their default setting. Check if the computer system is On, the LED status set Amber. Check if the video signal cable is purposed for servicing, please check the troubleshooting list below to see if you can self-diagnose the problem. Regulatory Compliance 217186 60950-1 If OSD Lock is switched on and in power saving/standby mode. Troubleshooting Before sending your LCD monitor for video and visual display of monitor. Check the power switch. Note: Acer monitor...
... AC power cord is properly connected to their default setting. Check if the computer system is On, the LED status set Amber. Check if the video signal cable is purposed for servicing, please check the troubleshooting list below to see if you can self-diagnose the problem. Regulatory Compliance 217186 60950-1 If OSD Lock is switched on and in power saving/standby mode. Troubleshooting Before sending your LCD monitor for video and visual display of monitor. Check the power switch. Note: Acer monitor...


