User Manual
Page 2
... and place of purchase information in new editions of this publication without the prior written permission of Acer Incorporated. All correspondence concerning your computer. Acer LCD Monitor User's Guide Original Issue: 08/2016 Changes may be made periodically to the information in any form... include the serial number, model number and purchase information. No part of Acer Incorporated. Acer LCD Monitor User's Guide Model number Serial number Date of purchase Place of purchase Acer and the Acer logo are registered trademarks of this publication may be reproduced, stored in a...
... and place of purchase information in new editions of this publication without the prior written permission of Acer Incorporated. All correspondence concerning your computer. Acer LCD Monitor User's Guide Original Issue: 08/2016 Changes may be made periodically to the information in any form... include the serial number, model number and purchase information. No part of Acer Incorporated. Acer LCD Monitor User's Guide Model number Serial number Date of purchase Place of purchase Acer and the Acer logo are registered trademarks of this publication may be reproduced, stored in a...

User Manual
Page 3
... . In this document for future reference. Keep this case, the screen is displayed for a few hours. Information for your monitor Please carefully follow these instructions carefully. Connecting/disconnecting the device Observe the following are turned off the power switch and then turn ...on the screen depending on the product. Cleaning your safety and comfort Safety instructions Read these guidelines when cleaning the monitor: • Always unplug the monitor before connecting any cable or unplugging the power cord. • If the system has multiple sources of power, ...
... . In this document for future reference. Keep this case, the screen is displayed for a few hours. Information for your monitor Please carefully follow these instructions carefully. Connecting/disconnecting the device Observe the following are turned off the power switch and then turn ...on the screen depending on the product. Cleaning your safety and comfort Safety instructions Read these guidelines when cleaning the monitor: • Always unplug the monitor before connecting any cable or unplugging the power cord. • If the system has multiple sources of power, ...

User Manual
Page 8
... keyboard key. Incorrect computer usage may complain of a computer. Finding your comfort zone Find your comfort zone by adjusting the viewing angle of the monitor, using a footrest, or raising your leg muscles Long work periods, bad posture, poor work habits, stress, inadequate working in front of eyestrain... has been shipped enabled for power management: • Activate the Display Sleep mode within 5 minutes of user inactivity. • Wake the monitor when it is in Active Off mode, move the mouse or press any other recurring or persistent discomfort and/or pain related to computer use...
... keyboard key. Incorrect computer usage may complain of a computer. Finding your comfort zone Find your comfort zone by adjusting the viewing angle of the monitor, using a footrest, or raising your leg muscles Long work periods, bad posture, poor work habits, stress, inadequate working in front of eyestrain... has been shipped enabled for power management: • Activate the Display Sleep mode within 5 minutes of user inactivity. • Wake the monitor when it is in Active Off mode, move the mouse or press any other recurring or persistent discomfort and/or pain related to computer use...

User Manual
Page 9
...-reduction filter • using a display visor, such as a piece of cardboard extended from the display's top front edge • Avoid adjusting your eyes from the monitor and focusing on how to an awkward viewing angle. • Avoid looking at bright light sources, such as open windows, for enhanced text readability and...
...-reduction filter • using a display visor, such as a piece of cardboard extended from the display's top front edge • Avoid adjusting your eyes from the monitor and focusing on how to an awkward viewing angle. • Avoid looking at bright light sources, such as open windows, for enhanced text readability and...
User Manual
Page 12
... for your safety and comfort Safety instructions Cleaning your monitor Connecting/disconnecting the device Accessibility Safe listening Warnings Using electrical power Product servicing Additional safety information IT equipment recycling information Disposal instructions LCD ... position adjustment Connecting the power cord Power saving Display Data Channel (DDC) Connector pin assignment Standard timing table Installation User controls How to adjust a setting Acer eColor Management User Troubleshooting HDMI/DVI/DP 1 iii iii iii iii iii iv iv iv iv v vi vi vii vii viii xi 1 2 2 5 5 5 6 8 9 10 ...
... for your safety and comfort Safety instructions Cleaning your monitor Connecting/disconnecting the device Accessibility Safe listening Warnings Using electrical power Product servicing Additional safety information IT equipment recycling information Disposal instructions LCD ... position adjustment Connecting the power cord Power saving Display Data Channel (DDC) Connector pin assignment Standard timing table Installation User controls How to adjust a setting Acer eColor Management User Troubleshooting HDMI/DVI/DP 1 iii iii iii iii iii iv iv iv iv v vi vi vii vii viii xi 1 2 2 5 5 5 6 8 9 10 ...

User Manual
Page 13
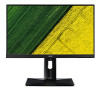
LCD monitor Quick start guide DP cable (Option) HDMI cable (Option) DVI cable (Option) AC power cord Audio Cable (Option) English 1 Unpacking Please check that the following items are present when you unpack the box, and save the packing materials in case you need to ship or transport the monitor in the future.
LCD monitor Quick start guide DP cable (Option) HDMI cable (Option) DVI cable (Option) AC power cord Audio Cable (Option) English 1 Unpacking Please check that the following items are present when you unpack the box, and save the packing materials in case you need to ship or transport the monitor in the future.

User Manual
Page 14
Remove: Reverse the steps to remove the base. English 2 ATTACHING/REMOVING THE BASE Install: Align the base with the stand and push the base towards the top of the monitor, and then rotate the base clockwise. Tighten the screw clockwise.
Remove: Reverse the steps to remove the base. English 2 ATTACHING/REMOVING THE BASE Install: Align the base with the stand and push the base towards the top of the monitor, and then rotate the base clockwise. Tighten the screw clockwise.

User Manual
Page 15
English 3 SCREEN POSITION ADJUSTMENT In oder to optimize the best viewing position, you can adjust the height/tilt/ swivel/pivot of the monitor. • Height Adjustment After pressing the top of the monitor then you can 35 degrees of recline be offered for an example of elevation. 5o 35o Only at the highest point can adjust the height of the monitor. 1 2 150mm • Tilt Please see the illustration below for the angle of the tilt range.
English 3 SCREEN POSITION ADJUSTMENT In oder to optimize the best viewing position, you can adjust the height/tilt/ swivel/pivot of the monitor. • Height Adjustment After pressing the top of the monitor then you can 35 degrees of recline be offered for an example of elevation. 5o 35o Only at the highest point can adjust the height of the monitor. 1 2 150mm • Tilt Please see the illustration below for the angle of the tilt range.

User Manual
Page 16
English 60o 60 • Monitor Pivot Before rotating the display,lift it to the top position and then push it back to the utmost degree. 4 • Swivel With the built-in pedestal, you can swivel the monitor for the most comfortable viewing angle. Rotate clockwise until the monitor stops at 90°. 35 o -90o 90o 150mm
English 60o 60 • Monitor Pivot Before rotating the display,lift it to the top position and then push it back to the utmost degree. 4 • Swivel With the built-in pedestal, you can swivel the monitor for the most comfortable viewing angle. Rotate clockwise until the monitor stops at 90°. 35 o -90o 90o 150mm
User Manual
Page 17
... sure that the power cord you use is around 3 seconds. Power saving The monitor will be switched to "on" is the correct type required for your system supports the DDC protocol, the monitor is activated. Mode On Power saving LED light Blue Amber The power saving mode ...back to "power saving" mode by the control signal from the display controller, as your area. • The monitor has a universal power supply that allows operation in which the monitor automatically informs the host system about its capabilities; 5 English Connecting the power cord • Check first to make...
... sure that the power cord you use is around 3 seconds. Power saving The monitor will be switched to "on" is the correct type required for your system supports the DDC protocol, the monitor is activated. Mode On Power saving LED light Blue Amber The power saving mode ...back to "power saving" mode by the control signal from the display controller, as your area. • The monitor has a universal power supply that allows operation in which the monitor automatically informs the host system about its capabilities; 5 English Connecting the power cord • Check first to make...
User Manual
Page 21
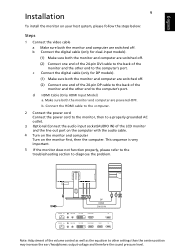
...than the center position may increase the ear-/headphones output voltage and therefore the sound pressure level. This sequence is very important. 5 If the monitor does not function properly, please refer to the troubleshooting section to the computer's port. d HDMI Cable (Only HDMI Input Model) a. Connect...audio input socket(AUDIO IN) of the volume control as well as the equalizer to the computer's port. English Installation 9 To install the monitor on the monitor first, then the computer. b. POWER DP HDMI DVI-D IN AUDIO IN DVI-D IN HDMI (MHL) DP POWER AUDIO IN DVI-D IN...
...than the center position may increase the ear-/headphones output voltage and therefore the sound pressure level. This sequence is very important. 5 If the monitor does not function properly, please refer to the troubleshooting section to the computer's port. d HDMI Cable (Only HDMI Input Model) a. Connect...audio input socket(AUDIO IN) of the volume control as well as the equalizer to the computer's port. English Installation 9 To install the monitor on the monitor first, then the computer. b. POWER DP HDMI DVI-D IN AUDIO IN DVI-D IN HDMI (MHL) DP POWER AUDIO IN DVI-D IN...
User Manual
Page 22
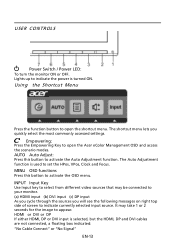
... button to indicate currently selected input source. Empowering: Press the Empowering Key to indicate the power is turned ON. It may be connected to your monitor. (a) HDMI input (b) DVI input (c) DP input As you cycle through the sources you quickly select the most commonly accessed settings. AUTO Auto Adjust: Press... for the image to activate the OSD menu. HDMI or DVI or DP If either HDMI, DP or DVI input is used to open the Acer eColor Management OSD and access the scenario modes. Lights up to open the shortcut menu. The Auto Adjustment function is selected, but the HDMI,...
... button to indicate currently selected input source. Empowering: Press the Empowering Key to indicate the power is turned ON. It may be connected to your monitor. (a) HDMI input (b) DVI input (c) DP input As you cycle through the sources you quickly select the most commonly accessed settings. AUTO Auto Adjust: Press... for the image to activate the OSD menu. HDMI or DVI or DP If either HDMI, DP or DVI input is used to open the Acer eColor Management OSD and access the scenario modes. Lights up to open the shortcut menu. The Auto Adjustment function is selected, but the HDMI,...
User Manual
Page 24
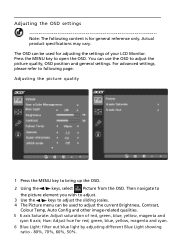
... the MENU key to adjust the current Brightness, Contrast, Colour Temp, Auto Config and other image-related qualities. 5 6 axis Saturate: Adjust saturation of your LCD Monitor.
... the MENU key to adjust the current Brightness, Contrast, Colour Temp, Auto Config and other image-related qualities. 5 6 axis Saturate: Adjust saturation of your LCD Monitor.
User Manual
Page 28
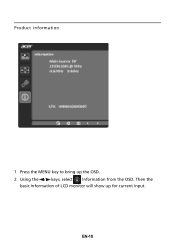
Then the basic information of LCD monitor will show up the OSD. 2 Using the / keys, select Information from the OSD. EN-18 Product information 1 Press the MENU key to bring up for current input.
Then the basic information of LCD monitor will show up the OSD. 2 Using the / keys, select Information from the OSD. EN-18 Product information 1 Press the MENU key to bring up for current input.
User Manual
Page 29
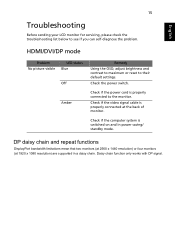
...can self-diagnose the problem. DP daisy chain and repeat functions DisplayPort bandwidth limitations mean that two monitors (at 2560 x 1440 resolution) or four monitors (at the back of monitor. Check if the power cord is properly connected at 1920 x 1080 resolution) are supported in ...power saving/ standby mode. Check if the video signal cable is properly connected to the monitor. English 15 Troubleshooting Before sending your LCD monitor for servicing, please check the troubleshooting list below to their default settings. Check the power switch. Check if...
...can self-diagnose the problem. DP daisy chain and repeat functions DisplayPort bandwidth limitations mean that two monitors (at 2560 x 1440 resolution) or four monitors (at the back of monitor. Check if the power cord is properly connected at 1920 x 1080 resolution) are supported in ...power saving/ standby mode. Check if the video signal cable is properly connected to the monitor. English 15 Troubleshooting Before sending your LCD monitor for servicing, please check the troubleshooting list below to their default settings. Check the power switch. Check if...

User Manual
Page 30
Environmental Protection Agency. Acer ENERGY STAR qualified products: • Produce less heat and reduce cooling loads, and warmer climates. • Automatically go into "display sleep" within 5 minutes of inactivity. • Wake the monitor when it is ENERGY STAR? marks Products that help customers save money, conserve energy and improve the quality of climate...
Environmental Protection Agency. Acer ENERGY STAR qualified products: • Produce less heat and reduce cooling loads, and warmer climates. • Automatically go into "display sleep" within 5 minutes of inactivity. • Wake the monitor when it is ENERGY STAR? marks Products that help customers save money, conserve energy and improve the quality of climate...


