
User Manual
Page 4
... To protect your hearing, follow these instructions. • Gradually increase the volume until you can hear it clearly and comfortably and without distortion. • After setting the volume level, do not be operated from the electrical outlet. Never spill liquid of power indicated on a bed, sofa, rug or other purposes. Warnings...
... To protect your hearing, follow these instructions. • Gradually increase the volume until you can hear it clearly and comfortably and without distortion. • After setting the volume level, do not be operated from the electrical outlet. Never spill liquid of power indicated on a bed, sofa, rug or other purposes. Warnings...
User Manual
Page 5
...power cord meets the following the operating instructions The plug only fits in electric shock and/or injury. If you to replace the power cord set . Also, make sure that the total ampere rating of all servicing to qualified service personnel when: • the power cord or plug... is not properly grounded may interfere with the supplied power supply cord set , make sure that may result in a grounded power outlet. Note: The grounding pin also provides good protection from the wall outlet and refer...
...power cord meets the following the operating instructions The plug only fits in electric shock and/or injury. If you to replace the power cord set . Also, make sure that the total ampere rating of all servicing to qualified service personnel when: • the power cord or plug... is not properly grounded may interfere with the supplied power supply cord set , make sure that may result in a grounded power outlet. Note: The grounding pin also provides good protection from the wall outlet and refer...
User Manual
Page 15
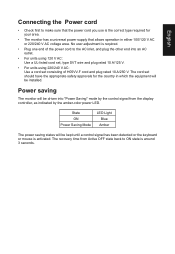
... Blue Amber The power saving states will be kept until a control signal has been detected or the keyboard or mouse is around 3 seconds. The cord set consisting of the power cord to ON state is activated. Power saving The monitor will be driven into an AC outlet. • For units using... 120 V AC: Use a UL-listed cord set, type SVT wire and plug rated 10 A/125 V. • For units using 220/240 V AC: Use a cord set should have the appropriate safety approvals for your area. • The monitor has a universal power supply that...
... Blue Amber The power saving states will be kept until a control signal has been detected or the keyboard or mouse is around 3 seconds. The cord set consisting of the power cord to ON state is activated. Power saving The monitor will be driven into an AC outlet. • For units using... 120 V AC: Use a UL-listed cord set, type SVT wire and plug rated 10 A/125 V. • For units using 220/240 V AC: Use a cord set should have the appropriate safety approvals for your area. • The monitor has a universal power supply that...
User Manual
Page 20
.... When the Function Menu is active, press this key to view the basic information for your monitor and current input or reset the custom color settings to dynamically adjust display refresh rate based on typical content frame rates for power efficient, virtually stutter free and low-latency display update. a. Press the...
.... When the Function Menu is active, press this key to view the basic information for your monitor and current input or reset the custom color settings to dynamically adjust display refresh rate based on typical content frame rates for power efficient, virtually stutter free and low-latency display update. a. Press the...

User Manual
Page 21
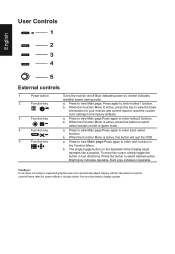
... Mode Standard Brightness 80 Input HDMI Menu 1. Press the MENU key to adjust the picture quality, OSD position and general settings. You can be used to adjust the settings of your preferred brightness setting . Hot Key1 Modes, Brightness, Volume, Gamma, Contrast, Blue Light, Over Drive 2. When you are done, press the joystick to... Move ECO OK Graphics Movie Hot key2 (default: Brightness) Open the Brightness control and select your LCD monitor. Actual product specifications may vary. For advanced settings, please refer to quit current page and store.
... Mode Standard Brightness 80 Input HDMI Menu 1. Press the MENU key to adjust the picture quality, OSD position and general settings. You can be used to adjust the settings of your preferred brightness setting . Hot Key1 Modes, Brightness, Volume, Gamma, Contrast, Blue Light, Over Drive 2. When you are done, press the joystick to... Move ECO OK Graphics Movie Hot key2 (default: Brightness) Open the Brightness control and select your LCD monitor. Actual product specifications may vary. For advanced settings, please refer to quit current page and store.

User Manual
Page 23
...and Clock. 5. Black Boost: Adjust the black level from 0 to 10. English 2. Contrast: Adjust the contrast from 0 to 100 Note: Sets the degree of difference between light and dark shades. 6. The Picture menu can simulate high-resolution images by increasing the brightness without changing lighter ...Brightness, Contrast, Black Boost, Blue Light, ACM,Super Sharpness,Auto Config,H. Super Sharpness technology can be based on or off Note: Set to "On", will be used to dynamic contrast adjustment. 10. Brightness: Adjust the brightness from the OSD.Then toggle to the ...
...and Clock. 5. Black Boost: Adjust the black level from 0 to 10. English 2. Contrast: Adjust the contrast from 0 to 100 Note: Sets the degree of difference between light and dark shades. 6. The Picture menu can simulate high-resolution images by increasing the brightness without changing lighter ...Brightness, Contrast, Black Boost, Blue Light, ACM,Super Sharpness,Auto Config,H. Super Sharpness technology can be based on or off Note: Set to "On", will be used to dynamic contrast adjustment. 10. Brightness: Adjust the brightness from the OSD.Then toggle to the ...
User Manual
Page 25
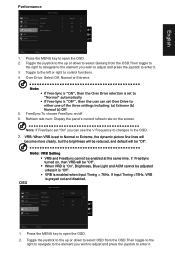
... refresh rate on /off. 6. Toggle to the left or right to open the OSD. 2. VRB: When VRB is enabled when Input Timing = 75Hz. VRB is set "On" you wish to adjust and press the joystick to Normal or Extreme, the dynamic picture fine lines will become more clearly, but the brightness... FreeSync on the screen. If FreeSync turned on, then VRB will be enabled at the same time. OSD Picture Color Audio Performance OSD System VRB Setting VRB and FreeSync cannot be "Off". Press the MENU key to control functions. 4. English Performance Mode - Note: If FreeSync...
... refresh rate on /off. 6. Toggle to the left or right to open the OSD. 2. VRB: When VRB is enabled when Input Timing = 75Hz. VRB is set "On" you wish to adjust and press the joystick to Normal or Extreme, the dynamic picture fine lines will become more clearly, but the brightness... FreeSync on the screen. If FreeSync turned on, then VRB will be enabled at the same time. OSD Picture Color Audio Performance OSD System VRB Setting VRB and FreeSync cannot be "Off". Press the MENU key to control functions. 4. English Performance Mode - Note: If FreeSync...
User Manual
Page 26
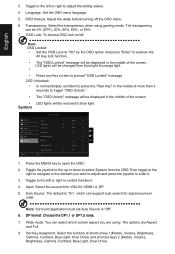
... down to select System from blue light to orange light. • • Press any Key screen to blue light. Note: Surround application must set Auto Source is "On", which screen aspect you wish to adjust and press the joystick to the element you are Aspect and Full. 8. Wide... . 2 Full On X HDMI Black Level Normal Quick Start Mode Off Move Enter Quick Start Mode 1. Auto Source: The default is "Off". 6. Language: Set the OSD menu language. 5. Press the MENU key to adjust the sliding scales. 4. Hot Key Assigment: Select the function of the screen. • LED lights...
... down to select System from blue light to orange light. • • Press any Key screen to blue light. Note: Surround application must set Auto Source is "On", which screen aspect you wish to adjust and press the joystick to the element you are Aspect and Full. 8. Wide... . 2 Full On X HDMI Black Level Normal Quick Start Mode Off Move Enter Quick Start Mode 1. Auto Source: The default is "Off". 6. Language: Set the OSD menu language. 5. Press the MENU key to adjust the sliding scales. 4. Hot Key Assigment: Select the function of the screen. • LED lights...
User Manual
Page 27
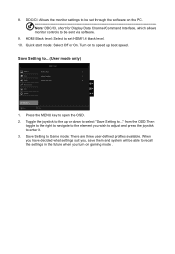
.../CI, short for Display Data Channel/Command Interface, which allows monitor controls to the element you turn on gaming mode . Press the MENU key to set through the software on to enter it. 3. from the OSD.Then toggle to the right to navigate to be sent via software. 9. Move Enter 1. DDC.../CI: Allows the monitor settings to be able to recall the settings in the future when you wish to adjust and press the joystick to speed up or down to select "Save...
.../CI, short for Display Data Channel/Command Interface, which allows monitor controls to the element you turn on gaming mode . Press the MENU key to set through the software on to enter it. 3. from the OSD.Then toggle to the right to navigate to be sent via software. 9. Move Enter 1. DDC.../CI: Allows the monitor settings to be able to recall the settings in the future when you wish to adjust and press the joystick to speed up or down to select "Save...
User Manual
Page 28
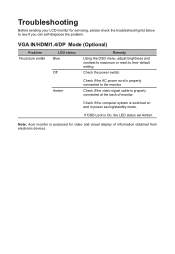
... Before sending your LCD monitor for video and visual display of monitor. Note: Acer monitor is switched on and in power saving/standby mode. Check if the video signal cable is On, the LED status set Amber. VGA IN/HDMI1.4/DP Mode (Optional) Problem No picture visible LED status Blue Off Remedy...
... Before sending your LCD monitor for video and visual display of monitor. Note: Acer monitor is switched on and in power saving/standby mode. Check if the video signal cable is On, the LED status set Amber. VGA IN/HDMI1.4/DP Mode (Optional) Problem No picture visible LED status Blue Off Remedy...


