

User Manual
Page 3
... on LCD monitors The following are normal with the LCD monitor and do not indicate a problem. • Due to make sure the flicker disappears. • You may remain after switching the image, when the same image is displayed for hours. It may flicker during initial use . • The LCD screen has 99.99% or more effective pixels. English Information for your monitor Please carefully follow these instructions carefully. Cleaning your...
... on LCD monitors The following are normal with the LCD monitor and do not indicate a problem. • Due to make sure the flicker disappears. • You may remain after switching the image, when the same image is displayed for hours. It may flicker during initial use . • The LCD screen has 99.99% or more effective pixels. English Information for your monitor Please carefully follow these instructions carefully. Cleaning your...

User Manual
Page 4
..., stand or table. Using electrical power • This product should never be sure to unplug the power cord from the equipment, be placed near or over a radiator or heat register, or in a built-in a fire or electric shock. These openings must not be operated from the type of time listening to music at high volume. • Avoid turning...
..., stand or table. Using electrical power • This product should never be sure to unplug the power cord from the equipment, be placed near or over a radiator or heat register, or in a built-in a fire or electric shock. These openings must not be operated from the type of time listening to music at high volume. • Avoid turning...
User Manual
Page 5
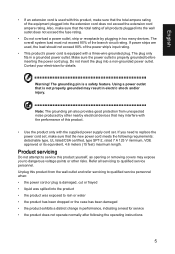
.... Do not insert the plug into the product • the product was exposed to replace the power cord set, make sure that the total rating of all servicing to dangerous voltage points or other nearby electrical devices that may interfere with the performance of the power strip's input rating. • This product's power cord is equipped with the supplied power supply cord set. Warning! Using a power outlet that is not...
.... Do not insert the plug into the product • the product was exposed to replace the power cord set, make sure that the total rating of all servicing to dangerous voltage points or other nearby electrical devices that may interfere with the performance of the power strip's input rating. • This product's power cord is equipped with the supplied power supply cord set. Warning! Using a power outlet that is not...

User Manual
Page 7
... injury after prolonged use Computer users may occasionally misfire or appear as black or red dots. The following symptoms may lead to achieve maximum comfort. Observe the following section provides tips for power management: • Activate display's Sleep mode within 5 minutes of user inactivity. • Wake the monitor when it is produced with high-precision manufacturing techniques. Long work periods, bad...
... injury after prolonged use Computer users may occasionally misfire or appear as black or red dots. The following symptoms may lead to achieve maximum comfort. Observe the following section provides tips for power management: • Activate display's Sleep mode within 5 minutes of user inactivity. • Wake the monitor when it is produced with high-precision manufacturing techniques. Long work periods, bad...

User Manual
Page 13
... 7 Taking care of your vision 8 Developing good work habits 8 Federal Communications Commission 10 Supplier's Declaration of Conformity 10 TCO Certified 12 Unpacking 14 Connecting the Power cord 17 Power saving 17 Display Data Channel (DDC) 18 19-pin color display signal cable* 18 20-pin color display signal cable* 18 24-pin USB 3.1 Type C cable 19 Standard timing table 20 Installation 21 User Controls 22 Troubleshooting 35 DP/HDMI Mode (Optional) 35 13
... 7 Taking care of your vision 8 Developing good work habits 8 Federal Communications Commission 10 Supplier's Declaration of Conformity 10 TCO Certified 12 Unpacking 14 Connecting the Power cord 17 Power saving 17 Display Data Channel (DDC) 18 19-pin color display signal cable* 18 20-pin color display signal cable* 18 24-pin USB 3.1 Type C cable 19 Standard timing table 20 Installation 21 User Controls 22 Troubleshooting 35 DP/HDMI Mode (Optional) 35 13

User Manual
Page 15
Only at the highest point can adjust the tilt of the monitor. • Attaching the Base Note: Remove the monitor and monitor base from its packaging.Carefully place the monitor face-down on a stable surface -- use a cloth to optimize the best viewing position, you can 25 degrees of recline be offered for an example of the tilt range. English SCREEN POSITION ADJUSTMENT In oder to avoid scratching the screen. • Tilt Please see the illustration below for the angle of elevation. -5° 25° 15
Only at the highest point can adjust the tilt of the monitor. • Attaching the Base Note: Remove the monitor and monitor base from its packaging.Carefully place the monitor face-down on a stable surface -- use a cloth to optimize the best viewing position, you can 25 degrees of recline be offered for an example of the tilt range. English SCREEN POSITION ADJUSTMENT In oder to avoid scratching the screen. • Tilt Please see the illustration below for the angle of elevation. -5° 25° 15

User Manual
Page 17
No user-adjustment is required. • Plug one end of H05VV-F cord and plug rated 10 A/250 V. The recovery time from the display controller, as indicated by the amber-color power LED. English Connecting the Power cord • Check first to make sure that allows operation in which the equipment will be driven into "Power Saving" mode by the control signal from Active OFF state back to the Adapter, and plug the other end into...
No user-adjustment is required. • Plug one end of H05VV-F cord and plug rated 10 A/250 V. The recovery time from the display controller, as indicated by the amber-color power LED. English Connecting the Power cord • Check first to make sure that allows operation in which the equipment will be driven into "Power Saving" mode by the control signal from Active OFF state back to the Adapter, and plug the other end into...
User Manual
Page 18
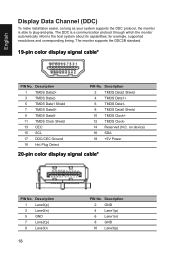
... +5V Power 20-pin color display signal cable* PIN No. Description 1 TMDS Data2+ 3 TMDS Data25 TMDS Data1 Shield 7 TMDS Data0+ 9 TMDS Data011 TMDS Clock Shield 13 CEC 15 SCL 17 DDC/CEC Ground 19 Hot Plug Detect PIN No. for example, supported resolutions and corresponding timing. Description 2 GND 4 Lane1(p) 6 Lane1(n) 8 GND 10 Lane3(p) English Display Data Channel (DDC) To make installation easier...
... +5V Power 20-pin color display signal cable* PIN No. Description 1 TMDS Data2+ 3 TMDS Data25 TMDS Data1 Shield 7 TMDS Data0+ 9 TMDS Data011 TMDS Clock Shield 13 CEC 15 SCL 17 DDC/CEC Ground 19 Hot Plug Detect PIN No. for example, supported resolutions and corresponding timing. Description 2 GND 4 Lane1(p) 6 Lane1(n) 8 GND 10 Lane3(p) English Display Data Channel (DDC) To make installation easier...
User Manual
Page 21
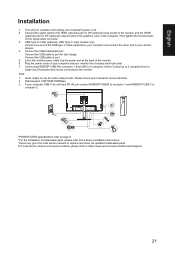
... Control up to 2 computers from a single set of replaceable parts, please refer to the above installation instructions. *Users may go to the local service network to the monitor. Plug the power cords of your computer and your electric devices. 4. Please check user manual for audio output model. Then tighten the thumbscrews on the computer. USB Type C Cable (Optional, USB Type-C input models only) Connect one end of the graphics card on the signal cable connector. 3. English Installation 1. Connect the USB cable to port...
... Control up to 2 computers from a single set of replaceable parts, please refer to the above installation instructions. *Users may go to the local service network to the monitor. Plug the power cords of your computer and your electric devices. 4. Please check user manual for audio output model. Then tighten the thumbscrews on the computer. USB Type C Cable (Optional, USB Type-C input models only) Connect one end of the graphics card on the signal cable connector. 3. English Installation 1. Connect the USB cable to port...

User Manual
Page 22
... monitor and current input or reset the custom color settings to the factory defaults. b. a. b. The single toggle button on . Press again to view Main page. b. Bright gray indicates operable. b. Press to view Main page.Press again to enter Input select function. Amber indicates standby, power saving and OSD locked. Press to view Main page.Press again to enter next function in the Function Menu. Dark gray indicates inoperable. English User Controls...
... monitor and current input or reset the custom color settings to the factory defaults. b. a. b. The single toggle button on . Press again to view Main page. b. Bright gray indicates operable. b. Press to view Main page.Press again to enter Input select function. Amber indicates standby, power saving and OSD locked. Press to view Main page.Press again to enter next function in the Function Menu. Dark gray indicates inoperable. English User Controls...

User Manual
Page 23
... product specifications may vary. The OSD (onscreen display) can use the OSD to following content is for general reference only. For advanced settings, please refer to adjust the picture quality and general settings. English Using the Shortcut Menu Note: The following page: Main page Mode Standard Brightness 70 Input HDMI(2.0) 1. Hot Key1 (Modes, Volume, Brightness,Gamma, Contrast, Low Blue Light, Over Drive) 2. Menu OSD Menu Hot key1 (default: Standard mode) To choose scenario mode(sRGB,Rec.709,HDR,User...
... product specifications may vary. The OSD (onscreen display) can use the OSD to following content is for general reference only. For advanced settings, please refer to adjust the picture quality and general settings. English Using the Shortcut Menu Note: The following page: Main page Mode Standard Brightness 70 Input HDMI(2.0) 1. Hot Key1 (Modes, Volume, Brightness,Gamma, Contrast, Low Blue Light, Over Drive) 2. Menu OSD Menu Hot key1 (default: Standard mode) To choose scenario mode(sRGB,Rec.709,HDR,User...

User Manual
Page 24
Picture Picture Color Audio Pertormance OSD System Save Settings to open the OSD. 2. Standard Brightness Contrast Black Boost Low Blue Light ACM HDR Super Sharpness Standard Off Off Off 70 50 5 X Move Enter 1. Press the MENU key to ... Toggle to the left or right to go back one level or use X to adjust the sliding scales. 4. Input Input Auto Source Move HDMI(2.0) On OK Exit The Function page Open the Function page to adjust the...
Picture Picture Color Audio Pertormance OSD System Save Settings to open the OSD. 2. Standard Brightness Contrast Black Boost Low Blue Light ACM HDR Super Sharpness Standard Off Off Off 70 50 5 X Move Enter 1. Press the MENU key to ... Toggle to the left or right to go back one level or use X to adjust the sliding scales. 4. Input Input Auto Source Move HDMI(2.0) On OK Exit The Function page Open the Function page to adjust the...

User Manual
Page 25
English 8. ACM: Turn ACM on the current screen to "User" Mode. 11. It complies with HDR signal. Super Sharpness technology can control off, HDR 10 and auto, the default is gray out and disable, and if you change other adjustable parameters, the "Modes" will automatically detect and deal with TÜV Rheinland Low Blue Light Hardware Solution certification under factory reset/default setting (Low Blue Light=Standard, Brightness: 80%, Contrast: 50%, CCT: Warm). 9. When HDR...
English 8. ACM: Turn ACM on the current screen to "User" Mode. 11. It complies with HDR signal. Super Sharpness technology can control off, HDR 10 and auto, the default is gray out and disable, and if you change other adjustable parameters, the "Modes" will automatically detect and deal with TÜV Rheinland Low Blue Light Hardware Solution certification under factory reset/default setting (Low Blue Light=Standard, Brightness: 80%, Contrast: 50%, CCT: Warm). 9. When HDR...
User Manual
Page 28
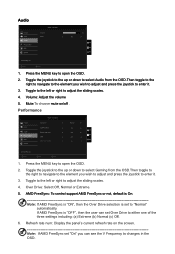
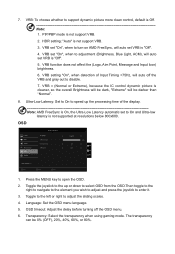
... from the OSD.Then toggle to the right to navigate to the element you wish to adjust and press the joystick to enter it . 3. AMD FreeSync: To control support AMD FreeSync or not, default is "OFF", then the user can see the V Frequency to "Normal" automatically. Audio Picture Color Audio Pertormance OSD System Mode - Performance Mode - Toggle to the left or right to open the OSD. 2.
... from the OSD.Then toggle to the right to navigate to the element you wish to adjust and press the joystick to enter it . 3. AMD FreeSync: To control support AMD FreeSync or not, default is "OFF", then the user can see the V Frequency to "Normal" automatically. Audio Picture Color Audio Pertormance OSD System Mode - Performance Mode - Toggle to the left or right to open the OSD. 2.
User Manual
Page 29
VRB setting "On", when detection of Input Timing 7. VRB: To choose whether to adjustment (Brightness, Blue Light, ACM), will auto set VRB is "Off". 4. VRB set "On", when to turn on AMD FreeSync, will auto set "On", when to support dynamic picture more clean control, default is "Off". 5. HDR setting: "Auto" is not support VRB. 2. VRB set VRB is Off Note: 1. VRB function does not affect the (Logo, Aim Point, Message and Input Icon) brightness. 6. PIP/PBP mode is not support VRB. 3.
VRB setting "On", when detection of Input Timing 7. VRB: To choose whether to adjustment (Brightness, Blue Light, ACM), will auto set VRB is "Off". 4. VRB set "On", when to turn on AMD FreeSync, will auto set "On", when to support dynamic picture more clean control, default is "Off". 5. HDR setting: "Auto" is not support VRB. 2. VRB set VRB is Off Note: 1. VRB function does not affect the (Logo, Aim Point, Message and Input Icon) brightness. 6. PIP/PBP mode is not support VRB. 3.
User Manual
Page 31
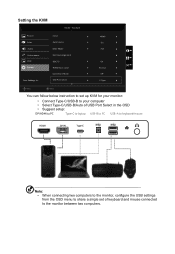
Input Auto Source Wide Mode Hot Key Assignment DDC/CI HDMI Black Level Quick Start Mode USB Port Select HDMI On Full On X Normal Off C-Type Move Enter You can follow below instruction to set up KVM for your monitor: • Connect Type-C/USB-B to your computer • Select Type-C/USB-B/Auto of USB Port Select in the OSD • Suggest setup: DP/HDMI to PC Type-C to laptop USB-B to PC USB-A to keyboard/mouse HDMI DP IN...
Input Auto Source Wide Mode Hot Key Assignment DDC/CI HDMI Black Level Quick Start Mode USB Port Select HDMI On Full On X Normal Off C-Type Move Enter You can follow below instruction to set up KVM for your monitor: • Connect Type-C/USB-B to your computer • Select Type-C/USB-B/Auto of USB Port Select in the OSD • Suggest setup: DP/HDMI to PC Type-C to laptop USB-B to PC USB-A to keyboard/mouse HDMI DP IN...
User Manual
Page 32
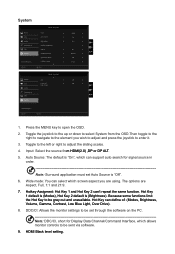
... software on the PC. Hotkey Assigment: Hot Key 1 and Hot Key 2 can define of: (Modes, Brightness, Volume, Gamma, Contrast, Low Blue Light, Over Drive). 8. HDMI Black level setting. The options are using. Note: DDC/CI, short for signal source in order. Standard Picture Color Audio Pertormance OSD System DPS Power-off USB change Off Off X Save Settings to enter it. 3. Toggle to the left or right to be set Auto Source is "Off". 6. Input: Select the source...
... software on the PC. Hotkey Assigment: Hot Key 1 and Hot Key 2 can define of: (Modes, Brightness, Volume, Gamma, Contrast, Low Blue Light, Over Drive). 8. HDMI Black level setting. The options are using. Note: DDC/CI, short for signal source in order. Standard Picture Color Audio Pertormance OSD System DPS Power-off USB change Off Off X Save Settings to enter it. 3. Toggle to the left or right to be set Auto Source is "Off". 6. Input: Select the source...
User Manual
Page 35
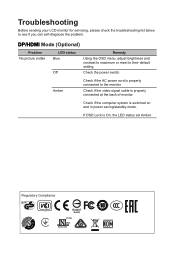
DP/HDMI Mode (Optional) Problem No picture visible LED status Blue Off Remedy Using the OSD menu, adjust brightness and contrast to maximum or reset to the monitor. Check if the video signal cable is switched on and in power saving/standby mode. Regulatory Compliance 217186 I.T.E. Check the power switch. Amber Check if the AC power cord is On, the LED status set Amber. Check if the computer system is properly connected at the back of monitor. Troubleshooting Before sending your LCD monitor for servicing, please check the troubleshooting list...
DP/HDMI Mode (Optional) Problem No picture visible LED status Blue Off Remedy Using the OSD menu, adjust brightness and contrast to maximum or reset to the monitor. Check if the video signal cable is switched on and in power saving/standby mode. Regulatory Compliance 217186 I.T.E. Check the power switch. Amber Check if the AC power cord is On, the LED status set Amber. Check if the computer system is properly connected at the back of monitor. Troubleshooting Before sending your LCD monitor for servicing, please check the troubleshooting list...
Quick Start Guide
Page 1
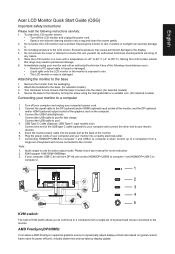
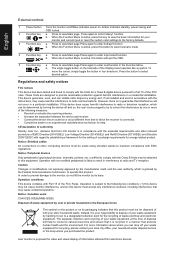
... instructions carefully. 1. Secure the base to the stand by turning the screw using the intergrated tab or a suitable coin. (for selected models). 3. Please check user manual for selected models) 4. Turn clockwise to dynamically adjust display refresh rate based on the computer. 3. USB Type C Cable (Optional, USB Type-C input models only) Connect one end of keyboard and mouse connected to the monitor. Store the LCD monitor in KVM switch allows you to control up to 2 computers from the packaging. 2. Connect the signal cable...
... instructions carefully. 1. Secure the base to the stand by turning the screw using the intergrated tab or a suitable coin. (for selected models). 3. Please check user manual for selected models) 4. Turn clockwise to dynamically adjust display refresh rate based on the computer. 3. USB Type C Cable (Optional, USB Type-C input models only) Connect one end of keyboard and mouse connected to the monitor. Store the LCD monitor in KVM switch allows you to control up to 2 computers from the packaging. 2. Connect the signal cable...
Quick Start Guide
Page 2
... scenario mode. / 4 Function key a. Amber indicates standby, power saving and OSD locked. 2 Function key a. Regulations and safety notices FCC notices This device has been tested and found to enter Input select function. /X b. English External controls 1 Power button Turns the monitor on/off.Blue indicates power on the backside of the Display bezel operates like a joystick. Press to view Main page.Press again to comply with Part 15...
... scenario mode. / 4 Function key a. Amber indicates standby, power saving and OSD locked. 2 Function key a. Regulations and safety notices FCC notices This device has been tested and found to enter Input select function. /X b. English External controls 1 Power button Turns the monitor on/off.Blue indicates power on the backside of the Display bezel operates like a joystick. Press to view Main page.Press again to comply with Part 15...


