
User Manual
Page 2
... hereof and specifically disclaims the implied warranties of such revisions or changes. All correspondence concerning your computer. Acer LCD Monitor User's Guide Model number Serial number Date of purchase Place of purchase Acer and the Acer logo are used herein for a particular purpose. Record the model number, serial number, purchase date and place of purchase information in new editions of this manual or supplementary documents and publications. No part of...
... hereof and specifically disclaims the implied warranties of such revisions or changes. All correspondence concerning your computer. Acer LCD Monitor User's Guide Model number Serial number Date of purchase Place of purchase Acer and the Acer logo are used herein for a particular purpose. Record the model number, serial number, purchase date and place of purchase information in new editions of this manual or supplementary documents and publications. No part of...

User Manual
Page 3
... after switching the image, when the same image is recovered slowly by unplugging all warnings and instructions marked on the desktop pattern you use . Follow all power cords from the LCD monitor: • Make sure the monitor is attached to its base before connecting the power cord to the nature of the LCD screen, an afterimage of power, disconnect power from the system by changing the image or turning off before cleaning. • Use...
... after switching the image, when the same image is recovered slowly by unplugging all warnings and instructions marked on the desktop pattern you use . Follow all power cords from the LCD monitor: • Make sure the monitor is attached to its base before connecting the power cord to the nature of the LCD screen, an afterimage of power, disconnect power from the system by changing the image or turning off before cleaning. • Use...
User Manual
Page 4
... product, make sure that the power outlet you . Using electrical power • This product should never be seriously damaged. • Slots and openings are not sure of the type of power available, consult your ears have adjusted. • Limit the amount of time listening to music at high volume. • Avoid turning up the volume to unplug the power cord from the...
... product, make sure that the power outlet you . Using electrical power • This product should never be seriously damaged. • Slots and openings are not sure of the type of power available, consult your ears have adjusted. • Limit the amount of time listening to music at high volume. • Avoid turning up the volume to unplug the power cord from the...
User Manual
Page 5
... damaged • the product exhibits a distinct change in too many devices. The grounding pin is equipped with the supplied power supply cord set. Product servicing Do not attempt to service this product from unexpected noise produced by plugging in performance, indicating a need to replace the power cord set, make sure that is properly grounded before inserting the power cord plug. Make sure the power outlet is not properly grounded may...
... damaged • the product exhibits a distinct change in too many devices. The grounding pin is equipped with the supplied power supply cord set. Product servicing Do not attempt to service this product from unexpected noise produced by plugging in performance, indicating a need to replace the power cord set, make sure that is properly grounded before inserting the power cord plug. Make sure the power outlet is not properly grounded may...

User Manual
Page 6
...views recycling, in the form of salvaging and disposal of used equipment, as grain, dust or metal powders. chemical plants; We at service stations. Switch off the device near gas pumps at Acer are very conscious of the environmental effects of our business and strive to identify and provide the best working... atmosphere are in bodily injury or even death. Keep them out of the reach of our other controls may contain small parts. For more information and help when recycling, please go to turn off your vehicle engine. acer-group .com for further information on the environment....
...views recycling, in the form of salvaging and disposal of used equipment, as grain, dust or metal powders. chemical plants; We at service stations. Switch off the device near gas pumps at Acer are very conscious of the environmental effects of our business and strive to identify and provide the best working... atmosphere are in bodily injury or even death. Keep them out of the reach of our other controls may contain small parts. For more information and help when recycling, please go to turn off your vehicle engine. acer-group .com for further information on the environment....

User Manual
Page 7
... or appear as hard drives, USB devices, tablet computers, laptops, cellphones, watches, earphones, speakers, credit cards, magnetic ID cards, etc. Warning Message for Magnet Certain electronic devices such as black or red dots. Magnet vii Disposal instructions Do not throw this electronic device... monitor base. are sensitive to or directly on the recorded image and does not constitute a malfunction. For more information on the Waste from Electrical and Electronics Equipment (WEEE) regulations, visit http://www.acer‐group.com/public/Sustainability LCD pixel statement The LCD unit...
... or appear as hard drives, USB devices, tablet computers, laptops, cellphones, watches, earphones, speakers, credit cards, magnetic ID cards, etc. Warning Message for Magnet Certain electronic devices such as black or red dots. Magnet vii Disposal instructions Do not throw this electronic device... monitor base. are sensitive to or directly on the recorded image and does not constitute a malfunction. For more information on the Waste from Electrical and Electronics Equipment (WEEE) regulations, visit http://www.acer‐group.com/public/Sustainability LCD pixel statement The LCD unit...

User Manual
Page 8
... of physical injury after prolonged use Computer users may complain of a computer. Observe the following tips: • refrain from Sleep mode by adjusting the viewing angle of the monitor, using a footrest, or raising your comfort zone by pushing the power button. Tips and information for comfortable use . The following section provides tips for more comfortable computer use , consult a physician immediately and inform...
... of physical injury after prolonged use Computer users may complain of a computer. Observe the following tips: • refrain from Sleep mode by adjusting the viewing angle of the monitor, using a footrest, or raising your comfort zone by pushing the power button. Tips and information for comfortable use . The following section provides tips for more comfortable computer use , consult a physician immediately and inform...

User Manual
Page 9
... looking at bright light sources, such as open windows, for extended periods of time. Display • Keep your display clean. • Keep your head at a higher level than the top edge of the display so your eyes point downward when looking at the middle of the display. • Adjust the display brightness and/or contrast to make your eyes. In order to prevent damage to the monitor, do...
... looking at bright light sources, such as open windows, for extended periods of time. Display • Keep your display clean. • Keep your head at a higher level than the top edge of the display so your eyes point downward when looking at the middle of the display. • Adjust the display brightness and/or contrast to make your eyes. In order to prevent damage to the monitor, do...
User Manual
Page 12
... Safe listening Warnings Using electrical power Product servicing Additional safety information IT equipment recycling information Disposal instructions LCD pixel statement Tips and information for comfortable use Federal Communications Commission Declaration of Conformity Unpacking Attaching/removing the base Screen position adjustment Connecting the power cord Power saving Display Data Channel (DDC) Connector pin assignment Standard timing table Installation User controls How to adjust a setting Acer eColor Management User Troubleshooting HDMI mode DVI mode DP mode 1 iii iii iii...
... Safe listening Warnings Using electrical power Product servicing Additional safety information IT equipment recycling information Disposal instructions LCD pixel statement Tips and information for comfortable use Federal Communications Commission Declaration of Conformity Unpacking Attaching/removing the base Screen position adjustment Connecting the power cord Power saving Display Data Channel (DDC) Connector pin assignment Standard timing table Installation User controls How to adjust a setting Acer eColor Management User Troubleshooting HDMI mode DVI mode DP mode 1 iii iii iii...

User Manual
Page 13
English 1 Unpacking Please check that the following items are present when you unpack the box, and save the packing materials in case you need to ship or transport the monitor in the future. LCD monitor Quick start guide DP cable (Optional) HDMI Cable (Optional) DVI cable (Optional) AC power cord Audio Cable (Optional) USB cable (Optional) MHL cable (Optional) MHL
English 1 Unpacking Please check that the following items are present when you unpack the box, and save the packing materials in case you need to ship or transport the monitor in the future. LCD monitor Quick start guide DP cable (Optional) HDMI Cable (Optional) DVI cable (Optional) AC power cord Audio Cable (Optional) USB cable (Optional) MHL cable (Optional) MHL

User Manual
Page 14
Tighten the screw clockwise. English 2 ATTACHING/REMOVING THE BASE Install: Align the base with the stand and push the base towards the top of the monitor, and then rotate the base clockwise. Remove: Reverse the steps to remove the base.
Tighten the screw clockwise. English 2 ATTACHING/REMOVING THE BASE Install: Align the base with the stand and push the base towards the top of the monitor, and then rotate the base clockwise. Remove: Reverse the steps to remove the base.

User Manual
Page 15
Only at the highest point can adjust the height of the monitor. 1 2 150mm • Tilt Please see the illustration below for the angle of the tilt range. English 3 SCREEN POSITION ADJUSTMENT In oder to optimize the best viewing position, you can adjust the height/tilt/ swivel/pivot of the monitor. • Height Adjustment After pressing the top of the monitor then you can 35 degrees of recline be offered for an example of elevation. 5o 35o
Only at the highest point can adjust the height of the monitor. 1 2 150mm • Tilt Please see the illustration below for the angle of the tilt range. English 3 SCREEN POSITION ADJUSTMENT In oder to optimize the best viewing position, you can adjust the height/tilt/ swivel/pivot of the monitor. • Height Adjustment After pressing the top of the monitor then you can 35 degrees of recline be offered for an example of elevation. 5o 35o
User Manual
Page 17
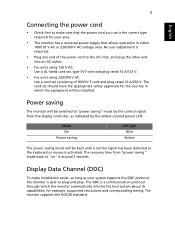
... using 120 V AC: Use a UL-listed cord set, type SVT wire and plug rated 10 A/125 V. • For units using 220/240 V AC: Use a cord set should have the appropriate safety approvals for example, supported resolutions and corresponding timing. The monitor supports the DDC2B standard. 5 English Connecting the power cord • Check first to "power saving" mode by the amber-colored power LED. The cord set consisting of H05VV-F cord and plug rated 10 A/250 V. The recovery time from the display controller...
... using 120 V AC: Use a UL-listed cord set, type SVT wire and plug rated 10 A/125 V. • For units using 220/240 V AC: Use a cord set should have the appropriate safety approvals for example, supported resolutions and corresponding timing. The monitor supports the DDC2B standard. 5 English Connecting the power cord • Check first to "power saving" mode by the amber-colored power LED. The cord set consisting of H05VV-F cord and plug rated 10 A/250 V. The recovery time from the display controller...
User Manual
Page 18
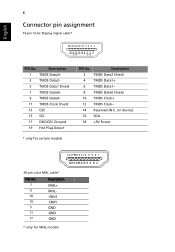
on device) 16 SDA 18 +5V Power Description 1 TMDS Data2+ 3 TMDS Data2- 5 TMDS Data1 Shield 7 TMDS Data0+ 9 TMDS Data0- 11 TMDS Clock Shield 13 CEC 15 SCL 17 DDC/CEC Ground 19 Hot Plug Detect * only for certain models PIN No. English 6 Connector pin assignment 19-pin Color Display Signal cable* 1917151311 9 7 5 3 1 1816141210 8 6 4 2 PIN No. Description 2 TMDS Data2 Shield 4 TMDS Data1+ 6 TMDS Data1- 8 TMDS Data0 Shield 10 TMDS Clock+ 12 TMDS Clock- 14 Reserved (N.C.
on device) 16 SDA 18 +5V Power Description 1 TMDS Data2+ 3 TMDS Data2- 5 TMDS Data1 Shield 7 TMDS Data0+ 9 TMDS Data0- 11 TMDS Clock Shield 13 CEC 15 SCL 17 DDC/CEC Ground 19 Hot Plug Detect * only for certain models PIN No. English 6 Connector pin assignment 19-pin Color Display Signal cable* 1917151311 9 7 5 3 1 1816141210 8 6 4 2 PIN No. Description 2 TMDS Data2 Shield 4 TMDS Data1+ 6 TMDS Data1- 8 TMDS Data0 Shield 10 TMDS Clock+ 12 TMDS Clock- 14 Reserved (N.C.
User Manual
Page 22
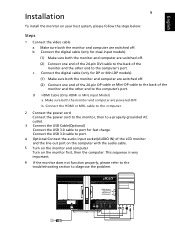
... video cable a Make sure both the monitor and computer are switched off. (2) Connect one end of the 24-pin DVI cable to the back of the monitor and the other end to the computer's port. b. Connect the USB 3.0 cable to diagnose the problem. d HDMI Cable (Only HDMI or MHL Input Model) a. c Connect the digital cable (only for DP or Mini-DP models). (1) Make sure both the monitor and computer are switched off. USB3.0 port -supporting fast charge USB3.0 port USB 2 USB English Installation...
... video cable a Make sure both the monitor and computer are switched off. (2) Connect one end of the 24-pin DVI cable to the back of the monitor and the other end to the computer's port. b. Connect the USB 3.0 cable to diagnose the problem. d HDMI Cable (Only HDMI or MHL Input Model) a. c Connect the digital cable (only for DP or Mini-DP models). (1) Make sure both the monitor and computer are switched off. USB3.0 port -supporting fast charge USB3.0 port USB 2 USB English Installation...
User Manual
Page 23
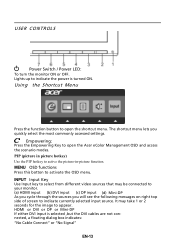
USER CONTROLS Power Switch / Power LED: To turn the monitor ON or OFF. Using the Shortcut Menu Press the function button to your monitor. (a) HDMI input (b) DVI input (c) DP input (d) Mini-DP As you cycle through the sources you quickly select the most commonly accessed settings. HDMI or DVI or DP or Mini-DP If either DVI input is turned ON. It may be connected to open the Acer eColor Management OSD and access the scenario modes. Lights up to activate the...
USER CONTROLS Power Switch / Power LED: To turn the monitor ON or OFF. Using the Shortcut Menu Press the function button to your monitor. (a) HDMI input (b) DVI input (c) DP input (d) Mini-DP As you cycle through the sources you quickly select the most commonly accessed settings. HDMI or DVI or DP or Mini-DP If either DVI input is turned ON. It may be connected to open the Acer eColor Management OSD and access the scenario modes. Lights up to activate the...
User Manual
Page 24
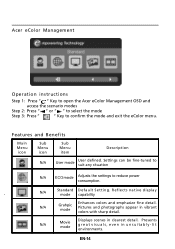
... instructions Step 1: Press " " Key to open the Acer eColor Management OSD and access the scenario modes Step 2: Press " " or " " to select the mode Step 3: Press " " Key to reduce power consumption. Pictures and photographs appear in unsuitably-lit environments. Presents great visuals, even in vibrant colors with sharp detail. Features and Benefits Main Menu icon Sub Menu icon Sub Menu item Description N/A User mode User defined. Settings...
... instructions Step 1: Press " " Key to open the Acer eColor Management OSD and access the scenario modes Step 2: Press " " or " " to select the mode Step 3: Press " " Key to reduce power consumption. Pictures and photographs appear in unsuitably-lit environments. Presents great visuals, even in vibrant colors with sharp detail. Features and Benefits Main Menu icon Sub Menu icon Sub Menu item Description N/A User mode User defined. Settings...

User Manual
Page 25
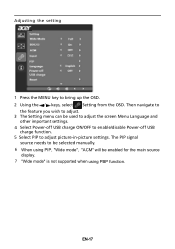
... the OSD. 2 Using the / keys, select Picture from the OSD. User can use the OSD to adjust the picture quality, OSD position and general settings. It can be used for general reference only. For advanced settings, please refer to open the OSD. Actual product specifications may vary. The OSD can make the image more sharper and clear. 7 DP mode selection,the default out of DP signal setting in B276HK is for adjusting the settings of the original source.
... the OSD. 2 Using the / keys, select Picture from the OSD. User can use the OSD to adjust the picture quality, OSD position and general settings. It can be used for general reference only. For advanced settings, please refer to open the OSD. Actual product specifications may vary. The OSD can make the image more sharper and clear. 7 DP mode selection,the default out of DP signal setting in B276HK is for adjusting the settings of the original source.
User Manual
Page 27
... main source display. 7 "Wide mode" is not supported when using PIP, "Wide mode", "ACM" will be used to adjust the screen Menu Language and other important settings. 4 Select Power-off USB charge ON/OFF to enable/disable Power-off USB charge function. 5 Select PIP to bring up the OSD. 2 Using the / keys, select Setting from the OSD. EN-17 Adjusting the setting 1 Press the MENU key to adjust picture‐in‐picture settings. The PIP signal source needs to be selected manually. 6 When using...
... main source display. 7 "Wide mode" is not supported when using PIP, "Wide mode", "ACM" will be used to adjust the screen Menu Language and other important settings. 4 Select Power-off USB charge ON/OFF to enable/disable Power-off USB charge function. 5 Select PIP to bring up the OSD. 2 Using the / keys, select Setting from the OSD. EN-17 Adjusting the setting 1 Press the MENU key to adjust picture‐in‐picture settings. The PIP signal source needs to be selected manually. 6 When using...
User Manual
Page 29
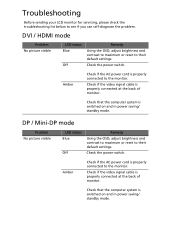
... power saving/ standby mode. Problem No picture visible LED status Blue Off Remedy Using the OSD, adjust brightness and contrast to maximum or reset to their default settings. DVI / HDMI mode Problem No picture visible LED status Blue Off Remedy Using the OSD, adjust brightness and contrast to maximum or reset to the monitor. Amber Check if the AC power cord is properly connected to their default settings. Amber Check if the AC power cord is properly connected to see if you can self-diagnose the problem. Check the power switch. Check if the video signal cable...
... power saving/ standby mode. Problem No picture visible LED status Blue Off Remedy Using the OSD, adjust brightness and contrast to maximum or reset to their default settings. DVI / HDMI mode Problem No picture visible LED status Blue Off Remedy Using the OSD, adjust brightness and contrast to maximum or reset to the monitor. Amber Check if the AC power cord is properly connected to their default settings. Amber Check if the AC power cord is properly connected to see if you can self-diagnose the problem. Check the power switch. Check if the video signal cable...

