User Manual
Page 2
..., in the space provided below. The serial number and model number are used herein for a particular purpose. Copyright © 2014. Other companies' product names or trademarks are recorded on the label affixed to their respective companies. Acer LCD Monitor User's Guide Original Issue: 09/2014 Changes may be made periodically to the contents hereof and specifically disclaims the implied warranties of purchase...
..., in the space provided below. The serial number and model number are used herein for a particular purpose. Copyright © 2014. Other companies' product names or trademarks are recorded on the label affixed to their respective companies. Acer LCD Monitor User's Guide Original Issue: 09/2014 Changes may be made periodically to the contents hereof and specifically disclaims the implied warranties of purchase...
User Manual
Page 3
... LCD monitor and the computer are normal with the LCD monitor and do not indicate a problem. • Due to make sure the flicker disappears. • You may find slightly uneven brightness on the screen depending on the desktop pattern you use . Turn off the power switch for your safety and comfort Safety instructions Read these guidelines when cleaning the monitor: • Always unplug the monitor before connecting the power cord...
... LCD monitor and the computer are normal with the LCD monitor and do not indicate a problem. • Due to make sure the flicker disappears. • You may find slightly uneven brightness on the screen depending on the desktop pattern you use . Turn off the power switch for your safety and comfort Safety instructions Read these guidelines when cleaning the monitor: • Always unplug the monitor before connecting the power cord...

User Manual
Page 4
... blocked or covered. Safe listening To protect your hearing, follow these instructions. • Gradually increase the volume until you can 't hear people speaking near water. • Do not place this product on the power cord. These openings must not be sure to rest on an unstable cart, stand or table. Warnings • Do not use it after your...
... blocked or covered. Safe listening To protect your hearing, follow these instructions. • Gradually increase the volume until you can 't hear people speaking near water. • Do not place this product on the power cord. These openings must not be sure to rest on an unstable cart, stand or table. Warnings • Do not use it after your...
User Manual
Page 5
... spilled into the wall outlet does not exceed the fuse rating. • Do not overload a power outlet, strip or receptacle by other risks. Make sure the power outlet is a safety feature. The grounding pin is properly grounded before inserting the power cord plug. Refer all products plugged into the product • the product was exposed to replace the power cord set . Do not...
... spilled into the wall outlet does not exceed the fuse rating. • Do not overload a power outlet, strip or receptacle by other risks. Make sure the power outlet is a safety feature. The grounding pin is properly grounded before inserting the power cord plug. Refer all products plugged into the product • the product was exposed to replace the power cord set . Do not...

User Manual
Page 6
...work by the operating instructions, since improper adjustment of our business and strive to identify and provide the best working procedures to this website: http://www.acer-group.com/public/Sustainability Visit www. Observe restrictions on the use of our other controls may contain small parts. or where blasting operations are in bodily injury or even death. Switch... and help when recycling, please go to reduce the environmental impact of small children. Keep them out of the reach of our products. chemical plants; vi Note: Adjust only those controls that are covered by ...
...work by the operating instructions, since improper adjustment of our business and strive to identify and provide the best working procedures to this website: http://www.acer-group.com/public/Sustainability Visit www. Observe restrictions on the use of our other controls may contain small parts. or where blasting operations are in bodily injury or even death. Switch... and help when recycling, please go to reduce the environmental impact of small children. Keep them out of the reach of our products. chemical plants; vi Note: Adjust only those controls that are covered by ...
User Manual
Page 7
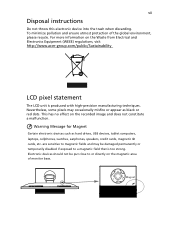
...image and does not constitute a malfunction. Magnet This has no effect on the Waste from Electrical and Electronics Equipment (WEEE) regulations, visit http://www.acer‐group.com/public/Sustainability LCD pixel statement The LCD unit is too strong. Warning Message for Magnet Certain electronic devices such as black or red...drives, USB devices, tablet computers, laptops, cellphones, watches, earphones, speakers, credit cards, magnetic ID cards, etc. are sensitive to a magnetic field that is produced with high-precision manufacturing techniques. vii Disposal instructions Do...
...image and does not constitute a malfunction. Magnet This has no effect on the Waste from Electrical and Electronics Equipment (WEEE) regulations, visit http://www.acer‐group.com/public/Sustainability LCD pixel statement The LCD unit is too strong. Warning Message for Magnet Certain electronic devices such as black or red...drives, USB devices, tablet computers, laptops, cellphones, watches, earphones, speakers, credit cards, magnetic ID cards, etc. are sensitive to a magnetic field that is produced with high-precision manufacturing techniques. vii Disposal instructions Do...

User Manual
Page 8
... work periods, bad posture, poor work habits, stress, inadequate working in front of a computer. The following tips: • refrain from Sleep mode by adjusting the viewing angle of the monitor, using a footrest, or raising your sitting height to achieve maximum comfort. viii This product has been shipped enabled for power management: • Activate display's Sleep mode within 15 minutes of user inactivity. • Activate computer's Sleep mode...
... work periods, bad posture, poor work habits, stress, inadequate working in front of a computer. The following tips: • refrain from Sleep mode by adjusting the viewing angle of the monitor, using a footrest, or raising your sitting height to achieve maximum comfort. viii This product has been shipped enabled for power management: • Activate display's Sleep mode within 15 minutes of user inactivity. • Activate computer's Sleep mode...

User Manual
Page 9
... at the middle of the display. • Adjust the display brightness and/or contrast to an awkward viewing angle. • Avoid looking at bright light sources, such as open windows, for enhanced text readability and graphics clarity. • Eliminate glare and reflections by using drapes, shades or blinds • using a task light • changing the display's viewing angle • using a glare-reduction filter • using a display visor, such as possible...
... at the middle of the display. • Adjust the display brightness and/or contrast to an awkward viewing angle. • Avoid looking at bright light sources, such as open windows, for enhanced text readability and graphics clarity. • Eliminate glare and reflections by using drapes, shades or blinds • using a task light • changing the display's viewing angle • using a glare-reduction filter • using a display visor, such as possible...
User Manual
Page 12
... Accessibility Safe listening Warnings Using electrical power Product servicing Additional safety information IT equipment recycling information Disposal instructions LCD pixel statement Tips and information for comfortable use Federal Communications Commission Declaration of Conformity Unpacking Attaching/removing the base Screen position adjustment Connecting the power cord Power saving Display Data Channel (DDC) Connector pin assignment Standard timing table Installation User controls How to adjust a setting Acer eColor Management User Troubleshooting VGA mode DVI mode 1 iii iii iii iii...
... Accessibility Safe listening Warnings Using electrical power Product servicing Additional safety information IT equipment recycling information Disposal instructions LCD pixel statement Tips and information for comfortable use Federal Communications Commission Declaration of Conformity Unpacking Attaching/removing the base Screen position adjustment Connecting the power cord Power saving Display Data Channel (DDC) Connector pin assignment Standard timing table Installation User controls How to adjust a setting Acer eColor Management User Troubleshooting VGA mode DVI mode 1 iii iii iii iii...

User Manual
Page 13
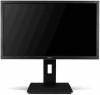
LCD monitor Quick start guide DP cable (Option) D-sub cable (Option) DVI cable (Option) AC power cord Audio Cable (Option) English 1 Unpacking Please check that the following items are present when you unpack the box, and save the packing materials in case you need to ship or transport the monitor in the future.
LCD monitor Quick start guide DP cable (Option) D-sub cable (Option) DVI cable (Option) AC power cord Audio Cable (Option) English 1 Unpacking Please check that the following items are present when you unpack the box, and save the packing materials in case you need to ship or transport the monitor in the future.

User Manual
Page 14
Remove: Reverse the steps to remove the base. Tighten the screw clockwise. English 2 ATTACHING/REMOVING THE BASE Install: Align the base with the stand and push the base towards the top of the monitor, and then rotate the base clockwise.
Remove: Reverse the steps to remove the base. Tighten the screw clockwise. English 2 ATTACHING/REMOVING THE BASE Install: Align the base with the stand and push the base towards the top of the monitor, and then rotate the base clockwise.

User Manual
Page 15
Only at the highest point can adjust the height of the monitor. 1 2 150mm • Tilt Please see the illustration below for the angle of the tilt range. English 3 SCREEN POSITION ADJUSTMENT In oder to optimize the best viewing position, you can adjust the height/tilt/ swivel/pivot of the monitor. • Height Adjustment After pressing the top of the monitor then you can 35 degrees of recline be offered for an example of elevation. 5o 35o
Only at the highest point can adjust the height of the monitor. 1 2 150mm • Tilt Please see the illustration below for the angle of the tilt range. English 3 SCREEN POSITION ADJUSTMENT In oder to optimize the best viewing position, you can adjust the height/tilt/ swivel/pivot of the monitor. • Height Adjustment After pressing the top of the monitor then you can 35 degrees of recline be offered for an example of elevation. 5o 35o

User Manual
Page 17
... be switched to the AC inlet, and plug the other end into an AC outlet. • For units using 120 V AC: Use a UL-listed cord set, type SVT wire and plug rated 10 A/125 V. • For units using 220/240 V AC: Use a cord set should have the appropriate safety approvals for example, supported resolutions and corresponding timing. Mode On Power saving LED light Blue Amber The power saving mode will be installed. The cord set consisting...
... be switched to the AC inlet, and plug the other end into an AC outlet. • For units using 120 V AC: Use a UL-listed cord set, type SVT wire and plug rated 10 A/125 V. • For units using 220/240 V AC: Use a cord set should have the appropriate safety approvals for example, supported resolutions and corresponding timing. Mode On Power saving LED light Blue Amber The power saving mode will be installed. The cord set consisting...
User Manual
Page 21
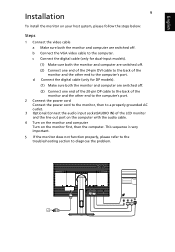
.... d Connect the digital cable (only for dual-input models). (1) Make sure both the monitor and computer are switched off. b Connect the VGA video cable to diagnose the problem. USB USB c Connect the digital cable (only for DP models). (1) Make sure both the monitor and computer are switched off. (2) Connect one end of the 20-pin DP cable to the back of the monitor and the other end to the computer's port. 2 Connect the power cord Connect the power cord to the monitor, then...
.... d Connect the digital cable (only for dual-input models). (1) Make sure both the monitor and computer are switched off. b Connect the VGA video cable to diagnose the problem. USB USB c Connect the digital cable (only for DP models). (1) Make sure both the monitor and computer are switched off. (2) Connect one end of the 20-pin DP cable to the back of the monitor and the other end to the computer's port. 2 Connect the power cord Connect the power cord to the monitor, then...
User Manual
Page 22
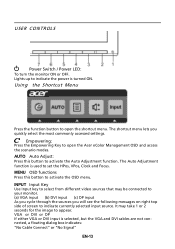
...: "No Cable Connect" or "No Signal" EN-13 Lights up to open the shortcut menu. USER CONTROLS Power Switch / Power LED: To turn the monitor ON or OFF. The shortcut menu lets you will see the following messages on right top side of screen to your monitor. (a) VGA input (b) DVI input (c) DP input As you cycle through the sources you quickly select the most commonly accessed settings. The Auto Adjustment function is used to appear. INPUT Input Key Use Input key to...
...: "No Cable Connect" or "No Signal" EN-13 Lights up to open the shortcut menu. USER CONTROLS Power Switch / Power LED: To turn the monitor ON or OFF. The shortcut menu lets you will see the following messages on right top side of screen to your monitor. (a) VGA input (b) DVI input (c) DP input As you cycle through the sources you quickly select the most commonly accessed settings. The Auto Adjustment function is used to appear. INPUT Input Key Use Input key to...
User Manual
Page 23
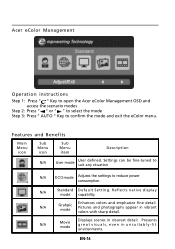
... Operation instructions Step 1: Press " " Key to open the Acer eColor Management OSD and access the scenario modes Step 2: Press " " or " " to select the mode Step 3: Press " AUTO " Key to reduce power consumption. Settings can be fine-tuned to suit any situation N/A ECO mode Adjusts the settings to confirm the mode and exit the eColor menu. Pictures and photographs appear in unsuitably-lit environments. N/A Movie mode Displays scenes...
... Operation instructions Step 1: Press " " Key to open the Acer eColor Management OSD and access the scenario modes Step 2: Press " " or " " to select the mode Step 3: Press " AUTO " Key to reduce power consumption. Settings can be fine-tuned to suit any situation N/A ECO mode Adjusts the settings to confirm the mode and exit the eColor menu. Pictures and photographs appear in unsuitably-lit environments. N/A Movie mode Displays scenes...
User Manual
Page 24
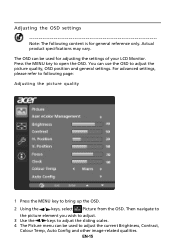
... Picture menu can use the OSD to adjust the current Brightness, Contrast, Colour Temp, Auto Config and other image-related qualities. EN-15 Actual product specifications may vary. Press the MENU key to bring up the OSD. 2 Using the / keys, select Picture from the OSD. The OSD can be used for general reference only. Adjusting the OSD settings Note: The following page: Adjusting the picture quality 1 Press the MENU key to open the OSD. For...
... Picture menu can use the OSD to adjust the current Brightness, Contrast, Colour Temp, Auto Config and other image-related qualities. EN-15 Actual product specifications may vary. Press the MENU key to bring up the OSD. 2 Using the / keys, select Picture from the OSD. The OSD can be used for general reference only. Adjusting the OSD settings Note: The following page: Adjusting the picture quality 1 Press the MENU key to open the OSD. For...

User Manual
Page 26
EN-17 Adjusting the setting 1 Press the MENU key to enable/disable Power-off USB charge ON/OFF to bring up the OSD. 2 Using the / keys, select Setting from the OSD. Then navigate to the feature you wish to adjust. 3 The Setting menu can be used to adjust the screen Menu Language and other important settings. 4 Select Power-off USB charge function.
EN-17 Adjusting the setting 1 Press the MENU key to enable/disable Power-off USB charge ON/OFF to bring up the OSD. 2 Using the / keys, select Setting from the OSD. Then navigate to the feature you wish to adjust. 3 The Setting menu can be used to adjust the screen Menu Language and other important settings. 4 Select Power-off USB charge function.

User Manual
Page 28
... select another resolution or vertical refresh rate. Check if the video signal cable is properly connected at the back of graphics adapter and monitor is missing, off the monitor. Image is in power saving/ standby mode. Wait for servicing, please check the troubleshooting list below to see if you can self-diagnose the problem. VGA mode Problem No picture visible LED status Blue Off Remedy Using the OSD, adjust brightness and contrast to maximum or reset to the monitor. Unstable picture Abnormal picture Check if the...
... select another resolution or vertical refresh rate. Check if the video signal cable is properly connected at the back of graphics adapter and monitor is missing, off the monitor. Image is in power saving/ standby mode. Wait for servicing, please check the troubleshooting list below to see if you can self-diagnose the problem. VGA mode Problem No picture visible LED status Blue Off Remedy Using the OSD, adjust brightness and contrast to maximum or reset to the monitor. Unstable picture Abnormal picture Check if the...
User Manual
Page 29
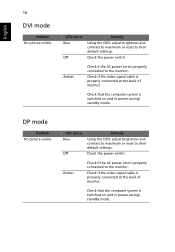
... AC power cord is properly connected to their default settings. Amber Check if the AC power cord is properly connected to their default settings. Check if the video signal cable is properly connected at the back of monitor. Check that the computer system is switched on and in power saving/ standby mode. Check that the computer system is switched on and in power saving/ standby mode. English 16 DVI mode Problem No picture visible LED status Blue Off Remedy Using the OSD, adjust brightness and contrast to maximum or reset...
... AC power cord is properly connected to their default settings. Amber Check if the AC power cord is properly connected to their default settings. Check if the video signal cable is properly connected at the back of monitor. Check that the computer system is switched on and in power saving/ standby mode. Check that the computer system is switched on and in power saving/ standby mode. English 16 DVI mode Problem No picture visible LED status Blue Off Remedy Using the OSD, adjust brightness and contrast to maximum or reset...

