Service Guide
Page 12
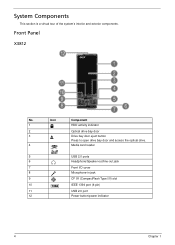
Front Panel X3812 No. Icon Component 1 HDD activity indicator 2 Optical drive bay door 3 Drive bay door eject button Press to open drive bay door and access the optical drive. 4 Media card reader 5 USB 2.0 ports 6 Headphone/Speaker-out/line-out jack 7 Front I/O cover 8 Microphone-in jack 9 CF I/II (CompactFlash Type I/II) slot 10 IEEE 1394 port (4-pin) 11 USB 2.0 port 12 Power button/power indicator 4 Chapter 1 System Components This section is a virtual tour of the system's interior and exterior components.
Front Panel X3812 No. Icon Component 1 HDD activity indicator 2 Optical drive bay door 3 Drive bay door eject button Press to open drive bay door and access the optical drive. 4 Media card reader 5 USB 2.0 ports 6 Headphone/Speaker-out/line-out jack 7 Front I/O cover 8 Microphone-in jack 9 CF I/II (CompactFlash Type I/II) slot 10 IEEE 1394 port (4-pin) 11 USB 2.0 port 12 Power button/power indicator 4 Chapter 1 System Components This section is a virtual tour of the system's interior and exterior components.

Service Guide
Page 13
... the icon. 4 Media card reader 5 USB 2.0 ports 6 Headphone/Speaker-out/line-out jack 7 Front I/O cover 8 Microphone-in jack 9 CF I/II (CompactFlash Type I /O cover. Icon Component 1 Power button/power indicator 2 Optical drive bay door 3 Front I/O cover open drive bay door and access the optical drive.
... the icon. 4 Media card reader 5 USB 2.0 ports 6 Headphone/Speaker-out/line-out jack 7 Front I/O cover 8 Microphone-in jack 9 CF I/II (CompactFlash Type I /O cover. Icon Component 1 Power button/power indicator 2 Optical drive bay door 3 Front I/O cover open drive bay door and access the optical drive.
Service Guide
Page 33
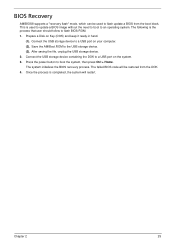
... update a BIOS image without the need to boot to a USB port on your computer. (2). After saving the file, unplug the USB storage device. 2. Press the power button to the USB storage device. (3). Connect the USB storage device containing the DOK to an operating system. Prepare a Disk on Key (DOK) and keep it...
... update a BIOS image without the need to boot to a USB port on your computer. (2). After saving the file, unplug the USB storage device. 2. Press the power button to the USB storage device. (3). Connect the USB storage device containing the DOK to an operating system. Prepare a Disk on Key (DOK) and keep it...

Service Guide
Page 79
No. 1 2 3 4 5 6 7 8 9 10 11 12 13 14 15 16 17 18 19 20 21 22 23 24 25 26 Part Name C.A LED POWER SWITCH EJECT BUTTON FRONT BEZEL FRONT COVER IO DOOR IO DOOR BKT LENS POWER MAGNET 10*6*3 MIDDLE BEZEL ODD DOOR ODD LINK BKT ODD DOOR SPRING POWER BUTTON PROTECTFILM BEZEL-CVR PROTECTFILM EJECT PROTECTFILM IO DOOR PROTECTFILM MID BZL PROTECTFILM ODD DOOR PROTECTFILM POWER RUB ODD LINK SPG ODD BUTTON BOXER ASSEMBLY L CASE - ASM ASSEMBLY U CASE - ASM FRONT IO BRACKET ODD BRACKET HDD BRACKET Chapter 6 71
No. 1 2 3 4 5 6 7 8 9 10 11 12 13 14 15 16 17 18 19 20 21 22 23 24 25 26 Part Name C.A LED POWER SWITCH EJECT BUTTON FRONT BEZEL FRONT COVER IO DOOR IO DOOR BKT LENS POWER MAGNET 10*6*3 MIDDLE BEZEL ODD DOOR ODD LINK BKT ODD DOOR SPRING POWER BUTTON PROTECTFILM BEZEL-CVR PROTECTFILM EJECT PROTECTFILM IO DOOR PROTECTFILM MID BZL PROTECTFILM ODD DOOR PROTECTFILM POWER RUB ODD LINK SPG ODD BUTTON BOXER ASSEMBLY L CASE - ASM ASSEMBLY U CASE - ASM FRONT IO BRACKET ODD BRACKET HDD BRACKET Chapter 6 71

