

Acer V3-551 and 551G Notebook Service Guide
Page 2
...2-6 Boot 2-10 Exit 2-11 Boot Manager 2-12 BIOS Flash Utilities 2-13 DOS Flash Utility 2-14 WinFlash Utility 2-16 Miscellaneous Tools 2-18 Using DMITools 2-18 Using the LAN MAC EEPROM Utility 2-19 HDD/BIOS Password 2-21 Unlocking the HDD 2-21 Clearing the Password Check and BIOS Password 2-23 Crisis Utility SOP 2-24 Creating a USB Flash Crisis Disk 2-24 Using the Crisis Utility Disk 2-25 Chapter 3. Hardware Specifications and Configurations Features 1-2 Notebook Tour 1-6 Top View 1-6 Front View 1-7 Left View 1-8 Right View 1-9 Base View 1-10 Touchpad Basics 1-11 Keyboard...
...2-6 Boot 2-10 Exit 2-11 Boot Manager 2-12 BIOS Flash Utilities 2-13 DOS Flash Utility 2-14 WinFlash Utility 2-16 Miscellaneous Tools 2-18 Using DMITools 2-18 Using the LAN MAC EEPROM Utility 2-19 HDD/BIOS Password 2-21 Unlocking the HDD 2-21 Clearing the Password Check and BIOS Password 2-23 Crisis Utility SOP 2-24 Creating a USB Flash Crisis Disk 2-24 Using the Crisis Utility Disk 2-25 Chapter 3. Hardware Specifications and Configurations Features 1-2 Notebook Tour 1-6 Top View 1-6 Front View 1-7 Left View 1-8 Right View 1-9 Base View 1-10 Touchpad Basics 1-11 Keyboard...
Acer V3-551 and 551G Notebook Service Guide
Page 3
...Removal 5-44 RTC Battery Installation 5-45 Mainboard Removal 5-46 Mainboard Installation 5-49 Thermal Module Removal 5-53 Thermal Module Installation 5-55 CPU Removal 5-57 CPU Installation 5-58 Speaker Removal 5-59 Speaker Installation 5-62 USB Module Removal 5-65 USB Module Installation 5-67 Power Board Removal 5-69 Power Board Installation 5-71 Keyboard Removal 5-73 Keyboard Installation 5-75 LCD Module Removal 5-78 LCD Module Installation 5-81 ii Internal Microphone Failure 4-11 USB Failure 4-12 Wireless Function Failure 4-13 Bluetooth Function Failure 4-14 4-in-1 Card...
...Removal 5-44 RTC Battery Installation 5-45 Mainboard Removal 5-46 Mainboard Installation 5-49 Thermal Module Removal 5-53 Thermal Module Installation 5-55 CPU Removal 5-57 CPU Installation 5-58 Speaker Removal 5-59 Speaker Installation 5-62 USB Module Removal 5-65 USB Module Installation 5-67 Power Board Removal 5-69 Power Board Installation 5-71 Keyboard Removal 5-73 Keyboard Installation 5-75 LCD Module Removal 5-78 LCD Module Installation 5-81 ii Internal Microphone Failure 4-11 USB Failure 4-12 Wireless Function Failure 4-13 Bluetooth Function Failure 4-14 4-in-1 Card...
Acer V3-551 and 551G Notebook Service Guide
Page 10
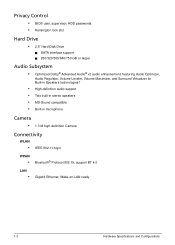
Privacy Control • BIOS user, supervisor, HDD passwords • Kensington lock slot Hard Drive • 2.5" Hard Disk Drive SATA interface support 250/320/500/640/750 GB or larger Audio Subsystem • Optimized Dolby® Advanced Audio® v2 audio enhancement, featuring Audio Optimizer, Audio Regulator, Volume Leveler, Volume Maximizer, and Surround Virtualizer for Built-in Speakers technologies7 • High-definition audio support • Two built-in stereo speakers • MS-Sound compatible •...
Privacy Control • BIOS user, supervisor, HDD passwords • Kensington lock slot Hard Drive • 2.5" Hard Disk Drive SATA interface support 250/320/500/640/750 GB or larger Audio Subsystem • Optimized Dolby® Advanced Audio® v2 audio enhancement, featuring Audio Optimizer, Audio Regulator, Volume Leveler, Volume Maximizer, and Surround Virtualizer for Built-in Speakers technologies7 • High-definition audio support • Two built-in stereo speakers • MS-Sound compatible •...
Acer V3-551 and 551G Notebook Service Guide
Page 15
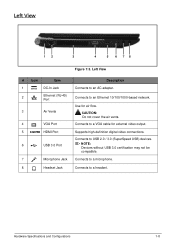
... USB 3.0 certification may not be compatible. 7 Microphone Jack Connects to a microphone. 8 Headset Jack Connects to an Ethernet 10/100/1000-based network. Hardware Specifications and Configurations 1-8 Left View 12 3 4 5 6 78 Figure 1:3. Left View # Icon Item Description 1 DC-In Jack Connects to an AC adapter. 2 Ethernet (RJ-45) Port Connects to a headset. Use for air flow. 3 Air Vents CAUTION: Do not cover the air vents. 4 VGA Port Connects to a VGA cable for external video...
... USB 3.0 certification may not be compatible. 7 Microphone Jack Connects to a microphone. 8 Headset Jack Connects to an Ethernet 10/100/1000-based network. Hardware Specifications and Configurations 1-8 Left View 12 3 4 5 6 78 Figure 1:3. Left View # Icon Item Description 1 DC-In Jack Connects to an AC adapter. 2 Ethernet (RJ-45) Port Connects to a headset. Use for air flow. 3 Air Vents CAUTION: Do not cover the air vents. 4 VGA Port Connects to a VGA cable for external video...
Acer V3-551 and 551G Notebook Service Guide
Page 20
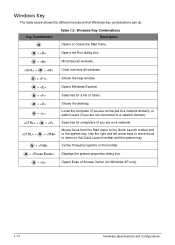
... Hardware Specifications and Configurations Cycles through programs on the toolbar. + Displays the system properties dialog box. + Opens Ease of Access Center (for computers (if you are connected to the system tray. Locks the computer (if you are not connected to items on a network). Windows Key The table below shows the different functions that Windows key combinations can do: Key Combination Table 1:2. Windows Key Combinations Description Opens or closes the Start menu. + Opens...
... Hardware Specifications and Configurations Cycles through programs on the toolbar. + Displays the system properties dialog box. + Opens Ease of Access Center (for computers (if you are connected to the system tray. Locks the computer (if you are not connected to items on a network). Windows Key The table below shows the different functions that Windows key combinations can do: Key Combination Table 1:2. Windows Key Combinations Description Opens or closes the Start menu. + Opens...
Acer V3-551 and 551G Notebook Service Guide
Page 21
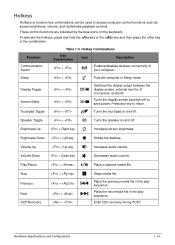
... + Turns the touchpad on and off to save power. Brightness Up + Right key Increases screen brightness. Volume Up + Up key Increases audio volume. Hotkeys Hotkeys or function key combinations can be used to return. Press any key to access computer control functions such as screen brightness, volume, and multimedia playback controls. Enter D2D recovery during POST Hardware Specifications and Configurations 1-14 To activate the hotkeys, press and hold the key or the key and then press the other key in Sleep mode. These control functions are indicated by...
... + Turns the touchpad on and off to save power. Brightness Up + Right key Increases screen brightness. Volume Up + Up key Increases audio volume. Hotkeys Hotkeys or function key combinations can be used to return. Press any key to access computer control functions such as screen brightness, volume, and multimedia playback controls. Enter D2D recovery during POST Hardware Specifications and Configurations 1-14 To activate the hotkeys, press and hold the key or the key and then press the other key in Sleep mode. These control functions are indicated by...

Acer V3-551 and 551G Notebook Service Guide
Page 22
... M/B BIOS ROM SYS BIOS (4M) EC BIOS (128K) FCH Hudson-M2/M3 uFCBGA-656 USB 3.3V 48MHz Port 10 (USB3.0) Port 0 Port 1 HD Audio 3.3V 24.576MHz/48Mhz SATA Gen2 Port 0 (USB3.0) Port 5 Port 7 Port 8 Port 9 GPP0 GEN2 LPC BUS ENE KB930/KB9012 port 0 SATA HDD1 Conn. Fan Control DC/DC Interface CKT. System Block Diagram Hardware Specifications and Configurations CRT Conn. port 1 ODD Conn. HDA Codec ALC271X VB6 ALC281X Touch Pad Int.KBD Power...
... M/B BIOS ROM SYS BIOS (4M) EC BIOS (128K) FCH Hudson-M2/M3 uFCBGA-656 USB 3.3V 48MHz Port 10 (USB3.0) Port 0 Port 1 HD Audio 3.3V 24.576MHz/48Mhz SATA Gen2 Port 0 (USB3.0) Port 5 Port 7 Port 8 Port 9 GPP0 GEN2 LPC BUS ENE KB930/KB9012 port 0 SATA HDD1 Conn. Fan Control DC/DC Interface CKT. System Block Diagram Hardware Specifications and Configurations CRT Conn. port 1 ODD Conn. HDA Codec ALC271X VB6 ALC281X Touch Pad Int.KBD Power...
Acer V3-551 and 551G Notebook Service Guide
Page 37
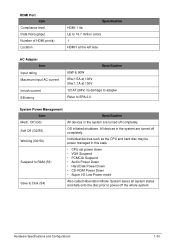
... to RAM (S3) • CPU set power down • VGA Suspend • PCMCIA Suspend • Audio Power Down • Hard Disk Power Down • CD-ROM Power Down • Super I/O Low Power mode Save to Disk (S4) Also called Hibernation Mode. All devices in the system are turned off completely. Working (G0/S0) Individual devices such as the CPU and hard disc may be power managed in the system are turned off completely. Hardware Specifications and Configurations 1-30...
... to RAM (S3) • CPU set power down • VGA Suspend • PCMCIA Suspend • Audio Power Down • Hard Disk Power Down • CD-ROM Power Down • Super I/O Low Power mode Save to Disk (S4) Also called Hibernation Mode. All devices in the system are turned off completely. Working (G0/S0) Individual devices such as the CPU and hard disc may be power managed in the system are turned off completely. Hardware Specifications and Configurations 1-30...
Acer V3-551 and 551G Notebook Service Guide
Page 44
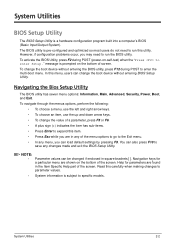
... enclosed in any menu, you may need to enter the multi-boot menu. Read this menu, users can load default settings by pressing F9. System Utilities BIOS Setup Utility The BIOS Setup Utility is subject to enter Setup." In this carefully when making changes to parameter values. • System information is a hardware configuration program built into a computer's BIOS (Basic Input/Output System). Navigating the Bios Setup Utility The BIOS utility has seven menu options: Information, Main, Advanced, Security, Power, Boot, and Exit...
... enclosed in any menu, you may need to enter the multi-boot menu. Read this menu, users can load default settings by pressing F9. System Utilities BIOS Setup Utility The BIOS Setup Utility is subject to enter Setup." In this carefully when making changes to parameter values. • System information is a hardware configuration program built into a computer's BIOS (Basic Input/Output System). Navigating the Bios Setup Utility The BIOS utility has seven menu options: Information, Main, Advanced, Security, Power, Boot, and Exit...
Acer V3-551 and 551G Notebook Service Guide
Page 45
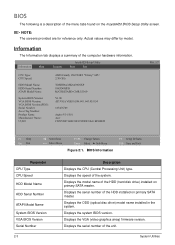
... VER10.094.001.043.035154 123456789 Aspire V3-5510 Acer FD525D8736B011E19990DC0EA1BF6BED Rev. 3.7 F1 Help Esc Exit Select Item Select Menu F5/F6 Change Values Enter Select Sub-Menu Figure 2:1. Displays the model name of the HDD (hard disk drive) installed on the InsydeH20 BIOS Setup Utility screen. Displays the ODD (optical disc drive) model name installed in the system. Displays the speed of the computer hardware information. Displays the serial number of the HDD installed on primary SATA master. NOTE...
... VER10.094.001.043.035154 123456789 Aspire V3-5510 Acer FD525D8736B011E19990DC0EA1BF6BED Rev. 3.7 F1 Help Esc Exit Select Item Select Menu F5/F6 Change Values Enter Select Sub-Menu Figure 2:1. Displays the model name of the HDD (hard disk drive) installed on the InsydeH20 BIOS Setup Utility screen. Displays the ODD (optical disc drive) model name installed in the system. Displays the speed of the computer hardware information. Displays the serial number of the HDD installed on primary SATA master. NOTE...

Acer V3-551 and 551G Notebook Service Guide
Page 47
... screen. Displays the video memory installed. Enable or disable system boot from 0 to 23, 0 to set the system time and date, enable or disable boot option, and enable or disable recovery. Displays the total memory installed. When enabled, displays the OEM (original equipment manufacturer) screen during system boot instead of boot menu during POST. Select the SATA controller mode: AHCI or IDE. 2-5 System Utilities BIOS Main F9 Setup Defaults F10 Save and Exit Parameter System Time System Date Total Memory Video Memory Graphic Mode Quiet Boot Network Boot...
... screen. Displays the video memory installed. Enable or disable system boot from 0 to 23, 0 to set the system time and date, enable or disable boot option, and enable or disable recovery. Displays the total memory installed. When enabled, displays the OEM (original equipment manufacturer) screen during system boot instead of boot menu during POST. Select the SATA controller mode: AHCI or IDE. 2-5 System Utilities BIOS Main F9 Setup Defaults F10 Save and Exit Parameter System Time System Date Total Memory Video Memory Graphic Mode Quiet Boot Network Boot...
Acer V3-551 and 551G Notebook Service Guide
Page 49
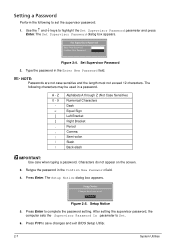
... changes and exit BIOS Setup Utility. 2-7 System Utilities Setting a Password Perform the following characters may be used in a password. Setup Notice 5. The Set Supervisor Password dialog box appears. Retype the password in the Enter New Password field. Press F10 to complete the password setting. The following to set the supervisor password: 1. Characters do not appear on the screen. 3. The Setup Notice dialog box appears. Use the ↑ and ↓ keys to Set. 6. After setting the supervisor password...
... changes and exit BIOS Setup Utility. 2-7 System Utilities Setting a Password Perform the following characters may be used in a password. Setup Notice 5. The Set Supervisor Password dialog box appears. Retype the password in the Enter New Password field. Press F10 to complete the password setting. The following to set the supervisor password: 1. Characters do not appear on the screen. 3. The Setup Notice dialog box appears. Use the ↑ and ↓ keys to Set. 6. After setting the supervisor password...
Acer V3-551 and 551G Notebook Service Guide
Page 53
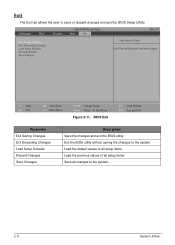
... Change Values Enter Select Sub-Menu Figure 2:11. Information Main Security InsydeH20 Setup Utility Boot Exit Rev. 3.7 Exit Saving Changes Exit Discarding Changes Load Setup Defaults Discard Changes Save Changes Item Specific Help Exit System Setup and save or discard changes and quit the BIOS Setup Uitility. BIOS Exit F9 Setup Defaults F10 Save and Exit Parameter Exit Saving Changes Exit Discarding Changes Load Setup Defaults Discard Changes Save Changes Description Save the changes and exit the BIOS utility...
... Change Values Enter Select Sub-Menu Figure 2:11. Information Main Security InsydeH20 Setup Utility Boot Exit Rev. 3.7 Exit Saving Changes Exit Discarding Changes Load Setup Defaults Discard Changes Save Changes Item Specific Help Exit System Setup and save or discard changes and quit the BIOS Setup Uitility. BIOS Exit F9 Setup Defaults F10 Save and Exit Parameter Exit Saving Changes Exit Discarding Changes Load Setup Defaults Discard Changes Save Changes Description Save the changes and exit the BIOS utility...
Acer V3-551 and 551G Notebook Service Guide
Page 54
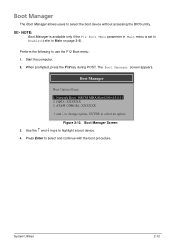
... Boot menu: 1. NOTE: Boot Manager is available only if the F12 Boot Menu parameter in Main menu is set to Enabled (refer to highlight a boot device. 4. Start the computer. 2. HDD : XXXXXX 3. Use the ↑ and ↓ keys to Main on page 2-5). Boot Manager The Boot Manager allows users to select and continue with the boot procedure. When prompted, press the F12 key during POST. Press Enter to select the boot device without accessing the BIOS utility. System Utilities 2-12 Boot Manager Screen 3. Boot Manager Boot Option Menu...
... Boot menu: 1. NOTE: Boot Manager is available only if the F12 Boot Menu parameter in Main menu is set to Enabled (refer to highlight a boot device. 4. Start the computer. 2. HDD : XXXXXX 3. Use the ↑ and ↓ keys to Main on page 2-5). Boot Manager The Boot Manager allows users to select and continue with the boot procedure. When prompted, press the F12 key during POST. Press Enter to select the boot device without accessing the BIOS utility. System Utilities 2-12 Boot Manager Screen 3. Boot Manager Boot Option Menu...

Acer V3-551 and 551G Notebook Service Guide
Page 76
... Support Information on Issues No Display Issues LCD Picture Failure Internal Keyboard Failure Touchpad Failure Internal Speaker Failure Internal Microphone Failure USB Failure Wireless Function Failure Bluetooth Function Failure 4-in -1 Card Function Failure on page 4-8 Figure 4:6. Use Table 4-1 with the tablet. NOTE: • The diagnostic tests are designed to be performed as possible about troubleshooting common problems associated with the verified symptom(s) to determine the solution. Symptoms Power on page 8-2. 4-2 Troubleshooting...
... Support Information on Issues No Display Issues LCD Picture Failure Internal Keyboard Failure Touchpad Failure Internal Speaker Failure Internal Microphone Failure USB Failure Wireless Function Failure Bluetooth Function Failure 4-in -1 Card Function Failure on page 4-8 Figure 4:6. Use Table 4-1 with the tablet. NOTE: • The diagnostic tests are designed to be performed as possible about troubleshooting common problems associated with the verified symptom(s) to determine the solution. Symptoms Power on page 8-2. 4-2 Troubleshooting...

Acer V3-551 and 551G Notebook Service Guide
Page 78
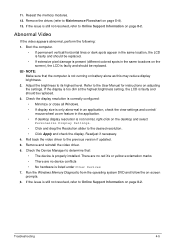
... 4:2. Connect an external monitor to the next step. 8. Remove any memory cards and CD/DVD discs. 10. Hold the power button for specific model procedures. 2. If there is discovered. 4-4 Troubleshooting Start the computer. No Display Issues If the system does not display, perform the following: Start Replace LCD NG panel/cable LCD panel/cable ok OK Replace M/B Can Power on OK RAM module well connected OK RAM module OK OK Lcd cable well connected OK NG Go to Power On Issues on page 4-3. Make sure that internal display...
... 4:2. Connect an external monitor to the next step. 8. Remove any memory cards and CD/DVD discs. 10. Hold the power button for specific model procedures. 2. If there is discovered. 4-4 Troubleshooting Start the computer. No Display Issues If the system does not display, perform the following: Start Replace LCD NG panel/cable LCD panel/cable ok OK Replace M/B Can Power on OK RAM module well connected OK RAM module OK OK Lcd cable well connected OK NG Go to Power On Issues on page 4-3. Make sure that internal display...
Acer V3-551 and 551G Notebook Service Guide
Page 79
... Windows Memory Diagnostic from the operating system DVD and follow the on adjusting the settings. Remove and reinstall the video driver. 6. If the issue is not running on page 8-2. Troubleshooting 4-5 NOTE: Make sure that : • The device is faulty and should be replaced. 3. If the issue is faulty and should be replaced. Remove the drives (refer to Online Support Information on page 5-4). 13. 11. Reseat the memory modules. 12. Boot...
... Windows Memory Diagnostic from the operating system DVD and follow the on adjusting the settings. Remove and reinstall the video driver. 6. If the issue is not running on page 8-2. Troubleshooting 4-5 NOTE: Make sure that : • The device is faulty and should be replaced. 3. If the issue is faulty and should be replaced. Remove the drives (refer to Online Support Information on page 5-4). 13. 11. Reseat the memory modules. 12. Boot...
Acer V3-551 and 551G Notebook Service Guide
Page 92
... scan using up to date software to Clearing the Password Check and BIOS Password on page 8-2. 4-18 Troubleshooting If HDD information is experiencing intermittent loss of BIOS Settings If the computer is missing from the BIOS, the drive may be defective and should be replaced. 6. Random Loss of BIOS information, perform the following : 1. Other Functions Failure If other functions such as the CRT switch, HDMI switch, LAN connection, external microphone, external speaker, or USB 3.0, perform...
... scan using up to date software to Clearing the Password Check and BIOS Password on page 8-2. 4-18 Troubleshooting If HDD information is experiencing intermittent loss of BIOS Settings If the computer is missing from the BIOS, the drive may be defective and should be replaced. 6. Random Loss of BIOS information, perform the following : 1. Other Functions Failure If other functions such as the CRT switch, HDMI switch, LAN connection, external microphone, external speaker, or USB 3.0, perform...
Acer V3-551 and 551G Notebook Service Guide
Page 93
... changed. 6. Perform the following : 1. Remove power from the computer. 2. Visually check FRUs for the system board in loop mode at least 10 times. 2. If the problem remains, replace the following devices: • Non-Acer devices • Printer, mouse, and other external devices • Battery pack • Hard disk drive • DIMM • CD-ROM/Diskette drive Module • PC Cards 4. Undetermined Problems The diagnostic problems do not identify which adapter or device failed, which installed devices are supported...
... changed. 6. Perform the following : 1. Remove power from the computer. 2. Visually check FRUs for the system board in loop mode at least 10 times. 2. If the problem remains, replace the following devices: • Non-Acer devices • Printer, mouse, and other external devices • Battery pack • Hard disk drive • DIMM • CD-ROM/Diskette drive Module • PC Cards 4. Undetermined Problems The diagnostic problems do not identify which adapter or device failed, which installed devices are supported...
Acer V3-551 and 551G Notebook Service Guide
Page 229
...; An overview of all the support services we offer, accompanied by a list of telephone, fax and email contacts for all models • Bios updates • Software utilities • Spare parts lists • TABs (Technical Announcement Bulletin) For these purposes, we have included an Acrobat File to facilitate the problem-free downloading of Acer's Notebook, Desktop and Server models including: • Service guides for ways to optimize and improve...
...; An overview of all the support services we offer, accompanied by a list of telephone, fax and email contacts for all models • Bios updates • Software utilities • Spare parts lists • TABs (Technical Announcement Bulletin) For these purposes, we have included an Acrobat File to facilitate the problem-free downloading of Acer's Notebook, Desktop and Server models including: • Service guides for ways to optimize and improve...


