Aspire T180 User's Guide EN
Page 5
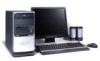
English 1 System tour Your computer consists of the following: Front panel Icon Description Power button Microphone jack Speaker or headphone jack Icon Description Floppy drive (selected models only) Optical drive (selected models only) Media card reader (selected models only) USB port IEEE 1394 port (selected models only) Rear panel Icon Description Icon PS/2 keyboard connector Description PS/2 mouse connector VGA port Printer connector Serial port (selected models only) USB port Microphone-in jack RJ-45 Ethernet connector Line-in jack Line-out / Speaker-out jack
English 1 System tour Your computer consists of the following: Front panel Icon Description Power button Microphone jack Speaker or headphone jack Icon Description Floppy drive (selected models only) Optical drive (selected models only) Media card reader (selected models only) USB port IEEE 1394 port (selected models only) Rear panel Icon Description Icon PS/2 keyboard connector Description PS/2 mouse connector VGA port Printer connector Serial port (selected models only) USB port Microphone-in jack RJ-45 Ethernet connector Line-in jack Line-out / Speaker-out jack

Aspire T180 User's Guide EN
Page 6
2 System tour English System features Performance • AMD mainstream high-performance processor • Expandable system memory • Power management functionality • 3.5" inch floppy drive (optional) • Multimedia card reader (optional) • CD-ROM, DVD-ROM, CD-RW (52X/24X), DVD/CD-RW combo ...
2 System tour English System features Performance • AMD mainstream high-performance processor • Expandable system memory • Power management functionality • 3.5" inch floppy drive (optional) • Multimedia card reader (optional) • CD-ROM, DVD-ROM, CD-RW (52X/24X), DVD/CD-RW combo ...
Aspire T180 User's Guide EN
Page 7
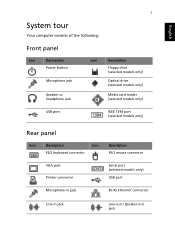
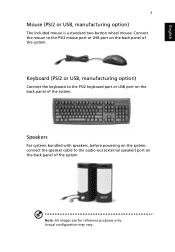
Speakers For systems bundled with speakers, before powering on the system, connect the speaker cable to the audio-out (external speaker) port on the back panel of the system. Note: All images are ...
Speakers For systems bundled with speakers, before powering on the system, connect the speaker cable to the audio-out (external speaker) port on the back panel of the system. Note: All images are ...
Aspire T180 User's Guide EN
Page 8
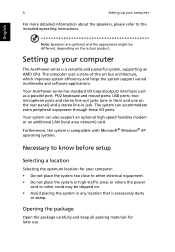
...your computer: • Do not place the system too close to the included operating instructions. 4 Setting up your computer The AcerPower series is a versatile and powerful system, supporting an AMD CPU. Your AcerPower series has standard I /O ports. Your system can accommodate extra peripheral equipment through these I /O (input/output) interfaces... about the speakers, please refer to other electrical equipment. • Do not place the system in high-traffic areas or where the power cord or other cords may be different, depending on . • Avoid placing the system in jack.
...your computer: • Do not place the system too close to the included operating instructions. 4 Setting up your computer The AcerPower series is a versatile and powerful system, supporting an AMD CPU. Your AcerPower series has standard I /O ports. Your system can accommodate extra peripheral equipment through these I /O (input/output) interfaces... about the speakers, please refer to other electrical equipment. • Do not place the system in high-traffic areas or where the power cord or other cords may be different, depending on . • Avoid placing the system in jack.
Aspire T180 User's Guide EN
Page 9
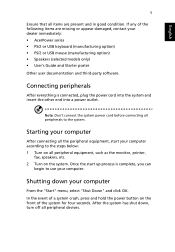
...good condition. Starting your computer After connecting all the peripheral equipment, start up process is connected, plug the power cord into the system and insert the other end into a power outlet. After the system has shut down your dealer immediately: • AcerPower series • PS/2 or ... all peripherals to the steps below: 1 Turn on the front of a system crash, press and hold the power button on all peripheral devices. Note: Don't connect the system power cord before connecting all items are missing or appear damaged, contact your computer From the "Start" menu, select...
...good condition. Starting your computer After connecting all the peripheral equipment, start up process is connected, plug the power cord into the system and insert the other end into a power outlet. After the system has shut down your dealer immediately: • AcerPower series • PS/2 or ... all peripherals to the steps below: 1 Turn on the front of a system crash, press and hold the power button on all peripheral devices. Note: Don't connect the system power cord before connecting all items are missing or appear damaged, contact your computer From the "Start" menu, select...
Aspire T180 User's Guide EN
Page 10
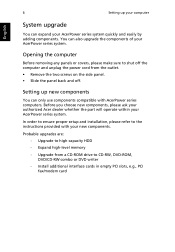
... and easily by adding components. Opening the computer Before removing any panels or covers, please make sure to shut off the computer and unplug the power cord from a CD-ROM drive to CD-RW, DVD-ROM, DVD/CD-RW combo or DVD writer - 6 Setting up new components You... can only use components compatible with your AcerPower series system. Before you choose new components, please ask your authorized Acer dealer whether the part will operate within your new components. In order to ensure proper setup and installation, please refer to high-capacity HDD -...
... and easily by adding components. Opening the computer Before removing any panels or covers, please make sure to shut off the computer and unplug the power cord from a CD-ROM drive to CD-RW, DVD-ROM, DVD/CD-RW combo or DVD writer - 6 Setting up new components You... can only use components compatible with your AcerPower series system. Before you choose new components, please ask your authorized Acer dealer whether the part will operate within your new components. In order to ensure proper setup and installation, please refer to high-capacity HDD -...
Aspire T180 User's Guide EN
Page 11
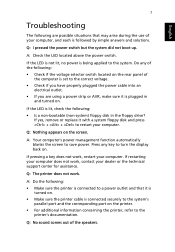
... selector switch located on the rear panel of the computer is set to the correct voltage. • Check if you have properly plugged the power cable into an electrical outlet. • If you are possible situations that it with a system floppy disk and press + + to restart your...LED is being applied to the system. If pressing a key does not work , contact your computer. English 7 Troubleshooting The following are using a power strip or AVR, make sure it is connected securely to the system's parallel port and the corresponding port on the printer. • For additional information...
... selector switch located on the rear panel of the computer is set to the correct voltage. • Check if you have properly plugged the power cable into an electrical outlet. • If you are possible situations that it with a system floppy disk and press + + to restart your...LED is being applied to the system. If pressing a key does not work , contact your computer. English 7 Troubleshooting The following are using a power strip or AVR, make sure it is connected securely to the system's parallel port and the corresponding port on the printer. • For additional information...
Aspire T180 User's Guide EN
Page 13
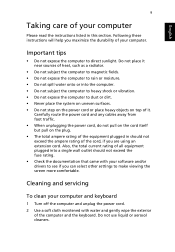
.... • Do not expose the computer to dust or dirt. • Never place the system on uneven surfaces. • Do not step on the power cord or place heavy objects on the plug. • The total ampere rating of the equipment plugged in this section. English 9 Taking care of it... should not exceed the ampere rating of your computer. Cleaning and servicing To clean your computer and keyboard 1 Turn off the computer and unplug the power cord. 2 Use a soft cloth moistened with your software and/or drivers to see if you are using an extension cord. Following these instructions will...
.... • Do not expose the computer to dust or dirt. • Never place the system on uneven surfaces. • Do not step on the power cord or place heavy objects on the plug. • The total ampere rating of the equipment plugged in this section. English 9 Taking care of it... should not exceed the ampere rating of your computer. Cleaning and servicing To clean your computer and keyboard 1 Turn off the computer and unplug the power cord. 2 Use a soft cloth moistened with your software and/or drivers to see if you are using an extension cord. Following these instructions will...

Aspire T180 User's Guide EN
Page 16
... of the product and to protect it from the wall outlet and refer servicing to qualified service personnel under the following conditions: a When the power cord or plug is provided. 6 This product should never be a detachable type : UL listed/CSA f If the product exhibits a distinct change... the product to qualified service personnel. 11 Unplug this product where people will often require extensive work by placing the product on the power cord. Do not locate this product from overheating. English 12 5 Slots and openings are followed. Also, make sure that could result...
... of the product and to protect it from the wall outlet and refer servicing to qualified service personnel under the following conditions: a When the power cord or plug is provided. 6 This product should never be a detachable type : UL listed/CSA f If the product exhibits a distinct change... the product to qualified service personnel. 11 Unplug this product where people will often require extensive work by placing the product on the power cord. Do not locate this product from overheating. English 12 5 Slots and openings are followed. Also, make sure that could result...
Aspire T180 User's Guide EN
Page 20
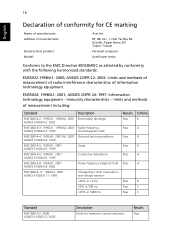
... -- AS/NZS CISPR 22: 2002: Limits and methods of measurement of radio interference characteristics of manufacturer: Declares that product: Model: Acer Inc. 8F, 88, Sec. 1, Hsin Tai Wu Rd. English 16 Declaration of conformity for harmonics current emissions Results Pass AS/...NZS 61000.4.5: 1999 Surge EN61000-4-6: 1996/A1: 2001 AS/NZS 61000.4.6: 1999 Conductive disturbance EN61000-4-8: 1993/A1: 2001 AS/NZS 61000.4.8: 2002 Power frequency magnetic field EN61000-4-11: 1994/A1: 2001 AS/NZS 61000.4.11: 1999 Voltage dips / short interruption and voltage variation >95% in...
... -- AS/NZS CISPR 22: 2002: Limits and methods of measurement of radio interference characteristics of manufacturer: Declares that product: Model: Acer Inc. 8F, 88, Sec. 1, Hsin Tai Wu Rd. English 16 Declaration of conformity for harmonics current emissions Results Pass AS/...NZS 61000.4.5: 1999 Surge EN61000-4-6: 1996/A1: 2001 AS/NZS 61000.4.6: 1999 Conductive disturbance EN61000-4-8: 1993/A1: 2001 AS/NZS 61000.4.8: 2002 Power frequency magnetic field EN61000-4-11: 1994/A1: 2001 AS/NZS 61000.4.11: 1999 Voltage dips / short interruption and voltage variation >95% in...
Aspire E380/T180 - Power M8 Service Guide
Page 6
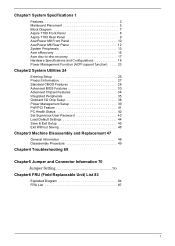
Chapter1 System Specifications 1 Features 2 Mainboard Placement 5 Block Diagram 7 Aspire T180 Front Panel 8 Aspire T180 Rear Panel 9 AcerPower M8 Front Panel 10 AcerPower M8 Rear Panel 12 System Peripherals 13 Acer eRecovery 15 Acer disc-to-disc recovery 17 Hardware Specifications and Configurations 18 Power Management Function (ACPI support function) . . . . 23 Chapter2 System Utilities 24 Entering Setup 25 Product...
Chapter1 System Specifications 1 Features 2 Mainboard Placement 5 Block Diagram 7 Aspire T180 Front Panel 8 Aspire T180 Rear Panel 9 AcerPower M8 Front Panel 10 AcerPower M8 Rear Panel 12 System Peripherals 13 Acer eRecovery 15 Acer disc-to-disc recovery 17 Hardware Specifications and Configurations 18 Power Management Function (ACPI support function) . . . . 23 Chapter2 System Utilities 24 Entering Setup 25 Product...

Aspire E380/T180 - Power M8 Service Guide
Page 10
.../2 Mouse Port T 1 Parallel Port, 1 Serial Port T 1 VGA(CRT) Port T 1 LAN Port T 4 USB Ports for non-1394 sku; 4 USB ports + IEEE1394 port for on board connecter Power Supply T PSP Type : 250/300W 4 Chapter 1
.../2 Mouse Port T 1 Parallel Port, 1 Serial Port T 1 VGA(CRT) Port T 1 LAN Port T 4 USB Ports for non-1394 sku; 4 USB ports + IEEE1394 port for on board connecter Power Supply T PSP Type : 250/300W 4 Chapter 1
Aspire E380/T180 - Power M8 Service Guide
Page 11
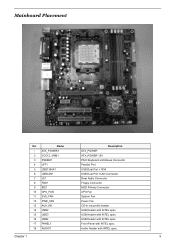
... Mouse Connector Parallel Port USB Dual Port +1394 USB Dual Port +LAN Connector Rear Audio Connector Floppy Connector HDD Primary Connector CPU Fan System Fan Power Fan CD-in low profile header USB Header with INTEL spec. USB Header with INTEL spec. USB Header with INTEL spec. Mainboard Placement No.
... Mouse Connector Parallel Port USB Dual Port +1394 USB Dual Port +LAN Connector Rear Audio Connector Floppy Connector HDD Primary Connector CPU Fan System Fan Power Fan CD-in low profile header USB Header with INTEL spec. USB Header with INTEL spec. USB Header with INTEL spec. Mainboard Placement No.
Aspire E380/T180 - Power M8 Service Guide
Page 14
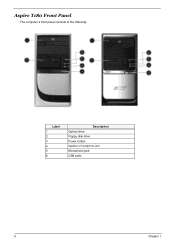
Aspire T180 Front Panel The computer's front panel consists of the following: No. DescriptioLnabel 1 2 3 4 5 6 DNesoc.riptiDonescription Optical drive Floppy disk drive Power button Speaker or headphone jack Microphone jack USB ports 8 Chapter 1
Aspire T180 Front Panel The computer's front panel consists of the following: No. DescriptioLnabel 1 2 3 4 5 6 DNesoc.riptiDonescription Optical drive Floppy disk drive Power button Speaker or headphone jack Microphone jack USB ports 8 Chapter 1
Aspire E380/T180 - Power M8 Service Guide
Page 15
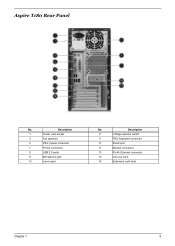
Description No. Description 2 Voltage selector switch 4 PS/2 keyboard connector 6 Serial port 8 Monitor connector 10 RJ-45 Ethernet connector 12 Line-out Jack 14 Extension card slots Chapter 1 9 Aspire T180 Rear Panel No. Description No. Description 1 Power cord socket 3 Fan aperture 5 PS/2 mouse connector 7 Printer connector 9 USB 2.0 ports 11 Microphone jack 13 Line-in jack No.
Description No. Description 2 Voltage selector switch 4 PS/2 keyboard connector 6 Serial port 8 Monitor connector 10 RJ-45 Ethernet connector 12 Line-out Jack 14 Extension card slots Chapter 1 9 Aspire T180 Rear Panel No. Description No. Description 1 Power cord socket 3 Fan aperture 5 PS/2 mouse connector 7 Printer connector 9 USB 2.0 ports 11 Microphone jack 13 Line-in jack No.
Aspire E380/T180 - Power M8 Service Guide
Page 16
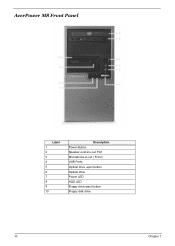
AcerPower M8 Front Panel Label 1 2 3 4 5 6 7 8 9 10 Description Power-Button Speaker-out/Line-out Port Microphone-in out ( Front ) USB Ports Optical drive eject button Optical drive Power LED HDD LED Floppy drive eject button Floppy disk drive 10 Chapter 1
AcerPower M8 Front Panel Label 1 2 3 4 5 6 7 8 9 10 Description Power-Button Speaker-out/Line-out Port Microphone-in out ( Front ) USB Ports Optical drive eject button Optical drive Power LED HDD LED Floppy drive eject button Floppy disk drive 10 Chapter 1

Aspire E380/T180 - Power M8 Service Guide
Page 17
5 4 3 8 2 7 6 1 Label 1 2 3 4 5 6 7 8 Description Power-Button USB ports Microphone-in & Speaker-out/Line-out Port Optical drive eject button Optical drive Indicators Card reader HDD Chapter 1 11
5 4 3 8 2 7 6 1 Label 1 2 3 4 5 6 7 8 Description Power-Button USB ports Microphone-in & Speaker-out/Line-out Port Optical drive eject button Optical drive Indicators Card reader HDD Chapter 1 11

Aspire E380/T180 - Power M8 Service Guide
Page 18
NoD.escription Description 2 Voltage selector switch 4 PS/2 keyboard connector 6 Serial port 8 Monitor connector 10 RJ-45 Ethernet connector 12 Line-out Jack 14 Extension card slots 12 Chapter 1 No. DesDcreispctrioipntion 1 Power cord socket 3 Fan aperture 5 PS/2 mouse connector 7 Printer connector 9 USB 2.0 ports 11 Microphone jack 13 Line-in jack No. AcerPower M8 Rear Panel No.
NoD.escription Description 2 Voltage selector switch 4 PS/2 keyboard connector 6 Serial port 8 Monitor connector 10 RJ-45 Ethernet connector 12 Line-out Jack 14 Extension card slots 12 Chapter 1 No. DesDcreispctrioipntion 1 Power cord socket 3 Fan aperture 5 PS/2 mouse connector 7 Printer connector 9 USB 2.0 ports 11 Microphone jack 13 Line-in jack No. AcerPower M8 Rear Panel No.

Aspire E380/T180 - Power M8 Service Guide
Page 20
NOTE: speakers are optional and the appearance might be different depending on the back panel of the system. For more detailed information about the speakers, please refer to the audio out (external speaker) port on the actual product. 14 Chapter 1 Speakers For systems bundled with speaNkoetres:, before powering on the system, connect the speaker cable to the included operating instructions.
NOTE: speakers are optional and the appearance might be different depending on the back panel of the system. For more detailed information about the speakers, please refer to the audio out (external speaker) port on the actual product. 14 Chapter 1 Speakers For systems bundled with speaNkoetres:, before powering on the system, connect the speaker cable to the included operating instructions.
Aspire E380/T180 - Power M8 Service Guide
Page 23
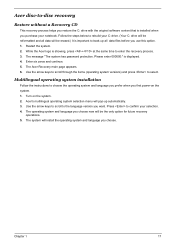
...process helps you restore the C: drive with the original software content that is installed when you purchase your notebook. While the Acer logo is displayed. 4. The Acer Recovery main page appears. 6. Press to enter the recovery process. 3. Follow the steps below to rebuild your selection. ... C: drive. (Your C: drive will be reformatted and all data files before you use this option. 1. Turn on the system. 1. Acer disc-to back up automatically. 3. Restart the system. 2. Multilingual operating system installation Follow the instructions to choose the operating system and language...
...process helps you restore the C: drive with the original software content that is installed when you purchase your notebook. While the Acer logo is displayed. 4. The Acer Recovery main page appears. 6. Press to enter the recovery process. 3. Follow the steps below to rebuild your selection. ... C: drive. (Your C: drive will be reformatted and all data files before you use this option. 1. Turn on the system. 1. Acer disc-to back up automatically. 3. Restart the system. 2. Multilingual operating system installation Follow the instructions to choose the operating system and language...


