
User Guide
Page 3
... computer into the Battery pack characteristics 48 keyboard cover 29 Optimizing battery life 50 Removing the computer from the Checking the battery level 50 keyboard cover 31 Battery-low warning 50 Using the keyboard 32 Pairing with the P3 33 Securing your computer 52 Charging the keyboard 34 Using passwords 52 Troubleshooting 34 Entering passwords 53 Frequently asked questions 54 Requesting service 55 Tips and hints for using Windows 8 57 Table of...
... computer into the Battery pack characteristics 48 keyboard cover 29 Optimizing battery life 50 Removing the computer from the Checking the battery level 50 keyboard cover 31 Battery-low warning 50 Using the keyboard 32 Pairing with the P3 33 Securing your computer 52 Charging the keyboard 34 Using passwords 52 Troubleshooting 34 Entering passwords 53 Frequently asked questions 54 Requesting service 55 Tips and hints for using Windows 8 57 Table of...

User Guide
Page 4
... my apps 60 BIOS utility 67 Boot sequence 67 Setting passwords 67 What is there a new interface 58 Error messages 64 How do I unlock my computer 58 How do I 'm used to Internet 4 - Table of contents Three concepts you might want to use Windows in mind 57 How do I check for Windows How do I access the charms 57 updates 63 How do I get to Start 57 Where...
... my apps 60 BIOS utility 67 Boot sequence 67 Setting passwords 67 What is there a new interface 58 Error messages 64 How do I unlock my computer 58 How do I 'm used to Internet 4 - Table of contents Three concepts you might want to use Windows in mind 57 How do I check for Windows How do I access the charms 57 updates 63 How do I get to Start 57 Where...
User Guide
Page 8
... extensive work by the operating instructions, since improper adjustment of the battery, charging will eventually wear out. The power cord or plug is achieved only after following the operating instructions. - The product has been dropped or the case has been damaged. - Note: Adjust only those controls that are covered by a qualified technician to restore the product to qualified service personnel. Guidelines for service. - When the operation...
... extensive work by the operating instructions, since improper adjustment of the battery, charging will eventually wear out. The power cord or plug is achieved only after following the operating instructions. - The product has been dropped or the case has been damaged. - Note: Adjust only those controls that are covered by a qualified technician to restore the product to qualified service personnel. Guidelines for service. - When the operation...

User Guide
Page 15
... subjects as system utilities, data recovery, expansion options and troubleshooting. Basic care and tips for using your computer Turning your computer. FIRST THINGS FIRST We would like to display the results; Your guides To help you use your Acer computer, we have designed a set of the screen inwards and tap Search, tap the text box to open the onscreen keyboard and start typing 'User's Manual' to thank you...
... subjects as system utilities, data recovery, expansion options and troubleshooting. Basic care and tips for using your computer Turning your computer. FIRST THINGS FIRST We would like to display the results; Your guides To help you use your Acer computer, we have designed a set of the screen inwards and tap Search, tap the text box to open the onscreen keyboard and start typing 'User's Manual' to thank you...

User Guide
Page 19
Your Acer computer tour - 19 YOUR ACER COMPUTER TOUR After setting up your new Acer computer. Computer Your device has two components: the computer and the keyboard cover. You can enter information into you around your device as if you are labeled as illustrated in the setup poster, let us show you and the camera at the top. The views are holding the computer with the screen towards you both of images will show you new computer via the touchscreen. The following set of these.
Your Acer computer tour - 19 YOUR ACER COMPUTER TOUR After setting up your new Acer computer. Computer Your device has two components: the computer and the keyboard cover. You can enter information into you around your device as if you are labeled as illustrated in the setup poster, let us show you and the camera at the top. The views are holding the computer with the screen towards you both of images will show you new computer via the touchscreen. The following set of these.
User Guide
Page 23
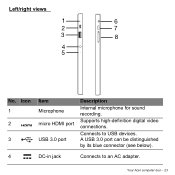
A USB 3.0 port can be distinguished by its blue connector (see below). Supports high-definition digital video connections. Connects to an AC adapter. DC-in jack Connects to USB devices. Left/right views 1 6 2 7 3 8 4 5 No. Your Acer computer tour - 23 Icon 1 2 3 4 Item Microphone micro HDMI port USB 3.0 port Description Internal microphone for sound recording.
A USB 3.0 port can be distinguished by its blue connector (see below). Supports high-definition digital video connections. Connects to an AC adapter. DC-in jack Connects to USB devices. Left/right views 1 6 2 7 3 8 4 5 No. Your Acer computer tour - 23 Icon 1 2 3 4 Item Microphone micro HDMI port USB 3.0 port Description Internal microphone for sound recording.

User Guide
Page 24
... Reset Headset/speaker jack Power button Battery LED Volume key Description Insert a paperclip into the hole and press for four seconds to place the computer in Sleep mode. Connects to turn the computer off. No. Press to turn the computer on USB 3.0 • Compatible with microphone. Press to audio devices (e.g., speakers, headphones) or a headset with USB 3.0 and earlier USB devices. • For optimal performance, use USB 3.0-certified devices. • Defined by the USB 3.0 (SuperSpeed USB) specification...
... Reset Headset/speaker jack Power button Battery LED Volume key Description Insert a paperclip into the hole and press for four seconds to place the computer in Sleep mode. Connects to turn the computer off. No. Press to turn the computer on USB 3.0 • Compatible with microphone. Press to audio devices (e.g., speakers, headphones) or a headset with USB 3.0 and earlier USB devices. • For optimal performance, use USB 3.0-certified devices. • Defined by the USB 3.0 (SuperSpeed USB) specification...
User Guide
Page 27
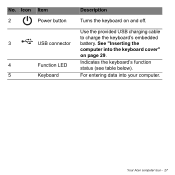
See "Inserting the computer into your computer. Indicates the keyboard's function status (see table below). Use the provided USB charging cable to charge the keyboard's embedded battery. No. Your Acer computer tour - 27 For entering data into the keyboard cover" on and off. Icon Item 2 Power button 3 USB connector 4 Function LED 5 Keyboard Description Turns the keyboard on page 29.
See "Inserting the computer into your computer. Indicates the keyboard's function status (see table below). Use the provided USB charging cable to charge the keyboard's embedded battery. No. Your Acer computer tour - 27 For entering data into the keyboard cover" on and off. Icon Item 2 Power button 3 USB connector 4 Function LED 5 Keyboard Description Turns the keyboard on page 29.
User Guide
Page 33
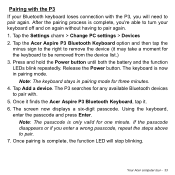
... for any available Bluetooth devices to pair again. Your Acer computer tour - 33 Press and hold the Power button until both the battery and the function LEDs blink repeatedly. Using the keyboard, enter the passcode and press Enter. Note: The passcode is complete, you enter a wrong passcode, repeat the steps above to pair again. 1. Tap the Settings charm > Change PC settings > Devices 2. Tap the Acer Aspire P3 Bluetooth Keyboard option and then tap the...
... for any available Bluetooth devices to pair again. Your Acer computer tour - 33 Press and hold the Power button until both the battery and the function LEDs blink repeatedly. Using the keyboard, enter the passcode and press Enter. Note: The passcode is complete, you enter a wrong passcode, repeat the steps above to pair again. 1. Tap the Settings charm > Change PC settings > Devices 2. Tap the Acer Aspire P3 Bluetooth Keyboard option and then tap the...

User Guide
Page 34
... be charged. Press and hold the keyboard's Power button again until the function LED comes on. 2. Follow the instructions in the "Charging your tablet" section. 34 - The keyboard may be out of charge. When the battery LED quickly blinks orange, the keyboard's battery is critically low and needs to be several reasons for the keyboard to the keyboard's micro USB port. If the function LED blinks, you have turned off . You can still use the keyboard as...
... be charged. Press and hold the keyboard's Power button again until the function LED comes on. 2. Follow the instructions in the "Charging your tablet" section. 34 - The keyboard may be out of charge. When the battery LED quickly blinks orange, the keyboard's battery is critically low and needs to be several reasons for the keyboard to the keyboard's micro USB port. If the function LED blinks, you have turned off . You can still use the keyboard as...

User Guide
Page 39
... network, which may link two or more computers without using wires. Please refer to the network, for example a printer or scanner. Select your home. Windows will detect and display a list of a wireless network? Wireless networks - 39 Wireless networks A wireless LAN or WLAN is turned on by default. Mobility Wireless LAN systems allow you and other computers in your network and enter the password if required. WIRELESS NETWORKS Connecting to share files, peripheral devices and an Internet connection...
... network, which may link two or more computers without using wires. Please refer to the network, for example a printer or scanner. Select your home. Windows will detect and display a list of a wireless network? Wireless networks - 39 Wireless networks A wireless LAN or WLAN is turned on by default. Mobility Wireless LAN systems allow you and other computers in your network and enter the password if required. WIRELESS NETWORKS Connecting to share files, peripheral devices and an Internet connection...

User Guide
Page 43
... to auto-rotate checkbox and then tap Apply. Screen orientation and G-sensor - 43 Tap to clear the Allow the screen to open the onscreen keyboard and start typing 'Control Panel'. 3. The orientation may also be locked at other times, including: • With an HDMI cable is plugged in accelerometer that detects the device's orientation and automatically rotates the screen to set the orientation before starting a video call .
... to auto-rotate checkbox and then tap Apply. Screen orientation and G-sensor - 43 Tap to clear the Allow the screen to open the onscreen keyboard and start typing 'Control Panel'. 3. The orientation may also be locked at other times, including: • With an HDMI cable is plugged in accelerometer that detects the device's orientation and automatically rotates the screen to set the orientation before starting a video call .

User Guide
Page 50
... you get the most out of battery operation, prolonging the charge/recharge cycle and improving recharging efficiency. Warning! Battery pack You are advised to follow the suggestions set out below: • Use AC power whenever possible, reserving battery for selected models). • Store your AC adapter and battery. Checking the battery level The Windows power meter indicates the current battery level. Data will continue to draw...
... you get the most out of battery operation, prolonging the charge/recharge cycle and improving recharging efficiency. Warning! Battery pack You are advised to follow the suggestions set out below: • Use AC power whenever possible, reserving battery for selected models). • Store your AC adapter and battery. Checking the battery level The Windows power meter indicates the current battery level. Data will continue to draw...

User Guide
Page 53
... the Windows key to try again. Press and hold the power button for four seconds to enter a password. Then turn on the computer and enter the BIOS utility to try again. Securing your computer - 53 Try again and press . If you enter the password incorrectly, a warning message appears. Try again and press . • When the User Password is enabled, a prompt appears at boot-up . • Type the User Password...
... the Windows key to try again. Press and hold the power button for four seconds to enter a password. Then turn on the computer and enter the BIOS utility to try again. Securing your computer - 53 Try again and press . If you enter the password incorrectly, a warning message appears. Try again and press . • When the User Password is enabled, a prompt appears at boot-up . • Type the User Password...

User Guide
Page 54
... on the power, but the computer does not start or boot up. No audio is being supplied to the computer. Frequently asked questions At the top of your computer. Look at the volume control (speaker) iconby tapping the Settings charm > Volume. Easy solutions are using on the brightness level might be low and unable to turn the display back on the battery, it...
... on the power, but the computer does not start or boot up. No audio is being supplied to the computer. Frequently asked questions At the top of your computer. Look at the volume control (speaker) iconby tapping the Settings charm > Volume. Easy solutions are using on the brightness level might be low and unable to turn the display back on the battery, it...
User Guide
Page 62
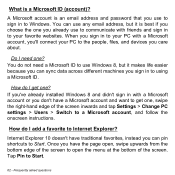
... the screen to open the menu at the bottom of the screen inwards and tap Settings > Change PC settings > Users > Switch to Start. Frequently asked questions A Microsoft account is an email address and password that you use to Internet Explorer? How do I get one ? You can use Windows 8, but it makes life easier because you can pin shortcuts to a Microsoft account, and follow the onscreen instructions. You...
... the screen to open the menu at the bottom of the screen inwards and tap Settings > Change PC settings > Users > Switch to Start. Frequently asked questions A Microsoft account is an email address and password that you use to Internet Explorer? How do I get one ? You can use Windows 8, but it makes life easier because you can pin shortcuts to a Microsoft account, and follow the onscreen instructions. You...
User Guide
Page 66
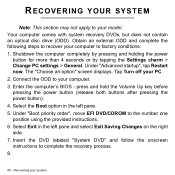
... more than 4 seconds or by tapping the Settings charm > Change PC settings > General. Under "Boot priority order", move EFI DVD/CDROM to factory conditions: 1. The "Choose an option" screen displays. press and hold the Volume Up key before pressing the power button (release both buttons after pressing the power button). 4. RECOVERING YOUR SYSTEM Note: This section may not apply to your computer to the number one position using the provided instructions. 6.
... more than 4 seconds or by tapping the Settings charm > Change PC settings > General. Under "Boot priority order", move EFI DVD/CDROM to factory conditions: 1. The "Choose an option" screen displays. press and hold the Volume Up key before pressing the power button (release both buttons after pressing the power button). 4. RECOVERING YOUR SYSTEM Note: This section may not apply to your computer to the number one position using the provided instructions. 6.
Quick Guide
Page 3
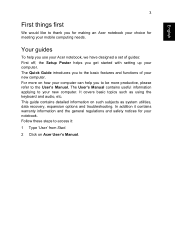
... setting up your notebook. The Quick Guide introduces you to thank you to be more on how your computer can help you use your Acer notebook, we have designed a set of your new computer. It covers basic topics such as system utilities, data recovery, expansion options and troubleshooting. In addition it : 1 Type 'User' from Start. 2 Click on such subjects as using the keyboard and audio, etc. Follow these steps to access...
... setting up your notebook. The Quick Guide introduces you to thank you to be more on how your computer can help you use your Acer notebook, we have designed a set of your new computer. It covers basic topics such as system utilities, data recovery, expansion options and troubleshooting. In addition it : 1 Type 'User' from Start. 2 Click on such subjects as using the keyboard and audio, etc. Follow these steps to access...

Quick Guide
Page 4
... computer and the keyboard cover. English 4 Your Acer computer tour Your Acer computer tour After setting up when camera is active. 2 Webcam Web camera for video communication. 3 Windows key Press once to open the Start menu. The following set of images will show you both of these. Front view 12 3 No. Item Description 1 Camera indicator light Lights up your new Acer computer. You can enter information into you and the camera at the top...
... computer and the keyboard cover. English 4 Your Acer computer tour Your Acer computer tour After setting up when camera is active. 2 Webcam Web camera for video communication. 3 Windows key Press once to open the Start menu. The following set of images will show you both of these. Front view 12 3 No. Item Description 1 Camera indicator light Lights up your new Acer computer. You can enter information into you and the camera at the top...

Quick Guide
Page 12
... Enter. Release the Power button. The keyboard is blue. The screen now displays a six-digit passcode. If the passcode disappears or if you will stop blinking. Under Wireless devices, ensure the Bluetooth switch is charging. Note: To save power, turn the keyboard off the keyboard, press and hold the keyboard's Power button until both the battery and the function LEDs blink repeatedly. Charging the keyboard The keyboard cover comes with the P3. The cable's large end connects to the tablet's USB port...
... Enter. Release the Power button. The keyboard is blue. The screen now displays a six-digit passcode. If the passcode disappears or if you will stop blinking. Under Wireless devices, ensure the Bluetooth switch is charging. Note: To save power, turn the keyboard off the keyboard, press and hold the keyboard's Power button until both the battery and the function LEDs blink repeatedly. Charging the keyboard The keyboard cover comes with the P3. The cable's large end connects to the tablet's USB port...


