
Aspire 9920G Service Guide
Page 43
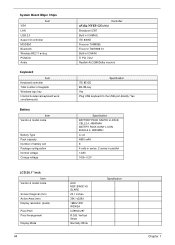
Video Interface Item Chipset Package Interface Supports ZV (Zoomed Video) port Specification nVdia NV8P-GS MXM 820-ball BGA 33mm x33mm Internal PCIE Video Memory Item Chipset Memory size Interface Specification Dedicated Video memory size: 128-bit DDR2/GDDR3/GDDR4 DDR2/...
Video Interface Item Chipset Package Interface Supports ZV (Zoomed Video) port Specification nVdia NV8P-GS MXM 820-ball BGA 33mm x33mm Internal PCIE Video Memory Item Chipset Memory size Interface Specification Dedicated Video memory size: 128-bit DDR2/GDDR3/GDDR4 DDR2/...
Aspire 9920G Service Guide
Page 44
... work simultaneously Battery Item Vendor & model name Battery Type Pack capacity Number of battery cell Package configuration Normal voltage Charge voltage Controller nVdia NV8P-GS MXM Broadcom 5787 Built in ICH8M-E ITE 8305E Foxconn T60M955 Foxconn T60H928.01 Built-in ICH8-M TI PCI 7412 Realtek ALC268(Dolby version) Specification ITE 8512E...
... work simultaneously Battery Item Vendor & model name Battery Type Pack capacity Number of battery cell Package configuration Normal voltage Charge voltage Controller nVdia NV8P-GS MXM Broadcom 5787 Built in ICH8M-E ITE 8305E Foxconn T60M955 Foxconn T60H928.01 Built-in ICH8-M TI PCI 7412 Realtek ALC268(Dolby version) Specification ITE 8512E...
Aspire 9920G Service Guide
Page 68
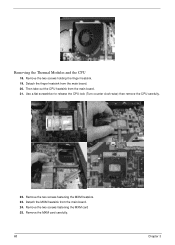
Remove the two screws holding the finger heatsink. 19. Detach the finger heatsink from the main board. 21. Use a flat screwdriver to release the CPU lock (Turn counter clock-wise) then remove the CPU carefully. 22. Removing the Thermal Modules and the CPU 18. Remove the two screws fastening the MXM heatsink. 23. Then take out the CPU heatsink from the main board. 20. Remove the two screws fastening the MXM card 25. Remove the MXM card carefully. 68 Chapter 3 Detach the MXM heatsink from the main board. 24.
Remove the two screws holding the finger heatsink. 19. Detach the finger heatsink from the main board. 21. Use a flat screwdriver to release the CPU lock (Turn counter clock-wise) then remove the CPU carefully. 22. Removing the Thermal Modules and the CPU 18. Remove the two screws fastening the MXM heatsink. 23. Then take out the CPU heatsink from the main board. 20. Remove the two screws fastening the MXM card 25. Remove the MXM card carefully. 68 Chapter 3 Detach the MXM heatsink from the main board. 24.