
Aspire 9500 User's Guide
Page 4
iv First things first We would like to thank you for making the Aspire series of the power button. This guide contains detailed information on the computer, simply ... Programs, AcerSystem. 2 Click on your computer. Basic care and tips for Starters... For more productive, please refer to use your Aspire, we have designed a set of your mobile computing needs. For instructions on how your notebook. Follow the instructions on page 10 for... and functions of guides: First off To turn on such subjects as system utilities, data recovery, expansion options and troubleshooting.
iv First things first We would like to thank you for making the Aspire series of the power button. This guide contains detailed information on the computer, simply ... Programs, AcerSystem. 2 Click on your computer. Basic care and tips for Starters... For more productive, please refer to use your Aspire, we have designed a set of your mobile computing needs. For instructions on how your notebook. Follow the instructions on page 10 for... and functions of guides: First off To turn on such subjects as system utilities, data recovery, expansion options and troubleshooting.

Aspire 9500 User's Guide
Page 9
... 63 Installing memory 64 Connecting your TV and AV-in cables 65 Acer Arcade TV set-up wizard (Windows XP Home and Professional) 67 BIOS utility 68 Boot sequence 68 Enable disk-to-disk recovery 68 Password 68 Using software 69 Playing DVD movies 69 Power management ...70 Acer eRecovery Management 70 Create backup 70 Restore from backup 71 Create factory default image CD 71 Re...
... 63 Installing memory 64 Connecting your TV and AV-in cables 65 Acer Arcade TV set-up wizard (Windows XP Home and Professional) 67 BIOS utility 68 Boot sequence 68 Enable disk-to-disk recovery 68 Password 68 Using software 69 Playing DVD movies 69 Power management ...70 Acer eRecovery Management 70 Create backup 70 Restore from backup 71 Create factory default image CD 71 Re...

Aspire 9500 User's Guide
Page 15
... your system using a CD or Acer eRecovery Management, detach all peripherals (except the external Acer ODD, if your computer has one), including your computer did not come with a Recovery CD or System CD, please use Acer eRecovery Management's "System backup to ...For more information, please refer to "Acer eRecovery Management" on page 70 in a hidden partition on D:\ drive. Empowering Technology 5 Acer eRecovery Management Acer eRecovery Management is a powerful utility that does away with : • Password protection. • Recovery of applications and drivers. • Image...
... your system using a CD or Acer eRecovery Management, detach all peripherals (except the external Acer ODD, if your computer has one), including your computer did not come with a Recovery CD or System CD, please use Acer eRecovery Management's "System backup to ...For more information, please refer to "Acer eRecovery Management" on page 70 in a hidden partition on D:\ drive. Empowering Technology 5 Acer eRecovery Management Acer eRecovery Management is a powerful utility that does away with : • Password protection. • Recovery of applications and drivers. • Image...

Aspire 9500 User's Guide
Page 28
English 18 Software I/O interface Environment System compliance Warranty Acer Empowering Technology Acer Launch Manager Acer GridVista Acer System Recovery CD Norton AntiVirus™ Adobe® Reader® CyberLink® PowerDVD™ NTI CD-Maker™ Acer Arcade Bluetooth profile Five USB 2.0 ports IEEE 1394 port Express card slot Ethernet (RJ-45) port Modem (RJ-11) port External...
English 18 Software I/O interface Environment System compliance Warranty Acer Empowering Technology Acer Launch Manager Acer GridVista Acer System Recovery CD Norton AntiVirus™ Adobe® Reader® CyberLink® PowerDVD™ NTI CD-Maker™ Acer Arcade Bluetooth profile Five USB 2.0 ports IEEE 1394 port Express card slot Ethernet (RJ-45) port Modem (RJ-11) port External...

Aspire 9500 User's Guide
Page 45
...to rebuild your C: drive. (Your C: drive will be reformatted and all data files before using this option. The system will reboot. This recovery process helps you restore the C: drive with the Internet Connection setup. Note: To activate the BIOS utility, press during POST. HyperTerminal), you... your notebook. Before performing a restore operation, please check the BIOS settings. 1 Check to see if Acer disk-to-disk recovery is enabled or not. 2 Make sure the D2D Recovery setting in Main is not necessary to complete the installation of your Operating System. English 35 I want ...
...to rebuild your C: drive. (Your C: drive will be reformatted and all data files before using this option. The system will reboot. This recovery process helps you restore the C: drive with the Internet Connection setup. Note: To activate the BIOS utility, press during POST. HyperTerminal), you... your notebook. Before performing a restore operation, please check the BIOS settings. 1 Check to see if Acer disk-to-disk recovery is enabled or not. 2 Make sure the D2D Recovery setting in Main is not necessary to complete the installation of your Operating System. English 35 I want ...

Aspire 9500 User's Guide
Page 46
...occupies 2 to the on the screen (or the number and sequence in the case of time a call Acer for online service, and please be at the same time to enter the recovery process. 3 Refer to 3 GB in contact with your problems efficiently. An ITW passport comes with our ...information: Name Address Telephone number Machine and model type Serial number Date of the ITW passport. English 36 To start the recovery process: 1 Restart the system. 2 While the Acer logo is showing, press + at your ITW passport on your hard disk. Place your computer, write them down as ...
...occupies 2 to the on the screen (or the number and sequence in the case of time a call Acer for online service, and please be at the same time to enter the recovery process. 3 Refer to 3 GB in contact with your problems efficiently. An ITW passport comes with our ...information: Name Address Telephone number Machine and model type Serial number Date of the ITW passport. English 36 To start the recovery process: 1 Restart the system. 2 While the Acer logo is showing, press + at your ITW passport on your hard disk. Place your computer, write them down as ...

Aspire 9500 User's Guide
Page 78
while the notebook PC logo is a hardware configuration program built into your computer's BIOS. Enable disk-to-disk recovery To enable disk-to-disk recovery (hard disk recovery), activate the BIOS utility, then select Main from the categories listed at the top of the screen. Select Set Supervisor ...navigate, input and verify the new password. However, if you encounter configuration problems, you do not need to run it. Find D2D Recovery at the top of the screen and use the key to Enabled. English 68 BIOS utility The BIOS utility is being displayed. Password ...
while the notebook PC logo is a hardware configuration program built into your computer's BIOS. Enable disk-to-disk recovery To enable disk-to-disk recovery (hard disk recovery), activate the BIOS utility, then select Main from the categories listed at the top of the screen. Select Set Supervisor ...navigate, input and verify the new password. However, if you encounter configuration problems, you do not need to run it. Find D2D Recovery at the top of the screen and use the key to Enabled. English 68 BIOS utility The BIOS utility is being displayed. Password ...
Aspire 9500 User's Guide
Page 81
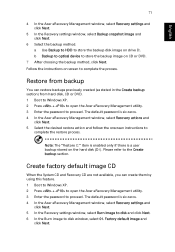
...7 After choosing the backup method, click Next. Follow the instructions on drive D:. English 71 4 In the Acer eRecovery Management window, select Recovery settings and click Next. 5 In the Recovery settings window, select Backup snapshot image and click Next. 6 Select the backup method. b Backup to optical ... Next. Please refer to disk window, select 01. The default password is six zeros. 4 In the Acer eRecovery Management window, select Recovery settings and click Next. 5 In the Recovery settings window, select Burn image to disk and click Next. 6 In the Burn image to the Create...
...7 After choosing the backup method, click Next. Follow the instructions on drive D:. English 71 4 In the Acer eRecovery Management window, select Recovery settings and click Next. 5 In the Recovery settings window, select Backup snapshot image and click Next. 6 Select the backup method. b Backup to optical ... Next. Please refer to disk window, select 01. The default password is six zeros. 4 In the Acer eRecovery Management window, select Recovery settings and click Next. 5 In the Recovery settings window, select Burn image to disk and click Next. 6 In the Burn image to the Create...
Aspire 9500 User's Guide
Page 82
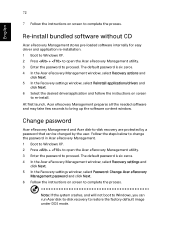
...Management utility. 3 Enter the password to re-install. The default password is six zeros. 4 In the Acer eRecovery Management window, select Recovery actions and click Next. 5 In the Recovery settings window, select Reinstall applications/drivers and click Next. 6 Select the desired driver/application and follow the .... Note: If the system crashes, and will not boot to Windows, you can be changed by a password that can run Acer disk-to-disk recovery to proceed. English 72 7 Follow the instructions on screen to bring up the software content window. The default password is six ...
...Management utility. 3 Enter the password to re-install. The default password is six zeros. 4 In the Acer eRecovery Management window, select Recovery actions and click Next. 5 In the Recovery settings window, select Reinstall applications/drivers and click Next. 6 Select the desired driver/application and follow the .... Note: If the system crashes, and will not boot to Windows, you can be changed by a password that can run Acer disk-to-disk recovery to proceed. English 72 7 Follow the instructions on screen to bring up the software content window. The default password is six ...
Service Guide
Page 38
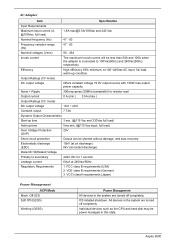
...- 63 Nominal voltages (Vrms) 90 - 264 Inrush current The maximum inrush current will be power managed in the system are turned off completely. Aspire 9500 Efficiency High efficiency 85% minimum, at 100~240Vac AC input, full load, warm-up time 5ms min. (@115 Vac input, full load) ...Over Voltage Protection 25V (OVP) Short circuit protection Output can be shorted without damage, and auto recovery Electrostatic discharge (ESD) 15kV (at air discharge) 8kV (at 240Vac/60Hz Regulatory Requirements 1. Off (G3) Soft Off (G2/S5) Working (G0...
...- 63 Nominal voltages (Vrms) 90 - 264 Inrush current The maximum inrush current will be power managed in the system are turned off completely. Aspire 9500 Efficiency High efficiency 85% minimum, at 100~240Vac AC input, full load, warm-up time 5ms min. (@115 Vac input, full load) ...Over Voltage Protection 25V (OVP) Short circuit protection Output can be shorted without damage, and auto recovery Electrostatic discharge (ESD) 15kV (at air discharge) 8kV (at 240Vac/60Hz Regulatory Requirements 1. Off (G3) Soft Off (G2/S5) Working (G0...

Service Guide
Page 46
...Speaker On/Off Fn + F9 Launch arcade Fn +w Volume up Fn +y Fn +x Fn +z Volume down Brightness up /down Alt + F10 Enter D2D recovery during POST Launch Acer eRecovery in ACPI mode Launch Display Mode Menu (DMM) Display blank (backlight off via an APM timer. This is assigned as each key makes...by the Analog function within the each time these keys are pressed. Enter D2D recovery during POST Launch Acer eRecovery in OS other is able to appear on the Power Management property. This key will launch Acer eManager->eSetting It will cause the volume of the audio chip to muted or...
...Speaker On/Off Fn + F9 Launch arcade Fn +w Volume up Fn +y Fn +x Fn +z Volume down Brightness up /down Alt + F10 Enter D2D recovery during POST Launch Acer eRecovery in ACPI mode Launch Display Mode Menu (DMM) Display blank (backlight off via an APM timer. This is assigned as each key makes...by the Analog function within the each time these keys are pressed. Enter D2D recovery during POST Launch Acer eRecovery in OS other is able to appear on the Power Management property. This key will launch Acer eManager->eSetting It will cause the volume of the audio chip to muted or...
Service Guide
Page 51
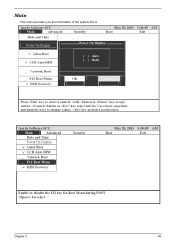
...Display ԩ Quiet Boot ԩ LCD Auto DIM ( ) Auto ( ) Both ˲ Network Boot ˲ʳ ʳ F12 Boot Menu OK ԩ D2D Recoveryʳ Cancel Press key to change values. button or key accept entries. Insyde Software SCU Main Advanced Date and Time ԩ Quiet Boot ԩ LCD... Auto DIM ˲ Network Boot ˲ʳ ʳ F12 Boot Menu ԩ D2D Recoveryʳ Security May 20, 2003 5:40:09 AM Boot Exit Enable or disable the F12 key for Boot Menu during POST for select Chapter 2 46...
...Display ԩ Quiet Boot ԩ LCD Auto DIM ( ) Auto ( ) Both ˲ Network Boot ˲ʳ ʳ F12 Boot Menu OK ԩ D2D Recoveryʳ Cancel Press key to change values. button or key accept entries. Insyde Software SCU Main Advanced Date and Time ԩ Quiet Boot ԩ LCD... Auto DIM ˲ Network Boot ˲ʳ ʳ F12 Boot Menu ԩ D2D Recoveryʳ Security May 20, 2003 5:40:09 AM Boot Exit Enable or disable the F12 key for Boot Menu during POST for select Chapter 2 46...
Service Guide
Page 52
...is not present. BOTH: Select "Both" item the display mode will not have "Press Change Boot Device" Enabled: Enable D2D Recovery/eRecovery Disabled: Disable D2D Recovery/eRecovery 47 Chapter 2 When this is selected, Boot from LAN feature is then disabled. Parameter Date and Time Power On Display Quiet... Boot Network Boot LCD Auto Dim F12 Boot Menu D2D Recovery Description Option The hours are displayed with 12 hour format. Enabled: During user's quite boot, the OEM POST screen will have "Press ...
...is not present. BOTH: Select "Both" item the display mode will not have "Press Change Boot Device" Enabled: Enable D2D Recovery/eRecovery Disabled: Disable D2D Recovery/eRecovery 47 Chapter 2 When this is selected, Boot from LAN feature is then disabled. Parameter Date and Time Power On Display Quiet... Boot Network Boot LCD Auto Dim F12 Boot Menu D2D Recovery Description Option The hours are displayed with 12 hour format. Enabled: During user's quite boot, the OEM POST screen will have "Press ...

Service Guide
Page 79
... Setup System Management Mode (SMM) area Display external L2 cache size Load custom defaults (optional) Display shadow-area message Display possible high address for UMB recovery Display error messages Check for configuration errors Check for keyboard errors Set up hardware interrupt vectors Initialize coprocessor if present Disable onboard Super I/O ports and...
... Setup System Management Mode (SMM) area Display external L2 cache size Load custom defaults (optional) Display shadow-area message Display possible high address for UMB recovery Display error messages Check for configuration errors Check for keyboard errors Set up hardware interrupt vectors Initialize coprocessor if present Disable onboard Super I/O ports and...
Service Guide
Page 81
... F5h F6h F7h Beeps 1 For Boot Block in ROM Initialize the chipset Initialize the bridge Initialize the CPU Initialize system timer Initialize system I/O Check force recovery boot Checksum BIOS ROM Go to BIOS Set Huge Segment Initialize Multi Processor Initialize OEM special code Initialize PIC and DMA Initialize Memory type Initialize...
... F5h F6h F7h Beeps 1 For Boot Block in ROM Initialize the chipset Initialize the bridge Initialize the CPU Initialize system timer Initialize system I/O Check force recovery boot Checksum BIOS ROM Go to BIOS Set Huge Segment Initialize Multi Processor Initialize OEM special code Initialize PIC and DMA Initialize Memory type Initialize...


