Aspire 7560, 7560G Service Guide
Page 3
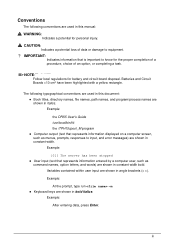
... names, and program/process names are shown in italics. NOTE: NOTE: Follow local regulations for personal injury. ! Example: At the prompt, type run -m Keyboard keys are shown in angle brackets (< >). Batteries and Circuit Boards >10 cm² have been highlighted with a yellow rectangle.
... names, and program/process names are shown in italics. NOTE: NOTE: Follow local regulations for personal injury. ! Example: At the prompt, type run -m Keyboard keys are shown in angle brackets (< >). Batteries and Circuit Boards >10 cm² have been highlighted with a yellow rectangle.
Aspire 7560, 7560G Service Guide
Page 5
... 1-11 Top View 1-11 Closed Front View 1-13 Rear View 1-14 Left View 1-15 Right View 1-17 Base View 1-18 Touchpad Basics 1-20 Using the Keyboard 1-21 Windows Keys 1-22 Hotkeys 1-23 System Block Diagram 1-25 Specification Tables 1-26 Computer specifications 1-26 System Board Major Chips 1-27 Processor 1-27 Processor Specifications... 1-27 CPU Fan True Value Table (Tj=100 1-28 System Memory 1-28 Memory Combinations 1-29 Video Interface 1-29 BIOS 1-30 LAN Interface 1-30 Keyboard 1-31 Hard Disk Drive (AVL components 1-31 v
... 1-11 Top View 1-11 Closed Front View 1-13 Rear View 1-14 Left View 1-15 Right View 1-17 Base View 1-18 Touchpad Basics 1-20 Using the Keyboard 1-21 Windows Keys 1-22 Hotkeys 1-23 System Block Diagram 1-25 Specification Tables 1-26 Computer specifications 1-26 System Board Major Chips 1-27 Processor 1-27 Processor Specifications... 1-27 CPU Fan True Value Table (Tj=100 1-28 System Memory 1-28 Memory Combinations 1-29 Video Interface 1-29 BIOS 1-30 LAN Interface 1-30 Keyboard 1-31 Hard Disk Drive (AVL components 1-31 v
Aspire 7560, 7560G Service Guide
Page 7
... Main and Secondary HDD Module Carrier Installation . . . . 3-19 WLAN Module Removal 3-20 WLAN Module Installation 3-21 DIMM Module Removal 3-22 DIMM Module Installation 3-23 Keyboard Removal 3-24 Keyboard Installation 3-26 Upper Cover Removal 3-27 Upper Cover Installation 3-30 Touchpad FFC Removal 3-32 Touchpad FFC Installation 3-33 Power Board Removal 3-34 Power Board...
... Main and Secondary HDD Module Carrier Installation . . . . 3-19 WLAN Module Removal 3-20 WLAN Module Installation 3-21 DIMM Module Removal 3-22 DIMM Module Installation 3-23 Keyboard Removal 3-24 Keyboard Installation 3-26 Upper Cover Removal 3-27 Upper Cover Installation 3-30 Touchpad FFC Removal 3-32 Touchpad FFC Installation 3-33 Power Board Removal 3-34 Power Board...
Aspire 7560, 7560G Service Guide
Page 8
... Microphone Module Installation 3-70 WLAN Antenna Removal 3-71 WLAN Antenna Installation 3-71 CHAPTER 4 Troubleshooting Introduction 4-3 General Information 4-3 Power On Issues 4-4 No Display Issues 4-5 LCD Failure 4-7 Keyboard Failure 4-8 Touchpad Failure 4-9 Internal Speaker Failure 4-10 Microphone Failure 4-12 USB Failure 4-13 Wireless Function Failure 4-14 Bluetooth Failure 4-15 Card Reader Failure 4-16 Thermal...
... Microphone Module Installation 3-70 WLAN Antenna Removal 3-71 WLAN Antenna Installation 3-71 CHAPTER 4 Troubleshooting Introduction 4-3 General Information 4-3 Power On Issues 4-4 No Display Issues 4-5 LCD Failure 4-7 Keyboard Failure 4-8 Touchpad Failure 4-9 Internal Speaker Failure 4-10 Microphone Failure 4-12 USB Failure 4-13 Wireless Function Failure 4-14 Bluetooth Failure 4-15 Card Reader Failure 4-16 Thermal...
Aspire 7560, 7560G Service Guide
Page 12
...1-11 Top View 1-11 Closed Front View 1-13 Rear View 1-14 Left View 1-15 Right View 1-17 Base View 1-18 Touchpad Basics 1-20 Using the Keyboard 1-21 Windows Keys 1-22 Hotkeys 1-23 System Block Diagram 1-25 Specification Tables 1-26 Computer specifications 1-26 System Board Major Chips 1-27 Processor 1-27 Processor Specifications... 1-27 CPU Fan True Value Table (Tj=100 1-28 System Memory 1-28 Memory Combinations 1-29 Video Interface 1-29 BIOS 1-30 LAN Interface 1-30 Keyboard 1-31 Hard Disk Drive (AVL components 1-31 Super-Multi Drive 1-34 BD Drive 1-35 1-2
...1-11 Top View 1-11 Closed Front View 1-13 Rear View 1-14 Left View 1-15 Right View 1-17 Base View 1-18 Touchpad Basics 1-20 Using the Keyboard 1-21 Windows Keys 1-22 Hotkeys 1-23 System Block Diagram 1-25 Specification Tables 1-26 Computer specifications 1-26 System Board Major Chips 1-27 Processor 1-27 Processor Specifications... 1-27 CPU Fan True Value Table (Tj=100 1-28 System Memory 1-28 Memory Combinations 1-29 Video Interface 1-29 BIOS 1-30 LAN Interface 1-30 Keyboard 1-31 Hard Disk Drive (AVL components 1-31 Super-Multi Drive 1-34 BD Drive 1-35 1-2

Aspire 7560, 7560G Service Guide
Page 18
... 48 Wh 4400 mAh 6-cell Li-ion standard battery pack Battery life: TBC hours ENERGY STAR® Power adapter Aspire 7560 0 3-pin 65 W AC adapter: 95 (W) x 50 (D) x 25.4 (H) mm (3.74 x 1.96 x 1 inches) ...DC cable Aspire 7560G 0 3-pin 90 W AC adapter: 133 (W) x 59 (D) x 31 (H) mm (5.23 x 2.32 x 1.22 inches) 390 g (0.86 lbs.) with 180 cm DC cable Special Keys and Controls 0 Keyboard 103-/104-/107-key Acer FineTip keyboard with ...
... 48 Wh 4400 mAh 6-cell Li-ion standard battery pack Battery life: TBC hours ENERGY STAR® Power adapter Aspire 7560 0 3-pin 65 W AC adapter: 95 (W) x 50 (D) x 25.4 (H) mm (3.74 x 1.96 x 1 inches) ...DC cable Aspire 7560G 0 3-pin 90 W AC adapter: 133 (W) x 59 (D) x 31 (H) mm (5.23 x 2.32 x 1.22 inches) 390 g (0.86 lbs.) with 180 cm DC cable Special Keys and Controls 0 Keyboard 103-/104-/107-key Acer FineTip keyboard with ...
Aspire 7560, 7560G Service Guide
Page 22
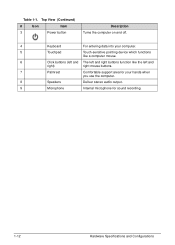
Top View (Continued) # Icon Item 3 Power button Description Turns the computer on and off. 4 Keyboard For entering data into your computer. 5 Touchpad Touch-sensitive pointing device which functions like a computer mouse. 6 Click buttons (left and The left and right buttons function like the left and right) right mouse buttons. 7 Palmrest Comfortable support area for your hands when you use the computer. 8 Speakers Deliver stereo audio output. 9 Microphone Internal microphone for sound recording. 1-12 Hardware Specifications and Configurations Table 1-1.
Top View (Continued) # Icon Item 3 Power button Description Turns the computer on and off. 4 Keyboard For entering data into your computer. 5 Touchpad Touch-sensitive pointing device which functions like a computer mouse. 6 Click buttons (left and The left and right buttons function like the left and right) right mouse buttons. 7 Palmrest Comfortable support area for your hands when you use the computer. 8 Speakers Deliver stereo audio output. 9 Microphone Internal microphone for sound recording. 1-12 Hardware Specifications and Configurations Table 1-1.

Aspire 7560, 7560G Service Guide
Page 31
... , the screen moves one line up or down when the up or + down arrow keys are in numeric mode. Using the Keyboard 0 Figure 1-9. Hardware Specifications and Configurations 1-21 Keyboard Lock Keys The keyboard has three lock keys which can be toggled on , the numeric keypad is on and off. (Table 1-8) Table 1-8. Num Lock...
... , the screen moves one line up or down when the up or + down arrow keys are in numeric mode. Using the Keyboard 0 Figure 1-9. Hardware Specifications and Configurations 1-21 Keyboard Lock Keys The keyboard has three lock keys which can be toggled on , the numeric keypad is on and off. (Table 1-8) Table 1-8. Num Lock...
Aspire 7560, 7560G Service Guide
Page 32
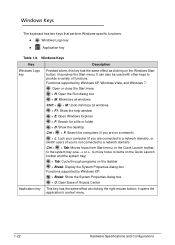
Windows Keys 0 The keyboard has two keys that perform Windows-specific functions. Windows Logo key Application key Table 1-9. It can also be used with other ...
Windows Keys 0 The keyboard has two keys that perform Windows-specific functions. Windows Logo key Application key Table 1-9. It can also be used with other ...
Aspire 7560, 7560G Service Guide
Page 33
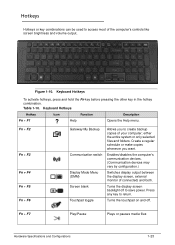
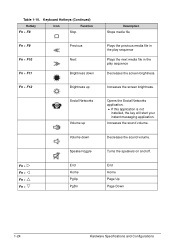
...the display screen, external monitor (if connected) and both. Turns the touchpad on and off to return. Press any key to save power. Keyboard Hotkeys Hotkey Fn + F1 Icon Function ? Create a regular schedule or make copies whenever you to access most of your computer; Turns the ... 1-23 Hotkeys 0 Hotkeys or key combinations can be used to create backup copies of the computer's controls like screen brightness and volume output. Keyboard Hotkeys To activate hotkeys, press and hold the Fn key before pressing the other key in the hotkey combination. Fn + F2 Fn + F3...
...the display screen, external monitor (if connected) and both. Turns the touchpad on and off to return. Press any key to save power. Keyboard Hotkeys Hotkey Fn + F1 Icon Function ? Create a regular schedule or make copies whenever you to access most of your computer; Turns the ... 1-23 Hotkeys 0 Hotkeys or key combinations can be used to create backup copies of the computer's controls like screen brightness and volume output. Keyboard Hotkeys To activate hotkeys, press and hold the Fn key before pressing the other key in the hotkey combination. Fn + F2 Fn + F3...
Aspire 7560, 7560G Service Guide
Page 34
... volume. Increases the screen brightness. Opens the Social Networks application. If this application is not installed, the key will start your instant messaging application. Keyboard Hotkeys (Continued) Hotkey Icon Function Fn + F8 Stop Fn + F9 Previous Fn + F10 Next Fn + F11 Brightness down Fn + F12 Brightness up Social Networks Fn...
... volume. Increases the screen brightness. Opens the Social Networks application. If this application is not installed, the key will start your instant messaging application. Keyboard Hotkeys (Continued) Hotkey Icon Function Fn + F8 Stop Fn + F9 Previous Fn + F10 Next Fn + F11 Brightness down Fn + F12 Brightness up Social Networks Fn...
Aspire 7560, 7560G Service Guide
Page 41
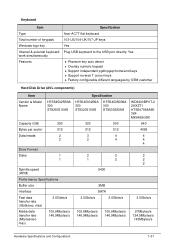
... Total number of keypads Windows logo key Internal & external keyboard work simultaneously Features Specification Acer AC7T flat keyboard 103-US/104-UK/107-JP keys Yes Plug USB keyboard to the USB port directly: Yes Phantom key auto detect Overlay numeric keypad Support independent pgdn/pgup/home/end keys Support...
... Total number of keypads Windows logo key Internal & external keyboard work simultaneously Features Specification Acer AC7T flat keyboard 103-US/104-UK/107-JP keys Yes Plug USB keyboard to the USB port directly: Yes Phantom key auto detect Overlay numeric keypad Support independent pgdn/pgup/home/end keys Support...
Aspire 7560, 7560G Service Guide
Page 55
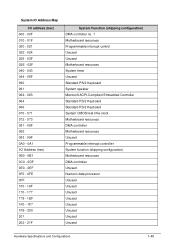
... (shipping configuration) DMA controller no. 1 Motherboard resources Programmable interrupt control Unused Unused Motherboard resources System timer Unused Standard PS/2 Keyboard System speaker Microsoft ACPI-Compliant Embedded Controller Standard PS/2 Keyboard Standard PS/2 Keyboard System CMOS/real time clock Motherboard resources DMA controller Motherboard resources Unused Programmable interrupt controller System function (shipping configuration) Motherboard...
... (shipping configuration) DMA controller no. 1 Motherboard resources Programmable interrupt control Unused Unused Motherboard resources System timer Unused Standard PS/2 Keyboard System speaker Microsoft ACPI-Compliant Embedded Controller Standard PS/2 Keyboard Standard PS/2 Keyboard System CMOS/real time clock Motherboard resources DMA controller Motherboard resources Unused Programmable interrupt controller System function (shipping configuration) Motherboard...
Aspire 7560, 7560G Service Guide
Page 90
... Main and Secondary HDD Module Carrier Installation . . . . 3-19 WLAN Module Removal 3-20 WLAN Module Installation 3-21 DIMM Module Removal 3-22 DIMM Module Installation 3-23 Keyboard Removal 3-24 Keyboard Installation 3-26 Upper Cover Removal 3-27 Upper Cover Installation 3-30 Touchpad FFC Removal 3-32 Touchpad FFC Installation 3-33 Power Board Removal 3-34 Power Board...
... Main and Secondary HDD Module Carrier Installation . . . . 3-19 WLAN Module Removal 3-20 WLAN Module Installation 3-21 DIMM Module Removal 3-22 DIMM Module Installation 3-23 Keyboard Removal 3-24 Keyboard Installation 3-26 Upper Cover Removal 3-27 Upper Cover Installation 3-30 Touchpad FFC Removal 3-32 Touchpad FFC Installation 3-33 Power Board Removal 3-34 Power Board...
Aspire 7560, 7560G Service Guide
Page 112
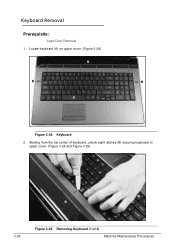
Keyboard Removal Prerequisite: Logic Door Removal 1. Locate keyboard (A) on upper cover. (Figure 3-24) B B A 0 B Figure 3-24. Removing Keyboard (1 of keyboard, unlock eight latches (B) securing keyboard to upper cover. (Figure 3-24 and Figure 3-25) B 3-24 Figure 3-25. Keyboard 2. Starting from the top center of 3) Machine Maintenance Procedures
Keyboard Removal Prerequisite: Logic Door Removal 1. Locate keyboard (A) on upper cover. (Figure 3-24) B B A 0 B Figure 3-24. Removing Keyboard (1 of keyboard, unlock eight latches (B) securing keyboard to upper cover. (Figure 3-24 and Figure 3-25) B 3-24 Figure 3-25. Keyboard 2. Starting from the top center of 3) Machine Maintenance Procedures
Aspire 7560, 7560G Service Guide
Page 113
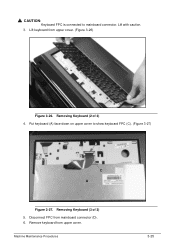
Remove keyboard from upper cover. (Figure 3-26) Figure 3-26. CAUTION: Keyboard FPC is connected to show keyboard FPC (C). (Figure 3-27) D C A Figure 3-27. Removing Keyboard (2 of 3) 5. Machine Maintenance Procedures 3-25 Put keyboard (A) face-down on upper cover to mainboard connector. Lift keyboard from upper cover. Removing Keyboard (3 of 3) 4. Disconnect FPC from mainboard connector (D). 6. ! Lift with caution. 3.
Remove keyboard from upper cover. (Figure 3-26) Figure 3-26. CAUTION: Keyboard FPC is connected to show keyboard FPC (C). (Figure 3-27) D C A Figure 3-27. Removing Keyboard (2 of 3) 5. Machine Maintenance Procedures 3-25 Put keyboard (A) face-down on upper cover to mainboard connector. Lift keyboard from upper cover. Removing Keyboard (3 of 3) 4. Disconnect FPC from mainboard connector (D). 6. ! Lift with caution. 3.
Aspire 7560, 7560G Service Guide
Page 114
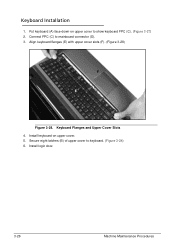
Put keyboard (A) face-down on upper cover. 5. Install logic door. 3-26 Machine Maintenance Procedures Keyboard Installation 0 1. Secure eight latches (B) of upper cover to show keyboard FPC (C). (Figure 3-27) 2. Keyboard Flanges and Upper Cover Slots 4. Align keyboard flanges (E) with upper cover slots (F). (Figure 3-28) F E Figure 3-28. Install keyboard on upper cover to keyboard. (Figure 3-24) 6. Connect FPC (C) to mainboard connector (D). 3.
Put keyboard (A) face-down on upper cover. 5. Install logic door. 3-26 Machine Maintenance Procedures Keyboard Installation 0 1. Secure eight latches (B) of upper cover to show keyboard FPC (C). (Figure 3-27) 2. Keyboard Flanges and Upper Cover Slots 4. Align keyboard flanges (E) with upper cover slots (F). (Figure 3-28) F E Figure 3-28. Install keyboard on upper cover to keyboard. (Figure 3-24) 6. Connect FPC (C) to mainboard connector (D). 3.

Aspire 7560, 7560G Service Guide
Page 162
Introduction 4-3 General Information 4-3 Power On Issues 4-4 No Display Issues 4-5 LCD Failure 4-7 Keyboard Failure 4-8 Touchpad Failure 4-9 Internal Speaker Failure 4-10 Microphone Failure 4-12 USB Failure 4-13 Wireless Function Failure 4-14 Bluetooth Failure 4-15 Card Reader Failure 4-16 Thermal Unit Failure 4-17 Case Failure 4-18 Other Functions Failure 4-19 ODD Failure 4-20 Intermittent Problems 4-25 Undetermined Problems 4-25 Post Codes 4-26 4-2
Introduction 4-3 General Information 4-3 Power On Issues 4-4 No Display Issues 4-5 LCD Failure 4-7 Keyboard Failure 4-8 Touchpad Failure 4-9 Internal Speaker Failure 4-10 Microphone Failure 4-12 USB Failure 4-13 Wireless Function Failure 4-14 Bluetooth Failure 4-15 Card Reader Failure 4-16 Thermal Unit Failure 4-17 Case Failure 4-18 Other Functions Failure 4-19 ODD Failure 4-20 Intermittent Problems 4-25 Undetermined Problems 4-25 Post Codes 4-26 4-2
Aspire 7560, 7560G Service Guide
Page 163
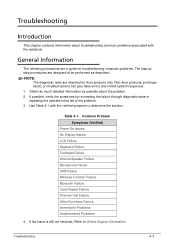
... procedures are designed to determine the solution. Common Problem Symptoms (Verified) Power On Issues No Display Issues LCD Failure Keyboard Failure Touchpad Failure Internal Speaker Failure Microphone Failure USB Failure Wireless Function Failure Bluetooth Failure Card Reader Failure Thermal Unit Failure... Use Table 4-1 with the verified symptom to be performed as possible about troubleshooting common problems associated with the notebook. Non-Acer products, prototype cards, or modified options can give false errors and invalid system responses. 1. NOTE: NOTE: The diagnostic tests...
... procedures are designed to determine the solution. Common Problem Symptoms (Verified) Power On Issues No Display Issues LCD Failure Keyboard Failure Touchpad Failure Internal Speaker Failure Microphone Failure USB Failure Wireless Function Failure Bluetooth Failure Card Reader Failure Thermal Unit Failure... Use Table 4-1 with the verified symptom to be performed as possible about troubleshooting common problems associated with the notebook. Non-Acer products, prototype cards, or modified options can give false errors and invalid system responses. 1. NOTE: NOTE: The diagnostic tests...

Aspire 7560, 7560G Service Guide
Page 168
OK Swap M/B Replace KB material Figure 4-4. Keyboard Failure 4-8 Troubleshooting Keyboard Failure 0 If the keyboard fails, perform the following: Start OK Check KB FPC well insert NG Re-assemble the KB FPC to M/B OK NG Is KB ok?
OK Swap M/B Replace KB material Figure 4-4. Keyboard Failure 4-8 Troubleshooting Keyboard Failure 0 If the keyboard fails, perform the following: Start OK Check KB FPC well insert NG Re-assemble the KB FPC to M/B OK NG Is KB ok?


