

Aspire 7100 Service Guide
Page 3
Screen messages Denotes actual messages that you have to the accomplishment of additional information related to any damage that might result from doing or not doing ...
Screen messages Denotes actual messages that you have to the accomplishment of additional information related to any damage that might result from doing or not doing ...

Aspire 7100 Service Guide
Page 11
... parity check feature Support for Local Bus speed 66MHz) 3.3 V 168-pin DIMM No Yes You can install memory modules in BIOS Setup Utility main menu screen, the Advanced Options menu then appears. The items shown in the Advanced Options menu are: Memory/Cache Options PnP/PCI Options Chipset Options System Memory...
... parity check feature Support for Local Bus speed 66MHz) 3.3 V 168-pin DIMM No Yes You can install memory modules in BIOS Setup Utility main menu screen, the Advanced Options menu then appears. The items shown in the Advanced Options menu are: Memory/Cache Options PnP/PCI Options Chipset Options System Memory...

Aspire 7100 Service Guide
Page 21
...8593;↓ = Move highlight bar ↵ = Select Esc = Exit The system supports two BIOS Utility levels: Basic and Advanced. The following screen shows the Setup Utility Advanced Level main menu. 14 System Utilities To view the Advanced Level, Press + . This allows you to view and...want to check the detailed configuration of your system. IMPORTANTYou must press simultaneously while the system is the BIOS Utility Basic Level screen. The above screen is booting. This key combination does not work during any other time. Entering Setup To enter Setup, press the key ...
...8593;↓ = Move highlight bar ↵ = Select Esc = Exit The system supports two BIOS Utility levels: Basic and Advanced. The following screen shows the Setup Utility Advanced Level main menu. 14 System Utilities To view the Advanced Level, Press + . This allows you to view and...want to check the detailed configuration of your system. IMPORTANTYou must press simultaneously while the system is the BIOS Utility Basic Level screen. The above screen is booting. This key combination does not work during any other time. Entering Setup To enter Setup, press the key ...

Aspire 7100 Service Guide
Page 22
... fixed settings and are already in the main menu, again to another. u To select an option, move within a screen and from one screen to exit Setup. These values may not be the same as those in Main Menu to move the highlight bar by pressing or then press . ... are in the main menu. The command line at the bottom of the menu tells you press + in your system. The grayed items on the screens show default values. to move to the next page or to return to the main menu. If you are not userconfigurable. * , 4 This item shows only...
... fixed settings and are already in the main menu, again to another. u To select an option, move within a screen and from one screen to exit Setup. These values may not be the same as those in Main Menu to move the highlight bar by pressing or then press . ... are in the main menu. The command line at the bottom of the menu tells you press + in your system. The grayed items on the screens show default values. to move to the next page or to return to the main menu. If you are not userconfigurable. * , 4 This item shows only...

Aspire 7100 Service Guide
Page 23
... Secondary Channel Master --- None Total Memory 32 MB 1st Bank SDRAM, 32 MB 2nd Bank None 3rd Bank None PgUp/PgDn = Move Screen Esc = Back to Main Menu The System Information menu shows the current basic configuration of the System Information menu. Hard Disk IDE Primary Channel... Port 1 3F8h, IRQ 4 Serial Port 2 2F8h, IRQ 3 Parallel Port 378h, IRQ 7 PS/2 Mouse Installed PgUp/PgDn = Move Screen Esc = Back to Main Menu The following screen appears if you select System Information from the main menu: System Information Processor Pentium II Processor Speed 350 MHz Internal Cache 32...
... Secondary Channel Master --- None Total Memory 32 MB 1st Bank SDRAM, 32 MB 2nd Bank None 3rd Bank None PgUp/PgDn = Move Screen Esc = Back to Main Menu The System Information menu shows the current basic configuration of the System Information menu. Hard Disk IDE Primary Channel... Port 1 3F8h, IRQ 4 Serial Port 2 2F8h, IRQ 3 Parallel Port 378h, IRQ 7 PS/2 Mouse Installed PgUp/PgDn = Move Screen Esc = Back to Main Menu The following screen appears if you select System Information from the main menu: System Information Processor Pentium II Processor Speed 350 MHz Internal Cache 32...

Aspire 7100 Service Guide
Page 26
... name of your system's serial number. Hardware checking is necessary for troubleshooting (will be required when asking for technical support). Chapter 2 19 Product Information The screen below appears if you to Main Menu The Product Information menu contains general data about the system, such as the product name, serial number, BIOS...
... name of your system's serial number. Hardware checking is necessary for troubleshooting (will be required when asking for technical support). Chapter 2 19 Product Information The screen below appears if you to Main Menu The Product Information menu contains general data about the system, such as the product name, serial number, BIOS...

Aspire 7100 Service Guide
Page 27
... Possible settings for the first floppy drive (drive A), highlight the Floppy Drive A parameter. Press or to configure the drives installed in your system. The following screen shows the Disk Drives menu: Disk Drives Floppy Drive A ------- [1.44 MB 3.5-inch] LS-120 drive as ------- [ Normal ] *IDE Primary Channel Master *IDE Primary Channel Slave...
... Possible settings for the first floppy drive (drive A), highlight the Floppy Drive A parameter. Press or to configure the drives installed in your system. The following screen shows the Disk Drives menu: Disk Drives Floppy Drive A ------- [1.44 MB 3.5-inch] LS-120 drive as ------- [ Normal ] *IDE Primary Channel Master *IDE Primary Channel Slave...

Aspire 7100 Service Guide
Page 29
The following screen appears if you select any of the IDE Drive parameters: IDE Primary Channel Master Type Auto ] Cylinder 4092 ] Head 16 ] Sector 63 ] Size 2111 ] MB ...
The following screen appears if you select any of the IDE Drive parameters: IDE Primary Channel Master Type Auto ] Cylinder 4092 ] Head 16 ] Sector 63 ] Size 2111 ] MB ...

Aspire 7100 Service Guide
Page 33
.... The options are configurable only if the Serial Port parameter is enabled. 26 System Utilities Selecting this option from the main menu displays the following screen: Serial Port This parameter allows you to set a logical base address for the serial port. The options are: u 3F8h u 2F8h u 3E8h u 2E8h Onboard Peripherals Serial...
.... The options are configurable only if the Serial Port parameter is enabled. 26 System Utilities Selecting this option from the main menu displays the following screen: Serial Port This parameter allows you to set a logical base address for the serial port. The options are: u 3F8h u 2F8h u 3E8h u 2E8h Onboard Peripherals Serial...

Aspire 7100 Service Guide
Page 34
... ECP parallel port function (as the operation mode. Following table lists the different operation modes. Check the parallel port address on the add-on the screen. Operation Mode This item allows you to enable or disable the parallel port. Setting Function Standard Parallel Port (SPP) Standard and Bi-directional Enhanced Parallel...
... ECP parallel port function (as the operation mode. Following table lists the different operation modes. Check the parallel port address on the add-on the screen. Operation Mode This item allows you to enable or disable the parallel port. Setting Function Standard Parallel Port (SPP) Standard and Bi-directional Enhanced Parallel...

Aspire 7100 Service Guide
Page 35
... IDE controllers. When disabled, it activates the USB function of the system. IDE Controller Set this option from the Onboard Peripherals menu displays the following screen: Onboard Device Settings Floppy Disk Controller --------- [Enabled ] IDE Controller Both ] PS/2 Mouse Controller Enabled ] USB Host Controller Enabled ] USB Legacy Mode Disabled] Onboard Audio Chip...
... IDE controllers. When disabled, it activates the USB function of the system. IDE Controller Set this option from the Onboard Peripherals menu displays the following screen: Onboard Device Settings Floppy Disk Controller --------- [Enabled ] IDE Controller Both ] PS/2 Mouse Controller Enabled ] USB Host Controller Enabled ] USB Legacy Mode Disabled] Onboard Audio Chip...
Aspire 7100 Service Guide
Page 37
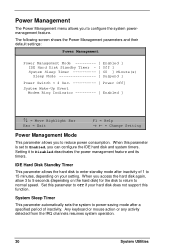
The following screen shows the Power Management parameters and their default settings: Power Management Power Management Mode Enabled ] IDE Hard Disk Standby Timer - [ Off ] System Sleep Timer 60 ] ...
The following screen shows the Power Management parameters and their default settings: Power Management Power Management Mode Enabled ] IDE Hard Disk Standby Timer - [ Off ] System Sleep Timer 60 ] ...

Aspire 7100 Service Guide
Page 39
... onboard video controller is IDE. If you installed a video card into your system, set this parameter to Onboard enables the onboard video controller. The following screen appears if you select Boot Options from the main menu: Boot Options Boot Sequence 1st [Floppy Disk] 2nd [ Hard Disk ] 3rd [ CD-ROM ] First Hard...
... onboard video controller is IDE. If you installed a video card into your system, set this parameter to Onboard enables the onboard video controller. The following screen appears if you select Boot Options from the main menu: Boot Options Boot Sequence 1st [Floppy Disk] 2nd [ Hard Disk ] 3rd [ CD-ROM ] First Hard...

Aspire 7100 Service Guide
Page 40
...the test routine. Chapter 2 33 The default setting is Enabled. Configuration Table This parameter allows you see the system initialization details on the screen. Select Disabled to return to the text mode. If any error occurred while booting, the system automatically switches to the normal booting process.... Then, the screen displays the operating system prompt (as in DOS) or logo (as in graphical mode and displays only an identification logo during POST. ...
...the test routine. Chapter 2 33 The default setting is Enabled. Configuration Table This parameter allows you see the system initialization details on the screen. Select Disabled to return to the text mode. If any error occurred while booting, the system automatically switches to the normal booting process.... Then, the screen displays the operating system prompt (as in DOS) or logo (as in graphical mode and displays only an identification logo during POST. ...

Aspire 7100 Service Guide
Page 41
... the items on the Date parameter and press or to set the time following the weekday-month-day-year format. Date and Time The following screen appears if you select the Date and Time option from the main menu: Date and Time Date Sun July 05, 1998] Time 22:33:42...
... the items on the Date parameter and press or to set the time following the weekday-month-day-year format. Date and Time The following screen appears if you select the Date and Time option from the main menu: Date and Time Date Sun July 05, 1998] Time 22:33:42...

Aspire 7100 Service Guide
Page 42
... and its data. System Security The Setup program has a number of security features to prevent unauthorized access to On (bypass password). Chapter 2 35 The following screen appears if you select System Security from the main menu: System Security Setup Password None ] Power-on Password None ] Operation Mode Normal ] Disk Drive Control...
... and its data. System Security The Setup program has a number of security features to prevent unauthorized access to On (bypass password). Chapter 2 35 The following screen appears if you select System Security from the main menu: System Security Setup Password None ] Power-on Password None ] Operation Mode Normal ] Disk Drive Control...

Aspire 7100 Service Guide
Page 43
... the BIOS utility, you must key-in your setup password, do not appear on the screen. 5. The Enter your password because the characters do the following screen appears: Setup Password or . Press to return to the System Security screen. 8. Set switch 5 of up to save the changes and reboot the system. 11. Enter...
... the BIOS utility, you must key-in your setup password, do not appear on the screen. 5. The Enter your password because the characters do the following screen appears: Setup Password or . Press to return to the System Security screen. 8. Set switch 5 of up to save the changes and reboot the system. 11. Enter...

Aspire 7100 Service Guide
Page 44
... Password menu appears. 3. A dialog box appears asking if you to type in a password. Chapter 2 37 Enter a new password. 5. Follow these steps to the System Security screen. 6. This time, the system does not require you want to bypass the password function. 3. From the Setup Password menu, highlight the Set or Change Password...
... Password menu appears. 3. A dialog box appears asking if you to type in a password. Chapter 2 37 Enter a new password. 5. Follow these steps to the System Security screen. 6. This time, the system does not require you want to bypass the password function. 3. From the Setup Password menu, highlight the Set or Change Password...

Aspire 7100 Service Guide
Page 46
... avoid damaging the system. Advanced Options NOTE The Advanced Options selection is available only in main menu screen, the Advanced Options menu will show Memory/Cache Options and PnP/PCI Options items. The following screen shows the Advanced Options parameters: Advanced Options • Memory/Cache Options • PnP/PCI Options • Chipset...
... avoid damaging the system. Advanced Options NOTE The Advanced Options selection is available only in main menu screen, the Advanced Options menu will show Memory/Cache Options and PnP/PCI Options items. The following screen shows the Advanced Options parameters: Advanced Options • Memory/Cache Options • PnP/PCI Options • Chipset...

Aspire 7100 Service Guide
Page 47
... the cache but not the memory when there is Enabled. Memory/Cache Options Selecting Memory/Cache Options from the Advanced Options menu displays the following screen: Memory/Cache Options Internal Cache (CPU Cache) -------- [Enabled ] External Cache Enabled ] Cache Scheme Write-back Memory at 15MB-16MB Reserved For To prevent memory address...
... the cache but not the memory when there is Enabled. Memory/Cache Options Selecting Memory/Cache Options from the Advanced Options menu displays the following screen: Memory/Cache Options Internal Cache (CPU Cache) -------- [Enabled ] External Cache Enabled ] Cache Scheme Write-back Memory at 15MB-16MB Reserved For To prevent memory address...

