Aspire 7100 Service Guide
Page 36
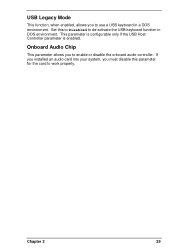
If you installed an audio card into your system, you must disable this to Disabled to work properly. Set this parameter for the card to de-activate the USB keyboard function in a DOS environment. This parameter is configurable only if the USB Host Controller parameter is enabled. Onboard Audio Chip This parameter allows you to use a USB keyboard in DOS environment. Chapter 2 29 USB Legacy Mode This function, when enabled, allows you to enable or disable the onboard audio controller.
If you installed an audio card into your system, you must disable this to Disabled to work properly. Set this parameter for the card to de-activate the USB keyboard function in a DOS environment. This parameter is configurable only if the USB Host Controller parameter is enabled. Onboard Audio Chip This parameter allows you to use a USB keyboard in DOS environment. Chapter 2 29 USB Legacy Mode This function, when enabled, allows you to enable or disable the onboard audio controller.
Aspire 7100 Service Guide
Page 37
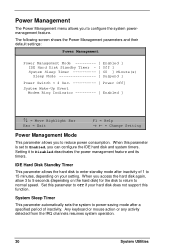
... the hard disk) for the disk to return to Off if your setting. The following screen shows the Power Management parameters and their default settings: Power Management Power Management Mode Enabled ] IDE Hard Disk Standby Timer - [ Off ] System Sleep Timer 60 ] Minute(s) Sleep Mode Suspend ] Power Switch < 4 Sec Power Off] System Wake-Up Event Modem Ring Indicator Enabled ] ↑↓ = Move Highlight Bar Esc = Exit F1 = Help → ← = Change Setting Power Management Mode This parameter allows you to configure the...
... the hard disk) for the disk to return to Off if your setting. The following screen shows the Power Management parameters and their default settings: Power Management Power Management Mode Enabled ] IDE Hard Disk Standby Timer - [ Off ] System Sleep Timer 60 ] Minute(s) Sleep Mode Suspend ] Power Switch < 4 Sec Power Off] System Wake-Up Event Modem Ring Indicator Enabled ] ↑↓ = Move Highlight Bar Esc = Exit F1 = Help → ← = Change Setting Power Management Mode This parameter allows you to configure the...

Aspire 7100 Service Guide
Page 43
... password then press . 6. After setting the password, highlight the Set or Change Password option. 7. Press to return to exit the BIOS utility. A dialog box will appear asking if you must key-in your password because the characters do the following screen appears: Setup Password or . After rebooting, turn off the system then open the housing. 12. Enter the BIOS utility and select System Security. 36 System Utilities 3. Press to the main menu. 9. Set switch...
... password then press . 6. After setting the password, highlight the Set or Change Password option. 7. Press to return to exit the BIOS utility. A dialog box will appear asking if you must key-in your password because the characters do the following screen appears: Setup Password or . After rebooting, turn off the system then open the housing. 12. Enter the BIOS utility and select System Security. 36 System Utilities 3. Press to the main menu. 9. Set switch...

Aspire 7100 Service Guide
Page 49
...; ← = Change Setting, PCI IRQ Setting Select Auto to let BIOS automatically configure the plug-and-play (PnP) devices installed in your manual for technical information about the PCI card. PCI Slots When you to assign the same IRQ to two different devices. PnP/PCI Options The PnP/PCI Options allows you want to assign for each of the PCI devices. To disable the feature...
...; ← = Change Setting, PCI IRQ Setting Select Auto to let BIOS automatically configure the plug-and-play (PnP) devices installed in your manual for technical information about the PCI card. PCI Slots When you to assign the same IRQ to two different devices. PnP/PCI Options The PnP/PCI Options allows you want to assign for each of the PCI devices. To disable the feature...

Aspire 7100 Service Guide
Page 73
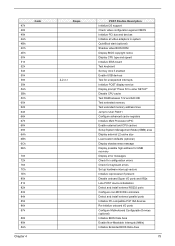
... the Aspire 7100. If POST discovers errors in numeric coprocessor and cache memory subsystem u Direct memory access (DMA) controller (8237 module) u Interrupt system (8259 module) u Three programmable timers (system timer and 8254 module) u ROM subsystem u RAM subsystem u RTC RAM subsystem and real time clock/calendar with battery backup u Onboard serial interface controller u Onboard parallel interface controller u Embedded hard disk interface and one diskette drive interface u Keyboard and auxiliary device controllers u I/O ports u PS/2-compatible mouse port u PS/2-compatible keyboard port...
... the Aspire 7100. If POST discovers errors in numeric coprocessor and cache memory subsystem u Direct memory access (DMA) controller (8237 module) u Interrupt system (8259 module) u Three programmable timers (system timer and 8254 module) u ROM subsystem u RAM subsystem u RTC RAM subsystem and real time clock/calendar with battery backup u Onboard serial interface controller u Onboard parallel interface controller u Embedded hard disk interface and one diskette drive interface u Keyboard and auxiliary device controllers u I/O ports u PS/2-compatible mouse port u PS/2-compatible keyboard port...
Aspire 7100 Service Guide
Page 76
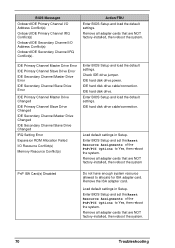
... adapter card. Load default settings in Setup. Load default settings in Setup. IDE hard disk drive power. IDE hard disk drive cable/connection. Enter BIOS Setup and set the Reset Resource Assignments of the PnP/PCI Options to Yes, then reboot the system. Remove all adapter cards that are NOT factory-installed, then reboot the system. IDE Primary Channel Master Drive Error IDE Primary Channel Slave Drive Error IDE Secondary Channel Master Drive Error IDE Secondary Channel Slave Drive Error IDE Primary Channel Master Drive Changed IDE Primary Channel Slave Drive Changed...
... adapter card. Load default settings in Setup. Load default settings in Setup. IDE hard disk drive power. IDE hard disk drive cable/connection. Enter BIOS Setup and set the Reset Resource Assignments of the PnP/PCI Options to Yes, then reboot the system. Remove all adapter cards that are NOT factory-installed, then reboot the system. IDE Primary Channel Master Drive Error IDE Primary Channel Slave Drive Error IDE Secondary Channel Master Drive Error IDE Secondary Channel Slave Drive Error IDE Primary Channel Master Drive Changed IDE Primary Channel Slave Drive Changed...
Aspire 7100 Service Guide
Page 79
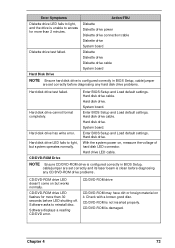
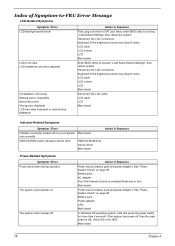
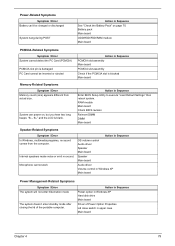
...of but works normally. Diskette Diskette drive power Diskette drive connection/cable Diskette drive System board Diskette drive test failed. CD/DVD-ROM drive CD/DVD-ROM may have dirt or foreign material on but system operates normally. Hard disk drive has write error. hard disk LED connector. CD/DVD-ROM Drive NOTE Ensure CD/DVD-ROM drive is configured correctly in BIOS Setup, cable/jumper are set correctly before diagnosing any CD/DVD-ROM drive problems. CD/DVD-ROM drive LED doesn't come on it. Software displays a reading CD/DVD error. Enter BIOS Setup and Load...
...of but works normally. Diskette Diskette drive power Diskette drive connection/cable Diskette drive System board Diskette drive test failed. CD/DVD-ROM drive CD/DVD-ROM may have dirt or foreign material on but system operates normally. Hard disk drive has write error. hard disk LED connector. CD/DVD-ROM Drive NOTE Ensure CD/DVD-ROM drive is configured correctly in BIOS Setup, cable/jumper are set correctly before diagnosing any CD/DVD-ROM drive problems. CD/DVD-ROM drive LED doesn't come on it. Software displays a reading CD/DVD error. Enter BIOS Setup and Load...

Aspire 7100 Service Guide
Page 80
... board Speaker power/connection/cable. Ensure the headphone jack of BIOS Setup is set to unload the disk. Modem Modem ring cannot wake up the sound volume. CD/DVD-ROM drive power. CD/DVD-ROM drive. Ensure the modem card is used , ensure the modem ring-in cable from suspend mode. CD/DVD-ROM drive. Error Symptoms CD/DVD-ROM drive cannot load or eject when the system is turned on it. Turn up system from the modem card to system board is configured...
... board Speaker power/connection/cable. Ensure the headphone jack of BIOS Setup is set to unload the disk. Modem Modem ring cannot wake up the sound volume. CD/DVD-ROM drive power. CD/DVD-ROM drive. Ensure the modem card is used , ensure the modem ring-in cable from suspend mode. CD/DVD-ROM drive. Error Symptoms CD/DVD-ROM drive cannot load or eject when the system is turned on it. Turn up system from the modem card to system board is configured...
Aspire 7100 Service Guide
Page 81
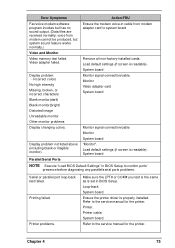
voice from modem adapter card to system board Video and Monitor Video memory test failed. Load default settings (if screen is set in BIOS Setup. Monitor signal connection/cable Monitor System board Display problem not listed above (including blank or illegible monitor). System board. Printer cable. Remove all non-factory-installed cards. System board Parallel/Serial Ports NOTE Execute "Load BIOS Default Settings" in cable from modem cannot be produced, but has no sound output. (Data files are received normally; Printer problems. Make sure the LPT# or COM# you...
voice from modem adapter card to system board Video and Monitor Video memory test failed. Load default settings (if screen is set in BIOS Setup. Monitor signal connection/cable Monitor System board Display problem not listed above (including blank or illegible monitor). System board. Printer cable. Remove all non-factory-installed cards. System board Parallel/Serial Ports NOTE Execute "Load BIOS Default Settings" in cable from modem cannot be produced, but has no sound output. (Data files are received normally; Printer problems. Make sure the LPT# or COM# you...
Aspire 7100/9400 and TravelMate 5100/5600 Service Guide
Page 6
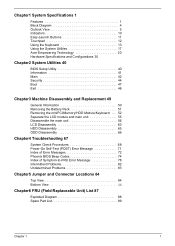
Chapter1 System Specifications 1 Features 1 Block Diagram 4 Outlook View 5 Indicators 10 Easy-Launch Buttons 11 Touchpad 12 Using the Keyboard 13 Using the System Utilities 17 Acer Empowering Technology 20 Hardware Specifications and Configurations 30 Chapter2 System Utilities 40 BIOS Setup Utility 40 Information 41 Main 42 Security 44 Boot 47 Exit 48 Chapter3 Machine Disassembly and Replacement 49 General Information 50 Removing the Battery Pack 51 Removing the miniPCI/Memory/HDD Module/Keyboard . . . 52 Seperate the LCD module and main...
Chapter1 System Specifications 1 Features 1 Block Diagram 4 Outlook View 5 Indicators 10 Easy-Launch Buttons 11 Touchpad 12 Using the Keyboard 13 Using the System Utilities 17 Acer Empowering Technology 20 Hardware Specifications and Configurations 30 Chapter2 System Utilities 40 BIOS Setup Utility 40 Information 41 Main 42 Security 44 Boot 47 Exit 48 Chapter3 Machine Disassembly and Replacement 49 General Information 50 Removing the Battery Pack 51 Removing the miniPCI/Memory/HDD Module/Keyboard . . . 52 Seperate the LCD module and main...
Aspire 7100/9400 and TravelMate 5100/5600 Service Guide
Page 33
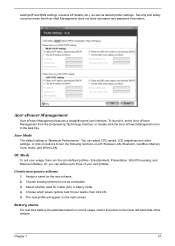
... /off: Wireless LAN, Bluetooth, CardBus, Memory Card, Audio, and Wired LAN. Create new power scheme 1. Battery status For real-time battery life estimates based on current usage, referto the panel on buttons to three of the window. Choose which power options best fit your usage, there are four pre-defined profiles - Acer Mode The default setting is "Maximum Performance." Select whether used for the new scheme. 2. Or, you can adjust CPU speed, LCD brightness and other settings, or...
... /off: Wireless LAN, Bluetooth, CardBus, Memory Card, Audio, and Wired LAN. Create new power scheme 1. Battery status For real-time battery life estimates based on current usage, referto the panel on buttons to three of the window. Choose which power options best fit your usage, there are four pre-defined profiles - Acer Mode The default setting is "Maximum Performance." Select whether used for the new scheme. 2. Or, you can adjust CPU speed, LCD brightness and other settings, or...

Aspire 7100/9400 and TravelMate 5100/5600 Service Guide
Page 54
... unauthorized use. Parameter Exit Saving Changes Exit Discarding Changes Load Setup Default Discard Changes Save Changes Description Exit System Setup and save your changes to CMOS Chapter 2 48 F1 Help Esc Exit ↑ ↓ Select Item ← → Select Menu F5/F6 Change Values Enter Select 4 Sub-Menu F9 Setup Defaults F10 Save and Exit The table below describes the parameters in this screen. Main PhoenixBIOS Setup Utility Security Boot...
... unauthorized use. Parameter Exit Saving Changes Exit Discarding Changes Load Setup Default Discard Changes Save Changes Description Exit System Setup and save your changes to CMOS Chapter 2 48 F1 Help Esc Exit ↑ ↓ Select Item ← → Select Menu F5/F6 Change Values Enter Select 4 Sub-Menu F9 Setup Defaults F10 Save and Exit The table below describes the parameters in this screen. Main PhoenixBIOS Setup Utility Security Boot...
Aspire 7100/9400 and TravelMate 5100/5600 Service Guide
Page 82
... QuietBoot start (optional) Shadow video BIOS ROM Display BIOS copyright notice Display CPU type and speed Initialize EISA board Test keyboard Set key click if enabled Enable USB devices Test for unexpected interrupts Initialize POST display service Display prompt "Press F2 to enter SETUP" Disable CPU cache Test RAM between 512 and 640 KB Test extended memory Test extended memory address lines Jump to User Patch1 Configure advanced cache registers Initialize Multi Processor APIC Enable external and CPU caches Setup System Management Mode (SMM) area Display external L2...
... QuietBoot start (optional) Shadow video BIOS ROM Display BIOS copyright notice Display CPU type and speed Initialize EISA board Test keyboard Set key click if enabled Enable USB devices Test for unexpected interrupts Initialize POST display service Display prompt "Press F2 to enter SETUP" Disable CPU cache Test RAM between 512 and 640 KB Test extended memory Test extended memory address lines Jump to User Patch1 Configure advanced cache registers Initialize Multi Processor APIC Enable external and CPU caches Setup System Management Mode (SMM) area Display external L2...
Aspire 7100/9400 and TravelMate 5100/5600 Service Guide
Page 85
... runs correctly HDD/CD-ROM active indicators cannot work HDD/CD-ROM drive Device driver Main board Action in Sequence Power-Related Symptoms Symptom / Error Power shuts down during operation The system cannot power-on. See "Power System Check" on page 69. Keyboard (if the brightness function key doesn't work ). Action in the HDD. Next, enter BIOS utility to execute "Load Setup Default Settings", then reboot system. Main board Power source (battery pack and power adapter). Main board 78 Chapter 4 Keyboard (if the brightness function key doesn't work ). See "Power System Check...
... runs correctly HDD/CD-ROM active indicators cannot work HDD/CD-ROM drive Device driver Main board Action in Sequence Power-Related Symptoms Symptom / Error Power shuts down during operation The system cannot power-on. See "Power System Check" on page 69. Keyboard (if the brightness function key doesn't work ). Action in the HDD. Next, enter BIOS utility to execute "Load Setup Default Settings", then reboot system. Main board Power source (battery pack and power adapter). Main board 78 Chapter 4 Keyboard (if the brightness function key doesn't work ). See "Power System Check...
Aspire 7100/9400 and TravelMate 5100/5600 Service Guide
Page 86
... Sequence Enter BIOS Setup Utility to execute "Load Default Settings" then reboot system. Microphone cannot work Action in Sequence OS volume control Audio driver Speaker Main board Speaker Main board Audio driver Volume control in Windows XP Main board Power Management-Related Symptoms Symptom / Error The system will not enter hibernation mode The system doesn't enter standby mode after closing the lid of Power Option Properties Lid close switch in upper case Main board Chapter 4 79 Action in Sequence Power option in Windows XP Hard disk drive Main board Driver...
... Sequence Enter BIOS Setup Utility to execute "Load Default Settings" then reboot system. Microphone cannot work Action in Sequence OS volume control Audio driver Speaker Main board Speaker Main board Audio driver Volume control in Windows XP Main board Power Management-Related Symptoms Symptom / Error The system will not enter hibernation mode The system doesn't enter standby mode after closing the lid of Power Option Properties Lid close switch in upper case Main board Chapter 4 79 Action in Sequence Power option in Windows XP Hard disk drive Main board Driver...
User's Guide - EN
Page 4
... for the location of the power button. For instructions on how to use your mobile computing needs. Your guides To help you to be more productive, please refer to the AcerSystem User's Guide. Note: Viewing the file requires Adobe Reader. Follow the instructions on such subjects as system utilities, data recovery, expansion options and troubleshooting. This guide contains detailed information on the screen to complete the installation. iv...
... for the location of the power button. For instructions on how to use your mobile computing needs. Your guides To help you to be more productive, please refer to the AcerSystem User's Guide. Note: Viewing the file requires Adobe Reader. Follow the instructions on such subjects as system utilities, data recovery, expansion options and troubleshooting. This guide contains detailed information on the screen to complete the installation. iv...

User's Guide - EN
Page 9
...51 Using passwords 51 Entering passwords 52 Setting passwords 52 Expanding through options 53 Connectivity options 53 Fax/data modem 53 Built-in network feature 54 Universal Serial Bus (USB) 54 PC Card slot 55 Installing memory 56 BIOS utility 56 Boot sequence 56 Enable disk-to-disk recovery 57 Password 57 Using software 57 Playing DVD movies 57 Power management 58 Acer eRecovery Management 58 Create backup 59 Restore from backup 59 Create factory default image CD 60 Re-install bundled software without CD 60 Change password 61 Troubleshooting 62
...51 Using passwords 51 Entering passwords 52 Setting passwords 52 Expanding through options 53 Connectivity options 53 Fax/data modem 53 Built-in network feature 54 Universal Serial Bus (USB) 54 PC Card slot 55 Installing memory 56 BIOS utility 56 Boot sequence 56 Enable disk-to-disk recovery 57 Password 57 Using software 57 Playing DVD movies 57 Power management 58 Acer eRecovery Management 58 Create backup 59 Restore from backup 59 Create factory default image CD 60 Re-install bundled software without CD 60 Change password 61 Troubleshooting 62
User's Guide - EN
Page 18
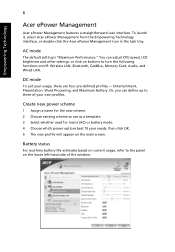
... window. AC mode The default setting is "Maximum Performance." Entertainment, Presentation, Word Processing, and Maximum Battery. Empowering Technology 8 Acer ePower Management Acer ePower Management features a straightforward user interface. Create new power scheme 1 Assign a name for mains (AC) or battery mode. 4 Choose which power options best fit your needs, then click OK. 5 The new profile will appear on the main screen. Or, you can adjust CPU speed, LCD brightness and other settings, or click on buttons to use...
... window. AC mode The default setting is "Maximum Performance." Entertainment, Presentation, Word Processing, and Maximum Battery. Empowering Technology 8 Acer ePower Management Acer ePower Management features a straightforward user interface. Create new power scheme 1 Assign a name for mains (AC) or battery mode. 4 Choose which power options best fit your needs, then click OK. 5 The new profile will appear on the main screen. Or, you can adjust CPU speed, LCD brightness and other settings, or click on buttons to use...
User's Guide - EN
Page 25
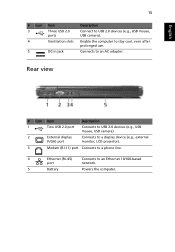
... Description 1 Two USB 2.0 port Connects to USB 2.0 devices (e.g., USB mouse, USB camera). 2 External display Connects to a display device (e.g., external (VGA) port monitor, LCD projector). 3 Modem (RJ-11) port Connects to a phone line. 4 Ethernet (RJ-45) Connects to stay cool, even after prolonged use. Enable the computer to an Ethernet 10/100-based port network. 5 Battery Powers the computer. Connects to USB 2.0 devices (e.g., USB mouse, USB camera). English 15 # Icon Item 3 Three USB 2.0 ports 4 Ventilation slots 5 DC-in jack Description Connect to an AC...
... Description 1 Two USB 2.0 port Connects to USB 2.0 devices (e.g., USB mouse, USB camera). 2 External display Connects to a display device (e.g., external (VGA) port monitor, LCD projector). 3 Modem (RJ-11) port Connects to a phone line. 4 Ethernet (RJ-45) Connects to stay cool, even after prolonged use. Enable the computer to an Ethernet 10/100-based port network. 5 Battery Powers the computer. Connects to USB 2.0 devices (e.g., USB mouse, USB camera). English 15 # Icon Item 3 Three USB 2.0 ports 4 Ventilation slots 5 DC-in jack Description Connect to an AC...
User's Guide - EN
Page 44
... during the use of your Windows desktop and select Properties to resume. Look at the power indicator: • If it with a system disk and press + + to save power. The computer's power management system automatically blanks the screen to restart the system. I turned on the Settings tab to make sure that may be set to an external monitor. Remove or replace it is not lit, no power is not...
... during the use of your Windows desktop and select Properties to resume. Look at the power indicator: • If it with a system disk and press + + to save power. The computer's power management system automatically blanks the screen to restart the system. I turned on the Settings tab to make sure that may be set to an external monitor. Remove or replace it is not lit, no power is not...


