Aspire 6530/6530G Quick Guide
Page 7
... 12 Lock Keys and embedded numeric keypad 12 Windows Keys 13 Hot Keys 14 Special Key 15 Using the System Utilities 16 Acer GridVista (dual-display compatible 16 Hardware Specifications and Configurations 18 System Utilities 27 BIOS Setup Utility 27 Navigating the BIOS Utility 27...Modules 48 Removing the VGA Module 49 Removing the TV Tuner Module 50 Removing the Main Hard Disk Drive Module 53 Removing the Optical Disk Drive Module 55 Removing the Secondary Hard Disk Drive Module 57 Main Unit Disassembly Process 59 Main Unit Disassembly Flowchart 59 Removing the Switch Cover...
... 12 Lock Keys and embedded numeric keypad 12 Windows Keys 13 Hot Keys 14 Special Key 15 Using the System Utilities 16 Acer GridVista (dual-display compatible 16 Hardware Specifications and Configurations 18 System Utilities 27 BIOS Setup Utility 27 Navigating the BIOS Utility 27...Modules 48 Removing the VGA Module 49 Removing the TV Tuner Module 50 Removing the Main Hard Disk Drive Module 53 Removing the Optical Disk Drive Module 55 Removing the Secondary Hard Disk Drive Module 57 Main Unit Disassembly Process 59 Main Unit Disassembly Flowchart 59 Removing the Switch Cover...

Aspire 6530/6530G Quick Guide
Page 8
... Module 107 Replacing the Keyboard 107 Replacing the Power Board 108 Replacing the Switch Cover 109 Replacing the Second Hard Disk Drive Module 111 Replacing the ODD Module 111 Replacing the Main Hard Disk Drive Module 112 Replacing the WLAN Module 113 Replacing the TV Tuner Module 114 Replacing the VGA Module 114 Replacing...
... Module 107 Replacing the Keyboard 107 Replacing the Power Board 108 Replacing the Switch Cover 109 Replacing the Second Hard Disk Drive Module 111 Replacing the ODD Module 111 Replacing the Main Hard Disk Drive Module 112 Replacing the WLAN Module 113 Replacing the TV Tuner Module 114 Replacing the VGA Module 114 Replacing...
Aspire 6530/6530G Quick Guide
Page 12
Storage subsystem • 2.5" hard disk drive • Optical drive options: • Blu-ray Disc™ /DVD-Super Multi double-layer drive* • DVD-Super Multi double-layer drive* • 5-in-1 card reader Audio • Dolby®-certified surround sound...lbs.) with two built-in stereo microphones MS-Sound compatible Communication • Acer Video Conference, featuring: • Integrated Acer Crystal Eye webcam* • Acer PureZone technology* • Optional Acer Xpress VoIP phone* • WLAN: Acer InviLink™ Nplify™ 802.11b/g/Draft-N* • WPAN: Bluetooth...
Storage subsystem • 2.5" hard disk drive • Optical drive options: • Blu-ray Disc™ /DVD-Super Multi double-layer drive* • DVD-Super Multi double-layer drive* • 5-in-1 card reader Audio • Dolby®-certified surround sound...lbs.) with two built-in stereo microphones MS-Sound compatible Communication • Acer Video Conference, featuring: • Integrated Acer Crystal Eye webcam* • Acer PureZone technology* • Optional Acer Xpress VoIP phone* • WLAN: Acer InviLink™ Nplify™ 802.11b/g/Draft-N* • WPAN: Bluetooth...
Aspire 6530/6530G Quick Guide
Page 20
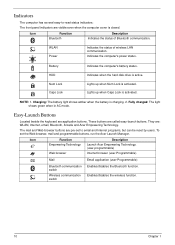
... when the battery is active. Indicates the computer's power status. Icon Function Empowering Technology Web browser Description Launch Acer Empowering Technology. (user-programmable) Internet browser (user-Programmable) Mail Email application (user-Programmable) Bluetooth communication switch ...Wireless communication switch Enables/disables the Bluetooth function. Indicates when the hard disk drive is charging. 2. Battery HDD Num Lock Caps Lock Indicates the computer's battery status. Lights up when Caps...
... when the battery is active. Indicates the computer's power status. Icon Function Empowering Technology Web browser Description Launch Acer Empowering Technology. (user-programmable) Internet browser (user-Programmable) Mail Email application (user-Programmable) Bluetooth communication switch ...Wireless communication switch Enables/disables the Bluetooth function. Indicates when the hard disk drive is charging. 2. Battery HDD Num Lock Caps Lock Indicates the computer's battery status. Lights up when Caps...
Aspire 6530/6530G Quick Guide
Page 30
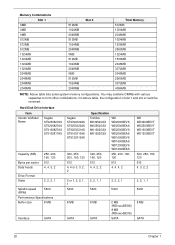
Hard Disk Drive Interface Item Vendor & Model Name Segate ST9250827AS ST9200827AS ST9160827AS ST9120817AS Capacity (MB) Bytes per sector Data heads 250, 200, 160, 120 512 4, 4, 3, 2 Drive Format Disks 2, 2, 2, 1 Spindle speed (RPM) 5400 Performance Specifications Buffer size 8 MB Interface SATA Segate ST9320320AS ST9250320AS ST9200321AS ST9160310AS ST9120310AS 320, 250, 200, 160, 120 512 4, 4 ...
Hard Disk Drive Interface Item Vendor & Model Name Segate ST9250827AS ST9200827AS ST9160827AS ST9120817AS Capacity (MB) Bytes per sector Data heads 250, 200, 160, 120 512 4, 4, 3, 2 Drive Format Disks 2, 2, 2, 1 Spindle speed (RPM) 5400 Performance Specifications Buffer size 8 MB Interface SATA Segate ST9320320AS ST9250320AS ST9200321AS ST9160310AS ST9120310AS 320, 250, 200, 160, 120 512 4, 4 ...
Aspire 6530/6530G Quick Guide
Page 43
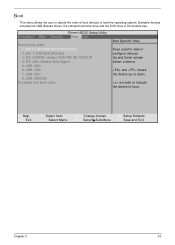
... a device. Boot This menu allows the user to decide the order of boot devices to load the operating system. Bootable devices includes the USB diskette drives, the onboard hard disk drive and the DVD drive in the module bay.
... a device. Boot This menu allows the user to decide the order of boot devices to load the operating system. Bootable devices includes the USB diskette drives, the onboard hard disk drive and the DVD drive in the module bay.

Aspire 6530/6530G Quick Guide
Page 63
See "Removing the Battery Pack" on page 47. 3. Step HDD Carrier Size M3*0.5+3.5I Quantity 4 Screw Type Chapter 3 53 Remove the Lower Cover. NOTE: To prevent damage to remove. Pull the HDD up as shown to HDD, avoid pressing down on it or placing heavy objects on top of it. 4. Remove the four screws securing the HDD to the carrier. See "Removing the Lower Covers" on page 44. 2. Hold the Pull Tab and slide the HDD away from the connector. Removing the Main Hard Disk Drive Module 1.
See "Removing the Battery Pack" on page 47. 3. Step HDD Carrier Size M3*0.5+3.5I Quantity 4 Screw Type Chapter 3 53 Remove the Lower Cover. NOTE: To prevent damage to remove. Pull the HDD up as shown to HDD, avoid pressing down on it or placing heavy objects on top of it. 4. Remove the four screws securing the HDD to the carrier. See "Removing the Lower Covers" on page 44. 2. Hold the Pull Tab and slide the HDD away from the connector. Removing the Main Hard Disk Drive Module 1.

Aspire 6530/6530G Quick Guide
Page 67
See "Removing the Lower Covers" on page 44. 2. Grasp the Pull Tab and pull the HDD out of the bay as shown. Removing the Secondary Hard Disk Drive Module 1. See "Removing the Battery Pack" on page 47. 3. Remove the two securing screws from the HDD. Remove the HDD2 Cover. Step HDD2 Carrier Size M2.0*3.0-I (BKAG) (NYLOK) IRON Quantity 2 4. Screw Type Chapter 3 57 Remove the Battery.
See "Removing the Lower Covers" on page 44. 2. Grasp the Pull Tab and pull the HDD out of the bay as shown. Removing the Secondary Hard Disk Drive Module 1. See "Removing the Battery Pack" on page 47. 3. Remove the two securing screws from the HDD. Remove the HDD2 Cover. Step HDD2 Carrier Size M2.0*3.0-I (BKAG) (NYLOK) IRON Quantity 2 4. Screw Type Chapter 3 57 Remove the Battery.

Aspire 6530/6530G Quick Guide
Page 121
Replace the four screws to connect 4. Replace the two securing screws as shown. With the ODD tray in the HDD carrier. 2. Replace the HDD and slide to the right to secure the carrier. 3. ODD cover on the ODD Module. the HDD interface. Turn the ODD over and replace the ODD bracket. Place the HDD in the eject position, replace the 2. Replacing the ODD Module 1. Chapter 3 111 Replacing the Second Hard Disk Drive Module 1.
Replace the four screws to connect 4. Replace the two securing screws as shown. With the ODD tray in the HDD carrier. 2. Replace the HDD and slide to the right to secure the carrier. 3. ODD cover on the ODD Module. the HDD interface. Turn the ODD over and replace the ODD bracket. Place the HDD in the eject position, replace the 2. Replacing the ODD Module 1. Chapter 3 111 Replacing the Second Hard Disk Drive Module 1.

Aspire 6530/6530G Quick Guide
Page 122
Replacing the Main Hard Disk Drive Module 1. Replace the HDD connector. 2. Replace the four screws to connect the HDD interface. 112 Chapter 3 Push down to secure the carrier. 4. Slide the module in the HDD carrier. 3. module is flush with the chassis. Place the HDD in to the chassis and press until 4. Replace the single securing screw as shown. Insert the back first and angle the HDD in place. 3.
Replacing the Main Hard Disk Drive Module 1. Replace the HDD connector. 2. Replace the four screws to connect the HDD interface. 112 Chapter 3 Push down to secure the carrier. 4. Slide the module in the HDD carrier. 3. module is flush with the chassis. Place the HDD in to the chassis and press until 4. Replace the single securing screw as shown. Insert the back first and angle the HDD in place. 3.
Aspire 6530/6530G Quick Guide
Page 140
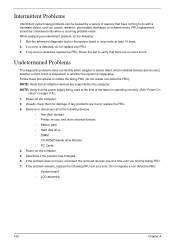
... following: 1. Power-off the computer. 2. If the problem remains, replace the following devices: • Non-Acer devices • Printer, mouse, and other external devices • Battery pack • Hard disk drive • DIMM • CD-ROM/Diskette drive Module • PC Cards 4. Power-on page 118.): 1. Undetermined Problems The diagnostic problems does not identify...
... following: 1. Power-off the computer. 2. If the problem remains, replace the following devices: • Non-Acer devices • Printer, mouse, and other external devices • Battery pack • Hard disk drive • DIMM • CD-ROM/Diskette drive Module • PC Cards 4. Power-on page 118.): 1. Undetermined Problems The diagnostic problems does not identify...

Aspire 6530/6530G Quick Guide
Page 143
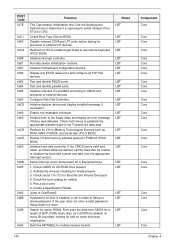
... Multi Processor table Search for option ROMs. One long, two short beeps on checksum failure Check for SMART Drive (optional) Shadow option ROMs Set up Power Management Initialize security engine (optional) Enable hardware interrupts Determine number of ATA and SCSI...(NMIs) Initialize Extended BIOS Data Area Test and initialize PS/2 mouse Initialize floppy controller Determine number of ATA drives (optional) Initialize hard-disk controllers Initialize local-bus hard-disk controllers Jump to boot with INT 19 Initialize POST Error Manager (PEM) Initialize error logging Initialize error display...
... Multi Processor table Search for option ROMs. One long, two short beeps on checksum failure Check for SMART Drive (optional) Shadow option ROMs Set up Power Management Initialize security engine (optional) Enable hardware interrupts Determine number of ATA and SCSI...(NMIs) Initialize Extended BIOS Data Area Test and initialize PS/2 mouse Initialize floppy controller Determine number of ATA drives (optional) Initialize hard-disk controllers Initialize local-bus hard-disk controllers Jump to boot with INT 19 Initialize POST Error Manager (PEM) Initialize error logging Initialize error display...
Aspire 6530/6530G Quick Guide
Page 152
...message if failure was detected. Configure Fisk Disk Controller. Check CMOS for Boot Record Volume Descriptor 4. Check sector 11h (17) for CD-ROM drive present 2. Search for option ROMs. Rom scan the area from C800h for a length of BCP_ROM_Scan_Size (or to check password. Remap I /O... in CR0. Pick a boot entry 6. Redirect Int 15h to enable target board to UserPatch2. Initialize hard-disk controller. Build the MPTABLE for PCMCIA (PICO BIOS). Initialize both drives to Memory Technologies Devices such as ROM, RAM, PCMCIA, and serial disk (PICO BIOS). Check the...
...message if failure was detected. Configure Fisk Disk Controller. Check CMOS for Boot Record Volume Descriptor 4. Check sector 11h (17) for CD-ROM drive present 2. Search for option ROMs. Rom scan the area from C800h for a length of BCP_ROM_Scan_Size (or to check password. Remap I /O... in CR0. Pick a boot entry 6. Redirect Int 15h to enable target board to UserPatch2. Initialize hard-disk controller. Build the MPTABLE for PCMCIA (PICO BIOS). Initialize both drives to Memory Technologies Devices such as ROM, RAM, PCMCIA, and serial disk (PICO BIOS). Check the...

Aspire 6530/6530G Quick Guide
Page 219
... Stick Duo Adaptor OLYMPUS XD Picture Card 2G OLYMPUS XD Picture Card 1G Fujifilm XD Picture Card 512MB UNIQUE UA351-CB USB2.0/1394 HDD Clearlight 2.5" Hard Drive Enclosure (40G)(QSMC) 1394 Peer To Peer Cable Creative Inspire 5.1 digital 5600 Edifier Speaker iRiver headphone Philips Headphone Creative Inspire 5.1 digital 5600 Cable Docking Appendix...
... Stick Duo Adaptor OLYMPUS XD Picture Card 2G OLYMPUS XD Picture Card 1G Fujifilm XD Picture Card 512MB UNIQUE UA351-CB USB2.0/1394 HDD Clearlight 2.5" Hard Drive Enclosure (40G)(QSMC) 1394 Peer To Peer Cable Creative Inspire 5.1 digital 5600 Edifier Speaker iRiver headphone Philips Headphone Creative Inspire 5.1 digital 5600 Cable Docking Appendix...


