

Acer Aspire 6530 Notebook Series Start Guide
Page 3
The Quick Guide introduces you for making an Acer notebook your choice for your computer, clicking on your computer. Follow the instructions on the screen to the basic features and functions of your mobile computing needs. Your guides To help you purchased. The Aspire Series Generic User Guide contains useful information applying to thank...
The Quick Guide introduces you for making an Acer notebook your choice for your computer, clicking on your computer. Follow the instructions on the screen to the basic features and functions of your mobile computing needs. Your guides To help you purchased. The Aspire Series Generic User Guide contains useful information applying to thank...

Acer Aspire 6530 Notebook Series Start Guide
Page 5
... and components. Protection fingerprint reader supporting Acer FingerNav 4-way control function (only for certain models). 9 Touchpad Touch-sensitive pointing device which functions like center* and right) the left and right buttons function like a computer mouse. 10 VOL+/ Volume Up/ VOL- 5 English # Icon Item Description 3 Display screen Also called Liquid-Crystal Display (LCD...
... and components. Protection fingerprint reader supporting Acer FingerNav 4-way control function (only for certain models). 9 Touchpad Touch-sensitive pointing device which functions like center* and right) the left and right buttons function like a computer mouse. 10 VOL+/ Volume Up/ VOL- 5 English # Icon Item Description 3 Display screen Also called Liquid-Crystal Display (LCD...

Aspire 6530/6530G Quick Guide
Page 4
Conventions The following conventions are used in this manual: SCREEN MESSAGES Denotes actual messages that might result from doing or not doing specific actions. NOTE WARNING CAUTION IMPORTANT Gives bits and pieces of procedures. Alerts you to do specific actions relevant to the accomplishment of additional information related to any damage that appear on screen. Gives precautionary measures to avoid possible hardware or software problems. Reminds you to the current topic. IV
Conventions The following conventions are used in this manual: SCREEN MESSAGES Denotes actual messages that might result from doing or not doing specific actions. NOTE WARNING CAUTION IMPORTANT Gives bits and pieces of procedures. Alerts you to do specific actions relevant to the accomplishment of additional information related to any damage that appear on screen. Gives precautionary measures to avoid possible hardware or software problems. Reminds you to the current topic. IV

Aspire 6530/6530G Quick Guide
Page 15
Turns the computer on and off. Front View No. 1 2 3 4 5 Chapter 1 Icon Item Acer Crystal Eye webcam Microphone Description Web camera for video communication (only for sound recording. Display screen Power button Also called Liquid-Crystal Display (LCD), displays computer output (Configuration may vary by models). Status indicators Light-Emitting Diodes (LEDs) that light...
Turns the computer on and off. Front View No. 1 2 3 4 5 Chapter 1 Icon Item Acer Crystal Eye webcam Microphone Description Web camera for video communication (only for sound recording. Display screen Power button Also called Liquid-Crystal Display (LCD), displays computer output (Configuration may vary by models). Status indicators Light-Emitting Diodes (LEDs) that light...

Aspire 6530/6530G Quick Guide
Page 22
... three lock keys which you can toggle on the keys. Lock key Caps Lock Num Lock + Scroll Lock + Description When Caps Lock is on , the screen moves one line up or down when you need to connect an external keypad. Hold while typing letters on the upper right corner of numeric...
... three lock keys which you can toggle on the keys. Lock key Caps Lock Num Lock + Scroll Lock + Description When Caps Lock is on , the screen moves one line up or down when you need to connect an external keypad. Hold while typing letters on the upper right corner of numeric...
Aspire 6530/6530G Quick Guide
Page 24
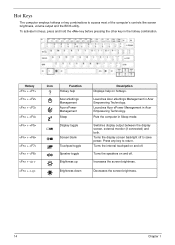
... Keys The computer employs hotkeys or key combinations to return. Launches Acer ePower Management in Sleep mode. To activate hot keys, press and hold the key before pressing the other key in Acer Empowering Technology. Turns the display screen backlight off . Launches Acer eSettings Management in the hotkey combination. Turns the internal touchpad on...
... Keys The computer employs hotkeys or key combinations to return. Launches Acer ePower Management in Sleep mode. To activate hot keys, press and hold the key before pressing the other key in Acer Empowering Technology. Turns the display screen backlight off . Launches Acer eSettings Management in the hotkey combination. Turns the internal touchpad on...
Aspire 6530/6530G Quick Guide
Page 26
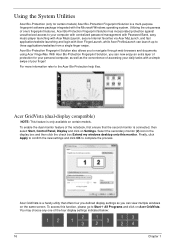
...this function, please go to complete the process. With Acer Bio-Protection Fingerprint Solution, you can now enjoy an extra layer of protection for certain models) Acer Bio-Protection Fingerprint Solution is only available on the same screen. Finally, click Apply to confirm the new settings ...and click OK to Start´ All Programs and click on Settings. Acer GridVista is a handy utility that the ...
...this function, please go to complete the process. With Acer Bio-Protection Fingerprint Solution, you can now enjoy an extra layer of protection for certain models) Acer Bio-Protection Fingerprint Solution is only available on the same screen. Finally, click Apply to confirm the new settings ...and click OK to Start´ All Programs and click on Settings. Acer GridVista is a handy utility that the ...

Aspire 6530/6530G Quick Guide
Page 27
... to be partitioned independently. Drag and drop each display from the task bar. 2. NOTE: Please ensure that the resolution setting of a well-organized desktop. Run Acer GridVista and select your preferred screen configuration for each window into the appropriate grid. 3. Double (vertical), Triple (primary at left), Triple (primary at right), or Quad...
... to be partitioned independently. Drag and drop each display from the task bar. 2. NOTE: Please ensure that the resolution setting of a well-organized desktop. Run Acer GridVista and select your preferred screen configuration for each window into the appropriate grid. 3. Double (vertical), Triple (primary at left), Triple (primary at right), or Quad...
Aspire 6530/6530G Quick Guide
Page 34
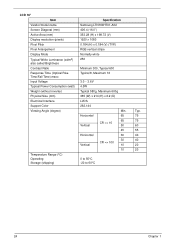
... Temperature Range (°C) Operating Storage (shipping) 0 to 50°C -20 to 60°C 24 Chapter 1 LCD 16" Item Specification Vendor/model name Samsung LTN160HT01-A02 Screen Diagonal (mm) 406.4 (16.0") Active Area (mm) 353.28 (H) x 198.72 (V) Display resolution (pixels) 1920 x 1080 Pixel Pitch 0.184 (H) x 0.184 (V) (TYP.) Pixel Arrangement RGB vertical...
... Temperature Range (°C) Operating Storage (shipping) 0 to 50°C -20 to 60°C 24 Chapter 1 LCD 16" Item Specification Vendor/model name Samsung LTN160HT01-A02 Screen Diagonal (mm) 406.4 (16.0") Active Area (mm) 353.28 (H) x 198.72 (V) Display resolution (pixels) 1920 x 1080 Pixel Pitch 0.184 (H) x 0.184 (V) (TYP.) Pixel Arrangement RGB vertical...

Aspire 6530/6530G Quick Guide
Page 37
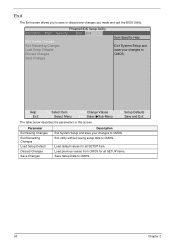
...; In any changes made and exit the BIOS Setup Utility. Navigating the BIOS Utility There are found in the Item Specific Help part of the screen. Help for a particular menu are in square brackets. Press F2 to Chapter 4 Troubleshooting when problem arises. You can also press F10 to save ...: You can load default settings by pressing F9. System Utilities Chapter 2 BIOS Setup Utility The BIOS Setup Utility is prompted on the bottom of the screen. If you are shown on the bottom of a parameter, press F5 or F6. • A plus sign (+) indicates the item has sub-items. Press ...
...; In any changes made and exit the BIOS Setup Utility. Navigating the BIOS Utility There are found in the Item Specific Help part of the screen. Help for a particular menu are in square brackets. Press F2 to Chapter 4 Troubleshooting when problem arises. You can also press F10 to save ...: You can load default settings by pressing F9. System Utilities Chapter 2 BIOS Setup Utility The BIOS Setup Utility is prompted on the bottom of the screen. If you are shown on the bottom of a parameter, press F5 or F6. • A plus sign (+) indicates the item has sub-items. Press ...
Aspire 6530/6530G Quick Guide
Page 38
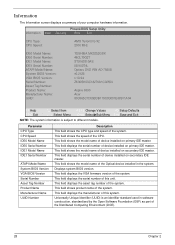
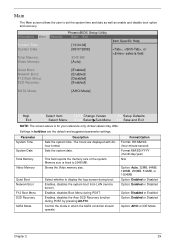
...hardware information. This field shows the model name of the Distributed Computing Environment (DCE). 28 Chapter 2 Information The Information screen displays a summary of the system. PhoenixBIOS Setup Utility Information Main Security Boot Exit CPU Type: CPU Speed: AMD Turion...Product Name: Manufacturer Name: UUID: TOSHIBA MK3252GSX 48CLT0G2T ST9160310AS 5SV00T4L Optiarc DVD RW AD-7560S v0.2126 v.10.94 ZK30SK03C18270A1C02500 Aspire 6530 Acer 00C565C7D09BDB119C0D001E68911A04 F1 Help ESC Exit ↑↓ Select Item ←→ Select Menu F5/F6 Change Values Enter SelectXSub-...
...hardware information. This field shows the model name of the Distributed Computing Environment (DCE). 28 Chapter 2 Information The Information screen displays a summary of the system. PhoenixBIOS Setup Utility Information Main Security Boot Exit CPU Type: CPU Speed: AMD Turion...Product Name: Manufacturer Name: UUID: TOSHIBA MK3252GSX 48CLT0G2T ST9160310AS 5SV00T4L Optiarc DVD RW AD-7560S v0.2126 v.10.94 ZK30SK03C18270A1C02500 Aspire 6530 Acer 00C565C7D09BDB119C0D001E68911A04 F1 Help ESC Exit ↑↓ Select Item ←→ Select Menu F5/F6 Change Values Enter SelectXSub-...
Aspire 6530/6530G Quick Guide
Page 39
... values may differ. Sets the system date. Enables, disables the Acer D2D Recovery function during POST. Shows the Video memory size. Enables...] [06/07/2008] 2048 MB [Auto] Item Specific Help , , or selects field. Main The Main screen allows the user to display the logo screen during boot. Quiet Boot: Network Boot: F12 Boot Menu: D2D Recovery: [Enabled] [Enabled] [Disabled] [...; Select Menu F5/F6 Change Values Enter SelectXSub-Menu F9 Setup Defaults F10 Save and Exit NOTE: The screen above is fixed to 2048 MB. Select whether to set the system time and date as well as enable...
... values may differ. Sets the system date. Enables, disables the Acer D2D Recovery function during POST. Shows the Video memory size. Enables...] [06/07/2008] 2048 MB [Auto] Item Specific Help , , or selects field. Main The Main screen allows the user to display the logo screen during boot. Quiet Boot: Network Boot: F12 Boot Menu: D2D Recovery: [Enabled] [Enabled] [Disabled] [...; Select Menu F5/F6 Change Values Enter SelectXSub-Menu F9 Setup Defaults F10 Save and Exit NOTE: The screen above is fixed to 2048 MB. Select whether to set the system time and date as well as enable...
Aspire 6530/6530G Quick Guide
Page 40
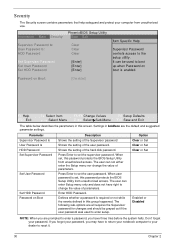
...Password on Boot Description Shows the setting of the Supervisor password Shows the setting of the hard disk password. Security The Security screen contains parameters that help safeguard and protect your computer from unauthorized access. Information Main Security Supervisor Password Is: User Password Is:... while the events defined in this password protects the BIOS Setup Utility from unauthorized access. Defines whether a password is set , this screen. If you forget your password, you have to return your notebook computer to enter a password, you may have three tries before ...
...Password on Boot Description Shows the setting of the Supervisor password Shows the setting of the hard disk password. Security The Security screen contains parameters that help safeguard and protect your computer from unauthorized access. Information Main Security Supervisor Password Is: User Password Is:... while the events defined in this password protects the BIOS Setup Utility from unauthorized access. Defines whether a password is set , this screen. If you forget your password, you have to return your notebook computer to enter a password, you may have three tries before ...
Aspire 6530/6530G Quick Guide
Page 41
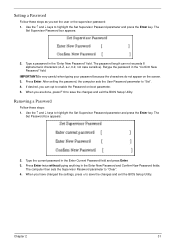
... Password box appears: 2. When you can not exceeds 8 alphanumeric characters (A-Z, a-z, 0-9, not case sensitive). Use the ↑ and ↓ keys to enable the Password on the screen. 3. The password length can opt to highlight the Set Supervisor Password parameter and press the Enter key. If desired, you have changed the settings, press...
... Password box appears: 2. When you can not exceeds 8 alphanumeric characters (A-Z, a-z, 0-9, not case sensitive). Use the ↑ and ↓ keys to enable the Password on the screen. 3. The password length can opt to highlight the Set Supervisor Password parameter and press the Enter key. If desired, you have changed the settings, press...
Aspire 6530/6530G Quick Guide
Page 42
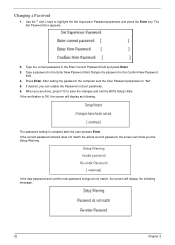
... Type the current password in the Enter New Password field. Retype the password in the Confirm New Password field. 4. The password setting is OK, the screen will display as following message. 32 Chapter 2 If the current password entered does not match the actual current password, the... screen will display the following . Press Enter. After setting the password, the computer sets the User Password parameter to highlight the Set Supervisor Password parameter...
... Type the current password in the Enter New Password field. Retype the password in the Confirm New Password field. 4. The password setting is OK, the screen will display as following message. 32 Chapter 2 If the current password entered does not match the actual current password, the... screen will display the following . Press Enter. After setting the password, the computer sets the User Password parameter to highlight the Set Supervisor Password parameter...
Aspire 6530/6530G Quick Guide
Page 44
... Change Values Enter SelectXSub-Menu F9 Setup Defaults F10 Save and Exit The table below describes the parameters in this screen. Load default values for all SETUP item. Exit The Exit screen allows you made and quit the BIOS Utility. PhoenixBIOS Setup Utility Information Main Security Boot Exit Exit Saving Changes Exit...
... Change Values Enter SelectXSub-Menu F9 Setup Defaults F10 Save and Exit The table below describes the parameters in this screen. Load default values for all SETUP item. Exit The Exit screen allows you made and quit the BIOS Utility. PhoenixBIOS Setup Utility Information Main Security Boot Exit Exit Saving Changes Exit...
Aspire 6530/6530G Quick Guide
Page 47
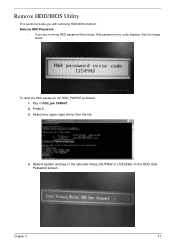
Key in the selected string (0KJFN42 or UVEIQ96) on the HDD User Password screen. Press 2. 3. Reboot system and key in hdd_pw 15494 0 2. See the image below. Select one upper-case string from the list. 4. Chapter 2 37 To reset the HDD password, run HDD_PW.EXE as follows: 1. Remove HDD/BIOS Utility This section provide you with removing HDD/BIOS method: Remove HDD Password: • If you key in wrong HDD password three times, Hdd password error code displays.
Key in the selected string (0KJFN42 or UVEIQ96) on the HDD User Password screen. Press 2. 3. Reboot system and key in hdd_pw 15494 0 2. See the image below. Select one upper-case string from the list. 4. Chapter 2 37 To reset the HDD password, run HDD_PW.EXE as follows: 1. Remove HDD/BIOS Utility This section provide you with removing HDD/BIOS method: Remove HDD Password: • If you key in wrong HDD password three times, Hdd password error code displays.

Aspire 6530/6530G Quick Guide
Page 48
To reset the BIOS password, run BIOS_PW.EXE as follows: 1. Key in the wrong Supervisor Password three times, System Disabled displays on the screen. Select one string from the list. 38 Chapter 2 Remove BIOS Password: If you key in bios_pw 14452 0 2. See the image below.
To reset the BIOS password, run BIOS_PW.EXE as follows: 1. Key in the wrong Supervisor Password three times, System Disabled displays on the screen. Select one string from the list. 38 Chapter 2 Remove BIOS Password: If you key in bios_pw 14452 0 2. See the image below.

Aspire 6530/6530G Quick Guide
Page 130
... is correctly configured: a. Readjust if necessary. 6. Check the Device Manager to determine that the computer is still not resolved, see "Online Support Information" on the screen), the LCD is present (different colored spots in the application. If the Issue is not running on the desktop and select Personalize´ Display Settings...
... is correctly configured: a. Readjust if necessary. 6. Check the Device Manager to determine that the computer is still not resolved, see "Online Support Information" on the screen), the LCD is present (different colored spots in the application. If the Issue is not running on the desktop and select Personalize´ Display Settings...
Aspire 6530/6530G Quick Guide
Page 135
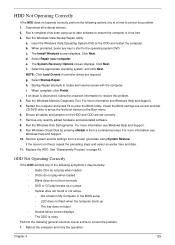
... the ODD and restart the computer. f. Ensure all external devices. 2. Run a complete virus scan using System Restore. The System Recovery Options screen displays. i. Run the Windows Memory Diagnostic Tool. HDD Not Operating Correctly If the HDD does not operate correctly, perform the following general solutions ... Check Disk by entering chkdsk /r from a known good date using up • The tray does not eject • Access failure screen displays • The ODD is virus free. 3. Reboot the computer and retry the operation. Chapter 4 125 The Install Windows...
... the ODD and restart the computer. f. Ensure all external devices. 2. Run a complete virus scan using System Restore. The System Recovery Options screen displays. i. Run the Windows Memory Diagnostic Tool. HDD Not Operating Correctly If the HDD does not operate correctly, perform the following general solutions ... Check Disk by entering chkdsk /r from a known good date using up • The tray does not eject • Access failure screen displays • The ODD is virus free. 3. Reboot the computer and retry the operation. Chapter 4 125 The Install Windows...


