Acer Aspire 5951G Service Guide
Page 6
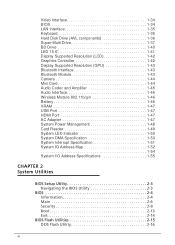
Video Interface 1-34 BIOS 1-34 LAN Interface 1-35 Keyboard 1-35 Hard Disk Drive (AVL components 1-36 Super-Multi Drive 1-37 BD Drive 1-40 LED 15.6 1-41 Display Supported Resolution (LCD 1-42 Graphics Controller 1-42 Display Supported Resolution (GPU 1-43 Bluetooth Interface 1-43 Bluetooth Module 1-43 Camera 1-44 Mini Card 1-44 Audio Codec and Amplifier 1-45 Audio Interface 1-46 Wireless Module 802.11b/g/n 1-46 Battery 1-46 VRAM 1-47 USB Port 1-47 HDMI Port 1-47 AC Adapter 1-47 System Power Management 1-48 Card Reader 1-49 System LED Indicator 1-50 System...
Video Interface 1-34 BIOS 1-34 LAN Interface 1-35 Keyboard 1-35 Hard Disk Drive (AVL components 1-36 Super-Multi Drive 1-37 BD Drive 1-40 LED 15.6 1-41 Display Supported Resolution (LCD 1-42 Graphics Controller 1-42 Display Supported Resolution (GPU 1-43 Bluetooth Interface 1-43 Bluetooth Module 1-43 Camera 1-44 Mini Card 1-44 Audio Codec and Amplifier 1-45 Audio Interface 1-46 Wireless Module 802.11b/g/n 1-46 Battery 1-46 VRAM 1-47 USB Port 1-47 HDMI Port 1-47 AC Adapter 1-47 System Power Management 1-48 Card Reader 1-49 System LED Indicator 1-50 System...

Acer Aspire 5951G Service Guide
Page 7
... 3-5 Maintenance Flowchart 3-6 Getting Started 3-7 Dummy Card Removal 3-8 Dummy Card Installation 3-8 Logic Door Removal 3-9 Logic Door Installation 3-10 Lower Cover DIMM Module Removal 3-11 Lower Cover DIMM Module Installation 3-12 HDD (Hard Disk Drive) Module Removal 3-13 HDD Module Installation 3-15 HDD Brackets Removal 3-16 HDD Carrier Installation 3-16 WLAN (Wireless Local Area Network) Module Removal . . . 3-17 WLAN Module Installation 3-18 Touchpad Removal 3-19 Touchpad Installation 3-20 ODD (Optical Disk Drive) Module Removal 3-21 ODD Module Installation 3-23 Keyboard...
... 3-5 Maintenance Flowchart 3-6 Getting Started 3-7 Dummy Card Removal 3-8 Dummy Card Installation 3-8 Logic Door Removal 3-9 Logic Door Installation 3-10 Lower Cover DIMM Module Removal 3-11 Lower Cover DIMM Module Installation 3-12 HDD (Hard Disk Drive) Module Removal 3-13 HDD Module Installation 3-15 HDD Brackets Removal 3-16 HDD Carrier Installation 3-16 WLAN (Wireless Local Area Network) Module Removal . . . 3-17 WLAN Module Installation 3-18 Touchpad Removal 3-19 Touchpad Installation 3-20 ODD (Optical Disk Drive) Module Removal 3-21 ODD Module Installation 3-23 Keyboard...
Acer Aspire 5951G Service Guide
Page 23
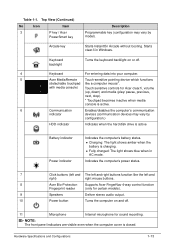
... Acer Bio-Protection Supports Acer FingerNav 4-way control function Fingerprint reader (only for certain models). 9 Speakers Deliver stereo audio output. 10 Power button Turns the computer on and off. 11 Microphone Internal microphone for Acer clear.fi, volume (up, down) and media (play/ pause, previous, next, stop). * Touchpad becomes inactive when media console is active. Top View (Continued) No Icon Item 3 P key / Acer PowerSmart key Arcade key Description Programmable key (configuration may vary by configuration.) HDD indicator Indicates when the hard disk drive...
... Acer Bio-Protection Supports Acer FingerNav 4-way control function Fingerprint reader (only for certain models). 9 Speakers Deliver stereo audio output. 10 Power button Turns the computer on and off. 11 Microphone Internal microphone for Acer clear.fi, volume (up, down) and media (play/ pause, previous, next, stop). * Touchpad becomes inactive when media console is active. Top View (Continued) No Icon Item 3 P key / Acer PowerSmart key Arcade key Description Programmable key (configuration may vary by configuration.) HDD indicator Indicates when the hard disk drive...

Acer Aspire 5951G Service Guide
Page 25
... sleep mode. Touchpad commands Icon Item Touchpad mode Description Change the function of inactivity. The MediaRemote will enter sleep mode after three minutes of the touchpad surface: Press once to activate clear.fi shortcuts. Press again to activate the media console. Press and hold to turn the MediaRemote on the current setting. Hardware Specifications and Configurations 1-15 The MediaRemote is active. Status light Light No light Blue Blue flash Slow orange flash Quick orange flash Charging...
... sleep mode. Touchpad commands Icon Item Touchpad mode Description Change the function of inactivity. The MediaRemote will enter sleep mode after three minutes of the touchpad surface: Press once to activate clear.fi shortcuts. Press again to activate the media console. Press and hold to turn the MediaRemote on the current setting. Hardware Specifications and Configurations 1-15 The MediaRemote is active. Status light Light No light Blue Blue flash Slow orange flash Quick orange flash Charging...
Acer Aspire 5951G Service Guide
Page 29
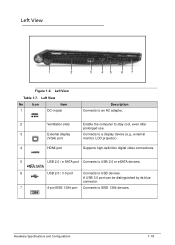
Left View 0 1 2 3 45 67 Figure 1-6. Hardware Specifications and Configurations 1-19 Left View No Icon Item 1 DC-in jack Description Connects to an AC adapter. 2 Ventilation slots Enable the computer to stay cool, even after prolonged use. 3 External display Connects to a display device (e.g., external (VGA) port monitor, LCD projector). 4 HDMI port Supports high-definition digital video connections. 5 USB 2.0 / e SATA port Connects to USB 2.0 or eSATA devices. 6 USB 2.0 / 3.0 port Connects to IEEE 1394 devices. A USB 3.0 port can be distinguished by its blue ...
Left View 0 1 2 3 45 67 Figure 1-6. Hardware Specifications and Configurations 1-19 Left View No Icon Item 1 DC-in jack Description Connects to an AC adapter. 2 Ventilation slots Enable the computer to stay cool, even after prolonged use. 3 External display Connects to a display device (e.g., external (VGA) port monitor, LCD projector). 4 HDMI port Supports high-definition digital video connections. 5 USB 2.0 / e SATA port Connects to USB 2.0 or eSATA devices. 6 USB 2.0 / 3.0 port Connects to IEEE 1394 devices. A USB 3.0 port can be distinguished by its blue ...

Acer Aspire 5951G Service Guide
Page 31
Table 1-8. NOTE: Wrap the computer security lock cable around an immovable object such as a table or handle of a locked drawer. Insert the lock into the notch and turn the key to a Kensington-compatible computer security lock. Hardware Specifications and Configurations 1-21 Some keyless models are also available. Right View (Continued) No Icon Item 7 Kensington lock slot Description Connects to secure the lock.
Table 1-8. NOTE: Wrap the computer security lock cable around an immovable object such as a table or handle of a locked drawer. Insert the lock into the notch and turn the key to a Kensington-compatible computer security lock. Hardware Specifications and Configurations 1-21 Some keyless models are also available. Right View (Continued) No Icon Item 7 Kensington lock slot Description Connects to secure the lock.

Acer Aspire 5951G Service Guide
Page 34
... keys function as a calculator (complete with some applications. Use this mode when doing a lot of the key caps. To simplify the keyboard legend, cursor-control key symbols are pressed respectively. Scroll Lock does not work with the arithmetic operators +, -, *, and /). Keyboard Lock Keys The keyboard has three lock keys which can be to connect an external keypad. Cursor-control keys on embedded keypad. Num Lock off . (Table 1-11) Table 1-11. Main keyboard keys Hold while typing...
... keys function as a calculator (complete with some applications. Use this mode when doing a lot of the key caps. To simplify the keyboard legend, cursor-control key symbols are pressed respectively. Scroll Lock does not work with the arithmetic operators +, -, *, and /). Keyboard Lock Keys The keyboard has three lock keys which can be to connect an external keypad. Cursor-control keys on embedded keypad. Num Lock off . (Table 1-11) Table 1-11. Main keyboard keys Hold while typing...
Acer Aspire 5951G Service Guide
Page 35
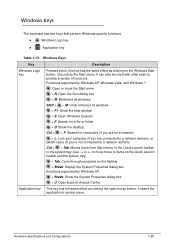
Windows Keys 0 The keyboard has two keys that perform Windows-specific functions. Windows Logo key Application key Table 1-13. Functions supported by Windows XP, Windows Vista, and Windows 7: : Open or close the Start menu + R: Open the Run dialog box + M: Minimizes all windows Shift + + M: Undo minimize all windows + F1: Show the help window + E: Open Windows Explorer + F: Search for a file or folder + D: Show the desktop Ctrl + + F: Search for computers (if you are on a network) + L: Lock your...
Windows Keys 0 The keyboard has two keys that perform Windows-specific functions. Windows Logo key Application key Table 1-13. Functions supported by Windows XP, Windows Vista, and Windows 7: : Open or close the Start menu + R: Open the Run dialog box + M: Minimizes all windows Shift + + M: Undo minimize all windows + F1: Show the help window + E: Open Windows Explorer + F: Search for a file or folder + D: Show the desktop Ctrl + + F: Search for computers (if you are on a network) + L: Lock your...
Acer Aspire 5951G Service Guide
Page 36
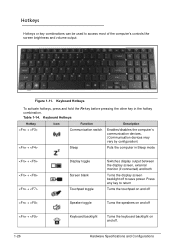
... Function Description + Communication switch Enables/disables the computer's communication devices. (Communication devices may vary by configuration) + Sleep Puts the computer in the hotkey combination. Press any key to return Turns the touchpad on and off + Speaker toggle Turns the speakers on and off + Keyboard backlight Turns the keyboard backlight on and off to access most of the computer's controls like screen brightness and volume output. Hotkeys 0 Hotkeys or key combinations can be used to save power. Keyboard Hotkeys...
... Function Description + Communication switch Enables/disables the computer's communication devices. (Communication devices may vary by configuration) + Sleep Puts the computer in the hotkey combination. Press any key to return Turns the touchpad on and off + Speaker toggle Turns the speakers on and off + Keyboard backlight Turns the keyboard backlight on and off to access most of the computer's controls like screen brightness and volume output. Hotkeys 0 Hotkeys or key combinations can be used to save power. Keyboard Hotkeys...

Acer Aspire 5951G Service Guide
Page 48
... disc format DVD: DVD-VIDEO, DVD-ROM, DVD-R(4.7GB), DVD-R DL DVD-RW(Ver.1.1/1.2) DVD+R, DVD+R DL, DVD+RW DVD-RAM(4.7GB) CD: CD-DA, CD-ROM, CD-ROM XA, PhotoCD (multi session), Video CD, Cd-Extract (CD+), CD-text Loading mechanism Electrical Release (Release Button) Release by ATAPI command Emergency Release Power Requirement Input Voltage 5V +/- 5% Item Vendor & Model name Performance Specification Transfer rate (KB/sec) Buffer Memory Interface Specification...
... disc format DVD: DVD-VIDEO, DVD-ROM, DVD-R(4.7GB), DVD-R DL DVD-RW(Ver.1.1/1.2) DVD+R, DVD+R DL, DVD+RW DVD-RAM(4.7GB) CD: CD-DA, CD-ROM, CD-ROM XA, PhotoCD (multi session), Video CD, Cd-Extract (CD+), CD-text Loading mechanism Electrical Release (Release Button) Release by ATAPI command Emergency Release Power Requirement Input Voltage 5V +/- 5% Item Vendor & Model name Performance Specification Transfer rate (KB/sec) Buffer Memory Interface Specification...

Acer Aspire 5951G Service Guide
Page 69
...;Menu - use the up and down arrow keys Change parameter value - The default parameter of the screen. press F5 or F6. Exit - press F9. Parameter help carefully when making changes to run . To change the boot device without entering the BIOS SETUP, press F12 during POST (power-on self-test) when prompted at the bottom of screen. The utility is a hardware configuration program built...
...;Menu - use the up and down arrow keys Change parameter value - The default parameter of the screen. press F5 or F6. Exit - press F9. Parameter help carefully when making changes to run . To change the boot device without entering the BIOS SETUP, press F12 during POST (power-on self-test) when prompted at the bottom of screen. The utility is a hardware configuration program built...
Acer Aspire 5951G Service Guide
Page 72
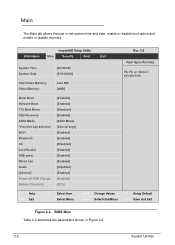
... enable or disable boot option and enable or disable recovery. BIOS Main Table 2-2 describes the parameters shown in Figure 2-2. 2-6 System Utilities InsydeH20 Setup Utility Information Main Security Boot Exit System Time System Date Total Video Memory: Video Memory: [09:00:00] [01/01/2003] xxxx MB [xMB] Rev. 3.5 Item Specific Help F5, F6, or selects field Quiet Boot Network Boot F12 Boot Menu D2D Recovery SATA Mode *Function key behavior Wi-Fi Bluetooth 3G Card Reader USB ports Wired Lan Audio [Camera] Power-off USB Charge Battery Threshold [Enabled] [Enabled] [Disabled] [Enabled...
... enable or disable boot option and enable or disable recovery. BIOS Main Table 2-2 describes the parameters shown in Figure 2-2. 2-6 System Utilities InsydeH20 Setup Utility Information Main Security Boot Exit System Time System Date Total Video Memory: Video Memory: [09:00:00] [01/01/2003] xxxx MB [xMB] Rev. 3.5 Item Specific Help F5, F6, or selects field Quiet Boot Network Boot F12 Boot Menu D2D Recovery SATA Mode *Function key behavior Wi-Fi Bluetooth 3G Card Reader USB ports Wired Lan Audio [Camera] Power-off USB Charge Battery Threshold [Enabled] [Enabled] [Disabled] [Enabled...

Acer Aspire 5951G Service Guide
Page 73
...D2D Recovery Option to use card reader. Option: Enabled or Disabled Wired LAN Option to use camera. Table 2-2. Option: Enabled or Disabled Bluetooth Option to use Bluetooth device. . to set the battery threshold level. Wi-Fi Option to use Wi-Fi device. Option: Enabled or Disabled 3G Option to use 3G device. Option: Enabled or Disabled USB ports Option to use external USB port. Option: Enabled or Disabled Camera Option to use D2D Recovery function Option: Enabled or Disabled SATA Mode Option to activate behavior specific function keys. Option...
...D2D Recovery Option to use card reader. Option: Enabled or Disabled Wired LAN Option to use camera. Table 2-2. Option: Enabled or Disabled Bluetooth Option to use Bluetooth device. . to set the battery threshold level. Wi-Fi Option to use Wi-Fi device. Option: Enabled or Disabled 3G Option to use 3G device. Option: Enabled or Disabled USB ports Option to use external USB port. Option: Enabled or Disabled Camera Option to use D2D Recovery function Option: Enabled or Disabled SATA Mode Option to activate behavior specific function keys. Option...

Acer Aspire 5951G Service Guide
Page 77
... Type current password in Enter New Password field and press Enter. 4. Changing a Password: Set Supervisor Password 2. Type new password in Enter Current Password field and press Enter. 3. Retype new password in Enter Current Password field and press Enter. 3. Use the and keys to highlight Set Supervisor Password and press Enter. Changing a Password: Setup Notice System Utilities 2-11 Removing a Password: Set Supervisor Password 2. Changing a Password 0 1. Type current password in Confirm New Password field and press Enter. 5. The Set Supervisor Password...
... Type current password in Enter New Password field and press Enter. 4. Changing a Password: Set Supervisor Password 2. Type new password in Enter Current Password field and press Enter. 3. Retype new password in Enter Current Password field and press Enter. 3. Use the and keys to highlight Set Supervisor Password and press Enter. Changing a Password: Setup Notice System Utilities 2-11 Removing a Password: Set Supervisor Password 2. Changing a Password 0 1. Type current password in Confirm New Password field and press Enter. 5. The Set Supervisor Password...

Acer Aspire 5951G Service Guide
Page 98
... 3-5 Maintenance Flowchart 3-6 Getting Started 3-7 Dummy Card Removal 3-8 Dummy Card Installation 3-8 Logic Door Removal 3-9 Logic Door Installation 3-10 Lower Cover DIMM Module Removal 3-11 Lower Cover DIMM Module Installation 3-12 HDD (Hard Disk Drive) Module Removal 3-13 HDD Module Installation 3-15 HDD Brackets Removal 3-16 HDD Carrier Installation 3-16 WLAN (Wireless Local Area Network) Module Removal . . . 3-17 WLAN Module Installation 3-18 Touchpad Removal 3-19 Touchpad Installation 3-20 ODD (Optical Disk Drive) Module Removal 3-21 ODD Module Installation 3-23 Keyboard...
... 3-5 Maintenance Flowchart 3-6 Getting Started 3-7 Dummy Card Removal 3-8 Dummy Card Installation 3-8 Logic Door Removal 3-9 Logic Door Installation 3-10 Lower Cover DIMM Module Removal 3-11 Lower Cover DIMM Module Installation 3-12 HDD (Hard Disk Drive) Module Removal 3-13 HDD Module Installation 3-15 HDD Brackets Removal 3-16 HDD Carrier Installation 3-16 WLAN (Wireless Local Area Network) Module Removal . . . 3-17 WLAN Module Installation 3-18 Touchpad Removal 3-19 Touchpad Installation 3-20 ODD (Optical Disk Drive) Module Removal 3-21 ODD Module Installation 3-23 Keyboard...
Acer Aspire 5951G Service Guide
Page 171
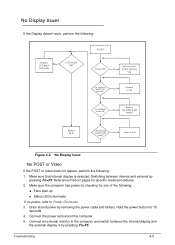
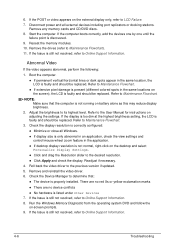
... or video does not appear, perform the following : Replace LCD panel/ No LCD cable LCD module OK? Make sure that internal display is by checking for one of the following: Fans start up Status LEDs illuminate If no power No trouble shooting step Ext. Make sure the computer has power by pressing Fn+F5. DDRRAM module OK? DDR RAM module Replace M/B CPU thermal module well No screw? Hold the power button for specific model...
... or video does not appear, perform the following : Replace LCD panel/ No LCD cable LCD module OK? Make sure that internal display is by checking for one of the following: Fans start up Status LEDs illuminate If no power No trouble shooting step Ext. Make sure the computer has power by pressing Fn+F5. DDRRAM module OK? DDR RAM module Replace M/B CPU thermal module well No screw? Hold the power button for specific model...
Acer Aspire 5951G Service Guide
Page 172
... the external display only, refer to the User Manual for instructions on the desktop and select Personalize Display Settings. Click and drag the Resolution slider to Maintenance Flowchart. 3. Check the display resolution is correctly configured: Minimize or close all external devices including port replicators or docking stations. Reseat the memory modules. 10. Remove and reinstall the video driver. 6. Run the Windows Memory Diagnostic from the operating system DVD...
... the external display only, refer to the User Manual for instructions on the desktop and select Personalize Display Settings. Click and drag the Resolution slider to Maintenance Flowchart. 3. Check the display resolution is correctly configured: Minimize or close all external devices including port replicators or docking stations. Reseat the memory modules. 10. Remove and reinstall the video driver. 6. Run the Windows Memory Diagnostic from the operating system DVD...
Acer Aspire 5951G Service Guide
Page 180
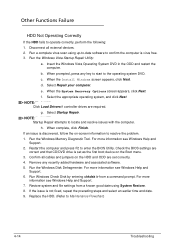
... locate and resolve issues with the computer. NOTE: NOTE: Startup Repair attempts to operate correctly, perform the following: 1. c. Select Startup Repair. Run the Windows Memory Diagnostic Tool. Restart the computer and press F2 to Maintenance Flowchart) 4-14 Troubleshooting Remove any key to start to resolve the problem. 1. NOTE: NOTE: Click Load Drivers if controller drives are set as the first boot device on the Boot menu. 3. When prompted, press any recently added hardware...
... locate and resolve issues with the computer. NOTE: NOTE: Startup Repair attempts to operate correctly, perform the following: 1. c. Select Startup Repair. Run the Windows Memory Diagnostic Tool. Restart the computer and press F2 to Maintenance Flowchart) 4-14 Troubleshooting Remove any key to start to resolve the problem. 1. NOTE: NOTE: Click Load Drivers if controller drives are set as the first boot device on the Boot menu. 3. When prompted, press any recently added hardware...

Acer Aspire 5951G Service Guide
Page 181
If no more errors. If an error is detected, do with a hardware defect, such as: cosmic radiation, electrostatic discharge, or software errors. Rerun the test to verify that have nothing to do not replace any FRU. 3. When analyzing an intermittent problem, perform the following: 1. Run the advanced diagnostic test for the system board in loop mode at least 10 times...
If no more errors. If an error is detected, do with a hardware defect, such as: cosmic radiation, electrostatic discharge, or software errors. Rerun the test to verify that have nothing to do not replace any FRU. 3. When analyzing an intermittent problem, perform the following: 1. Run the advanced diagnostic test for the system board in loop mode at least 10 times...

Acer Aspire 5951G Service Guide
Page 186
... party relate functions - BDS Phase POST Code Table Functionality Name (Include\ PostCode.h) BDS_ENTER_BDS BDS_INSTALL_HOTKEY BDS_ASF_INIT* BDS_PCI_ENUMERATION_START BDS_BEFORE_PCIIO_INSTALL BDS_PCI_ENUMERATION_END BDS_CONNECT_CONSOLE_IN Phase Post Code Description BDS 10 Enter BDS entry BDS 11 Install Hotkey service BDS 12 ASF Initialization BDS 13 PCI enumeration BDS 14 PCI resource assign complete BDS 15 PCI enumeration complete BDS 16 Keyboard Controller, keyboard and mouse initialization 4-20 Troubleshooting Platform...
... party relate functions - BDS Phase POST Code Table Functionality Name (Include\ PostCode.h) BDS_ENTER_BDS BDS_INSTALL_HOTKEY BDS_ASF_INIT* BDS_PCI_ENUMERATION_START BDS_BEFORE_PCIIO_INSTALL BDS_PCI_ENUMERATION_END BDS_CONNECT_CONSOLE_IN Phase Post Code Description BDS 10 Enter BDS entry BDS 11 Install Hotkey service BDS 12 ASF Initialization BDS 13 PCI enumeration BDS 14 PCI resource assign complete BDS 15 PCI enumeration complete BDS 16 Keyboard Controller, keyboard and mouse initialization 4-20 Troubleshooting Platform...


