Quick Start Guide
Page 3
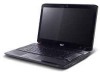
... functions or features which are marked in Portable Document Format (PDF) and comes preloaded on the screen to complete the installation. It covers basic topics such as the AcerSystem User Guide mentioned below will run the Adobe Reader setup program first. Please understand that due to its nature, the Generic User Guide as well as Acer eRecovery Management, using the keyboard, audio, etc. Follow these steps to access...
... functions or features which are marked in Portable Document Format (PDF) and comes preloaded on the screen to complete the installation. It covers basic topics such as the AcerSystem User Guide mentioned below will run the Adobe Reader setup program first. Please understand that due to its nature, the Generic User Guide as well as Acer eRecovery Management, using the keyboard, audio, etc. Follow these steps to access...

Quick Start Guide
Page 5
... pressing the other key in Sleep mode. Hotkeys The computer employs hotkeys or key combinations to access most of wireless LAN communication. 4 Speakers Left and right speakers deliver stereo audio output. 5 Keyboard For entering data into your hands when you use the computer. 9 HDD Indicates when the hard disk drive is active. English 5 # Icon Item Description 2 Display screen Also called Liquid-Crystal Display (LCD), displays computer output. 3 Touchpad toggle Turns the internal touchpad on and off. Power button Turns the computer...
... pressing the other key in Sleep mode. Hotkeys The computer employs hotkeys or key combinations to access most of wireless LAN communication. 4 Speakers Left and right speakers deliver stereo audio output. 5 Keyboard For entering data into your hands when you use the computer. 9 HDD Indicates when the hard disk drive is active. English 5 # Icon Item Description 2 Display screen Also called Liquid-Crystal Display (LCD), displays computer output. 3 Touchpad toggle Turns the internal touchpad on and off. Power button Turns the computer...

Quick Start Guide
Page 10
... battery pack BIOS user, supervisor, HDD passwords Kensington lock slot ACPI 3.0 48.8 W 4400 mAh 3-pin 65 W AC adapter ENERGY STAR®* 99-/100-/103-key keyboard Touchpad pointing device 10 English Specifications Operating • system Platform • • • System memory • • Display • • Graphics • Storage • subsystem • • Audio • • • Communication • • • Dimensions • • Privacy control • • Power...
... battery pack BIOS user, supervisor, HDD passwords Kensington lock slot ACPI 3.0 48.8 W 4400 mAh 3-pin 65 W AC adapter ENERGY STAR®* 99-/100-/103-key keyboard Touchpad pointing device 10 English Specifications Operating • system Platform • • • System memory • • Display • • Graphics • Storage • subsystem • • Audio • • • Communication • • • Dimensions • • Privacy control • • Power...
Quick Start Guide
Page 3
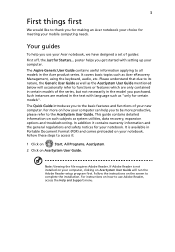
... to functions or features which are marked in the Aspire product series. This guide contains detailed information on your new computer. Note: Viewing the file requires Adobe Reader. It covers basic topics such as system utilities, data recovery, expansion options and troubleshooting. The Aspire Series Generic User Guide contains useful information applying to complete the installation. It is not installed on such subjects as Acer's Empowering Technology, using the keyboard, audio, etc...
... to functions or features which are marked in the Aspire product series. This guide contains detailed information on your new computer. Note: Viewing the file requires Adobe Reader. It covers basic topics such as system utilities, data recovery, expansion options and troubleshooting. The Aspire Series Generic User Guide contains useful information applying to complete the installation. It is not installed on such subjects as Acer's Empowering Technology, using the keyboard, audio, etc...

Quick Start Guide
Page 5
... the hard disk drive is activated. Num Lock Lights up when Caps Lock is active. 5 English # Icon Item Description 2 Display screen Also called Liquid-Crystal Display (LCD), displays computer output (Configuration may vary by models). 3 Power button Turns the computer on and off. 4 Keyboard For entering data into your computer. 5 Backup key Launches Acer Backup Management for your hands when you use the computer. 11 Touchpad toggle Turns the internal touchpad on and off. Indicates the status of wireless LAN communication. 6 Touchpad Touch-sensitive...
... the hard disk drive is activated. Num Lock Lights up when Caps Lock is active. 5 English # Icon Item Description 2 Display screen Also called Liquid-Crystal Display (LCD), displays computer output (Configuration may vary by models). 3 Power button Turns the computer on and off. 4 Keyboard For entering data into your computer. 5 Backup key Launches Acer Backup Management for your hands when you use the computer. 11 Touchpad toggle Turns the internal touchpad on and off. Indicates the status of wireless LAN communication. 6 Touchpad Touch-sensitive...
Service Guide
Page 7
... 9 TouchPad Basics (with fingerprint reader 10 Using the Keyboard 11 Lock Keys and embedded numeric keypad 11 Windows Keys 12 Hot Keys 13 Special Key 14 Using the System Utilities 15 Acer GridVista (dual-display compatible 15 Hardware Specifications and Configurations 16 System Utilities 23 BIOS Setup Utility 23 Navigating the BIOS Utility 23 Information 24 Main 25 Advanced 26 Security 28 Power 31 Boot 33 Exit 34 BIOS Flash Utilities 35 DOS Flash Utility 36 WinFlash Utility 38 Remove HDD/BIOS Password Utilities 39 Machine Disassembly and Replacement...
... 9 TouchPad Basics (with fingerprint reader 10 Using the Keyboard 11 Lock Keys and embedded numeric keypad 11 Windows Keys 12 Hot Keys 13 Special Key 14 Using the System Utilities 15 Acer GridVista (dual-display compatible 15 Hardware Specifications and Configurations 16 System Utilities 23 BIOS Setup Utility 23 Navigating the BIOS Utility 23 Information 24 Main 25 Advanced 26 Security 28 Power 31 Boot 33 Exit 34 BIOS Flash Utilities 35 DOS Flash Utility 36 WinFlash Utility 38 Remove HDD/BIOS Password Utilities 39 Machine Disassembly and Replacement...

Service Guide
Page 15
...5 Keyboard Backup key Bluetooth communication button/indicator Wireless LAN communication button/indicator TouchPad For entering data into your new computer. Enables/disables the wireless LAN function. Also called Liquid-Crystal Display (LCD), displays computer output (configuration may vary by models). Turns the computer on and off. Launches Acer Backup Management for video communication. Indicates the status of wireless LAN communication. Front View No. 1 2 3 4 5 6 Icon Item Acer Crystal Eye webcam Display screen Power button Description Web camera for three-step data backup...
...5 Keyboard Backup key Bluetooth communication button/indicator Wireless LAN communication button/indicator TouchPad For entering data into your new computer. Enables/disables the wireless LAN function. Also called Liquid-Crystal Display (LCD), displays computer output (configuration may vary by models). Turns the computer on and off. Launches Acer Backup Management for video communication. Indicates the status of wireless LAN communication. Front View No. 1 2 3 4 5 6 Icon Item Acer Crystal Eye webcam Display screen Power button Description Web camera for three-step data backup...

Service Guide
Page 16
... Acer Bio-Protection fingerprint reader supporting Acer FingerNav 4-way control function (only for certain models). 9 Microphone Internal microphone for sound recording. 10 Palmrest Comfortable support area for Acer Arcade, volume (up when Caps Lock is charging. 2. with mute and hold keys. 13 Acer PowerSmart Puts your hands when you use the computer. 11 TouchPad toggle Turns the internal TouchPad on and off to return. Charging: The light shows amber when the battery is activated. Press any key to save power. Indicates...
... Acer Bio-Protection fingerprint reader supporting Acer FingerNav 4-way control function (only for certain models). 9 Microphone Internal microphone for sound recording. 10 Palmrest Comfortable support area for Acer Arcade, volume (up when Caps Lock is charging. 2. with mute and hold keys. 13 Acer PowerSmart Puts your hands when you use the computer. 11 TouchPad toggle Turns the internal TouchPad on and off to return. Charging: The light shows amber when the battery is activated. Press any key to save power. Indicates...
Service Guide
Page 34
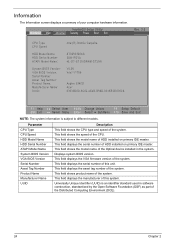
... Open Software Foundation (OSF) as part of this unit. This field displays the serial number of HDD installed on primary IDE master. Information The Information screen displays a summary of the system. This field displays the VGA firmware version of your computer hardware information. This field shows the model name of this system. InsydeH20 Setup Utility Information Main Advanced Security Power Boot Exit Rev. 3.5 CPU Type CPU Speed HDD Model Name: HDD Serial Number: ATAPI Model Name: System BIOS...
... Open Software Foundation (OSF) as part of this unit. This field displays the serial number of HDD installed on primary IDE master. Information The Information screen displays a summary of the system. This field displays the VGA firmware version of your computer hardware information. This field shows the model name of this system. InsydeH20 Setup Utility Information Main Advanced Security Power Boot Exit Rev. 3.5 CPU Type CPU Speed HDD Model Name: HDD Serial Number: ATAPI Model Name: System BIOS...
Service Guide
Page 39
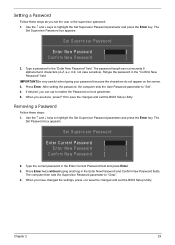
... "Enter New Password" field. When you are done, press F10 to save the changes and exit the BIOS Setup Utility. When you have changed the settings, press u to enable the Password on the screen. 3. The password length can opt to save the changes and exit the BIOS Setup Utility. Removing a Password Follow these steps as you can not exceeds 8 alphanumeric characters (A-Z, a-z, 0-9, not case sensitive). Use the ↑ and ↓ keys to...
... "Enter New Password" field. When you are done, press F10 to save the changes and exit the BIOS Setup Utility. When you have changed the settings, press u to enable the Password on the screen. 3. The password length can opt to save the changes and exit the BIOS Setup Utility. Removing a Password Follow these steps as you can not exceeds 8 alphanumeric characters (A-Z, a-z, 0-9, not case sensitive). Use the ↑ and ↓ keys to...

Service Guide
Page 40
... password, the computer sets the User Password parameter to highlight the Set Supervisor Password parameter and press the Enter key. If desired, you the Setup Warning. Type a password in the Enter New Password field. If the current password entered does not match the actual current password, the screen will display the following . Changing a Password 1. Use the ↑ and ↓ keys to "Set". 5. When you are done, press F10 to save the changes and exit the BIOS Setup Utility...
... password, the computer sets the User Password parameter to highlight the Set Supervisor Password parameter and press the Enter key. If desired, you the Setup Warning. Type a password in the Enter New Password field. If the current password entered does not match the actual current password, the screen will display the following . Changing a Password 1. Use the ↑ and ↓ keys to "Set". 5. When you are done, press F10 to save the changes and exit the BIOS Setup Utility...
Service Guide
Page 44
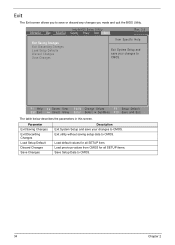
InsydeH20 Setup Utility Information Main Advanced Security Power Boot Exit Rev. 3.5 Exit Saving Changes Exit Discarding Changes Load Setup Defaults Discard Changes Save Changes Item Specific Help Exit System Setup and save your changes to CMOS. F1 Help ESC Exit Select Item F5/F6 Change Values F9 Setup Default Select Menu Enter Select SubMenu F10 Save and Exit The table below describes the parameters in this screen. Parameter Exit Saving Changes Exit...
InsydeH20 Setup Utility Information Main Advanced Security Power Boot Exit Rev. 3.5 Exit Saving Changes Exit Discarding Changes Load Setup Defaults Discard Changes Save Changes Item Specific Help Exit System Setup and save your changes to CMOS. F1 Help ESC Exit Select Item F5/F6 Change Values F9 Setup Default Select Menu Enter Select SubMenu F10 Save and Exit The table below describes the parameters in this screen. Parameter Exit Saving Changes Exit...
Service Guide
Page 145
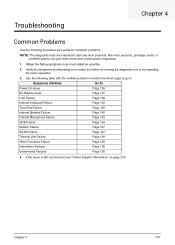
... "Online Support Information" on page 219. Troubleshooting Chapter 4 Common Problems Use the following table with the verified symptom to determine which page to go to test only Acer products. Symptoms (Verified) Go To Power On Issue No Display Issue LCD Failure Internal Keyboard Failure TouchPad Failure Internal Speaker Failure Internal Microphone Failure ODD Failure Modem Failure WLAN Failure Thermal Unit Failure Other Functions Failure Intermittent...
... "Online Support Information" on page 219. Troubleshooting Chapter 4 Common Problems Use the following table with the verified symptom to determine which page to go to test only Acer products. Symptoms (Verified) Go To Power On Issue No Display Issue LCD Failure Internal Keyboard Failure TouchPad Failure Internal Speaker Failure Internal Microphone Failure ODD Failure Modem Failure WLAN Failure Thermal Unit Failure Other Functions Failure Intermittent...

Service Guide
Page 147
... boots correctly, add the devices one by pressing Fn+F5. Make sure the computer has power by removing the power cable and battery and holding down the power button for specific model procedures. 2. Chapter 4 137 Reseat the memory modules. 7. Remove any stored power by checking at least one of the following occurs: • Fans start up • Status LEDs light up If there is selected. No Display Issue If the Display doesn't work...
... boots correctly, add the devices one by pressing Fn+F5. Make sure the computer has power by removing the power cable and battery and holding down the power button for specific model procedures. 2. Chapter 4 137 Reseat the memory modules. 7. Remove any stored power by checking at least one of the following occurs: • Fans start up • Status LEDs light up If there is selected. No Display Issue If the Display doesn't work...

Service Guide
Page 148
... or dark spots display in the same locations on page 219. 138 Chapter 4 Adjust the brightness to correct the problem. 1. There are no device conflicts. • No hardware is still not resolved, see "Online Support Information" on the screen), the LCD is correctly configured: a. Reboot the computer. 2. Remove and reinstall the video driver. 8. Check the display resolution is faulty and should be replaced. c. Abnormal Video Display If video displays abnormally, perform...
... or dark spots display in the same locations on page 219. 138 Chapter 4 Adjust the brightness to correct the problem. 1. There are no device conflicts. • No hardware is still not resolved, see "Online Support Information" on the screen), the LCD is correctly configured: a. Reboot the computer. 2. Remove and reinstall the video driver. 8. Check the display resolution is faulty and should be replaced. c. Abnormal Video Display If video displays abnormally, perform...

Service Guide
Page 153
... software. 8. The Install Windows screen displays. e. Click Next. NOTE: Click Load Drivers if controller drives are set as the first boot device on page 46. Run the Windows Memory Diagnostic Tool. See "Disassembly Process" on the Boot menu. 6. Run a complete virus scan using System Restore. Run the Windows 7 Startup Repair Utility: a. Select the appropriate operating system, and click Next. If an issue is virus free. 3. Ensure all external devices. 2. d. i. Check the BIOS settings are correct and that CD/DVD drive...
... software. 8. The Install Windows screen displays. e. Click Next. NOTE: Click Load Drivers if controller drives are set as the first boot device on page 46. Run the Windows Memory Diagnostic Tool. See "Disassembly Process" on the Boot menu. 6. Run a complete virus scan using System Restore. Run the Windows 7 Startup Repair Utility: a. Select the appropriate operating system, and click Next. If an issue is virus free. 3. Ensure all external devices. 2. d. i. Check the BIOS settings are correct and that CD/DVD drive...

Service Guide
Page 158
... back the mouse driver to check the events log for errors. Remove any recently added hardware and associated software. 7. For more information see Windows Help and Support. 10. Check the Device Manager to verify mouse operation. No Connect it well CPU OK? If the mouse uses a USB connection, try an alternate USB port. 4. Restart the computer. 6. Do not replace a non-defective FRUs: START Fan cable well connected? No Seat it well Fan OK? See the mouse user manual. 3. Try...
... back the mouse driver to check the events log for errors. Remove any recently added hardware and associated software. 7. For more information see Windows Help and Support. 10. Check the Device Manager to verify mouse operation. No Connect it well CPU OK? If the mouse uses a USB connection, try an alternate USB port. 4. Restart the computer. 6. Do not replace a non-defective FRUs: START Fan cable well connected? No Seat it well Fan OK? See the mouse user manual. 3. Try...

Service Guide
Page 164
... Extended BIOS Data Area Test and initialize PS/2 mouse Initialize floppy controller Determine number of ATA drives (optional) Initialize hard-disk controllers Initialize local-bus hard-disk controllers Jump to UserPatch1 Configure advanced cache registers Initialize Multi Processor APIC Enable external and CPU caches Setup System Management Mode (SMM) area Display external L2 cache size Load custom defaults (optional) Display shadow-area message Display possible high address for UMB recovery Display error messages Check for configuration errors Check for boot Chapter 4 Code...
... Extended BIOS Data Area Test and initialize PS/2 mouse Initialize floppy controller Determine number of ATA drives (optional) Initialize hard-disk controllers Initialize local-bus hard-disk controllers Jump to UserPatch1 Configure advanced cache registers Initialize Multi Processor APIC Enable external and CPU caches Setup System Management Mode (SMM) area Display external L2 cache size Load custom defaults (optional) Display shadow-area message Display possible high address for UMB recovery Display error messages Check for configuration errors Check for boot Chapter 4 Code...

Service Guide
Page 231
... Removing 93 Replacing 105 Common Problems 136 computer on indicator 6 CPU 100 Replacing 101 Index D DIMM Modules Removing 56 Display 4 display hotkeys 13 E EasyTouch Failure 148 Euro 14 Express Dummy Card Removing 49 External Module Disassembly Flowchart 47 F Features 1 Finger Print Reader Removing 76 Replacing 112 Flash Utility 35 FRU (Field Replaceable Unit) List 171 H Hard Disk Drive Module Removing 54 HDD Removing 54 HDD Cover Removing 51 HDTV Switch Failure 148 Hibernation mode hotkey 13 Hinge Wells Removing 94 Replacing 105 Hot Keys 11 I Intermittent Problems 150 Internal Microphone...
... Removing 93 Replacing 105 Common Problems 136 computer on indicator 6 CPU 100 Replacing 101 Index D DIMM Modules Removing 56 Display 4 display hotkeys 13 E EasyTouch Failure 148 Euro 14 Express Dummy Card Removing 49 External Module Disassembly Flowchart 47 F Features 1 Finger Print Reader Removing 76 Replacing 112 Flash Utility 35 FRU (Field Replaceable Unit) List 171 H Hard Disk Drive Module Removing 54 HDD Removing 54 HDD Cover Removing 51 HDTV Switch Failure 148 Hibernation mode hotkey 13 Hinge Wells Removing 94 Replacing 105 Hot Keys 11 I Intermittent Problems 150 Internal Microphone...

Service Guide
Page 232
... K Keyboard Removing 61 Keyboard Failure 139 L Launch Board Removing 68 Replacing 121 LCD Failure 139 LCD Module Removing 81 Left Hinge Well Removing 94 Replacing 105 Left Saddle Removing 87 Replacing 108 Lower Cover Disassembly Flowchart 60 Lower Covers Removing 51 M Main Module Reassembly Procedure 101 Main Unit Disassembly Flowchart 59 Mainboard Removing 95 Replacing 104 media access on indicator 6 Media Board Removing 66 Replacing 123 Memory Check 136 Memory Cover Removing 51 MIC Board 222 Removing 75 Replacing 115 Model Definition 182 Modem Failure 147 MXM Card Removing...
... K Keyboard Removing 61 Keyboard Failure 139 L Launch Board Removing 68 Replacing 121 LCD Failure 139 LCD Module Removing 81 Left Hinge Well Removing 94 Replacing 105 Left Saddle Removing 87 Replacing 108 Lower Cover Disassembly Flowchart 60 Lower Covers Removing 51 M Main Module Reassembly Procedure 101 Main Unit Disassembly Flowchart 59 Mainboard Removing 95 Replacing 104 media access on indicator 6 Media Board Removing 66 Replacing 123 Memory Check 136 Memory Cover Removing 51 MIC Board 222 Removing 75 Replacing 115 Model Definition 182 Modem Failure 147 MXM Card Removing...


