
Quick Start Guide
Page 10
...slot Description Connect to a Kensington-compatible computer security lock. Lights up when the optical drive is turned off . Internal optical drive; Ejects the optical disk from external microphones. accepts CDs or DVDs. Connects to USB 2.0 devices (e.g., USB mouse, USB camera). Note: Insert a... paper clip to the emergency eject hole to audio line-out devices (e.g., speakers, headphones). Ejects the optical drive tray when the computer is active....
...slot Description Connect to a Kensington-compatible computer security lock. Lights up when the optical drive is turned off . Internal optical drive; Ejects the optical disk from external microphones. accepts CDs or DVDs. Connects to USB 2.0 devices (e.g., USB mouse, USB camera). Note: Insert a... paper clip to the emergency eject hole to audio line-out devices (e.g., speakers, headphones). Ejects the optical drive tray when the computer is active....
Service Guide
Page 12
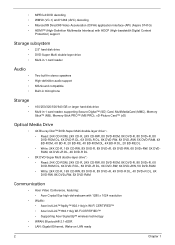
...DXVA) application interface (API) (Aspire 5741G) • HDMI™ (High-Definition Multimedia Interface) with HDCP (High-bandwidth Digital Content Protection) support Storage subsystem • 2.5" hard disk drive • DVD-Super Multi double-layer drive • Multi-in-1 card reader...drive*:· • Read: 24X CD-ROM, 24X CD-R, 24X CD-RW, 8X DVD-ROM, 8X DVD-R, 8X DVD+R, 6X DVD-ROM DL, 6X DVD-R DL, 6X DVD+R DL, 6X DVD-RW, 6X DVD+RW, 5X DVD-RAM • Write: 24X CD-R, 16X CD-RW, 8X DVD-R, 8X DVD+R, 4X DVD-R DL, 4X DVD+R DL, 6X DVD-RW, 8X DVD+RW, 5X DVD-RAM Communication • Acer...
...DXVA) application interface (API) (Aspire 5741G) • HDMI™ (High-Definition Multimedia Interface) with HDCP (High-bandwidth Digital Content Protection) support Storage subsystem • 2.5" hard disk drive • DVD-Super Multi double-layer drive • Multi-in-1 card reader...drive*:· • Read: 24X CD-ROM, 24X CD-R, 24X CD-RW, 8X DVD-ROM, 8X DVD-R, 8X DVD+R, 6X DVD-ROM DL, 6X DVD-R DL, 6X DVD+R DL, 6X DVD-RW, 6X DVD+RW, 5X DVD-RAM • Write: 24X CD-R, 16X CD-RW, 8X DVD-R, 8X DVD+R, 4X DVD-R DL, 4X DVD+R DL, 6X DVD-RW, 8X DVD+RW, 5X DVD-RAM Communication • Acer...
Service Guide
Page 14
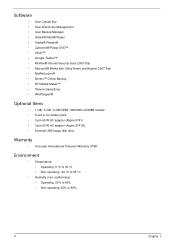
Software • Acer Crystal Eye • Acer eRecovery Management • Acer Backup Manager • Adobe® Flash® Player • Adobe® Reader® • Cyberlink® Power DVD™ • eSobi™ • Google Toolbar™ • McAfee®...GB DDR3 1066 MHz soDIMM module • 6-cell Li-ion battery pack • 3-pin 65 W AC adapter (Aspire 5741) • 3-pin 90 W AC adapter (Aspire 5741G) • External USB floppy disk drive Warranty • One-year International Travelers Warranty (ITW) Environment • Temperature: • Operating: 5 °C...
Software • Acer Crystal Eye • Acer eRecovery Management • Acer Backup Manager • Adobe® Flash® Player • Adobe® Reader® • Cyberlink® Power DVD™ • eSobi™ • Google Toolbar™ • McAfee®...GB DDR3 1066 MHz soDIMM module • 6-cell Li-ion battery pack • 3-pin 65 W AC adapter (Aspire 5741) • 3-pin 90 W AC adapter (Aspire 5741G) • External USB floppy disk drive Warranty • One-year International Travelers Warranty (ITW) Environment • Temperature: • Operating: 5 °C...

Service Guide
Page 18
... USB camera). USB mouse, USB camera). Accepts input from the drive. speakers, headphones). No. 1 2 3 4 5 6 1 2 345 6 Icon Item USB 2.0 ports Optical drive Optical disk access indicator Optical drive eject button Emergency eject hole Kensington lock slot Description Connect to USB... 2.0 devices (e.g. accepts CDs or DVDs. Ejects the optical disk from external microphones. Note: Wrap the computer...
... USB camera). USB mouse, USB camera). Accepts input from the drive. speakers, headphones). No. 1 2 3 4 5 6 1 2 345 6 Icon Item USB 2.0 ports Optical drive Optical disk access indicator Optical drive eject button Emergency eject hole Kensington lock slot Description Connect to USB... 2.0 devices (e.g. accepts CDs or DVDs. Ejects the optical disk from external microphones. Note: Wrap the computer...

Service Guide
Page 27
Sustained: 1,571 (typical) With DVD Diskette Sustained: 10,993 (typical) Chapter 1 17 Hard Disk Drive Interface Item Vendor & Model Name Seagate Capacity (MB) 160, 250, 320, 500 Bytes per sector Data heads Drive Format Disks Spindle speed (RPM) Performance Specifications Buffer size Interface...500 512 2-4 1-2 5400 8 MB SATA 5V ±5% 5V ±5% Western Digital 160, 250, 320, 500, 640 5V ±5% Super-Multi Drive Module Item Vendor & model name Performance Specification Transfer rate (MB/ sec) Buffer Memory Interface HLDS GT20N With CD Diskette Sustained: 3,600 KB/s (24x...
Sustained: 1,571 (typical) With DVD Diskette Sustained: 10,993 (typical) Chapter 1 17 Hard Disk Drive Interface Item Vendor & Model Name Seagate Capacity (MB) 160, 250, 320, 500 Bytes per sector Data heads Drive Format Disks Spindle speed (RPM) Performance Specifications Buffer size Interface...500 512 2-4 1-2 5400 8 MB SATA 5V ±5% 5V ±5% Western Digital 160, 250, 320, 500, 640 5V ±5% Super-Multi Drive Module Item Vendor & model name Performance Specification Transfer rate (MB/ sec) Buffer Memory Interface HLDS GT20N With CD Diskette Sustained: 3,600 KB/s (24x...

Service Guide
Page 37
... move it down the list, or to load the operating system. IDE1 : TSSTcorp CDDVDW TS-L633C 3. Bootable devices includes the USB diskette drives, the onboard hard disk drive and the DVD drive in the module bay. Boot This menu allows the user to decide the order of boot devices to move it up the...
... move it down the list, or to load the operating system. IDE1 : TSSTcorp CDDVDW TS-L633C 3. Bootable devices includes the USB diskette drives, the onboard hard disk drive and the DVD drive in the module bay. Boot This menu allows the user to decide the order of boot devices to move it up the...
Service Guide
Page 141
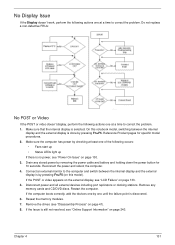
Make sure that the internal display is discovered. 6. Drain any memory cards and CD/DVD discs. Disconnect power and all external devices including port replicators or docking stations. Do not replace a non-defective FRUs: No POST or Video If the .... Make sure the computer has power by removing the power cable and battery and holding down the power button for specific model procedures. 2. Remove the drives (see "Power On Issue" on page 41). 8. If the Issue is no power, see "Disassembly Process" on page 130. 3. No Display Issue If the Display...
Make sure that the internal display is discovered. 6. Drain any memory cards and CD/DVD discs. Disconnect power and all external devices including port replicators or docking stations. Do not replace a non-defective FRUs: No POST or Video If the .... Make sure the computer has power by removing the power cable and battery and holding down the power button for specific model procedures. 2. Remove the drives (see "Power On Issue" on page 41). 8. If the Issue is no power, see "Disassembly Process" on page 130. 3. No Display Issue If the Display...
Service Guide
Page 142
.... Check the Device Manager to determine that the computer is listed under Other Devices. 9. Run the Windows Memory Diagnostic from the BIOS, the drive may reduce display brightness. If the Issue is not normal, right-click on page 41. 5. Run a complete virus scan using up-to-..."Online Support Information" on the screen), the LCD is faulty and should be replaced. If extensive pixel damage is missing from the operating system DVD and follow the onscreen prompts. 11. Check the display resolution is virus free. 3. d. Roll back the video driver to its highest level. ...
.... Check the Device Manager to determine that the computer is listed under Other Devices. 9. Run the Windows Memory Diagnostic from the BIOS, the drive may reduce display brightness. If the Issue is not normal, right-click on page 41. 5. Run a complete virus scan using up-to-..."Online Support Information" on the screen), the LCD is faulty and should be replaced. If extensive pixel damage is missing from the operating system DVD and follow the onscreen prompts. 11. Check the display resolution is virus free. 3. d. Roll back the video driver to its highest level. ...
Service Guide
Page 146
... appropriate operating system, and click Next. For more information see Windows Help and Support. 10. insert the Windows Vista Operating System DVD in the ODD and restart the computer. Restore system and file settings from a command prompt. Restart the computer and press F2 ... the BIOS settings are required. For more information see Windows Help and Support. 9. NOTE: Click Load Drivers if controller drives are correct and that CD/DVD drive is not fixed, repeat the preceding steps and select an earlier time and date. 11. When prompted, press any recently...
... appropriate operating system, and click Next. For more information see Windows Help and Support. 10. insert the Windows Vista Operating System DVD in the ODD and restart the computer. Restore system and file settings from a command prompt. Restart the computer and press F2 ... the BIOS settings are required. For more information see Windows Help and Support. 9. NOTE: Click Load Drivers if controller drives are correct and that CD/DVD drive is not fixed, repeat the preceding steps and select an earlier time and date. 11. When prompted, press any recently...

Service Guide
Page 147
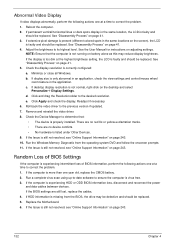
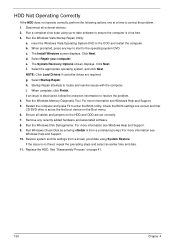
... exhibits any of the following symptoms it may be faulty: • Audio CDs do not play when loaded • DVDs do not play when loaded • Blank discs do not burn correctly • DVD or CD play breaks up • The tray does not eject • Access failure screen displays • The... ODD is displayed in My Computer or the BIOS setup • LED does not flash when the computer starts up or jumps • Optical drive not found or not...
... exhibits any of the following symptoms it may be faulty: • Audio CDs do not play when loaded • DVDs do not play when loaded • Blank discs do not burn correctly • DVD or CD play breaks up • The tray does not eject • Access failure screen displays • The... ODD is displayed in My Computer or the BIOS setup • LED does not flash when the computer starts up or jumps • Optical drive not found or not...
Service Guide
Page 148
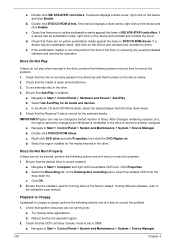
...perform the following actions one at a time to DMA: a. Double-click DVD/CD-ROM drives. e. Ensure that the default drive is set to correct the problem. 1. Right-click DVD drive and click Properties, then click the DVD Region tab. Ensure that AutoPlay is clean and scratch free. 3. Navigate to... media: IMPORTANT:Region can not be burned, perform the following actions one at a time to correct the problem. 1. Double-click DVD/CD-ROM drives. Select the region suitable for all media and devices. Ensure that the Regional Code is correct for burning discs is visible. 2....
...perform the following actions one at a time to DMA: a. Double-click DVD/CD-ROM drives. e. Ensure that the default drive is set to correct the problem. 1. Right-click DVD drive and click Properties, then click the DVD Region tab. Ensure that AutoPlay is clean and scratch free. 3. Navigate to... media: IMPORTANT:Region can not be burned, perform the following actions one at a time to correct the problem. 1. Double-click DVD/CD-ROM drives. Select the region suitable for all media and devices. Ensure that the Regional Code is correct for burning discs is visible. 2....
Service Guide
Page 149
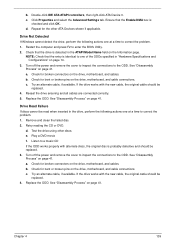
Restart the computer and press F2 to the ODD. Check for bent or broken pins on page 14. 3. Replace the ODD. e. Play a DVD movie f. See "Disassembly Process" on page 41. b. Try an alternate cable, if available. a. b. See "Disassembly Process" on page 41. c. Click ...of the ODDs specified in the ATAPI Model Name field on the drive, motherboard, and cables. Turn off the power and remove the cover to inspect the connections to correct the problem. 1. c. Retry reading the CD or DVD. Replace the ODD. Double-click IDE ATA/ATAPI controllers, then...
Restart the computer and press F2 to the ODD. Check for bent or broken pins on page 14. 3. Replace the ODD. e. Play a DVD movie f. See "Disassembly Process" on page 41. b. Try an alternate cable, if available. a. b. See "Disassembly Process" on page 41. c. Click ...of the ODDs specified in the ATAPI Model Name field on the drive, motherboard, and cables. Turn off the power and remove the cover to inspect the connections to correct the problem. 1. c. Retry reading the CD or DVD. Replace the ODD. Double-click IDE ATA/ATAPI controllers, then...


