
Aspire 5670 User's Guide - EN
Page 10
... 69 Installing memory 70 Connecting your TV and AV-in cables 71 Acer Arcade TV set-up wizard (Windows XP Home and Professional) 73 BIOS utility 74 Boot sequence 74 Enable disk-to-disk recovery 74 Password 74 Using software 75 Playing DVD movies 75 Power management ...76 Acer eRecovery Management 76 Create backup 77 Restore from backup 77 Create factory default image CD ...
... 69 Installing memory 70 Connecting your TV and AV-in cables 71 Acer Arcade TV set-up wizard (Windows XP Home and Professional) 73 BIOS utility 74 Boot sequence 74 Enable disk-to-disk recovery 74 Password 74 Using software 75 Playing DVD movies 75 Power management ...76 Acer eRecovery Management 76 Create backup 77 Restore from backup 77 Create factory default image CD ...

Aspire 5670 User's Guide - EN
Page 17
...recovery disks provided by the manufacturer. Note: If your system's HDD. Empowering Technology 5 Acer eRecovery Management Acer eRecovery Management is a powerful utility that does away with : • Password protection. • Recovery of applications and drivers. • Image/data backup: • Back up to HDD (set recovery...stored on your computer did not come with a Recovery CD or System CD, please use Acer eRecovery Management's "System backup to optical disk" feature to burn a backup image to CD/DVD. • Image/data recovery tools: • Recover from a hidden partition ...
...recovery disks provided by the manufacturer. Note: If your system's HDD. Empowering Technology 5 Acer eRecovery Management Acer eRecovery Management is a powerful utility that does away with : • Password protection. • Recovery of applications and drivers. • Image/data backup: • Back up to HDD (set recovery...stored on your computer did not come with a Recovery CD or System CD, please use Acer eRecovery Management's "System backup to optical disk" feature to burn a backup image to CD/DVD. • Image/data recovery tools: • Recover from a hidden partition ...

Aspire 5670 User's Guide - EN
Page 55
...BIOS utility and save changes. Before performing a restore operation, please check the BIOS settings. 1 Check to see if Acer disk-to-disk recovery is enabled or not. 2 Make sure the D2D Recovery setting in Main is set up, you can skip the Internet Connection setup, as it is turned on. •... (e.g. Note: If your system is the multilingual version, the operating system and language you choose when you purchase your notebook. This recovery process helps you restore the C: drive with the Internet Connection setup. The system will be reformatted and all data files before using this...
...BIOS utility and save changes. Before performing a restore operation, please check the BIOS settings. 1 Check to see if Acer disk-to-disk recovery is enabled or not. 2 Make sure the D2D Recovery setting in Main is set up, you can skip the Internet Connection setup, as it is turned on. •... (e.g. Note: If your system is the multilingual version, the operating system and language you choose when you purchase your notebook. This recovery process helps you restore the C: drive with the Internet Connection setup. The system will be reformatted and all data files before using this...

Aspire 5670 User's Guide - EN
Page 56
An ITW passport comes with our offices worldwide. Read this handy booklet. English 44 To start the recovery process: 1 Restart the system. 2 While the Acer logo is in this passport thoroughly. If the country you are there to know about the ITW program. With your ...when you a helping hand. Please consult http://global.acer.com. Important! A list of mind when traveling. Always have an Acer-authorized ITW service site, you need to give you call Acer for online service, and please be at your hard disk. Requesting service International Travelers Warranty (ITW) Your ...
An ITW passport comes with our offices worldwide. Read this handy booklet. English 44 To start the recovery process: 1 Restart the system. 2 While the Acer logo is in this passport thoroughly. If the country you are there to know about the ITW program. With your ...when you a helping hand. Please consult http://global.acer.com. Important! A list of mind when traveling. Always have an Acer-authorized ITW service site, you need to give you call Acer for online service, and please be at your hard disk. Requesting service International Travelers Warranty (ITW) Your ...

Aspire 5670 User's Guide - EN
Page 86
... select Boot from the categories listed at the bottom of the screen. Find D2D Recovery at the top of the screen and use the and keys to enable this feature. Enable disk-to-disk recovery To enable disk-to run this value to set a password on boot, activate the BIOS utility... Security from the categories listed at the top of the screen. However, if you encounter configuration problems, you do not need to -disk recovery (hard disk recovery), activate the BIOS utility, then select Main from the categories listed at the top of the screen. To activate the BIOS utility, press...
... select Boot from the categories listed at the bottom of the screen. Find D2D Recovery at the top of the screen and use the and keys to enable this feature. Enable disk-to-disk recovery To enable disk-to run this value to set a password on boot, activate the BIOS utility... Security from the categories listed at the top of the screen. However, if you encounter configuration problems, you do not need to -disk recovery (hard disk recovery), activate the BIOS utility, then select Main from the categories listed at the top of the screen. To activate the BIOS utility, press...

Aspire 5670 User's Guide - EN
Page 89
... the password to proceed. Please refer to store the backup disk image on CD or DVD. 7 After choosing the backup method, click Next. The default password is six zeros. 4 In the Acer eRecovery Management window, select Recovery settings and click Next. 5 In the Recovery settings window, select Backup snapshot image and click Next. 6 Select...
... the password to proceed. Please refer to store the backup disk image on CD or DVD. 7 After choosing the backup method, click Next. The default password is six zeros. 4 In the Acer eRecovery Management window, select Recovery settings and click Next. 5 In the Recovery settings window, select Backup snapshot image and click Next. 6 Select...

Aspire 5670 User's Guide - EN
Page 90
...XP. 2 Press + to open the Acer eRecovery Management utility. 3 Enter the password to proceed. The default password is six zeros. 4 In the Acer eRecovery Management window, select Recovery settings and click Next. 5 In the Recovery settings window, select Burn image to disk and click Next. 6 In the ...Burn image to disk window, select 1. Note: Select 1. If you wish to have a disk that contains your computer's entire...
...XP. 2 Press + to open the Acer eRecovery Management utility. 3 Enter the password to proceed. The default password is six zeros. 4 In the Acer eRecovery Management window, select Recovery settings and click Next. 5 In the Recovery settings window, select Burn image to disk and click Next. 6 In the ...Burn image to disk window, select 1. Note: Select 1. If you wish to have a disk that contains your computer's entire...

Aspire 5670 User's Guide - EN
Page 91
... the user. Follow the steps below to change the password in Acer eRecovery Management. 1 Boot to Windows XP. 2 Press + to open the Acer eRecovery Management utility. 3 Enter the password to restore the factory...Acer eRecovery Management window, select Recovery settings and click Next. 5 In the Recovery settings window, select Password: Change Acer eRecovery Management password and click Next. 6 Follow the instructions on screen to -disk recovery are protected by a password that can run Acer disk-to-disk recovery to proceed. English 79 Change password Acer eRecovery Management and Acer disk...
... the user. Follow the steps below to change the password in Acer eRecovery Management. 1 Boot to Windows XP. 2 Press + to open the Acer eRecovery Management utility. 3 Enter the password to restore the factory...Acer eRecovery Management window, select Recovery settings and click Next. 5 In the Recovery settings window, select Password: Change Acer eRecovery Management password and click Next. 6 Follow the instructions on screen to -disk recovery are protected by a password that can run Acer disk-to-disk recovery to proceed. English 79 Change password Acer eRecovery Management and Acer disk...

Aspire 5670, TravelMate 4210, and TravelMate 4670 Service Guide
Page 39
... Management utility occupies space in a hidden partition on D:\ drive. T Recovery of applications and drivers. T Back up to CD/DVD. Acer eRecovery Management provides you with the need for recovery disks provided by the manufacturer. T Recover from CD/DVD. 32 Chapter 1 Acer eRecovery Management Acer eRecovery Management is a powerful utility that does away with : T Password protection. T Image...
... Management utility occupies space in a hidden partition on D:\ drive. T Recovery of applications and drivers. T Back up to CD/DVD. Acer eRecovery Management provides you with the need for recovery disks provided by the manufacturer. T Recover from CD/DVD. 32 Chapter 1 Acer eRecovery Management Acer eRecovery Management is a powerful utility that does away with : T Password protection. T Image...

Aspire 5670, TravelMate 4210, and TravelMate 4670 Service Guide
Page 40
...has been removed or replaced. Chapter 1 33 Furthermore, Acer eSettings Management enables you to optimize your Windows operating system, so your computer did not come with a Recovery CD or System CD, please use Acer eRecovery Management's "System backup to optical disk" feature to burn a backup image to CD or... DVD. T Keeps a history log of all peripherals (except the external Acer ODD, if your computer has one), ...
...has been removed or replaced. Chapter 1 33 Furthermore, Acer eSettings Management enables you to optimize your Windows operating system, so your computer did not come with a Recovery CD or System CD, please use Acer eRecovery Management's "System backup to optical disk" feature to burn a backup image to CD or... DVD. T Keeps a history log of all peripherals (except the external Acer ODD, if your computer has one), ...
Aspire 5670, TravelMate 4210, and TravelMate 4670 Service Guide
Page 51
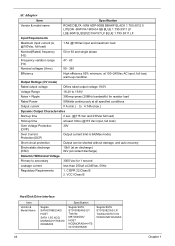
VCCI Class B Hard Disk Drive Interface Item Vendor & Model Name Segate SATAST98823AS/ HGST SATA 1.5G NCQ MORAGA+HTS5410 80G9SA00 Specification Segate SATA ST9100824AS LF/ Toshiba MK1032GSX/ HGST NCQMORAGA+HTS ... Protection 30V (OVP) Over Current Protection(OCP) Output current limit is 6A(Max mode) Short circuit protection Output can be shorted without damage, and auto recovery Electrostatic discharge (ESD) 15kV (at air discharge) 8kV (at contact discharge) Dielectric Withstand Voltage Primary to secondary 3000 Vac for 1 second Leakage current less than...
VCCI Class B Hard Disk Drive Interface Item Vendor & Model Name Segate SATAST98823AS/ HGST SATA 1.5G NCQ MORAGA+HTS5410 80G9SA00 Specification Segate SATA ST9100824AS LF/ Toshiba MK1032GSX/ HGST NCQMORAGA+HTS ... Protection 30V (OVP) Over Current Protection(OCP) Output current limit is 6A(Max mode) Short circuit protection Output can be shorted without damage, and auto recovery Electrostatic discharge (ESD) 15kV (at air discharge) 8kV (at contact discharge) Dielectric Withstand Voltage Primary to secondary 3000 Vac for 1 second Leakage current less than...

Aspire 5670, TravelMate 4210, and TravelMate 4670 Service Guide
Page 59
Parameter F12 Boot Menu D2D Recovery Description When this is selected, users can modify device boot priority by pressing F12 key during POST. Allow user to enable/disable the Disk-to-Disk recovery Chapter 2 52 When this is not selected, device boot priority will not be adjustable during POST.
Parameter F12 Boot Menu D2D Recovery Description When this is selected, users can modify device boot priority by pressing F12 key during POST. Allow user to enable/disable the Disk-to-Disk recovery Chapter 2 52 When this is not selected, device boot priority will not be adjustable during POST.

Aspire 5670, TravelMate 4210, and TravelMate 4670 Service Guide
Page 110
... 15h to enable remote keyboard Redirect Int 13h to Full DOS Chapter 4 103 Redirect Int 10h to enable remote serial video Re-map I /O Check force recovery boot Checksum BIOS ROM Go to BIOS Set Huge Segment Initialize Multi Processor Initialize OEM special code Initialize PIC and DMA Initialize Memory type Initialize... System Management Mode 1 Output one beep Clear Huge Segment Boot to Mini DOS Boot to Memory Technologies Devices such as ROM, RAM, PCMCIA, and serial disk.
... 15h to enable remote keyboard Redirect Int 13h to Full DOS Chapter 4 103 Redirect Int 10h to enable remote serial video Re-map I /O Check force recovery boot Checksum BIOS ROM Go to BIOS Set Huge Segment Initialize Multi Processor Initialize OEM special code Initialize PIC and DMA Initialize Memory type Initialize... System Management Mode 1 Output one beep Clear Huge Segment Boot to Mini DOS Boot to Memory Technologies Devices such as ROM, RAM, PCMCIA, and serial disk.


